New Mexico, United States
Joined: December 04, 2013
KitMaker: 84 posts
Armorama: 81 posts
Posted: Tuesday, April 19, 2016 - 02:15 AM UTC
This is one of those projects that has been on my to-do list for a very long time.
At the core of this build are two kits: the old Tamiya M2A2 and the new Meng M3A3 Interior set. The Tamiya kit I have had since the late 90s, the Meng kit I picked up for Christmas.

This will be a combination of updating the Tamiya kit and backdating the Meng kit all at the same time. The goal is to build one of the Bradleys my unit, C troop, 1/3 ACR used in Desert Storm.
Ken.
Florida, United States
Joined: May 16, 2002
KitMaker: 17,694 posts
Armorama: 13,742 posts
Posted: Tuesday, April 19, 2016 - 02:42 AM UTC
This will be an interesting build to watch. How do you plan to rebuild the A3 TOW reload hatch on the top? The Meng interior is really nice. I recently backdated a Meng M3A3 to an M2A2 ODS as used in the invasion of Iraq. You can see it
here.
Good luck with it and keep us posted.
Field Artillery --- The KING of BATTLE!!!
"People sleep peaceably in their beds at night only because rough men stand ready to do violence on their behalf." -- George Orwell
Showcase
New Mexico, United States
Joined: December 04, 2013
KitMaker: 84 posts
Armorama: 81 posts
Posted: Tuesday, April 19, 2016 - 03:00 AM UTC
Quoted Text
This will be an interesting build to watch. How do you plan to rebuild the A3 TOW reload hatch on the top? The Meng interior is really nice. I recently backdated a Meng M3A3 to an M2A2 ODS as used in the invasion of Iraq. You can see it here.
Good luck with it and keep us posted.
Im not. I only have the interior for the Meng kit, not the whole vehicle. There was no point, since I already had the Tamiya kit. I should add the periscopes to the hatch from the Tamiya kit, but I dont think I will. Too much work for too little pay-off. And I do not want to take forever building this.
I have looked at your build, very inspirational. Also Kims and a few others. Awesome stuff. I do not intend to put THAT much work into this one. I dont want this to turn into another multi-year build. And besides; outside of this forum (where there are a lot of very knowledgeable people who would notice) most people who see this will not know the difference. Some of them will even comment, What a nice looking TANK! UGGH!!
Ken.
Florida, United States
Joined: May 16, 2002
KitMaker: 17,694 posts
Armorama: 13,742 posts
Posted: Tuesday, April 19, 2016 - 03:16 AM UTC
Its up to you, but it would drive me nuts knowing it isn't accurate. Also, I build for me, not the idiots who make stupid comments like, "Nice tank".
Rebuilding the hatch is not that hard. I would give it a go. Without the A3 hatch, and a few other small changes, it is just an M2A2, not an M3A2. Also, you may want to get an older, Tamiya or Academy M2 interior for the individual seats, as opposed to the Meng seats. As you probably know, the M3A3 interior is very different than the M3A2 interior.
Check out
this post for more info on how to build an accurate M3A2.
Field Artillery --- The KING of BATTLE!!!
"People sleep peaceably in their beds at night only because rough men stand ready to do violence on their behalf." -- George Orwell
Showcase
New Mexico, United States
Joined: December 04, 2013
KitMaker: 84 posts
Armorama: 81 posts
Posted: Tuesday, April 19, 2016 - 06:48 AM UTC
I will have to think about the hatch. Although some of the vehicles we got were actually M2s, and had the scopes in the roof
I have some (most?) of the interior parts and some decals from an old Tamiya kit. Unfortunately, those squad seats are not accurate either. I will try to combine parts from both kits to get something accurate looking. I only have to make 2.
And with all this talk about the Tamiya kit, I might as well start on it. The first thing I have to do is fill in the motorization holes.


As well as ejector pin marks and other voids.


Florida, United States
Joined: May 16, 2002
KitMaker: 17,694 posts
Armorama: 13,742 posts
Posted: Tuesday, April 19, 2016 - 06:54 AM UTC
Looks like you are off to a good start. Yup, lots of "imperfections" to fill in on the old Tamiya kit.
After I typed the part about the M3A2, I remembered that some of the CAV troops had M2A2s in place of M3A2s as well, so either way is really correct, depending on what you had.
Field Artillery --- The KING of BATTLE!!!
"People sleep peaceably in their beds at night only because rough men stand ready to do violence on their behalf." -- George Orwell
Showcase
New Mexico, United States
Joined: December 04, 2013
KitMaker: 84 posts
Armorama: 81 posts
Posted: Tuesday, April 19, 2016 - 07:05 AM UTC
I was on a tank, not a Bradley, so I did not pay too much attention at the time; but we got a real mixed bag of vehicles for the war. There were not enough new M3A2 models to go around. Some of our guys got stuck using their old plain M3s. Others got M2A2 infantry Brads. Looking at my photos, some got the early model M3A2s, and some got upgraded ones with some of the ODS mods, like the ISU doors. And they all still had the old style tracks.
Ken.
Florida, United States
Joined: May 16, 2002
KitMaker: 17,694 posts
Armorama: 13,742 posts
Posted: Tuesday, April 19, 2016 - 07:23 AM UTC
If you decide to go with an M3A2, here are a couple shots of the interior for you to use.

Inside top hatch.

Outside top hatch. This is an M3A3 top hatch. The M3A2 hatch did not have the extra armor plates on the top and front.

Field Artillery --- The KING of BATTLE!!!
"People sleep peaceably in their beds at night only because rough men stand ready to do violence on their behalf." -- George Orwell
Showcase
New Mexico, United States
Joined: December 04, 2013
KitMaker: 84 posts
Armorama: 81 posts
Posted: Thursday, April 21, 2016 - 04:26 AM UTC
Thanks! I have been scouring the internet, and have a bunch of books, plus my old photos, but I can always use more.
The big problem I am finding right now is that I have lots of information on the original M2/M3, M2A3/M3A3, and even a lot of stuff on the ODS upgrades for the M2A2/M3A2, but very little info on the early model M3A2, which is what we had. It is all the little details like was the engine fire extinguisher still mounted above the steering control like in the early Brads? What warning stickers were used inside? What ammo box was used for the coax in the turret?
The upgrades came so fast after Desert Storm that it is really hard to figure what came when. I know I will have to guess on a lot of things, or just use what came in the Meng or Tamiya kits, because I dont have enough info to do any better. So I will just have to try and get the right period feel for it.
Ken.
New Mexico, United States
Joined: December 04, 2013
KitMaker: 84 posts
Armorama: 81 posts
Posted: Thursday, April 21, 2016 - 04:43 AM UTC
Back to the building. Once all the flaws were fixed, I started to add parts to the upper hull interior.

I also put in some basic shock absorbers and an adjusting link to the suspension. The shocks came off a tank (I dont remember which one, they were in the parts box) and the adjusters are shocks from an old Jeep CJ kit.


Ken.
Georgia, United States
Joined: August 16, 2015
KitMaker: 63 posts
Armorama: 60 posts
Posted: Thursday, April 21, 2016 - 05:56 AM UTC
Outstanding! I will be following this.
I did the same thing with Tamiya's M2 kit, I built it as my M2A1 from Desert Storm. I was with 3-15 Inf. 24th ID.

27th FEB. 1991... THE VALKYRIES CARRIED MY BROTHERS TO VALHALLA
For the Everlasting Glory of the Infantry.

#384
Nevada, United States
Joined: August 23, 2005
KitMaker: 1,426 posts
Armorama: 1,316 posts
Posted: Thursday, April 21, 2016 - 06:37 AM UTC
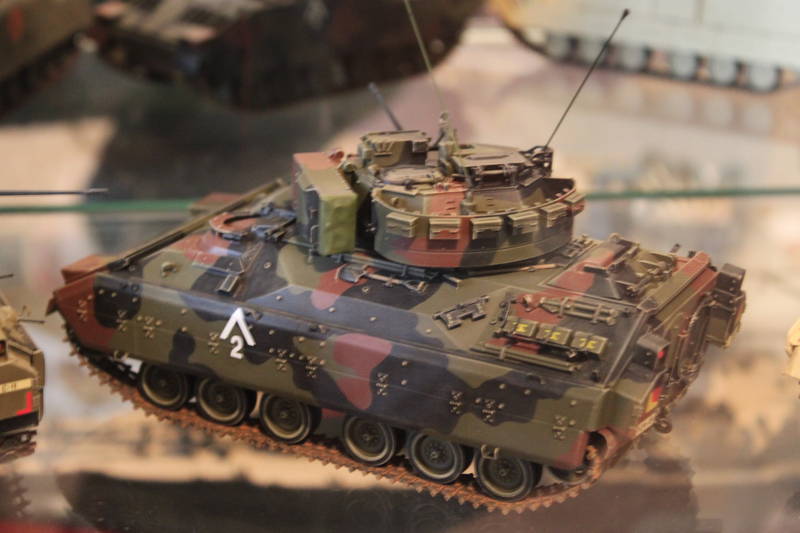
Hi Ken, Brave Rifles! I too was 1/3 ACR back in the 80's. That hatch is a giant pain, but it can be done. Here's my M3A2, not 100% accurate but I like it. It's all Tamiya. The hatch is layered styrene and I think the periscopes are from the kit. You can do it

New Mexico, United States
Joined: December 04, 2013
KitMaker: 84 posts
Armorama: 81 posts
Posted: Saturday, April 23, 2016 - 08:41 AM UTC
One of the things that really needs to be done to the old Tamiya kit is to add some anti-skid compound to the upper surfaces.


I tried to do a decent job of masking off the bolt heads and stuff, then painted it with some textured paint. I also redid the floor in the troop area and textured it.

New Mexico, United States
Joined: December 04, 2013
KitMaker: 84 posts
Armorama: 81 posts
Posted: Monday, April 25, 2016 - 07:26 AM UTC
OK, Just a real quick update here. Laying out the turret interior parts.

Wisconsin, United States
Joined: July 30, 2013
KitMaker: 584 posts
Armorama: 525 posts
Posted: Monday, April 25, 2016 - 06:23 PM UTC
nice!!!!!
I have found that for making anti slip, embossing powder works really good as well. Keep up the good work though!
New Mexico, United States
Joined: December 04, 2013
KitMaker: 84 posts
Armorama: 81 posts
Posted: Monday, April 25, 2016 - 06:52 PM UTC
that's a new one to me, I am not sue what embossing powder is. I have seen a of of different techniques for doing the anti-slip. For this one I decided to try the textured paint. We'll see how it works out.
Ken.
New Mexico, United States
Joined: December 04, 2013
KitMaker: 84 posts
Armorama: 81 posts
Posted: Tuesday, April 26, 2016 - 02:29 AM UTC
The engine in the Meng kit is just beautiful, unfortunately in the end you cant see most of it. I did it up fairly well, but even with what little I did, most of it will never bee seen. At least I will have the pictures here.


Florida, United States
Joined: May 16, 2002
KitMaker: 17,694 posts
Armorama: 13,742 posts
Posted: Tuesday, April 26, 2016 - 06:32 AM UTC
Looking good. The interior is coming along nicely. Good job on the troop area floor.
Field Artillery --- The KING of BATTLE!!!
"People sleep peaceably in their beds at night only because rough men stand ready to do violence on their behalf." -- George Orwell
Showcase
New Mexico, United States
Joined: December 04, 2013
KitMaker: 84 posts
Armorama: 81 posts
Posted: Wednesday, April 27, 2016 - 04:57 AM UTC
Thanks! Its not as nice as yours, but most of it will be covered up with gear, so it wont be seen.
Ken.
New Mexico, United States
Joined: December 04, 2013
KitMaker: 84 posts
Armorama: 81 posts
Posted: Wednesday, April 27, 2016 - 05:12 AM UTC
Speaking of the interior, here is the main floor section ready to be installed.

Ken.
Florida, United States
Joined: May 16, 2002
KitMaker: 17,694 posts
Armorama: 13,742 posts
Posted: Wednesday, April 27, 2016 - 07:27 PM UTC
Interior is looking good. One correction though, the extra switch panel (P39) is not used on the older M3A2. Nice job with the older style info placards too.
Field Artillery --- The KING of BATTLE!!!
"People sleep peaceably in their beds at night only because rough men stand ready to do violence on their behalf." -- George Orwell
Showcase
Warszawa, Poland
Joined: December 17, 2014
KitMaker: 448 posts
Armorama: 448 posts
Posted: Wednesday, April 27, 2016 - 07:50 PM UTC
Good job!
The troop area floor is looking very nice! I'm very impressed.
New Mexico, United States
Joined: December 04, 2013
KitMaker: 84 posts
Armorama: 81 posts
Posted: Thursday, April 28, 2016 - 06:47 AM UTC
Quoted Text
Interior is looking good. One correction though, the extra switch panel (P39) is not used on the older M3A2. Nice job with the older style info placards too.
Great! Now I find out! Oh well, now I'm stuck with it, already installed it and modified the Tamiya instrument panel to fit. Thanks for the info though. Once everything is done, it should not be too noticeable I hope.
Ken.
New Mexico, United States
Joined: December 04, 2013
KitMaker: 84 posts
Armorama: 81 posts
Posted: Tuesday, May 24, 2016 - 08:34 AM UTC
Progress on this has been slow. Working on little detail parts, as well as dealing with real life.
One of the details Meng left out was most of the commo system. Scrounging around, I found a couple of comm boxes from an old Dragon M1A1 kit, and added some extra detail to them.

I also added some additional parts to the Tamiya drivers night vision viewer. I also used a starter motor from some car kit to fill in for the gun elevation motor in the turret.


I added the little fillet to the side of the engine compartment, it just looked odd without it.

Florida, United States
Joined: May 16, 2002
KitMaker: 17,694 posts
Armorama: 13,742 posts
Posted: Tuesday, May 24, 2016 - 07:58 PM UTC
Still looking good. Keep up the good work.
Field Artillery --- The KING of BATTLE!!!
"People sleep peaceably in their beds at night only because rough men stand ready to do violence on their behalf." -- George Orwell
Showcase


