

Sd.Kfz.9 "Famo" & Sd.Ah.116
1/35 - Tamiya, Eduard, Aber, Panzerart, Friul, Real Model
The original
The heavy half-track vehicle Sd.Kfz. 9 "Famo" 18ton was one of the heaviest and strongest towing vehicles of the German Wehrmacht. Used as towing vehicle for the heavy artillery or other heavy guns and also as recovery vehicle or crane vehicle or as towing vehicle for the heavy tank transport trailer Sd.Ahg.116. The "Famo" was used at all fronts during 2nd worldwar.
1936 the Wehrmacht command demanded a heavy towing- and recovery vehicle which could be used as towing vehicle for heavy guns and artillery. It was constructed and built from Fahrzeug und Motorenwerke (FAMO) in Breslau, later also from Votländische Maschinenfabrig (VOMAG) in Plauen as well as from Tatra in Nesseldorf. Comissioned 1939 it remained on duty until end of the war only with smallest modifications.
At the beginning of the war it was mainly used as towing and recovery vehicle for damaged tanks at all fronts, later in war it was more and more used to maintain the transport operations. Specially in the eastern theatre before and after the winter is was used in the heavy mud of the Russian areas, specially as towing vehicle for the Strabokran, or heavy Flak- and artillery guns.
As towing vehicle for the heavy tank transport trailer Sd.Ahg. 116 the Famo was used in the tank transport service. The tank was transported between the four steerable axles of the trailer. The trailer had an additional wheelhouse on the rear to assist the steering of the vehicle.
The kit and the additional used parts
The kit of the Sd.Kfz.9 Famo in scale 1/35 by Tamiya is in my eyes on of the best kits in the military scale 1/35 on the market. Together with the Sd.Ahg.116 trailer the kit consists of more then 1000 highly detailed plastic parts, plus metal parts, rubber tires, decals, screws and a piece of cord. Although this kit could become a stunning model without any upgrade parts I want to give it some additional touch with some bonus parts. Photo etced parts from Aber and Eduard will bring it some further details. The metal tracks from Friul Models are a must have as well as the resin wheels for the Famo and for the trailer. An open front grill from Panzerart will be used as well as some stuff for the cargo bed from Real Model.
Hosted by Darren Baker
Sd.Kfz.9 "FAMO" + Sd.Ahg.116 - 1/35 by Tamiya

elmarriachi

Joined: December 26, 2009
KitMaker: 813 posts
Armorama: 240 posts
Posted: Monday, April 25, 2016 - 01:12 PM UTC
elmarriachi
Joined: December 26, 2009
KitMaker: 813 posts
Armorama: 240 posts
Posted: Monday, April 25, 2016 - 01:13 PM UTC
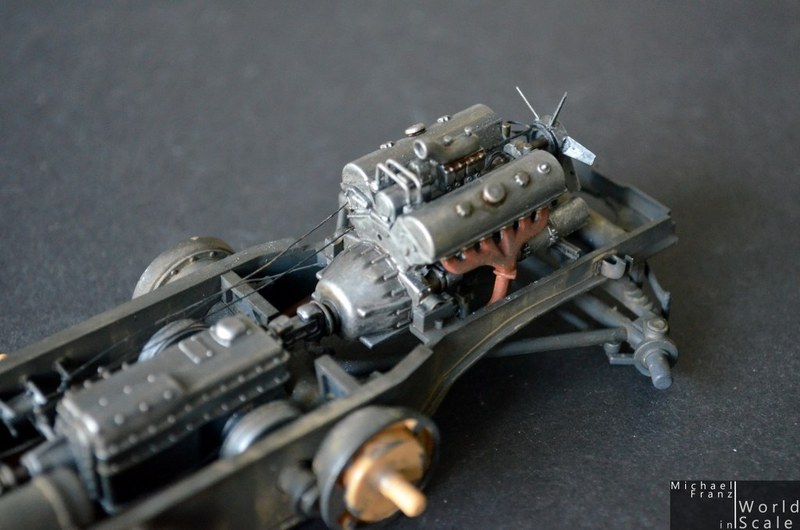
*** UPDATE 1 ***
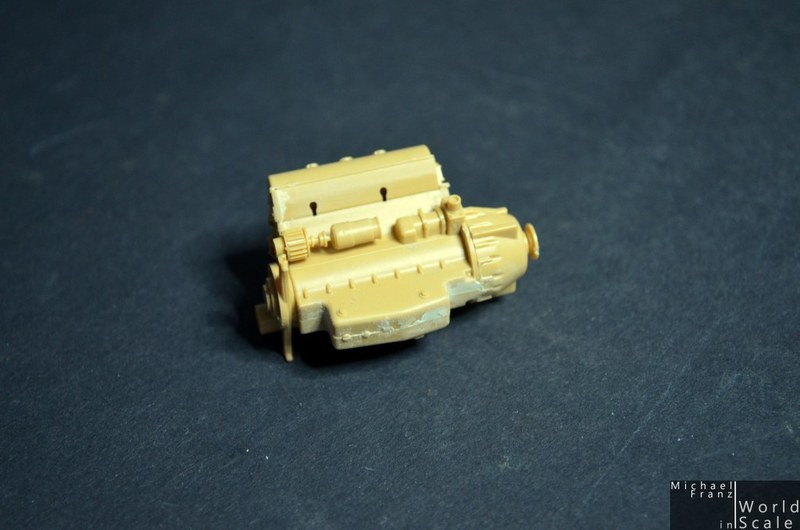
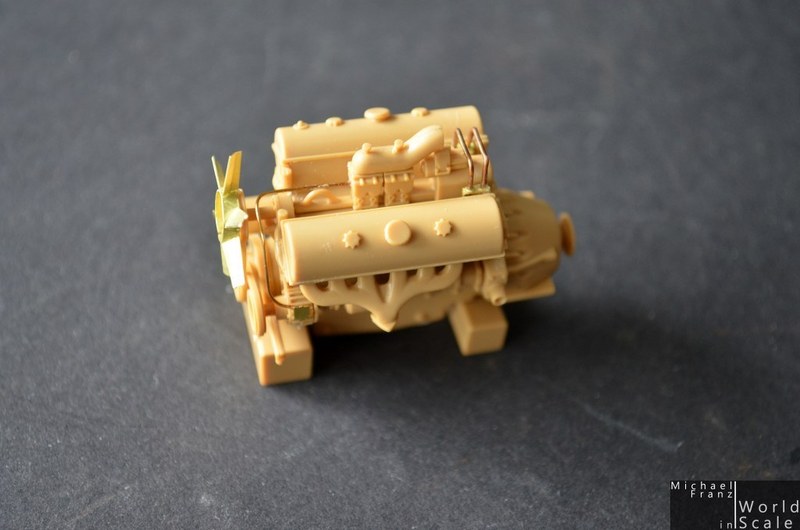
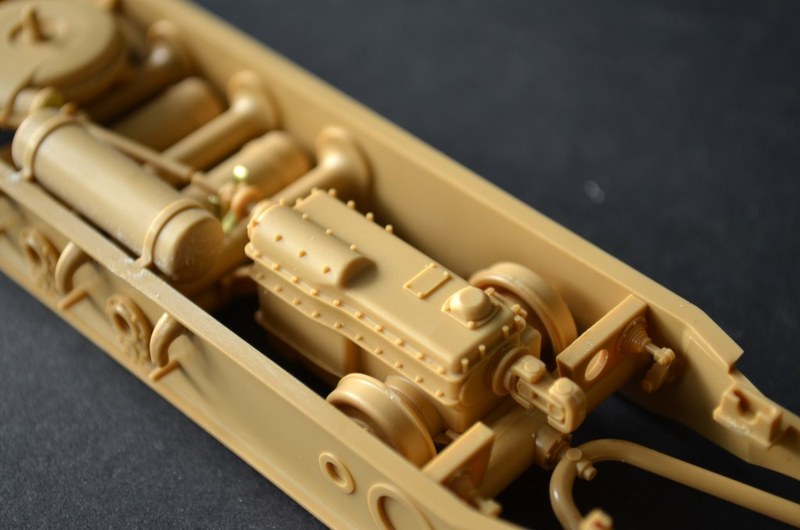
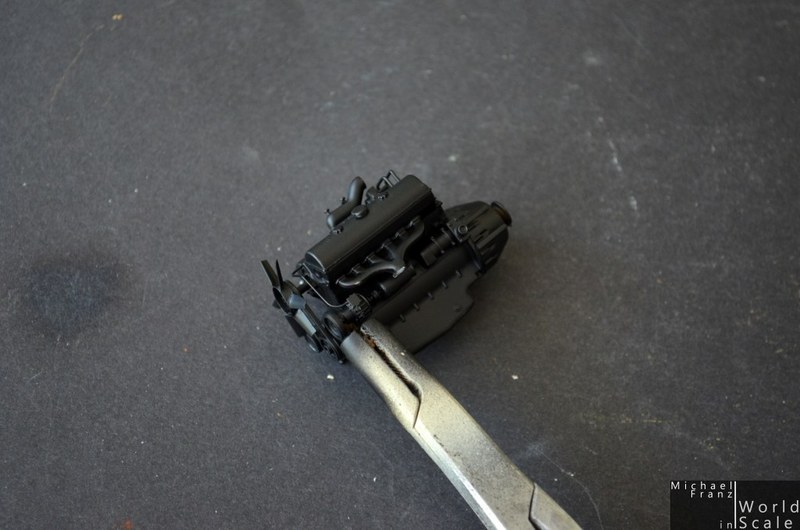
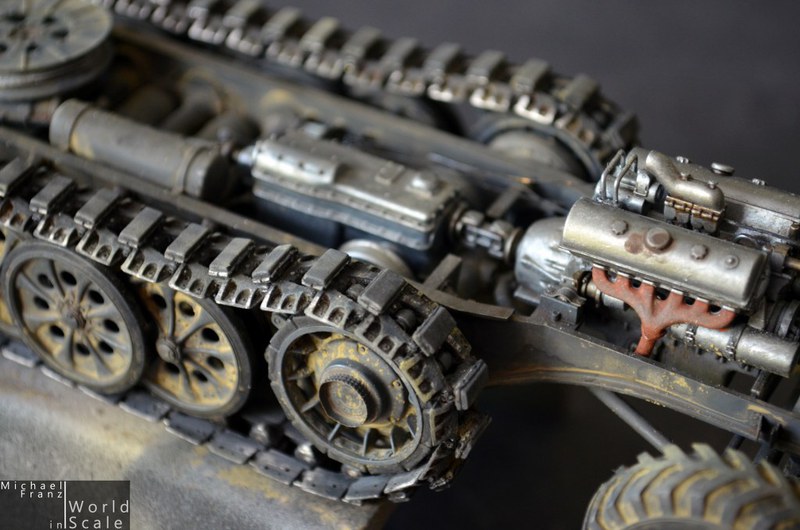
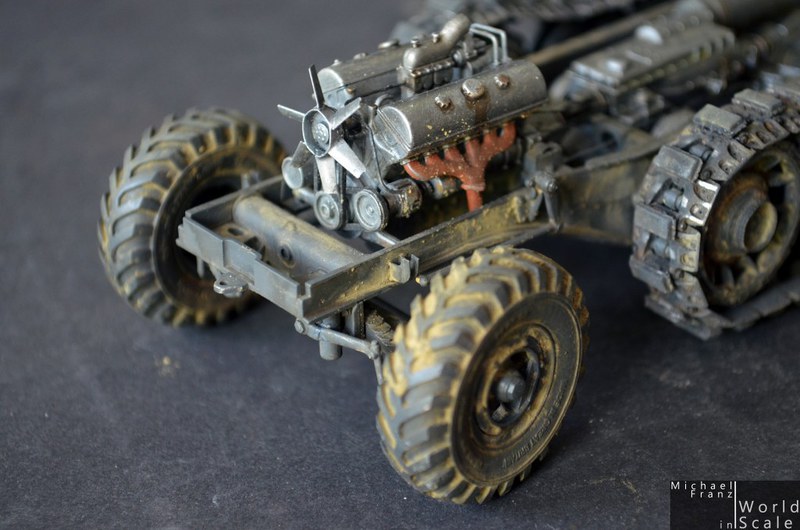
[u]The Maybach HL 108 engine[/u]
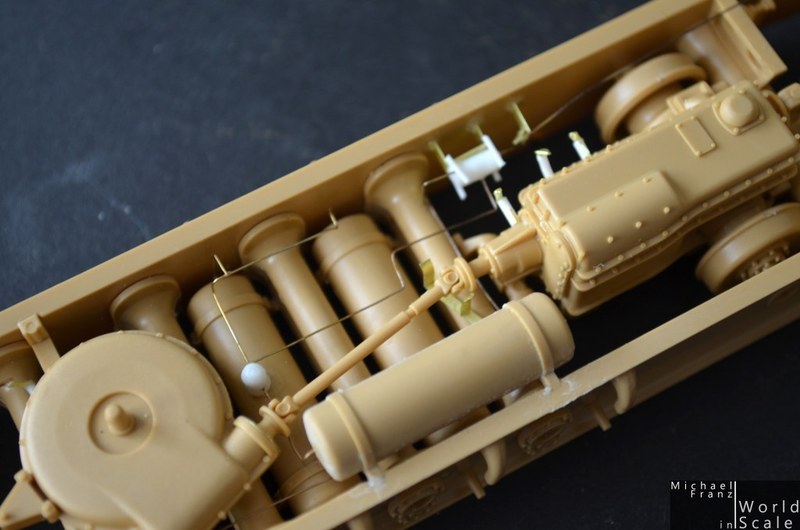
The engine is built straight from the box at first. The bond seams sanded, partly a little bit of putty added and sanded to get a smooth surface. As I am planning an open engine cover on one side of the vehicle it is necessary to give some further details to the engine with photo etched parts, wire and plastic stripes.


Cheers
Micha
[u]The Maybach HL 108 engine[/u]
The engine is built straight from the box at first. The bond seams sanded, partly a little bit of putty added and sanded to get a smooth surface. As I am planning an open engine cover on one side of the vehicle it is necessary to give some further details to the engine with photo etched parts, wire and plastic stripes.
Cheers
Micha

Doodeck

Joined: August 15, 2014
KitMaker: 155 posts
Armorama: 154 posts
Posted: Monday, April 25, 2016 - 02:10 PM UTC
Hi Michael,
I'll be following your build as I just returned to mine after a long time. I had to order a new Famo (original from the box had a major disaster) so while I'm waiting for it I'm working on a trailer.
Be ready to have a permanent smile on your face as this kit is an absolute and ultimate pleasure to build.

Modelrob

Joined: October 20, 2015
KitMaker: 304 posts
Armorama: 293 posts
Posted: Monday, April 25, 2016 - 03:50 PM UTC
Hi Michael,
Going to stay tuned with this build I have one waiting to be built. Might have to move it up the build list.
Robert
Going to stay tuned with this build I have one waiting to be built. Might have to move it up the build list.
Robert
Thirian24
Joined: September 30, 2015
KitMaker: 2,493 posts
Armorama: 2,344 posts
Posted: Monday, April 25, 2016 - 05:09 PM UTC
Very nice. I'd like to build this too. I'll be watching.
Cheers
Dustin
Cheers
Dustin
elmarriachi
Joined: December 26, 2009
KitMaker: 813 posts
Armorama: 240 posts
Posted: Monday, May 02, 2016 - 10:57 PM UTC
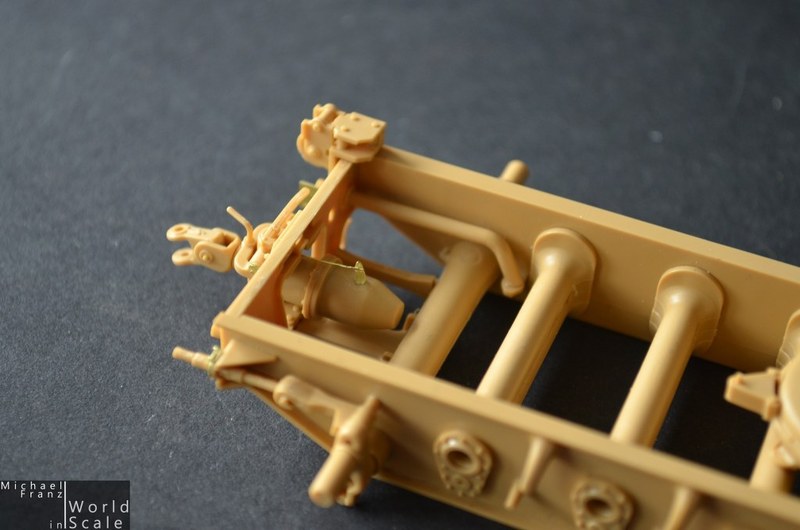
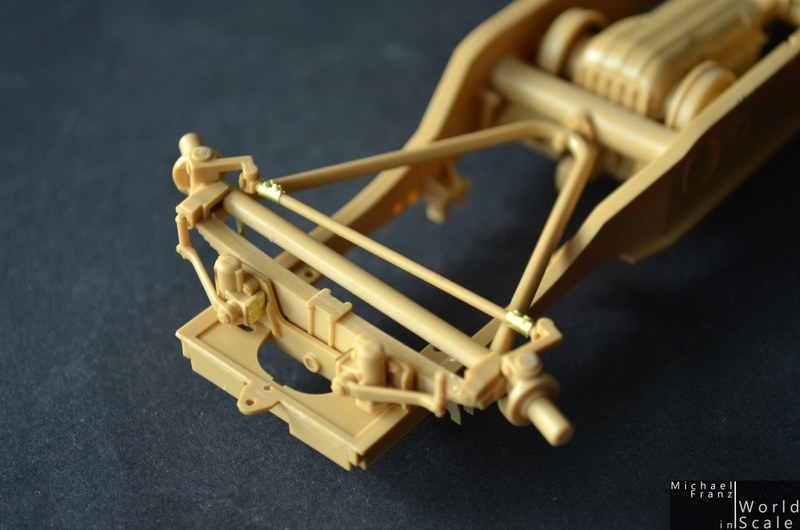
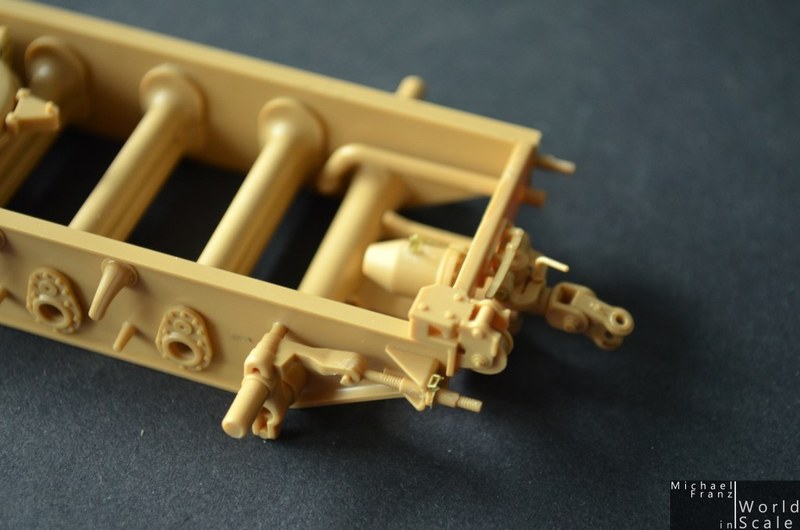
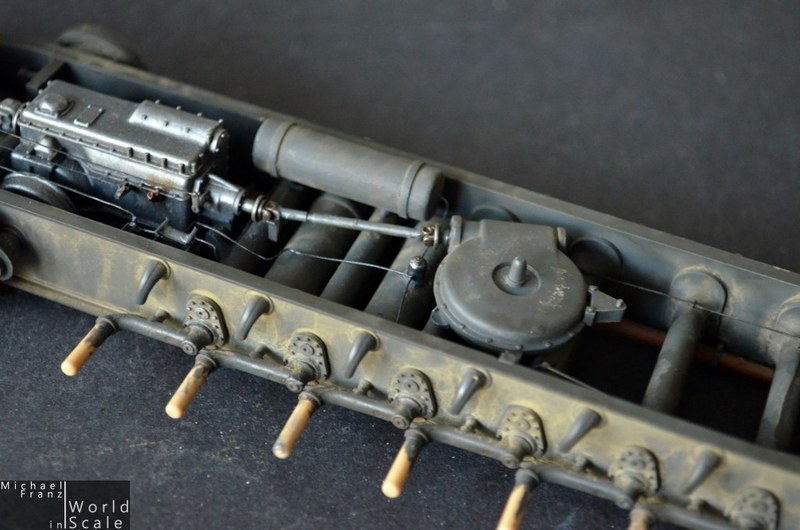
*** UPDATE 2 ***
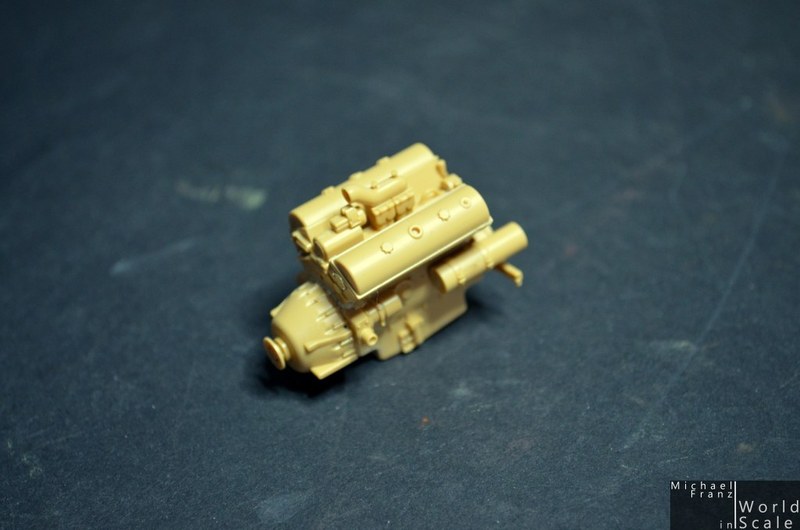
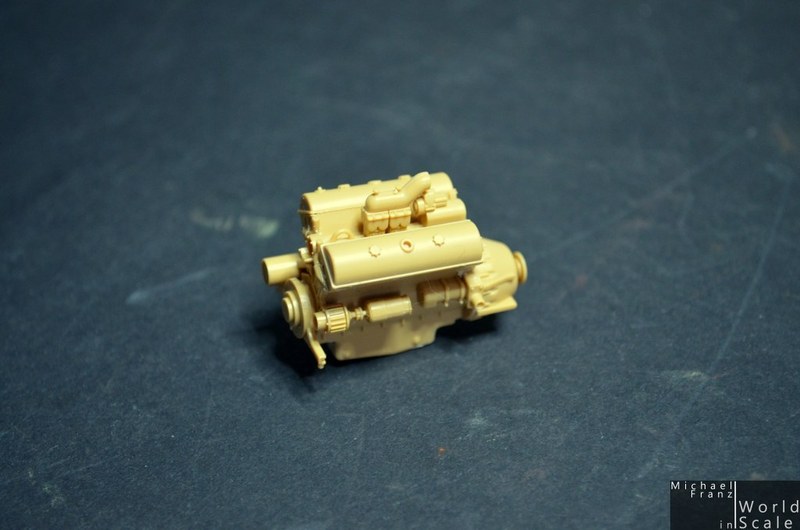
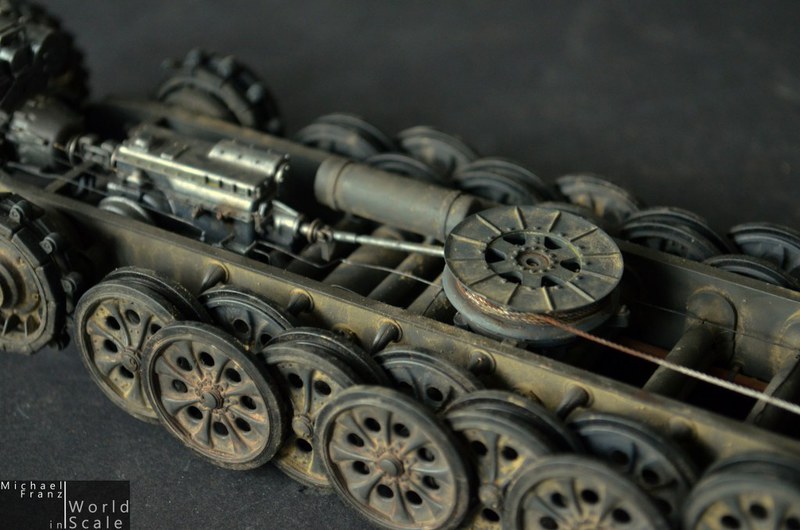
The engine received some PE-parts and some wiring ....
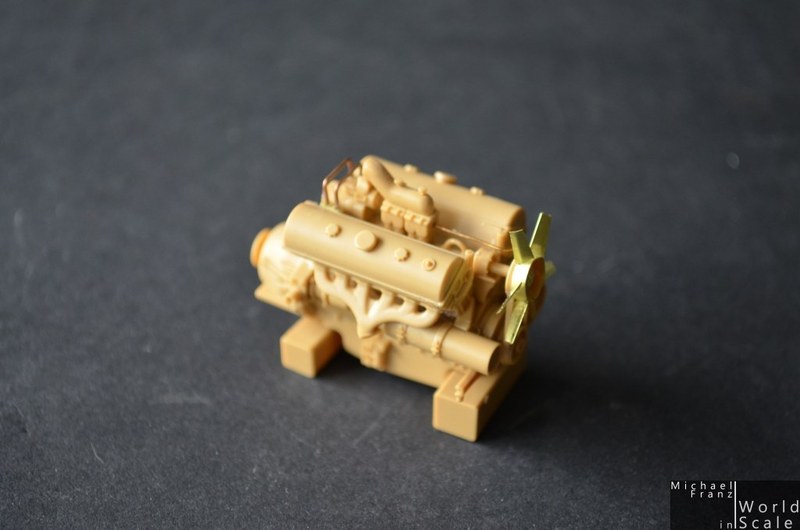

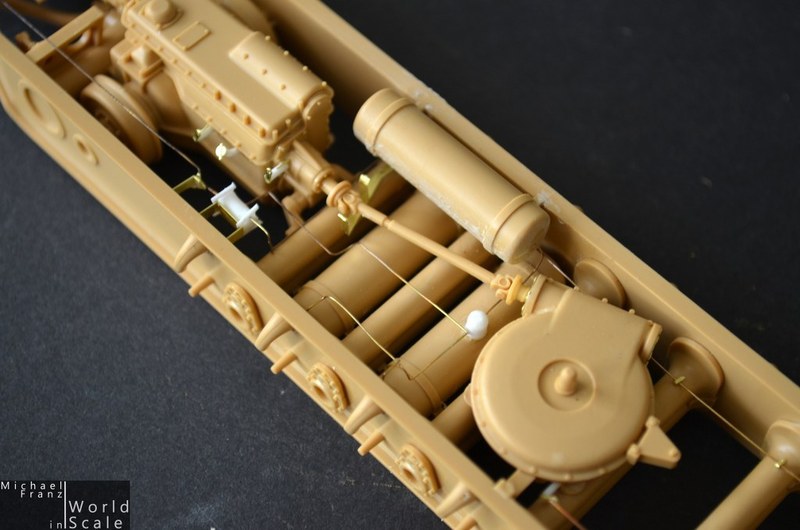
The main frame was glued together and several plastic parts added. The engine for the winch, the gearbox, the trailer hitch and the fully steerable front axle with workable suspension. Several PE parts added on all these parts.
The wiring I will not add I think as it won't be visible later, once the body is installed ...


Cheers
Micha
The engine received some PE-parts and some wiring ....
The main frame was glued together and several plastic parts added. The engine for the winch, the gearbox, the trailer hitch and the fully steerable front axle with workable suspension. Several PE parts added on all these parts.
The wiring I will not add I think as it won't be visible later, once the body is installed ...
Cheers
Micha
bill_c
Joined: January 09, 2008
KitMaker: 10,553 posts
Armorama: 8,109 posts
Posted: Tuesday, May 03, 2016 - 03:13 AM UTC
Nice work, Micha, you will get more props over here for your armor than LSP, haha! 

elmarriachi
Joined: December 26, 2009
KitMaker: 813 posts
Armorama: 240 posts
Posted: Tuesday, May 03, 2016 - 08:51 PM UTC
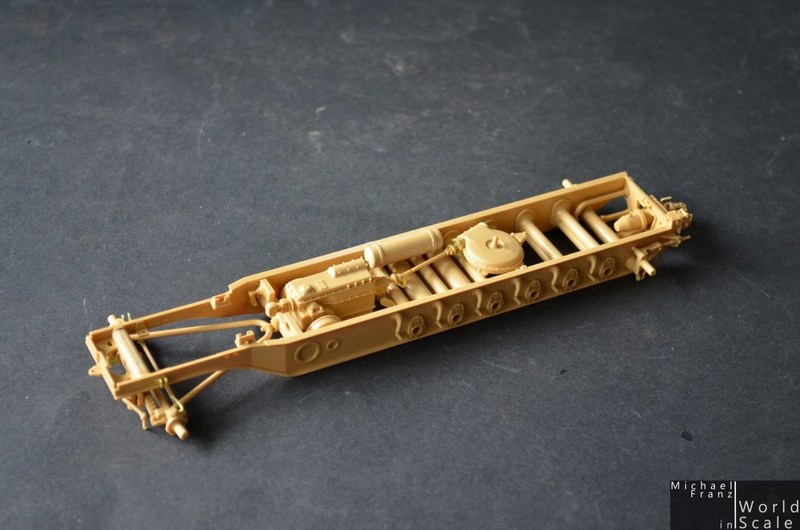
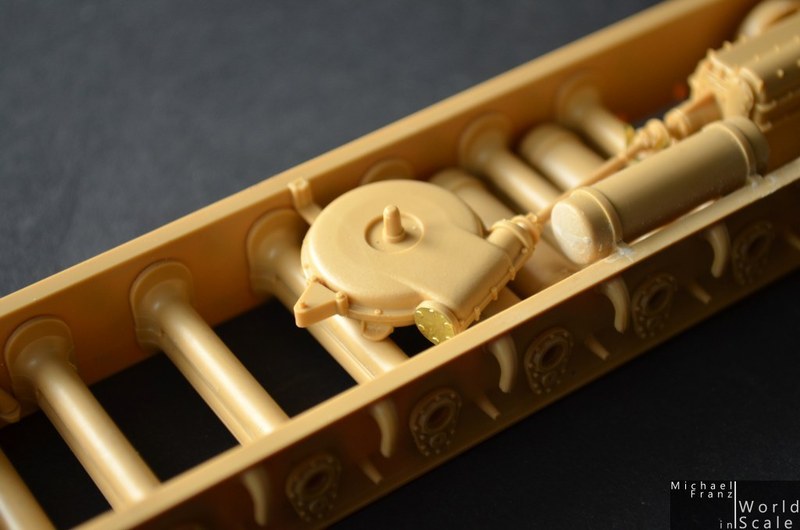
*** UPDATE 3 ***
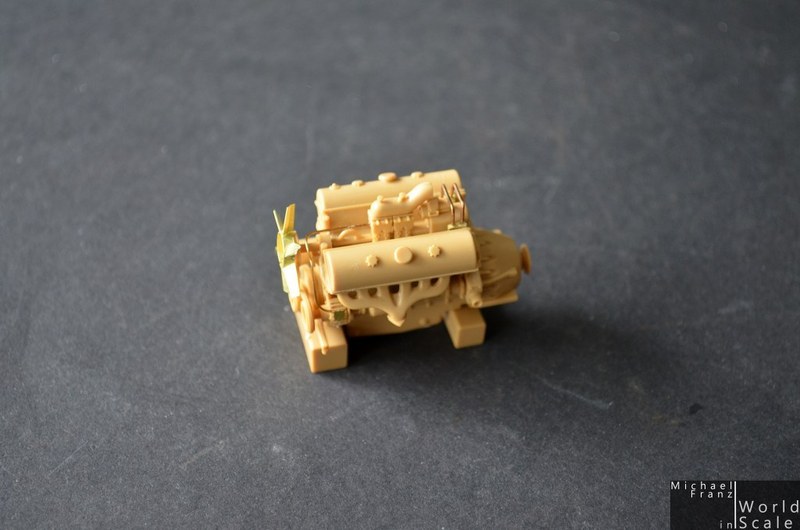
I have changed my mind ... and added some scratch built plastic parts inside... some wiring.... and some mechanical things ..... some more wire will follow after the painting and installation of the engine.

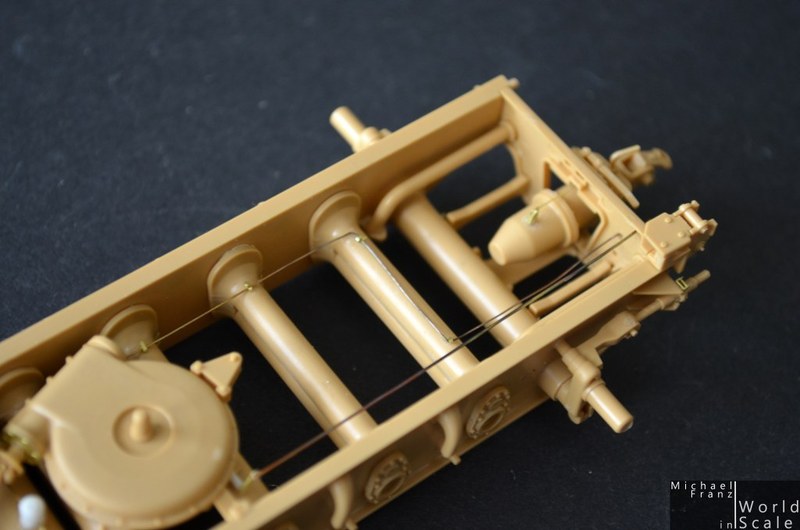

Ready to paint .... next step - black primer
Cheers
Micha
I have changed my mind ... and added some scratch built plastic parts inside... some wiring.... and some mechanical things ..... some more wire will follow after the painting and installation of the engine.
Ready to paint .... next step - black primer
Cheers
Micha
elmarriachi
Joined: December 26, 2009
KitMaker: 813 posts
Armorama: 240 posts
Posted: Monday, May 09, 2016 - 01:49 AM UTC
*** UPDATE 4 ***
After the primer ... (Black Primer by Valleyo):

After the "real" painting .... Tamiya German Grey for most of the parts, silver for the engine rust for the exhaust. The wheels are airbrushed with a template made of carton for the keeping the rubber black ....


Some oil color washings later .... (washing 1: black oil color.... wasing 2: blue oil color.... washing 3: dark brown oil color) ....
Pigments.... dust, earth, mud .... darker ones at the inside.... fixed with turpentine ....
Painting some leaking oil (Tamiya smoke) ...
Adding some rusty pigments on the exhausts ...
Adding some smoky pigments at the end tips of the exhaust ....


Next - mounting the wheels... adding some more painting details .....
Cheers
Micha
After the primer ... (Black Primer by Valleyo):
After the "real" painting .... Tamiya German Grey for most of the parts, silver for the engine rust for the exhaust. The wheels are airbrushed with a template made of carton for the keeping the rubber black ....
Some oil color washings later .... (washing 1: black oil color.... wasing 2: blue oil color.... washing 3: dark brown oil color) ....
Pigments.... dust, earth, mud .... darker ones at the inside.... fixed with turpentine ....
Painting some leaking oil (Tamiya smoke) ...
Adding some rusty pigments on the exhausts ...
Adding some smoky pigments at the end tips of the exhaust ....
Next - mounting the wheels... adding some more painting details .....
Cheers
Micha

airborne1

Joined: April 15, 2006
KitMaker: 915 posts
Armorama: 797 posts

Posted: Monday, May 09, 2016 - 02:38 PM UTC
Nice choice Michael,
Good to see you take on a big project full of detail and a real pleasure of a build.
Looking at your work has inspired me to try and finish the beast of a Famo started back in 2013 put it back in the box 3 months ago,lost the mojo.Now the mojo is comimg back
Excellent work so far.
Cheers
Michael
Good to see you take on a big project full of detail and a real pleasure of a build.
Looking at your work has inspired me to try and finish the beast of a Famo started back in 2013 put it back in the box 3 months ago,lost the mojo.Now the mojo is comimg back
Excellent work so far.
Cheers
Michael
Modelrob
Joined: October 20, 2015
KitMaker: 304 posts
Armorama: 293 posts
Posted: Monday, May 09, 2016 - 03:10 PM UTC
Excellent detail work and painting.
elmarriachi
Joined: December 26, 2009
KitMaker: 813 posts
Armorama: 240 posts
Posted: Monday, May 16, 2016 - 01:11 PM UTC
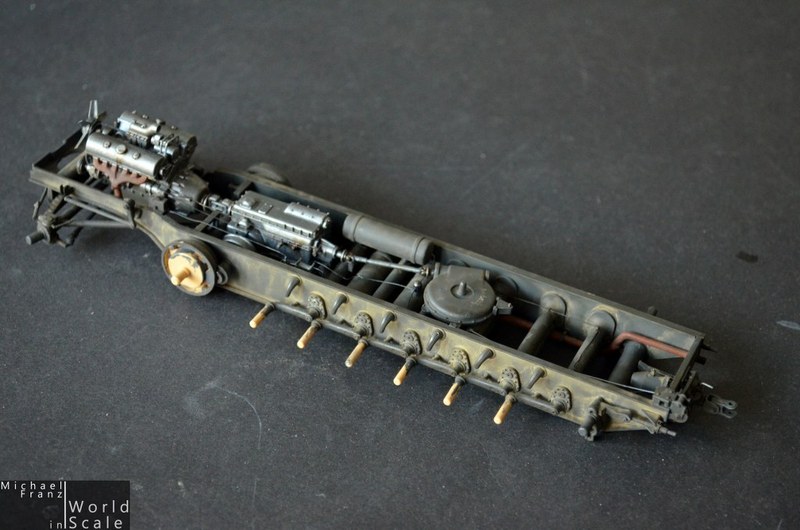
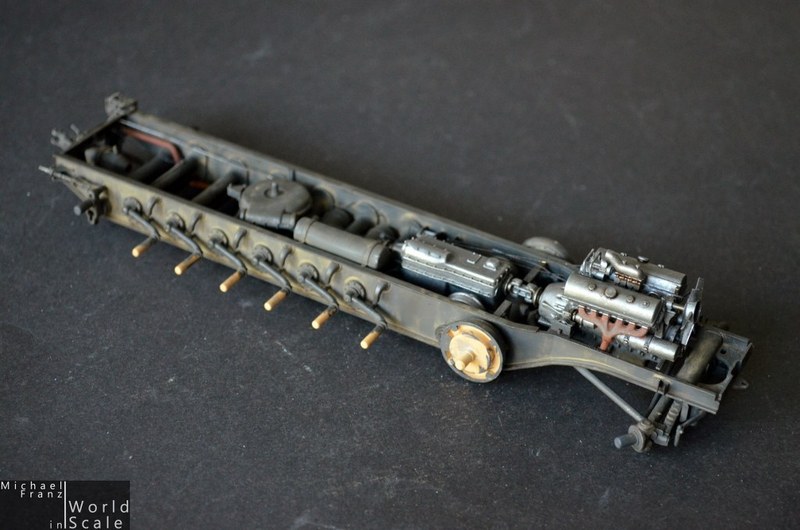
**** UPDATE 5 ****
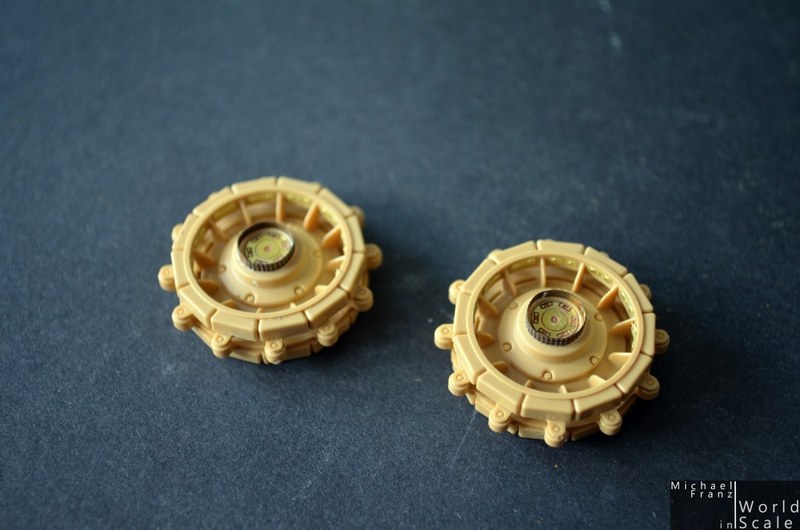
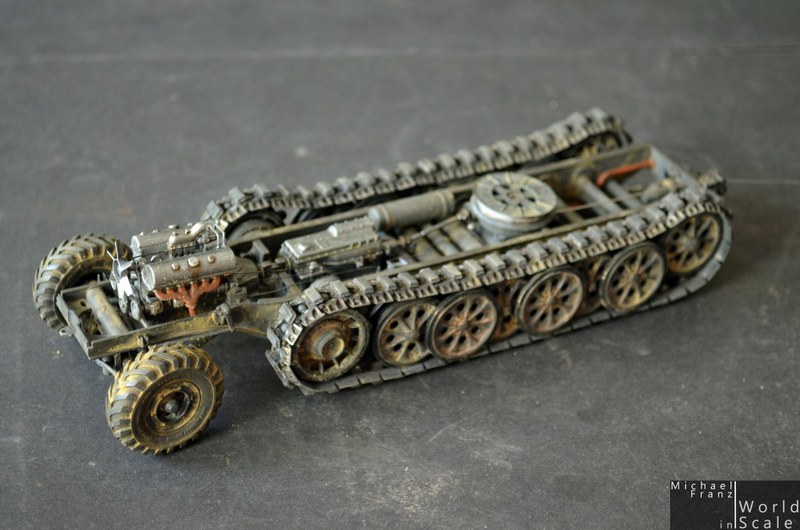
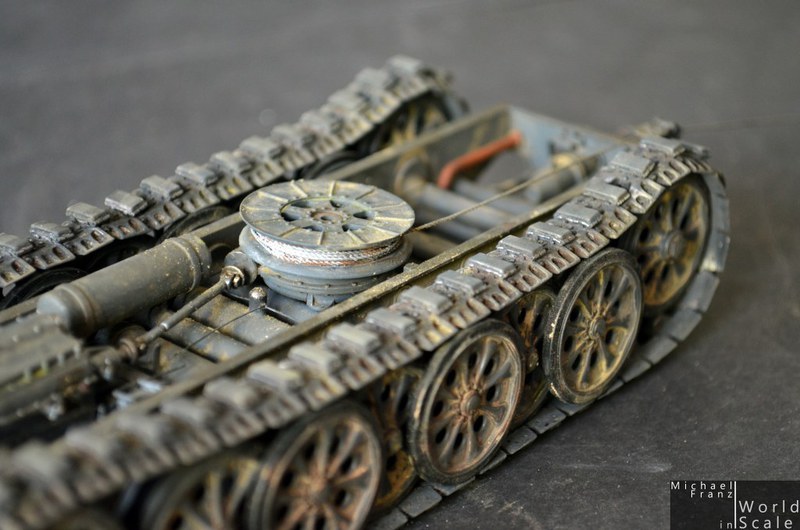
The wheels got painted and weathered separately then mounted on the frame. The steering wheels on the front axle are coming from Panzerart and have a British off-road pattern. These give the car a much stronger and heavier look I think

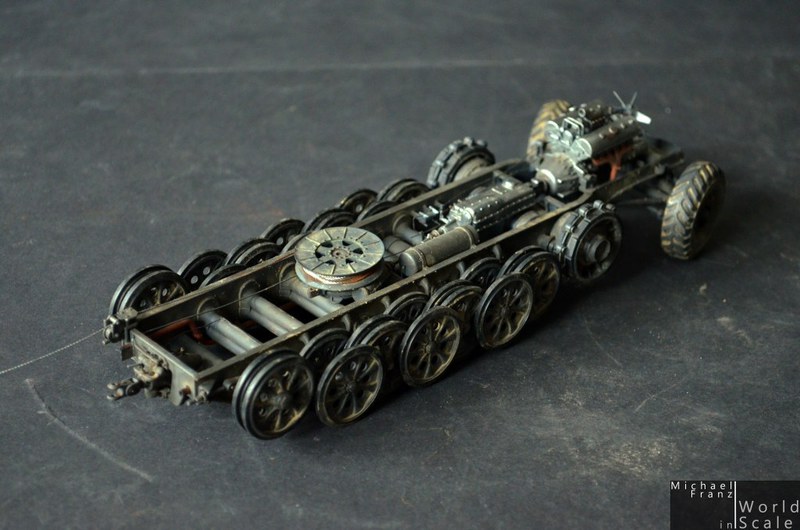


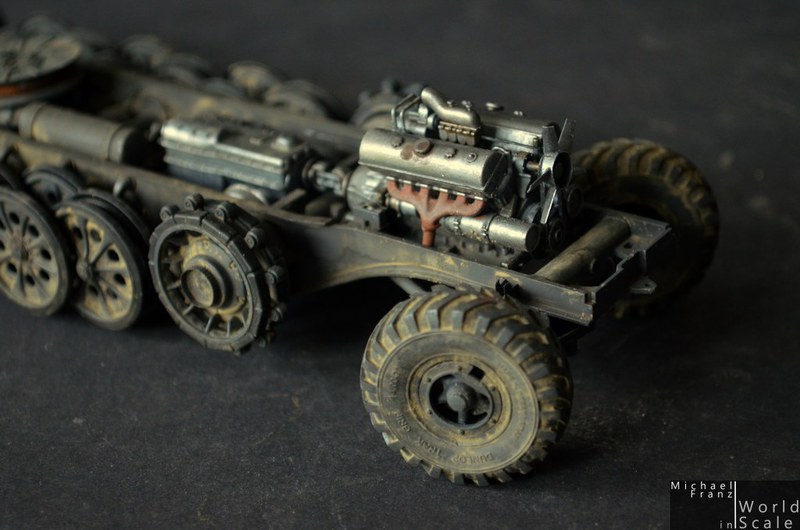
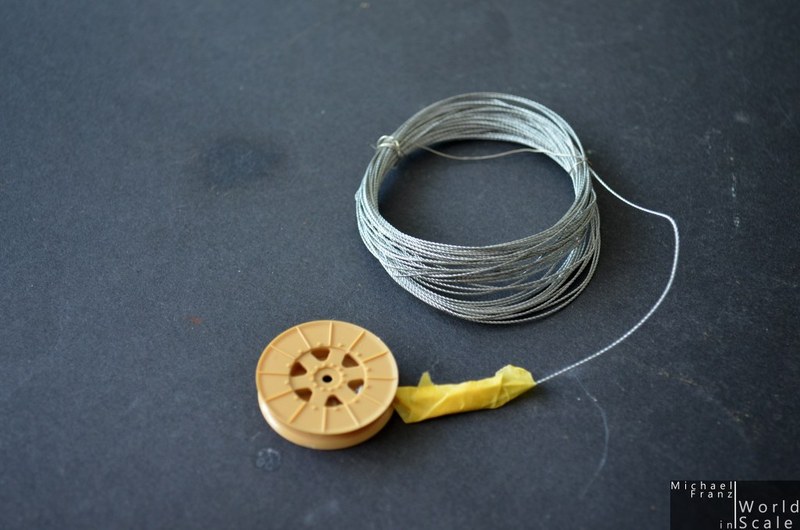
Now the tracks from Friul follow ....
Cheers
Micha
The wheels got painted and weathered separately then mounted on the frame. The steering wheels on the front axle are coming from Panzerart and have a British off-road pattern. These give the car a much stronger and heavier look I think
Now the tracks from Friul follow ....
Cheers
Micha

GazzaS

#424
Joined: April 23, 2015
KitMaker: 4,648 posts
Armorama: 2,248 posts

Posted: Monday, May 16, 2016 - 01:46 PM UTC
Michael,
Very impressive dusty look! Excellent!
Gaz
Very impressive dusty look! Excellent!
Gaz

easyco69

Joined: November 03, 2012
KitMaker: 2,275 posts
Armorama: 2,233 posts
Posted: Monday, May 16, 2016 - 02:29 PM UTC
sexy

alewar

Joined: December 27, 2006
KitMaker: 773 posts
Armorama: 765 posts
Posted: Monday, May 16, 2016 - 04:43 PM UTC
Well.No words.

jrutman
Joined: April 10, 2011
KitMaker: 7,941 posts
Armorama: 7,934 posts
Posted: Monday, May 16, 2016 - 06:08 PM UTC
The chassis really turned out great! Siet gute aus!
I also think you are correct about those front tires. They have a nice meaty look. Reminds me of the way the Kubelwagen looks with the fatter tires.
J
I also think you are correct about those front tires. They have a nice meaty look. Reminds me of the way the Kubelwagen looks with the fatter tires.
J

jimz66
Joined: December 15, 2006
KitMaker: 1,165 posts
Armorama: 1,105 posts
Posted: Monday, May 16, 2016 - 08:17 PM UTC
Very nice Michael. Very nice.
elmarriachi
Joined: December 26, 2009
KitMaker: 813 posts
Armorama: 240 posts
Posted: Saturday, May 21, 2016 - 10:29 PM UTC
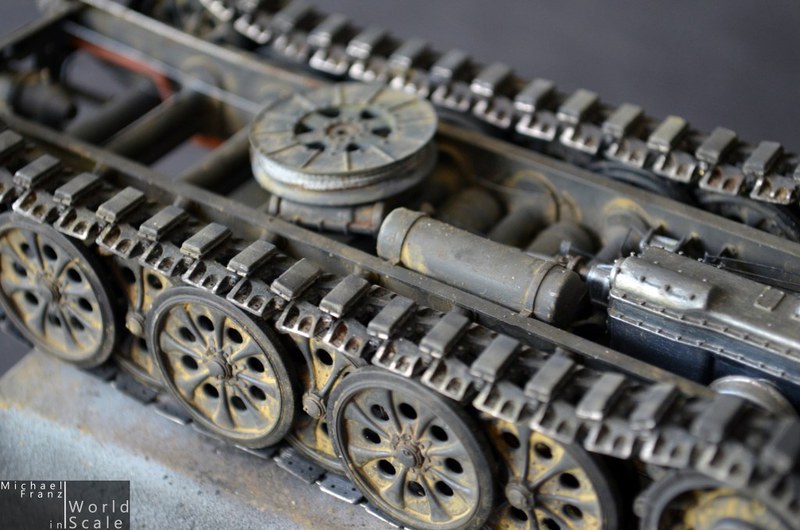
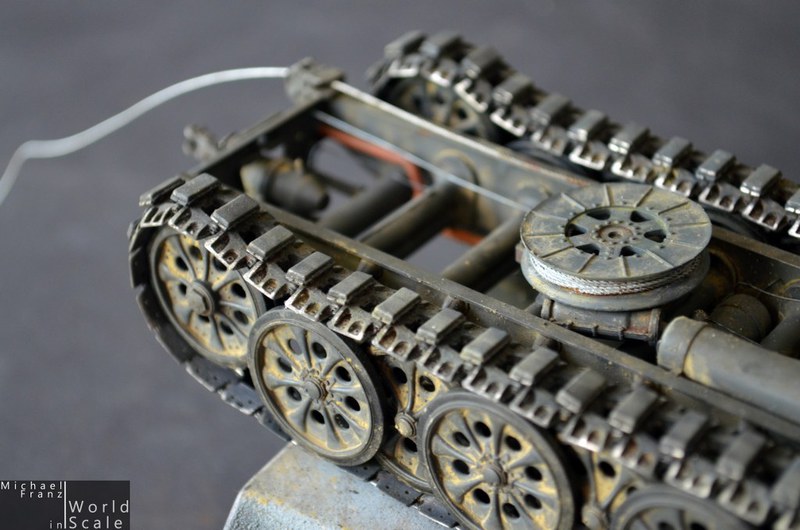
*** UPDATE ***
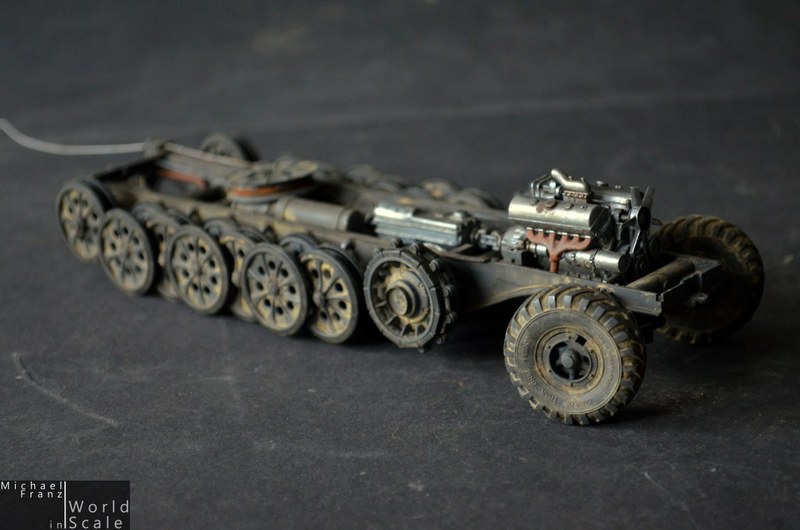
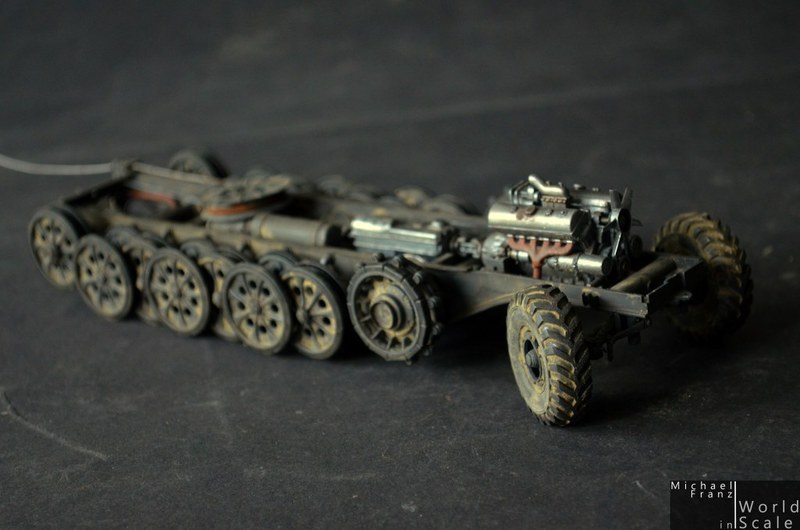
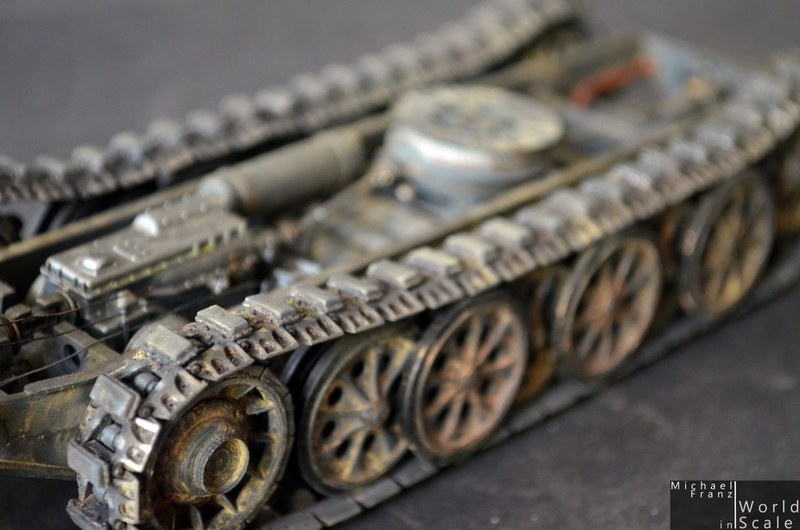
The tracks were replaced with Metal tracks from Friul Models. After putting these together the tracks got blackened, then washed with several brown oil color washings. Pigments as used on the rest of the car followed and got fixed with Pigment fixer.
Sanding the sides brought some metal look back.


Cheers
Micha
The tracks were replaced with Metal tracks from Friul Models. After putting these together the tracks got blackened, then washed with several brown oil color washings. Pigments as used on the rest of the car followed and got fixed with Pigment fixer.
Sanding the sides brought some metal look back.
Cheers
Micha
elmarriachi
Joined: December 26, 2009
KitMaker: 813 posts
Armorama: 240 posts
Posted: Saturday, May 28, 2016 - 11:19 PM UTC
**** UPDATE ****
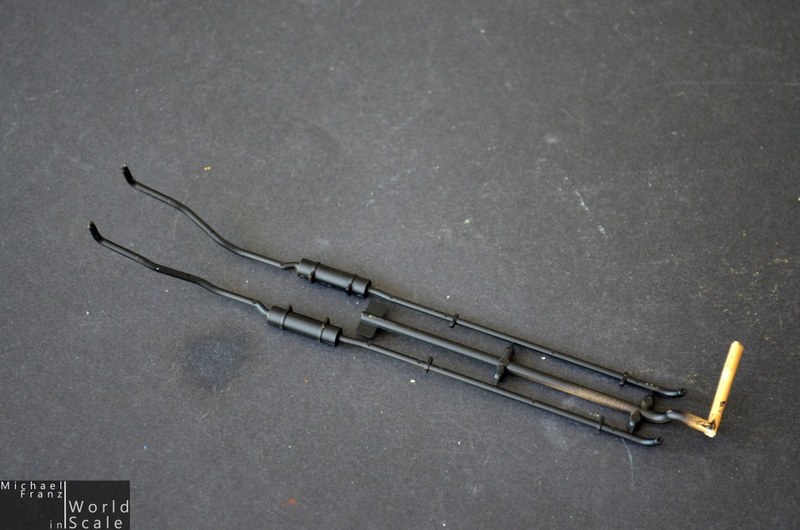
Some first parts glued together in the interior. Some first etched parts added, some furtehr tools added.... and the pedals made new with wire and etched parts.
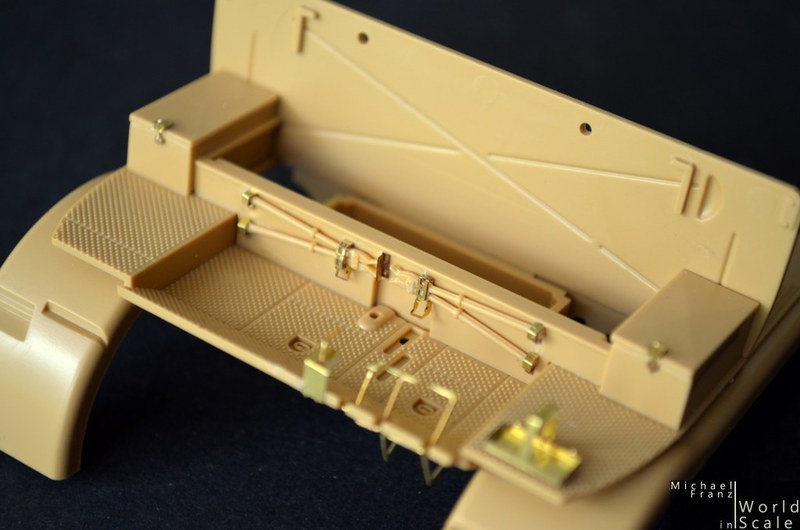

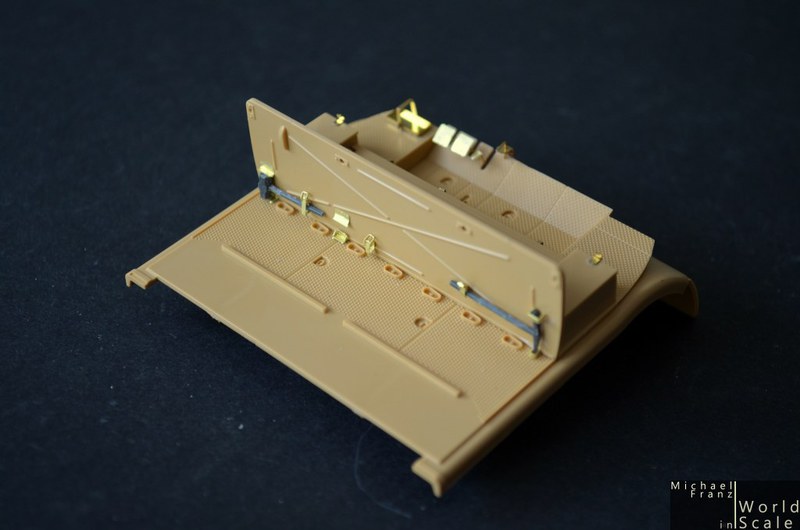
Cheers
Micha
Some first parts glued together in the interior. Some first etched parts added, some furtehr tools added.... and the pedals made new with wire and etched parts.
Cheers
Micha
elmarriachi
Joined: December 26, 2009
KitMaker: 813 posts
Armorama: 240 posts
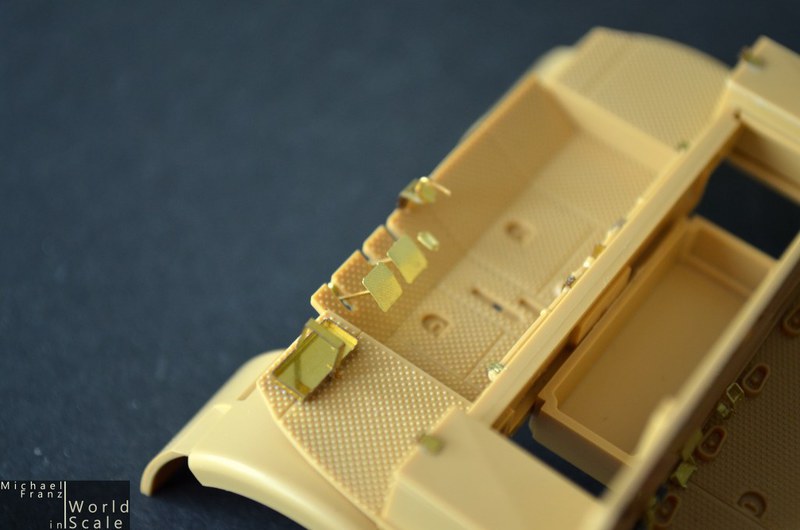
Posted: Sunday, June 05, 2016 - 02:14 PM UTC
*** UPDATE ***
Some more etched details in the interior followed. The holders for the guns were replaced with etched parts, all the tools received etched holders as well and some etched details (shovel blade). Some tools were added which I had on "stock" from older kits.
Then the side walls, rear wall and the upper part of the front were mounted, a little putty and sanding was necessary at the front part.


Cheers
Micha
Some more etched details in the interior followed. The holders for the guns were replaced with etched parts, all the tools received etched holders as well and some etched details (shovel blade). Some tools were added which I had on "stock" from older kits.
Then the side walls, rear wall and the upper part of the front were mounted, a little putty and sanding was necessary at the front part.
Cheers
Micha
dhines
Joined: November 17, 2015
KitMaker: 407 posts
Armorama: 373 posts
Posted: Sunday, June 05, 2016 - 05:02 PM UTC
Hi Micha, great work on the Famo. I have the same kit with all the etch sets in my stash waiting to be built. I look forward to your next update. Best regards....Dale
elmarriachi
Joined: December 26, 2009
KitMaker: 813 posts
Armorama: 240 posts
Posted: Monday, June 13, 2016 - 01:31 PM UTC
*** UPDATE ***
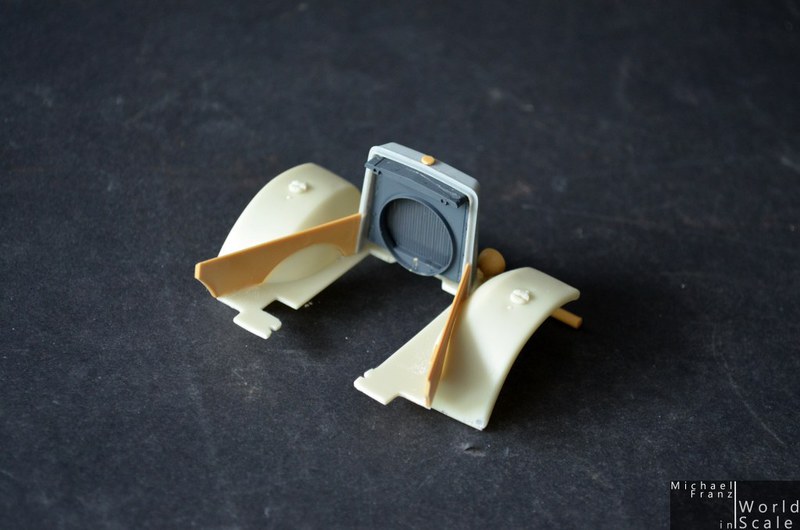
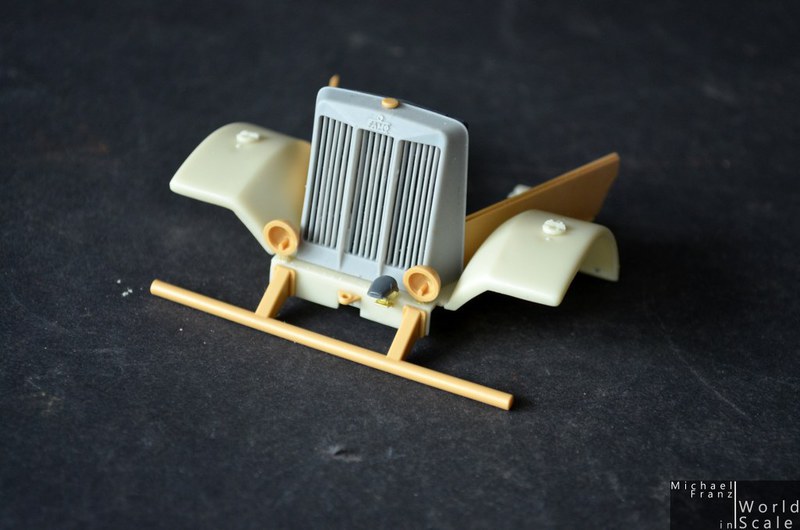
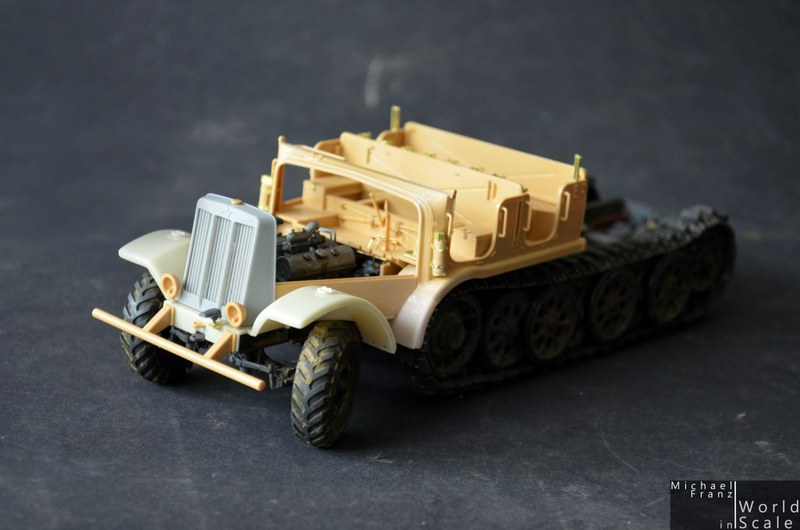
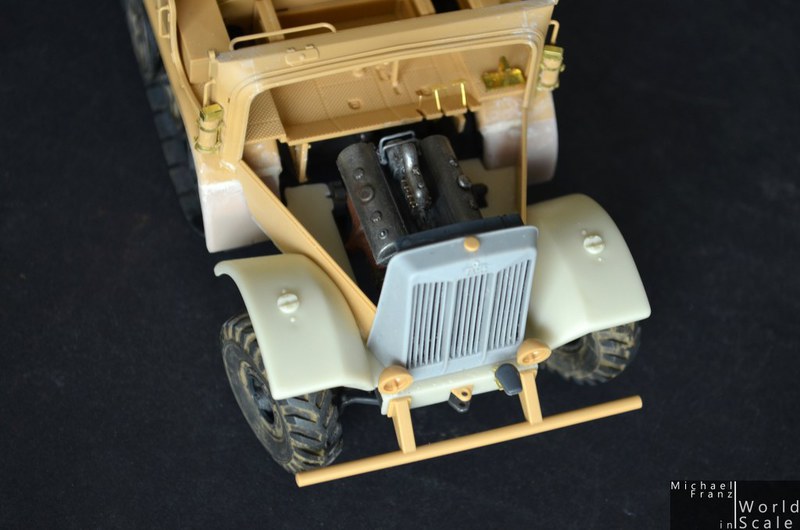
The interior received some further etched parts as well as some wiring. Also some further tools were added which I had left from another old kit. The fenders were removed and replaced by resin parts from Real Model.
The wall between engine and driver area was detailed next. Some kit parts, some wiring, some etched parts and some scratch built parts made of plastic stripes.
The details of the dashboard follow later after the painting.
The front fender part of the kit was replaced from a Resin one from Real Model, showing the later style fenders (F3). The front grille from Panzerart with open ribs was installed, the lower side walls, some details inside, the front bar, lamps and further details. The Notek was used also from another kit and added some etched parts to it.
Some wiring for the lamps follows, the licence plate as well also some details of the tow hook later.


Cheers
Micha
The interior received some further etched parts as well as some wiring. Also some further tools were added which I had left from another old kit. The fenders were removed and replaced by resin parts from Real Model.
The wall between engine and driver area was detailed next. Some kit parts, some wiring, some etched parts and some scratch built parts made of plastic stripes.
The details of the dashboard follow later after the painting.
The front fender part of the kit was replaced from a Resin one from Real Model, showing the later style fenders (F3). The front grille from Panzerart with open ribs was installed, the lower side walls, some details inside, the front bar, lamps and further details. The Notek was used also from another kit and added some etched parts to it.
Some wiring for the lamps follows, the licence plate as well also some details of the tow hook later.
Cheers
Micha

ColinEdm

Joined: October 15, 2013
KitMaker: 1,355 posts
Armorama: 1,229 posts
Posted: Monday, June 13, 2016 - 07:09 PM UTC
Wow...great work Micha!

varanus
Joined: November 22, 2007
KitMaker: 54 posts
Armorama: 53 posts
Posted: Friday, June 17, 2016 - 05:44 AM UTC
Love the weathering on the wheels, very realistic. Have 2 in my stash - I'l be following this thread..
elmarriachi
Joined: December 26, 2009
KitMaker: 813 posts
Armorama: 240 posts
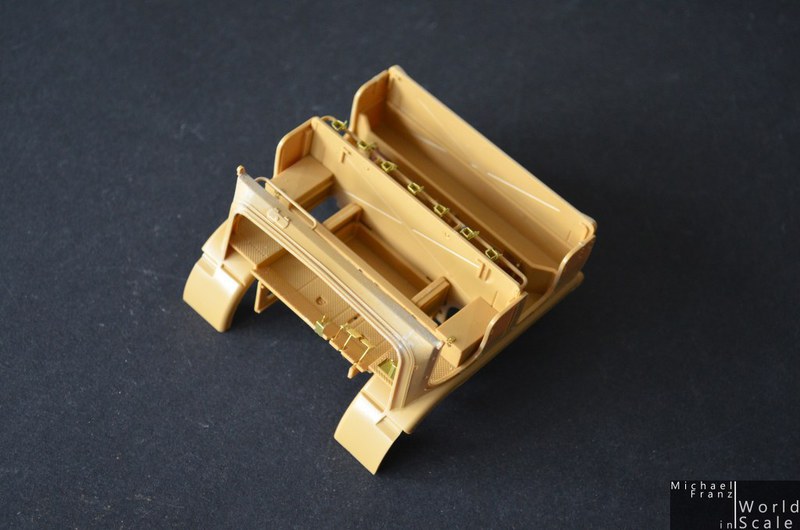
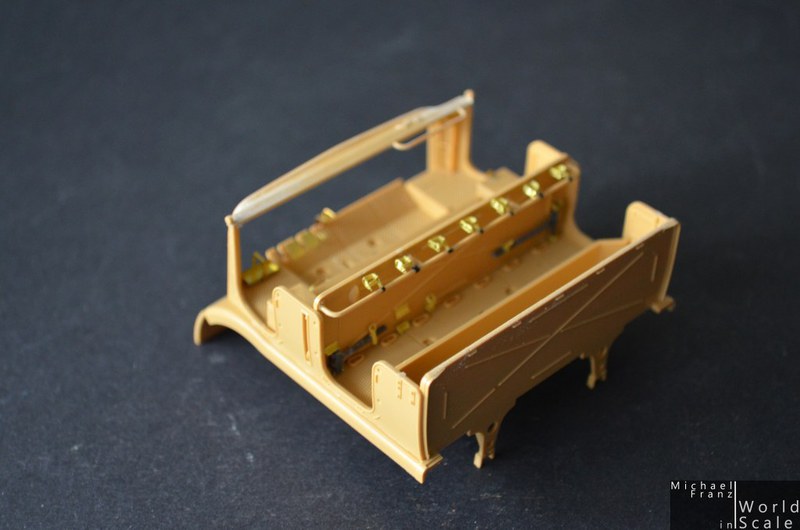
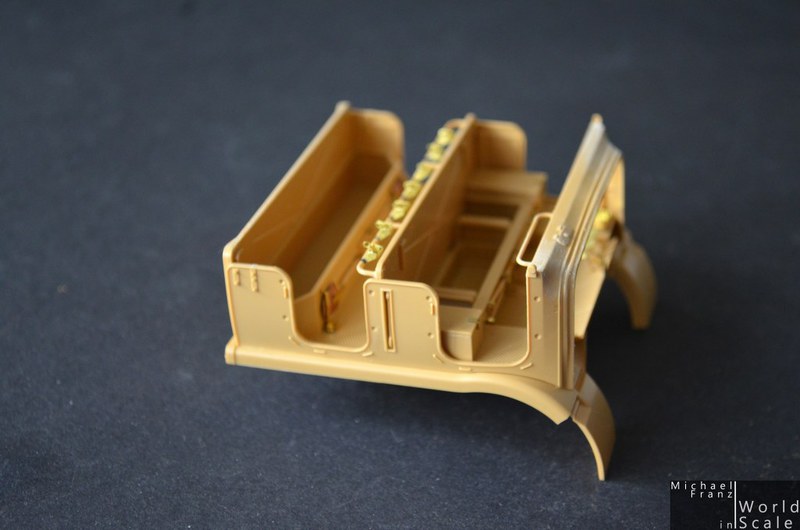
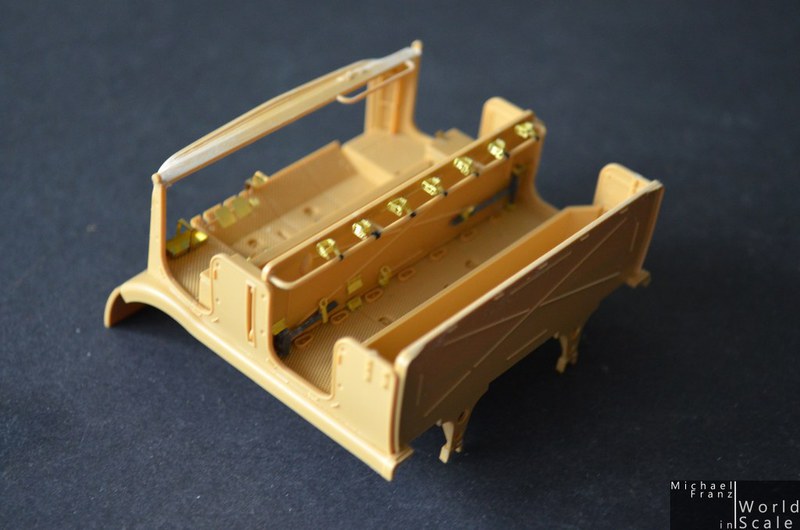
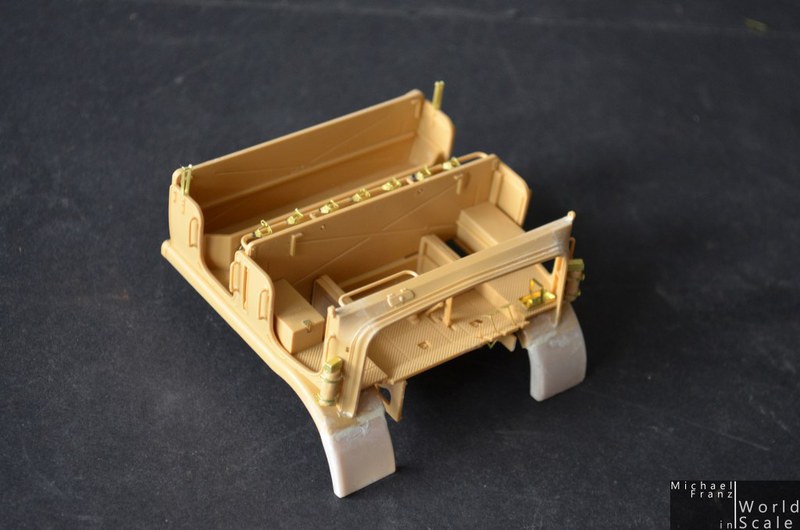
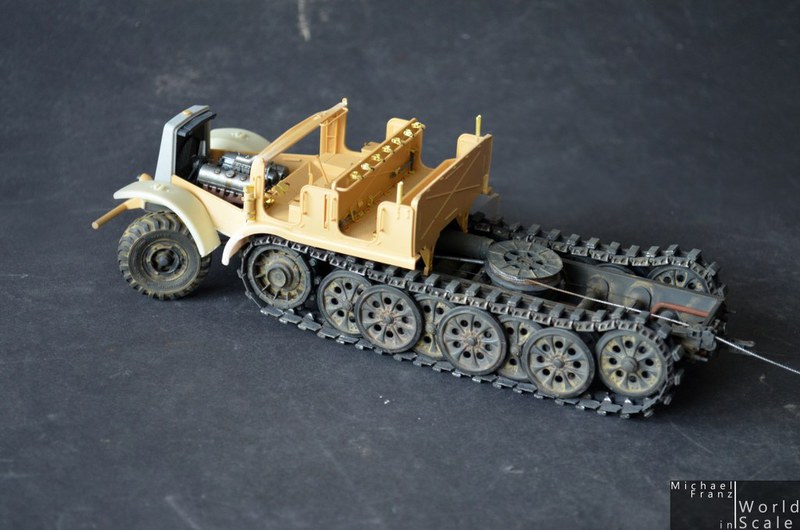
Posted: Sunday, June 19, 2016 - 03:50 PM UTC
*** UPDATE ***
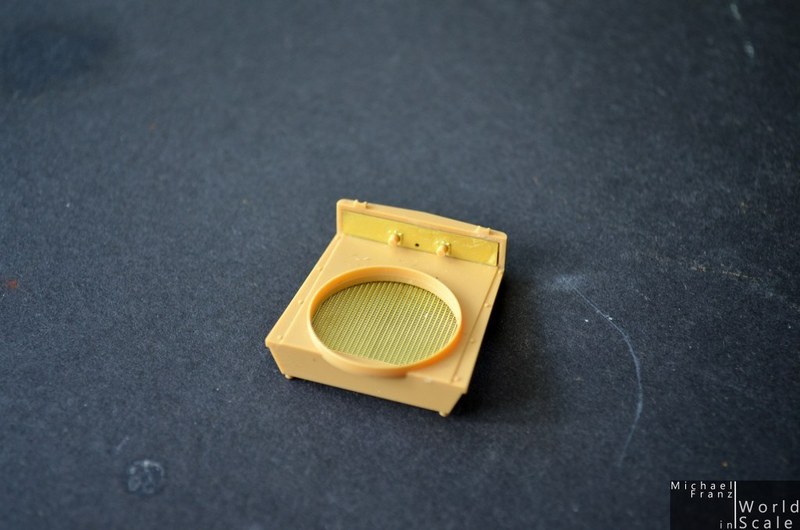
The rear superstructure was glued together next. The two doors of the tool boxes left and right were replaced by photo etched parts. The one on the right side also incl. interior - lock, closing mechanism - and will remain in open position later.
All the parts of the body were primered then in black. The paintig was made with Tamiya "German Grey" as first paint, then highlights were made with two further lighter grey tones on the upper side. A dark blue washing with oil colors followed.
Light beige washing on the underside of the body, as well as in the wheelhouses, then some pigments in beige / brown on the underside followed next.
Also the interior received some updates. The details (tools) were painted with a fine brush, the floor dusted with a beige washing. Some sheer metal will follow. The dashboard received gauges with Archer Fine Transfers and also some details painted.
Then the cab and the front parts were glued to the chassis.


Some further washing, dusting, scratching will follow on the outside as soon as the rear part of the body is installed as well.
Cheers,
Micha
The rear superstructure was glued together next. The two doors of the tool boxes left and right were replaced by photo etched parts. The one on the right side also incl. interior - lock, closing mechanism - and will remain in open position later.
All the parts of the body were primered then in black. The paintig was made with Tamiya "German Grey" as first paint, then highlights were made with two further lighter grey tones on the upper side. A dark blue washing with oil colors followed.
Light beige washing on the underside of the body, as well as in the wheelhouses, then some pigments in beige / brown on the underside followed next.
Also the interior received some updates. The details (tools) were painted with a fine brush, the floor dusted with a beige washing. Some sheer metal will follow. The dashboard received gauges with Archer Fine Transfers and also some details painted.
Then the cab and the front parts were glued to the chassis.
Some further washing, dusting, scratching will follow on the outside as soon as the rear part of the body is installed as well.
Cheers,
Micha
 |

WEB HOSTING BY


Copyright ©2021 Armorama and Kitmaker Network, a subsidiary of Silver Star Enterprises
All Rights Reserved. Please read our Conditions of Use and Privacy Policy.
All Rights Reserved. Please read our Conditions of Use and Privacy Policy.