

Armor/AFV
For discussions on tanks, artillery, jeeps, etc.
For discussions on tanks, artillery, jeeps, etc.
Hosted by Darren Baker, Mario Matijasic
Flammpanzerwagen Kfz. 251/16 ausf. C - Dragon
brekinapez

Joined: July 26, 2013
KitMaker: 2,272 posts
Armorama: 1,860 posts
Posted: Sunday, November 20, 2016 - 03:33 AM UTC
How do they open the rear hatches with that bar across the back?
JohnDoe4th
Joined: March 03, 2016
KitMaker: 142 posts
Armorama: 137 posts
Posted: Sunday, November 20, 2016 - 04:03 AM UTC
Your chipping technic is amazing!!!!

Kraftstoff

Joined: September 06, 2002
KitMaker: 93 posts
Armorama: 37 posts
Posted: Sunday, November 20, 2016 - 07:04 AM UTC
Lukasz, I very much like the paint work and chipping .. Maybe just touch up the couple of green runs..2 thumbs up

simonn

Joined: October 15, 2016
KitMaker: 62 posts
Armorama: 18 posts
Posted: Sunday, November 20, 2016 - 11:53 AM UTC
Lukasz
The overall effect is excellent. there are one or two green lines that could be touched up but only if you think it is necessary. It looks great as is.
I have this kit - won it in the club raffle - and was wondering if I have the parts in the kit to make a standard half track and leave off the flame throwing equipment. What do you think?
Simon

justsendit
Joined: February 24, 2014
KitMaker: 3,033 posts
Armorama: 2,492 posts
Posted: Sunday, November 20, 2016 - 11:38 PM UTC
Hi Łukasz,
Nice job on the details, painting, and camo! Looking forward to what you'll do with your building.
mike
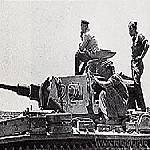
Looks like the bar in question might be an external, removable weapon attached to a hose for creating even more carnage from outside of the vehicle ... nasty business! I found these on the web: drawing and rear view image
Nice job on the details, painting, and camo! Looking forward to what you'll do with your building.
mike
Quoted Text
How do they open the rear hatches with that bar across the back?
Looks like the bar in question might be an external, removable weapon attached to a hose for creating even more carnage from outside of the vehicle ... nasty business! I found these on the web: drawing and rear view image

Stojkovic1987

Joined: March 26, 2015
KitMaker: 255 posts
Armorama: 254 posts
Posted: Saturday, November 26, 2016 - 02:32 AM UTC
Hello!
Well As far as I know, this is not a bar on the door, but some kind of equipment (petrol pistol like on the gas stations) for refuel the tanks for flamethrowers (there goes the pipeline wich will be attached later).
I believe that the extra parts in model would give a Chance to make standard Halftrack without flamethrowers.
The Painting scheme was not good enough, so I decided to repaint the model. Now the lines are more clear.


Feel free to speak your mind. Thanks!
justsendit
Joined: February 24, 2014
KitMaker: 3,033 posts
Armorama: 2,492 posts
Posted: Saturday, November 26, 2016 - 03:26 AM UTC
Quoted Text
The Painting scheme was not good enough, so I decided to repaint the model. Now the lines are more clear.
I really like this version a lot ... nice improvement! Now try not to get too carried away with the chipping.

mike

Dioramartin
Joined: May 04, 2016
KitMaker: 1,476 posts
Armorama: 1,463 posts
Posted: Saturday, November 26, 2016 - 04:58 AM UTC
Hi Lukasz
Yes thats much better, brave choice to repaint it as Mike said dont overdo the chipping, the first version looked like it was 30 years old. Check out Colins Marder II just posted in the Constructive Feedback forum, his chipping looks just right.
Also you had a lot of wear on the engine inspection doors before Id suggest the doors would be relatively clean, its the areas around the hatch where mechanics trod and put down leaky oil cans that would be worn.
Looking forward to seeing the finished article, its looking great.
Cheers, Tim
Stojkovic1987
Joined: March 26, 2015
KitMaker: 255 posts
Armorama: 254 posts
Posted: Friday, December 30, 2016 - 02:50 AM UTC
Hello,
The model repainted 3rd time - final one.
I've already put decals. The tricky one was the front and read licence plates which contains the white background and every numer tto be set separately. It took ages to make it 3 Times and as steady and accurate as I can.


Now the weathering and all other stuff.
Stojkovic1987
Joined: March 26, 2015
KitMaker: 255 posts
Armorama: 254 posts
Posted: Wednesday, January 04, 2017 - 11:59 PM UTC
Hello,
I'm after several next steps with my model.
Wash, oils and streaking grime.


The wheels also were prepared

I just glued the last pipes next to the flamethrower device.

Still lots of things to do with this one...
I'm after several next steps with my model.
Wash, oils and streaking grime.


The wheels also were prepared

I just glued the last pipes next to the flamethrower device.

Still lots of things to do with this one...

RobinNilsson

Joined: November 29, 2006
KitMaker: 6,693 posts
Armorama: 5,562 posts
Posted: Thursday, January 05, 2017 - 06:10 AM UTC
Impressive !
Maybe it is the photos but the balkenkreuz and the number 89 look very clean compared to the rest of the vehicle? The registration number is on the same level of dirty as the rest so they are fine.
Good timing to update this thread now that there is News post about Dragon re-issuing the Sd.Kfz 251/16 .....
/ Robin
Stojkovic1987
Joined: March 26, 2015
KitMaker: 255 posts
Armorama: 254 posts
Posted: Saturday, January 28, 2017 - 12:31 AM UTC
Awww like always the building proces is slowing down.
Just made some chipping otn the pipes added at the end of the flamethrower device.
Also make some fit test with the MG.


And the wore thing is that I need to assemble the tracks...
Just made some chipping otn the pipes added at the end of the flamethrower device.

Also make some fit test with the MG.


And the wore thing is that I need to assemble the tracks...
RobinNilsson
Joined: November 29, 2006
KitMaker: 6,693 posts
Armorama: 5,562 posts
Posted: Saturday, January 28, 2017 - 01:52 AM UTC
Assembling tracks is like meditation
Make separate sections and let them dry, long sections for the upper and lower run and chort curved sections to go around the idler and sprocket. The upper run reaches from one or maybe two teeth onto the sprocket to halfway around the idler. The lower run reaches from halfway around the idler to one or maybe two teeth onto the sprocket and then a short section to close the gap on the sprocket. The track sag is adjusted so that the upper and lower runs can meet on the idler, the sprocket end is much easier. Most of the upper and lower runs can be made independently of each other. The upper run will allow for a small adjustment of track sag, the rest is taken beneath the idler and the sprocket.
/ Robin
Stojkovic1987
Joined: March 26, 2015
KitMaker: 255 posts
Armorama: 254 posts
Posted: Tuesday, February 14, 2017 - 06:09 PM UTC
Just tried to assemble the first track, but saw there is too less rubber elements to connect the links!
Not because I lost tchem during the build, but that tere is not enough on frets... Wierd.
Not because I lost tchem during the build, but that tere is not enough on frets... Wierd.
Stojkovic1987
Joined: March 26, 2015
KitMaker: 255 posts
Armorama: 254 posts
Posted: Friday, March 31, 2017 - 11:28 PM UTC
Hello,
Some minor progres with this hot one.


After taking this photos I've added the outside road wheels


This is the first fit of the crew and a conception how they should look


Some minor progres with this hot one.
After taking this photos I've added the outside road wheels
This is the first fit of the crew and a conception how they should look
Stojkovic1987
Joined: March 26, 2015
KitMaker: 255 posts
Armorama: 254 posts
Posted: Tuesday, April 18, 2017 - 11:44 AM UTC
Hello,
The flame-boys are in their places.
Everything is set and ready for final galery.
Any thoughts?


Let me know if anything is wrong
The flame-boys are in their places.
Everything is set and ready for final galery.
Any thoughts?


Let me know if anything is wrong
Stojkovic1987
Joined: March 26, 2015
KitMaker: 255 posts
Armorama: 254 posts
Posted: Wednesday, June 07, 2017 - 12:10 PM UTC
Hello,
Final galery below.


Thanks for watching and keeping fingers crossed during the build.
Final galery below.


Thanks for watching and keeping fingers crossed during the build.

jrutman
Joined: April 10, 2011
KitMaker: 7,941 posts
Armorama: 7,934 posts
Posted: Wednesday, June 07, 2017 - 06:08 PM UTC
Very nice work ! You don't see this version built that often !
J
J
All_You_Can_Kit

Joined: August 22, 2012
KitMaker: 599 posts
Armorama: 527 posts
Posted: Wednesday, June 07, 2017 - 07:09 PM UTC
IMO, you may made the number plate on the right back side looks dirtier, as dirty as another one on the left side that already looks so natural and great. Overall, the vehicle looks so impressive! thanks for sharing since I have similar kit that not yet finished since 2013.. 

Kind regards,
Garry
Kind regards,
Garry
canismalus

#465

Joined: September 12, 2014
KitMaker: 398 posts
Armorama: 394 posts
Posted: Wednesday, June 07, 2017 - 07:18 PM UTC
Hi Łukasz,
Excellent SdKfz. 251/16, from the meticulous build to the camo/weathering to the figures - with those flame suits they lend the build a old-school, Jules Verne sci-fi sort of air.
Jerry
Excellent SdKfz. 251/16, from the meticulous build to the camo/weathering to the figures - with those flame suits they lend the build a old-school, Jules Verne sci-fi sort of air.
Jerry
Stojkovic1987
Joined: March 26, 2015
KitMaker: 255 posts
Armorama: 254 posts
Posted: Thursday, June 08, 2017 - 12:03 PM UTC
Thanks for very warm reception of my model!
 |

WEB HOSTING BY


Copyright ©2021 Armorama and Kitmaker Network, a subsidiary of Silver Star Enterprises
All Rights Reserved. Please read our Conditions of Use and Privacy Policy.
All Rights Reserved. Please read our Conditions of Use and Privacy Policy.