_GOTOBOTTOM
Armor/AFV: Modern - USA
Modern Armor, AFVs, and Support vehicles.
Hosted by Darren Baker
M60A2 Starship Dragon 3562 build log
MattSz
Visit this Community
California, United States
Joined: January 06, 2013
KitMaker: 98 posts
Armorama: 98 posts
Posted: Saturday, May 14, 2016 - 05:10 PM UTC
Hello
Few days ago I started build and review Dragon M60A2 Starship, kit No 3562.

In this thread I'll show my progress. Before I get this kit to review I knew not too much about this tank, but at a time when I was waiting for sample I started learn about M60 tanks family.
I used the following publications:


The construction of the model, according to the instruction I started from the wheels.

1:Drive sprockets are made up of four parts, need 2 of them
2:Road wheels,need four parts to build each wheel:inner hub, rear hub, and 2 x road wheel outers. It requires a lot of work to create the full compliment of road wheels and the two idler wheels but the final effect is worth of labor input.
3:Return rollers, to assembly one you need two parts.
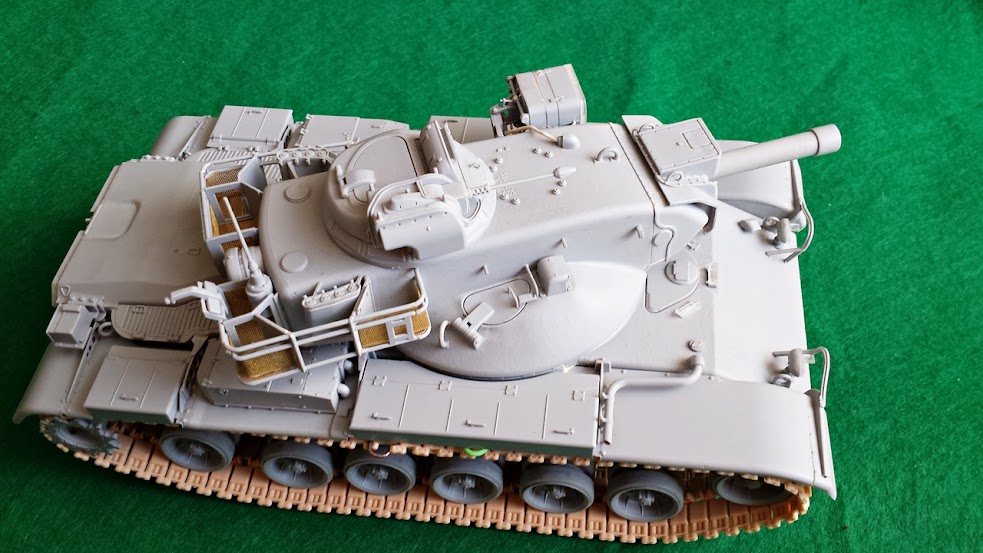
After a few hours of cutting, sanding and gluing I finished all wheels:

I also checked track and sprockets ftting, all fits very well:

When I watched reference images and drive sprockets pictures noticed, that almost all drive sprockets has three mud holes.


Then I started modifying the Dragon sprockets, and cut out these holes, I drilled pilot holes and used a combination of hobby knife and sanding to form the holes and achieve the slightly oblong shape. Now drive sprockets looks more similiar to the original, I'm happy with the result:

Now I'm going to bulid suspension, photos soon
TankCarl
Visit this Community
Rhode Island, United States
Joined: May 10, 2002
KitMaker: 3,581 posts
Armorama: 2,782 posts
Posted: Saturday, May 14, 2016 - 07:27 PM UTC
Nice start.I am also doing a side by side build of mine versus the academy kit.Message me if you hit any snags.I was a crrewman on one in the '70's
MattSz
Visit this Community
California, United States
Joined: January 06, 2013
KitMaker: 98 posts
Armorama: 98 posts
Posted: Tuesday, May 24, 2016 - 01:56 AM UTC
Thanks Carl,if I will have any question I wimm pm you for sure

I finished suspension assembly. First, I glued lower and upper hull together, they fit each other really good. Next I removed some details that was for a different M60 version and used some putty for cover unnecessary holes(point 1).


As You can see on the photo, insctuction indicate glue part C8 and remove half which stick out of the hull. I choosed easier way and just used putty (point 2)

Then I could begin to add suspension details like bumpstops, swingarms and return rollers. All parts fits very well, I found only one litte handicap resulting from too small pins on swingarms. When I glued swingarm in place, it still can move up and down so you had to be careful to make everything equal to each other.
Finished suspension looks really impressive.


Next I am going to make engine deck and upper hull details. I know that, Dragon's Starship has two fuel gaps, it's wrong so I had to remove one. I am wondering wchich I should remove, right or left?
barkingdigger
Staff MemberAssociate Editor
ARMORAMA
#013
Visit this Community
England - East Anglia, United Kingdom
Joined: June 20, 2008
KitMaker: 3,981 posts
Armorama: 3,403 posts
Posted: Tuesday, May 24, 2016 - 02:20 AM UTC
Definitely off to a good start! (Those wheels look fun - more parts than you can shake a stick at.) I do like the suspension mounts, since they are way better than the ones on the Academy kit.
TankCarl
Visit this Community
Rhode Island, United States
Joined: May 10, 2002
KitMaker: 3,581 posts
Armorama: 2,782 posts
Posted: Tuesday, May 24, 2016 - 04:52 AM UTC
I used a straight edge to make sure the axle pins on the arms were the same level. I did shave the mount on the last torsion bar mounts,a little.I was able to move them closer to the correct (even) spacing.
MattSz
Visit this Community
California, United States
Joined: January 06, 2013
KitMaker: 98 posts
Armorama: 98 posts
Posted: Thursday, June 02, 2016 - 03:42 PM UTC
Thank You all for watching.
Carl: I knew that the spacing between road wheels are a little bit wrong but I decided to leave it as it is.

A little progress: I finished engine deck and rear of the hull.
Engine deck has a really good detail, these handle grabs looks cool

Unfortunatelly I had some problems, parts doesn't fit too well

To glue these parts together I used cyanoacrylate glue and next I filled the cracks with acryl filler.

On the occasion I filled atachment point for one fuel cap. Kit comes with two fuelling ports so the one on the left should be removed.

And finally I made rear part of the hull. Here everything fits perfectly and final effect is good.

I noticed one minor issue, the rear engine access doors should have the fitting for the snorkel tube on them (picture below), unfortunately Dragon missed this detail.

That's all for today, now I'm going to make fenders and finish the hull
HeavyArty
Visit this Community
Florida, United States
Joined: May 16, 2002
KitMaker: 17,694 posts
Armorama: 13,742 posts
Posted: Thursday, June 02, 2016 - 04:41 PM UTC

Quoted Text

I noticed one minor issue, the rear engine access doors should have the fitting for the snorkel tube on them (picture below), unfortunately Dragon missed this detail.


Not necessarily. The snorkel attachment point was a feature on later tanks. Not all M60A2s had this feature, so not really a mistake on Dragon's part.
phantom8747
Visit this Community
Alabama, United States
Joined: March 09, 2015
KitMaker: 281 posts
Armorama: 273 posts
Posted: Thursday, June 02, 2016 - 05:45 PM UTC
Nice build so far but I am waiting for the AFV Club release
Vodnik
Visit this Community
Warszawa, Poland
Joined: March 26, 2003
KitMaker: 4,342 posts
Armorama: 3,938 posts
Posted: Thursday, June 02, 2016 - 06:47 PM UTC

Quoted Text


I noticed one minor issue, the rear engine access doors should have the fitting for the snorkel tube on them (picture below), unfortunately Dragon missed this detail.


First: The snorkel attachment is there on the Dragon part, so I have no idea what you mean?...

Second: Don't bother checking the accuracy of this kit AT ALL if you want to have fun building it. Just build it and don't even think about looking at any references. Trust me - the snorkel fitting is the least important issue (particularly that it is actually there...).
TankCarl
Visit this Community
Rhode Island, United States
Joined: May 10, 2002
KitMaker: 3,581 posts
Armorama: 2,782 posts
Posted: Friday, June 03, 2016 - 11:10 PM UTC
The left side filler isn't needed.
My A2 had the door for the snorkel, but we never used it. That heavy ridge above the grills on the rear doors is not needed.If you look at the actual photgraph you posted, you can see the difference.
SKiernan
Visit this Community
Dordogne, France
Joined: March 11, 2006
KitMaker: 87 posts
Armorama: 80 posts
Posted: Friday, June 03, 2016 - 11:26 PM UTC
Carl

Can you offer any insight into life on the tank and how it performed?

I have the Academy one in the man cave and for whatever reason always thought it was a neat looking vehicle

Steve
GazzaS
#424
Visit this Community
Queensland, Australia
Joined: April 23, 2015
KitMaker: 4,648 posts
Armorama: 2,248 posts
Posted: Saturday, June 04, 2016 - 03:22 AM UTC
Interesting tank to build. I don't know much about it. The mouldings look really crisp.

Gonna follow your build.

Gaz
djohannsen
Visit this Community
Virginia, United States
Joined: June 24, 2005
KitMaker: 364 posts
Armorama: 355 posts
Posted: Saturday, June 04, 2016 - 06:08 AM UTC

Quoted Text

Carl

Can you offer any insight into life on the tank and how it performed?


I'm most definitely not an "M60 guy," but since no on e else has replied... I believe that only a couple of hundred M60A2 entered service, and they were long gone before either the M60A1 or M60A3. From these two facts, I would conclude that they didn't perform terribly well.
dtniedert
Visit this Community
Kentucky, United States
Joined: December 11, 2014
KitMaker: 152 posts
Armorama: 139 posts
Posted: Saturday, June 04, 2016 - 06:33 AM UTC

Quoted Text


Quoted Text

Carl

Can you offer any insight into life on the tank and how it performed?


I'm most definitely not an "M60 guy," but since no on e else has replied... I believe that only a couple of hundred M60A2 entered service, and they were long gone before either the M60A1 or M60A3. From these two facts, I would conclude that they didn't perform terribly well.


526 total IIRC.
Kevlar06
Visit this Community
Washington, United States
Joined: March 15, 2009
KitMaker: 3,670 posts
Armorama: 2,052 posts
Posted: Saturday, June 04, 2016 - 10:19 AM UTC


I'm most definitely not an "M60 guy," but since no on e else has replied... I believe that only a couple of hundred M60A2 entered service, and they were long gone before either the M60A1 or M60A3. From these two facts, I would conclude that they didn't perform terribly well.[/quote]


They actually served concurrently with the M60A1, but were on the way out when the A3 arrived in 1980. I went to the missile training course at Fort Knox, which used A2s as an add on course from the M60A1 course in 1976. There were lots of reasons so few were made-- one was the extreme cost of the Shillelagh missile, about $5000 a round ad that time, which meant you couldn't really train with it. It did fire the 152mm expendable cased round like the M551 Sheridan, but that round was less accurate at long ranges than the 105mm M60A1 round. Those were just a couple of reasons it was made in smaller numbers. The narrow turret was very cramped too, compared to either the Sheridan or M60 series, which meant fewer rounds could be carried.
VR Russ
TankCarl
Visit this Community
Rhode Island, United States
Joined: May 10, 2002
KitMaker: 3,581 posts
Armorama: 2,782 posts
Posted: Saturday, June 04, 2016 - 08:48 PM UTC
The A2 worked for me. I was given the normal M60/A1 school training at Ft>Knox in 74.
Then I was given A2 training, before going to Germany in early '75. It wasn't until Dec- Feb/Mar 76,That our battalion had been given the full complement of A2's. one company at a time went to Graf, and transitioned. There was less space inside the turret, and the loader usually sat hunched over,under his hatch.As a gunner, there was plenty of headroom, and I had my own hatch. It was cramped to both sides of me, what with the side of the turret to the right, and the ammo racks to the left.
On this Dragon kit, the dimensions for width are suspect. Also there are holders for the tow cable on the turret sides,
BUT
No
Tow
Cable.
SKiernan
Visit this Community
Dordogne, France
Joined: March 11, 2006
KitMaker: 87 posts
Armorama: 80 posts
Posted: Saturday, June 04, 2016 - 10:15 PM UTC
Carl

Thank you for the insight. I find it interesting the Russians are still pursuing missile firing gun tanks.

Steve
Thirian24
Visit this Community
Oklahoma, United States
Joined: September 30, 2015
KitMaker: 2,493 posts
Armorama: 2,344 posts
Posted: Tuesday, July 05, 2016 - 06:26 AM UTC
Any update on this?
MattSz
Visit this Community
California, United States
Joined: January 06, 2013
KitMaker: 98 posts
Armorama: 98 posts
Posted: Thursday, August 18, 2016 - 02:40 PM UTC
Hi again after long time.
I had a break from modeling, jut too much work and no time for hobby.
Now, I'm back and continue work with Starship.
I finished the hull:

As you can see I removed left fuel cap.

I must mention that plastic fenders looks very nice, they are very thin and work with these parts not require a lot of time.


And the view on the headlights: I glued piece of silver foil between plastic and clear parts, I think that after painting it will look acceptably.

Next I started with with turret. All parts fit together very well so build was fast, two evenings and I almost finished it. Turet bin assembly is hard to do but other turret parts fit very well.


I hope that I find more time and further work will go faster.
M4A1Sherman
Visit this Community
New York, United States
Joined: May 02, 2013
KitMaker: 4,403 posts
Armorama: 4,078 posts
Posted: Thursday, August 18, 2016 - 04:59 PM UTC

Quoted Text


Quoted Text


I noticed one minor issue, the rear engine access doors should have the fitting for the snorkel tube on them (picture below), unfortunately Dragon missed this detail.


First: The snorkel attachment is there on the Dragon part, so I have no idea what you mean?...

Second: Don't bother checking the accuracy of this kit AT ALL if you want to have fun building it. Just build it and don't even think about looking at any references. Trust me - the snorkel fitting is the least important issue (particularly that it is actually there...).


Hi, Pawel & Gino!

I understand that the AFV CLUB M60A2 is a better starting point than the DRAGON kit- I know some people are a bit put-off with the overdone texture of the AFV CLUB M60-series kits; not a problem for me, anyway- Your comments..?
Vodnik
Visit this Community
Warszawa, Poland
Joined: March 26, 2003
KitMaker: 4,342 posts
Armorama: 3,938 posts
Posted: Thursday, August 18, 2016 - 07:25 PM UTC

Quoted Text


I understand that the AFV CLUB M60A2 is a better starting point than the DRAGON kit- I know some people are a bit put-off with the overdone texture of the AFV CLUB M60-series kits; not a problem for me, anyway- Your comments..?


The AFV Club kit is excellent. The texture on the turret has been toned down a bit, that on the hull is still very rough. But other than that it is the best M60A2 on the market - far ahead of any other.
M4A1Sherman
Visit this Community
New York, United States
Joined: May 02, 2013
KitMaker: 4,403 posts
Armorama: 4,078 posts
Posted: Thursday, August 18, 2016 - 08:19 PM UTC

Quoted Text


Quoted Text


I understand that the AFV CLUB M60A2 is a better starting point than the DRAGON kit- I know some people are a bit put-off with the overdone texture of the AFV CLUB M60-series kits; not a problem for me, anyway- Your comments..?


The AFV Club kit is excellent. The texture on the turret has been toned down a bit, that on the hull is still very rough. But other than that it is the best M60A2 on the market - far ahead of any other.


Thank You, Pawel!
MattSz
Visit this Community
California, United States
Joined: January 06, 2013
KitMaker: 98 posts
Armorama: 98 posts
Posted: Wednesday, August 31, 2016 - 12:45 PM UTC
Finish
Last night I finished Starship assembling.All straight form the box, I added only wire to the search light.
I really like the look of this tank


Cantstopbuyingkits
Visit this Community
European Union
Joined: January 28, 2015
KitMaker: 2,099 posts
Armorama: 1,920 posts
Posted: Wednesday, August 31, 2016 - 06:13 PM UTC
Didn't they put this turret on a couple of M48s?
avenue
Visit this Community
Philippines
Joined: May 25, 2013
KitMaker: 544 posts
Armorama: 542 posts
Posted: Wednesday, August 31, 2016 - 07:10 PM UTC
kit is excellent! older tamiya kit lack detail.
 _GOTOTOP