Utrecht, Netherlands
Joined: December 14, 2006
KitMaker: 2,679 posts
Armorama: 313 posts
Posted: Monday, May 23, 2016 - 01:48 PM UTC
North Carolina, United States
Joined: September 16, 2004
KitMaker: 1,281 posts
Armorama: 1,222 posts
Posted: Monday, May 23, 2016 - 05:19 PM UTC
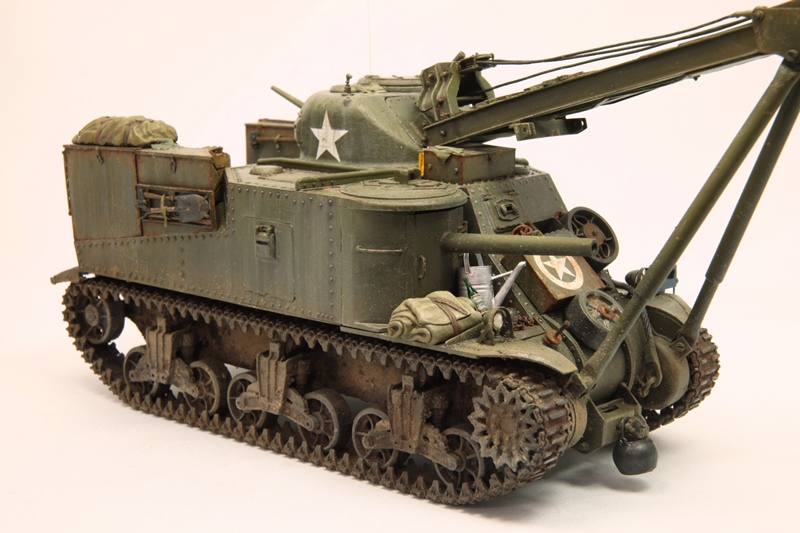
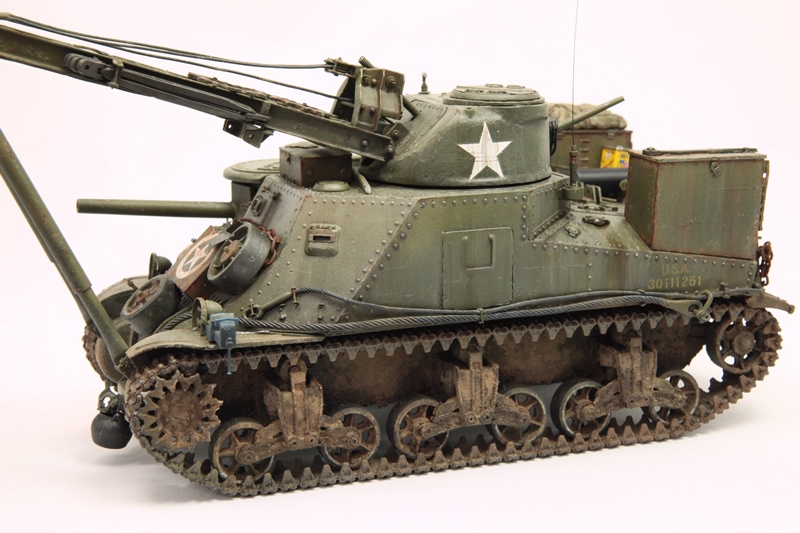
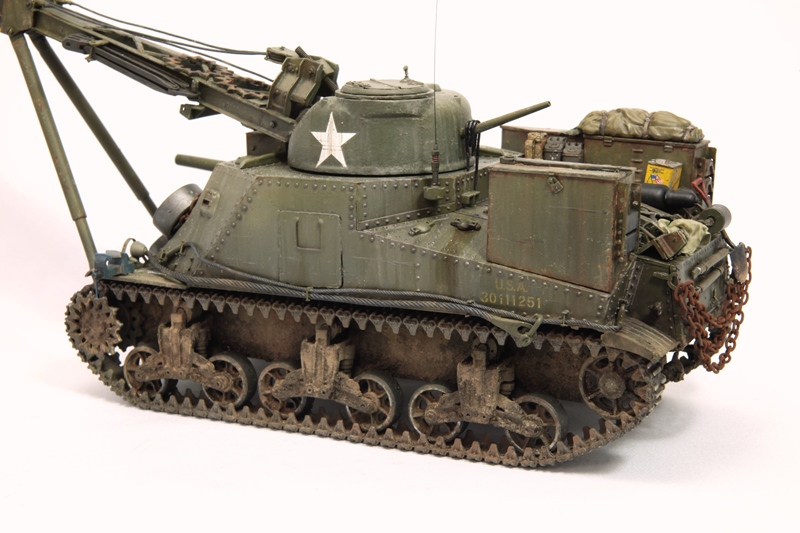
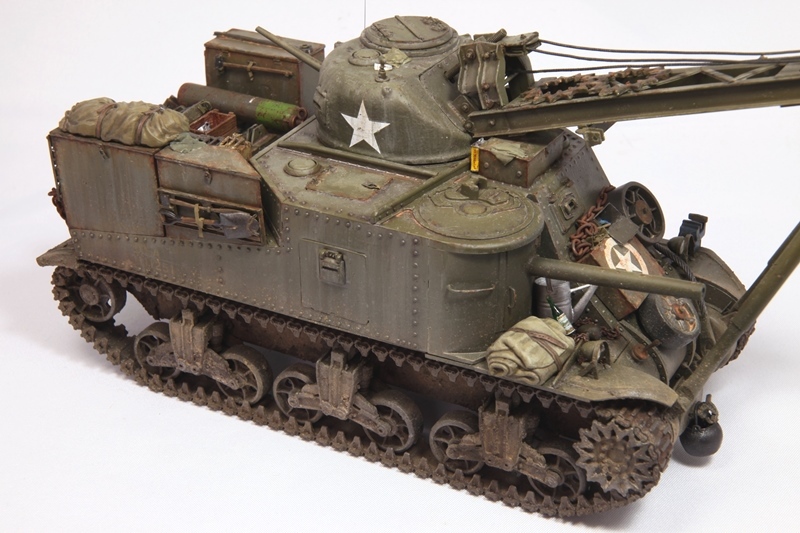
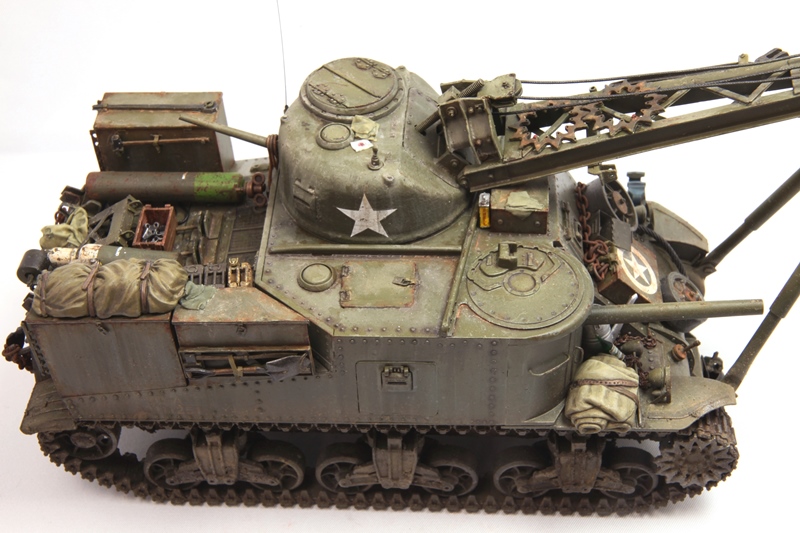
Looks great!! Have wanted to do one of these for years now. Really like the weathering and the accessories.
South Africa
Joined: July 22, 2015
KitMaker: 72 posts
Armorama: 67 posts
Posted: Monday, May 23, 2016 - 06:06 PM UTC
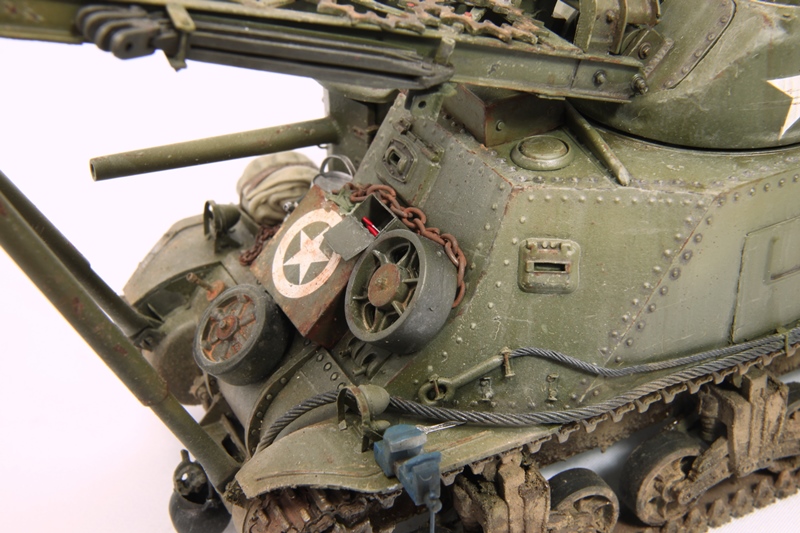
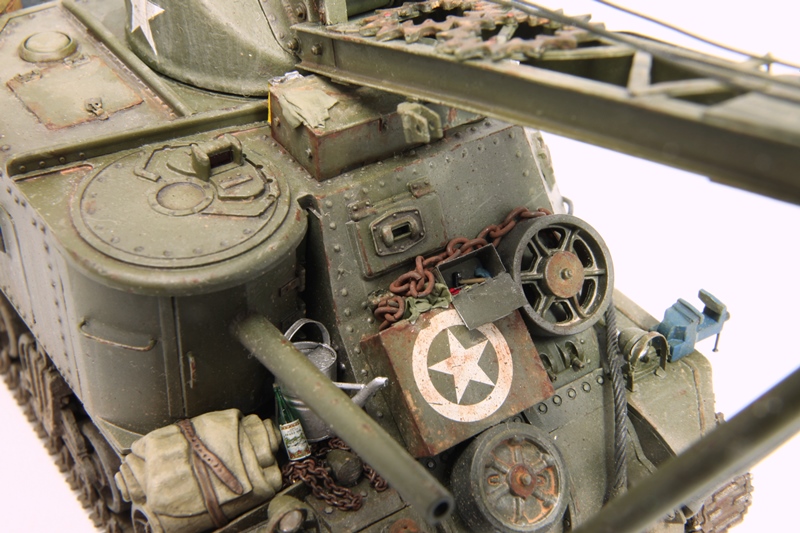
Martin, that is simply incredible. I particularly like the weathering on the bottles on the back. Top class!!
Utrecht, Netherlands
Joined: December 14, 2006
KitMaker: 2,679 posts
Armorama: 313 posts
Posted: Friday, May 27, 2016 - 04:59 PM UTC
Thnx guys

Virginia, United States
Joined: February 05, 2002
KitMaker: 6,149 posts
Armorama: 4,573 posts
Posted: Friday, May 27, 2016 - 05:11 PM UTC
DJ Judge
COL (R), USA
"Tanker Boots do not a Tanker Make."
England - East Anglia, United Kingdom
Joined: May 25, 2003
KitMaker: 416 posts
Armorama: 342 posts
Posted: Friday, May 27, 2016 - 05:33 PM UTC
Outstanding! Loving the grimy filthy look,Good Work Fella!

New York, United States
Joined: May 02, 2013
KitMaker: 4,403 posts
Armorama: 4,078 posts
Posted: Friday, May 27, 2016 - 06:16 PM UTC
Quoted Text
Thnx guys
VERY NICE, indeed!!! I built an M31 a few years back, using the CALIBER 35 Conversion set, with the ACADEMY M3 kit as a donor.
I also built an M32B2 ARV, using the Tasca M32B1 ARV kit as a donor. I used an extra early-style M4A2 Lower Hull, with an Initial Production 56-degree M4A3 Upper Hull, (the 47-degree Hull was not used on -B2 ARVs); I got these pieces from FORMATIONS, and made the necessary changes to accurately portray this ARV. I used a lot of the parts from the TASCA -B1; the Crane assembly, which I had to modify to make it fit the "welded" Initial 56-degree Upper Hull. I also used the Stowage Boxes and all of the appropriate parts from the TASCA kit to "flesh it out", including the entire Suspension assembly. I'm quite satisfied with the results in both of my ARVs, which came out to be very similar to Martin's M31 build, in their overall appearance...
Again, VERY NICELY EXECUTED, MARTIN!!!

Oklahoma, United States
Joined: November 08, 2006
KitMaker: 217 posts
Armorama: 117 posts
Posted: Friday, May 27, 2016 - 06:30 PM UTC
Looks very good. These vehicles were workhorses. They were always in need, and in short supply. They didn't get the TLC and yours looks very appropriate.

Ontario, Canada
Joined: July 20, 2002
KitMaker: 281 posts
Armorama: 226 posts
Posted: Monday, May 30, 2016 - 06:04 PM UTC
Hi Martin
I love what you have done with this conversion and especially the weathering and all the stuff you loaded on it. Congratulation on an excellent piece of armor.
I scratch built one over 15 years ago using the Tamiya kit. I sill have some fine details to add on to call it finished.
If you like to see it check out my web page,
http://s1301.photobucket.com/user/scratch-builder/library/?sort=2&page=1Cheers.
Ralph
Utrecht, Netherlands
Joined: December 14, 2006
KitMaker: 2,679 posts
Armorama: 313 posts
Posted: Wednesday, June 01, 2016 - 11:47 PM UTC
Thnx Guys
@ Ralph, wow your scatch build is fantasic, all it needs is a realy nice paintjob. I love you LVT series aswell.
I could only dream of building something like that.
Martin
New Jersey, United States
Joined: September 26, 2006
KitMaker: 857 posts
Armorama: 811 posts
Posted: Thursday, June 02, 2016 - 12:16 AM UTC

#521
Kentucky, United States
Joined: April 13, 2011
KitMaker: 9,465 posts
Armorama: 8,695 posts
Posted: Thursday, June 02, 2016 - 12:41 AM UTC
WOW! Based on your Photobucket Scratch Builder website you run a much bigger chop shop than I ever dreamed of doing. Also it looks like you buy even more copies of the Dragon Wagon kit!
Much Respect. Thanks for sharing.
Mike - "the Chassis Man"
p.s. And you use the same brand of "Transatlantic (Plus Models) Oil" as I do!

Dublin, Ireland
Joined: November 27, 2004
KitMaker: 6,048 posts
Armorama: 4,619 posts
Posted: Thursday, June 02, 2016 - 02:17 AM UTC
Pat
work to become not to acquire
Ohio, United States
Joined: September 14, 2010
KitMaker: 135 posts
Armorama: 130 posts
Posted: Thursday, June 02, 2016 - 04:42 AM UTC
Great work, I could only hope to do this at some time in my future.
Ontario, Canada
Joined: July 20, 2002
KitMaker: 281 posts
Armorama: 226 posts
Posted: Sunday, June 05, 2016 - 05:31 PM UTC
Thank you very much for the compliment Martin and Michael.
Martin, if you do not mind I'm going to keep your pictures for reference. I love scratch building especially LVT's and painting is not my strongest ability.
Michael, I have followed your scratch builds an love your work and yes I have 3 x Dragon Wagon kit.
Soon I'm going to post pictures of my latest project the tracked wagons for the 240mm Howitzer that where used in the Philippines during WW2 and later the start of the guns and carriage, this is going to be a long project.
Cheers,
Ralph
#521
Kentucky, United States
Joined: April 13, 2011
KitMaker: 9,465 posts
Armorama: 8,695 posts
Posted: Monday, June 06, 2016 - 12:01 AM UTC
Quoted Text
Soon I'm going to post pictures of my latest project the tracked wagons for the 240mm Howitzer that where used in the Philippines during WW2 and later the start of the guns and carriage, this is going to be a long project.
Cheers,
Ralph
That idea gives me goose bumps. With all the big WWI and WWII gun models being turned out these days it is high time the US 240mm got it's turn. I have always wanted to build the early designed transport chassis based on using Stuart and Sherman tracks and return rollers.
Cannot wait to see you start that project! Mike
#521
Kentucky, United States
Joined: April 13, 2011
KitMaker: 9,465 posts
Armorama: 8,695 posts
Posted: Monday, June 06, 2016 - 08:30 PM UTC
Ralph, do do you have scale drawings on either the big gun or the transport chassis ? I have found photos of both but never anything I felt I could start a build from.
#521
Kentucky, United States
Joined: April 13, 2011
KitMaker: 9,465 posts
Armorama: 8,695 posts
Posted: Monday, June 06, 2016 - 08:44 PM UTC
The minute I saw this photo in an Ampersand book I started thinking maybe I could scratch build the two transport chassis and hitch them behind my Mack NO.
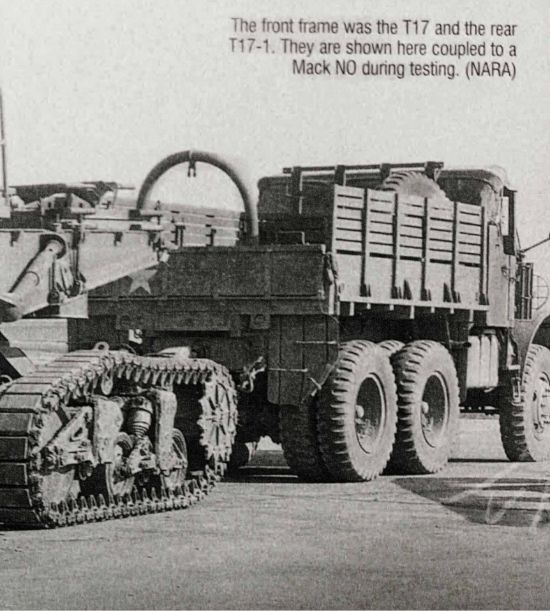 Ampersand Publishing photo - Shown here for discussion purposes only
New York, United States
Joined: May 02, 2013
KitMaker: 4,403 posts
Armorama: 4,078 posts
Posted: Thursday, June 09, 2016 - 07:55 AM UTC
Quoted Text
The minute I saw this photo in an Ampersand book I started thinking maybe I could scratch build the two transport chassis and hitch them behind my Mack NO.
Ampersand Publishing photo - Shown here for discussion purposes only
Mike- Most photos that I've seen of the US 240mm Howitzer show that the Howitzer was broken down into TWO separate entities; i.e the Trails and Gun Cradle in one WHEELED set, and the long, heavy Barrel in the SECOND wheeled set, as opposed to the Tracked set-up shown in your photo. These two sets were towed by TWO M4 Artillery Tractors or M5 High-Speed Tractors, or Two Mack NOs. I'd PURELY LOVE to see a PLASTIC kit of the 240mm Howitzer, with a choice "deployed position" or in "travel mode"- AND new plastic kits of the M5 High Speed Tractor, and of course, the Mack NO...
#521
Kentucky, United States
Joined: April 13, 2011
KitMaker: 9,465 posts
Armorama: 8,695 posts
Posted: Thursday, June 09, 2016 - 08:51 AM UTC
Dennis, as I understand it, before the creation of the multiple wheeled transport chassis for the 240mm the Army first experimented with multiple towed tracked chassis based on both the Stuart and the Sherman running gear,
Two greatly modified Stuart units carried the gun trails. That is what is partially seen in the Mack NO photo above. Then a Sherman tracked unit carried the gun itself.
You will notice that the trails, when together form a smooth inclined ramp. During assembly of the gun the Sherman chassis would literally be winched up this ramp to somehow "deposit" the gun barrel trunnions into their supports on the gun base.
I believe Ampersand Publishing did an "Allied-Axis" book that illustrated the process.
#521
Kentucky, United States
Joined: April 13, 2011
KitMaker: 9,465 posts
Armorama: 8,695 posts
Posted: Thursday, June 09, 2016 - 05:33 PM UTC
Correction: the wheeled multiple chassis for the 240mm gun came first! The tracked chassis came later in an attempt to reduce ground pressure when moving the massive 20 ton gun trails/base.
This is all illustrated in the "Allied-Axis" book #14 from Ampersand. Amazing photographs!
Myanmar
Joined: March 05, 2004
KitMaker: 4,011 posts
Armorama: 1,498 posts
Posted: Wednesday, December 13, 2017 - 08:55 AM UTC
i watched a scale plastic figure crawl along the edge . . . of an exacto blade . . . that's my dream , it's my nightmare . . . . . . . crawling , slithering . . . . . along the edge . . . . . . of an exacto . . . . . blade . . . . and surviving
North Carolina, United States
Joined: September 16, 2004
KitMaker: 1,281 posts
Armorama: 1,222 posts
Posted: Wednesday, December 13, 2017 - 08:49 PM UTC
I remember this build. Wish he'd repost those images. Very hard to make out the small details from the thumbnails.
Utrecht, Netherlands
Joined: December 14, 2006
KitMaker: 2,679 posts
Armorama: 313 posts
Posted: Friday, December 22, 2017 - 05:52 PM UTC
thumpnails are working again.
thanks for showing intrest in my project
North Carolina, United States
Joined: September 16, 2004
KitMaker: 1,281 posts
Armorama: 1,222 posts
Posted: Friday, December 22, 2017 - 07:55 PM UTC
Quoted Text
thumpnails are working again.
thanks for showing intrest in my project
Thank you for fixing those. This time I remembered to save those pictures to my reference file.


