Hosted by Darren Baker
Meng Abrams TUSK II

zorrolobo

Joined: May 31, 2013
KitMaker: 1,457 posts
Armorama: 1,440 posts

Posted: Tuesday, October 04, 2016 - 03:00 AM UTC
Nice!

SpaceXhydro

Joined: March 13, 2015
KitMaker: 418 posts
Armorama: 235 posts

Posted: Tuesday, October 04, 2016 - 03:18 AM UTC
wow, nicely done interior. i might use these pictures for references for a possible future project.

Bricksy1969

Joined: September 19, 2006
KitMaker: 262 posts
Armorama: 251 posts

Posted: Tuesday, October 04, 2016 - 01:08 PM UTC
Thanks guys - its been a pleasure to build

Bricksy1969

Joined: September 19, 2006
KitMaker: 262 posts
Armorama: 251 posts

Posted: Tuesday, October 11, 2016 - 03:06 PM UTC
Thirian24

Joined: September 30, 2015
KitMaker: 2,493 posts
Armorama: 2,344 posts

Posted: Tuesday, October 11, 2016 - 03:40 PM UTC
Very nice!

Bricksy1969

Joined: September 19, 2006
KitMaker: 262 posts
Armorama: 251 posts

Posted: Wednesday, October 12, 2016 - 08:36 PM UTC
Thanks - its now on with some stowage

Bricksy1969

Joined: September 19, 2006
KitMaker: 262 posts
Armorama: 251 posts

Posted: Monday, October 17, 2016 - 02:45 PM UTC

bison126

Joined: June 10, 2004
KitMaker: 5,329 posts
Armorama: 5,204 posts

Posted: Monday, October 17, 2016 - 05:03 PM UTC

Nice job Paul but the side protection should be parallel to the side bin like this.

Loos like Meng did a great job too.

Bricksy1969

Joined: September 19, 2006
KitMaker: 262 posts
Armorama: 251 posts

Posted: Monday, October 17, 2016 - 05:29 PM UTC
Thanks Olivier
I wanted to show something a little different with the side armour as I will be showing this with the crew decanted.
Its hinged to be pushed back
I wanted to show something a little different with the side armour as I will be showing this with the crew decanted.
Its hinged to be pushed back


HeavyArty


Joined: May 16, 2002
KitMaker: 17,694 posts
Armorama: 13,742 posts

Posted: Monday, October 17, 2016 - 05:39 PM UTC
That is not really a hinge, but just a positionable connection point between the two panels. The side armor panel is bolted in place either straight back or angled behind the loader's hatch opening and does not move. The small L bracket at the aft end has a bolt through it that attaches to a welded point on top of the turret. In the position you have it, it doesn't really provide any protection to the loader and it would not allow the storage bin to open. It may look interesting, but is not accurate.

Bricksy1969

Joined: September 19, 2006
KitMaker: 262 posts
Armorama: 251 posts

Posted: Monday, October 17, 2016 - 05:55 PM UTC
Quoted Text
That is not a hinge, but just a connection point between the two panels. The side armor panel is bolted in place straight back and does not move. The small L bracket at the aft end is a bolt that attaches to a welded point on top of the turret. It may look interesting, but is not accurate.
I bow down to your superior knowledge
 I will change later
Bricksy1969

Joined: September 19, 2006
KitMaker: 262 posts
Armorama: 251 posts

Posted: Tuesday, October 18, 2016 - 12:35 PM UTC
Thirian24

Joined: September 30, 2015
KitMaker: 2,493 posts
Armorama: 2,344 posts

Posted: Tuesday, October 18, 2016 - 01:41 PM UTC
I must say, you've done a beautiful job so far. That turret looks amazing. Hopefully my TUSK II looks half as nice.

HeavyArty


Joined: May 16, 2002
KitMaker: 17,694 posts
Armorama: 13,742 posts

Posted: Tuesday, October 18, 2016 - 05:47 PM UTC
Looks much better. The tarp is more visually appealing as well.

Bricksy1969

Joined: September 19, 2006
KitMaker: 262 posts
Armorama: 251 posts

Posted: Thursday, October 20, 2016 - 01:08 PM UTC
leopard122

Joined: August 26, 2016
KitMaker: 417 posts
Armorama: 411 posts

Posted: Thursday, October 20, 2016 - 07:04 PM UTC
Very beautiful kit you have done... Have been very fun to follow your build... Looking forward to see more pictures of the model.. 


Bricksy1969

Joined: September 19, 2006
KitMaker: 262 posts
Armorama: 251 posts

Posted: Sunday, October 23, 2016 - 01:18 PM UTC

Recon

Joined: October 19, 2002
KitMaker: 1,571 posts
Armorama: 764 posts

Posted: Sunday, October 23, 2016 - 06:57 PM UTC
Very well done. Do you have a website for the chair and cones?
Mike
Mike

Bricksy1969

Joined: September 19, 2006
KitMaker: 262 posts
Armorama: 251 posts

Posted: Sunday, October 23, 2016 - 07:18 PM UTC
Cones are from Accurate Armour
https://accurate-armour.com/
Chairs are from Replikant.
https://www.replikanttechnologies.com/gb/dr-1-35-scale/26-plastic-chairs.html
https://accurate-armour.com/
Chairs are from Replikant.
https://www.replikanttechnologies.com/gb/dr-1-35-scale/26-plastic-chairs.html
youngtiger1

Joined: May 14, 2008
KitMaker: 534 posts
Armorama: 344 posts

Posted: Monday, October 24, 2016 - 07:00 AM UTC
Nice work Paul. Everything about it simply superb. I had seen a pic of M1A1 or A2 with arm chair with wheels (like the one everyone has for their computer desk) on it's back. Anyway, great build 


Bricksy1969

Joined: September 19, 2006
KitMaker: 262 posts
Armorama: 251 posts

Posted: Monday, October 24, 2016 - 12:47 PM UTC

Bricksy1969

Joined: September 19, 2006
KitMaker: 262 posts
Armorama: 251 posts

Posted: Tuesday, October 25, 2016 - 04:20 PM UTC

Bricksy1969

Joined: September 19, 2006
KitMaker: 262 posts
Armorama: 251 posts

Posted: Sunday, October 30, 2016 - 01:56 PM UTC
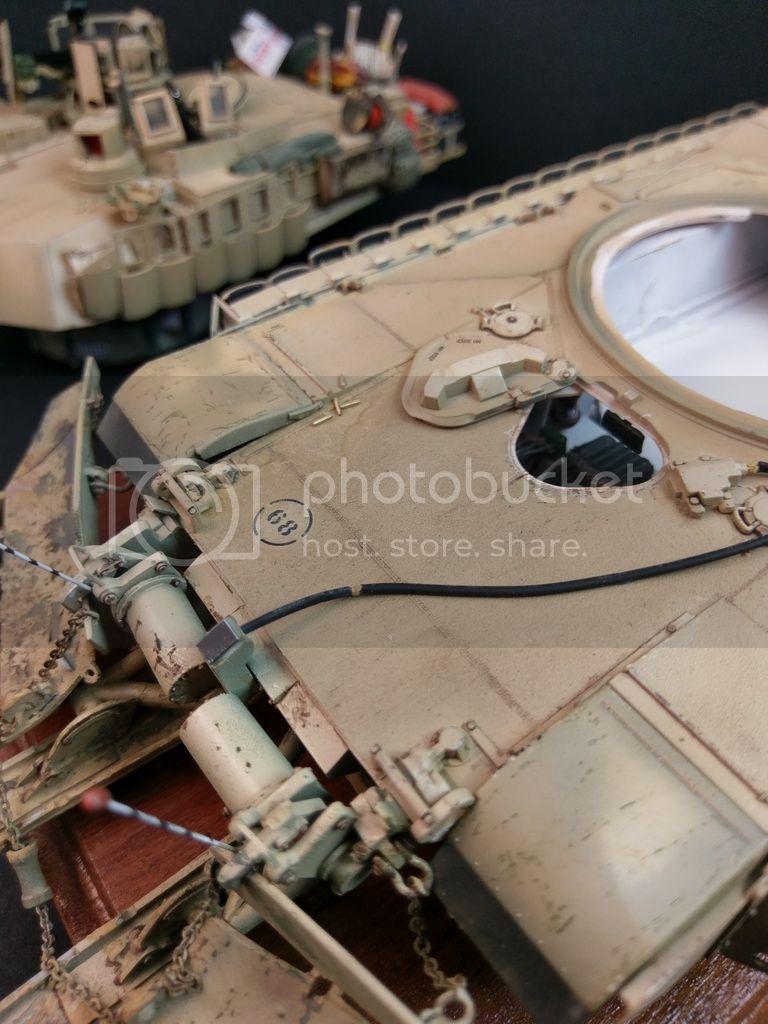
Finally got this finished over the weekend.
In short a brilliant kit to make and finish Highly recommended.


 [IMG]http://i733.photobucket.com/albums/ww335/Bricksy69/IMAG2316.jpg" BORDER="0">MG]


In short a brilliant kit to make and finish Highly recommended.


 [IMG]http://i733.photobucket.com/albums/ww335/Bricksy69/IMAG2316.jpg" BORDER="0">MG]

Thirian24

Joined: September 30, 2015
KitMaker: 2,493 posts
Armorama: 2,344 posts

Posted: Sunday, October 30, 2016 - 04:55 PM UTC
Very nice! Great work!
youngtiger1

Joined: May 14, 2008
KitMaker: 534 posts
Armorama: 344 posts

Posted: Monday, October 31, 2016 - 12:53 AM UTC
Paul, that looks awesome. The interior sure pops up out of that open hatch. I love it 

 |


