Sd. kfz 7/1 z 2 cm Flak 38 - Dragon 1:35
Wojewodztwo Slaskie, Poland
Joined: March 26, 2015
KitMaker: 255 posts
Armorama: 254 posts
Posted: Friday, May 19, 2017 - 01:45 PM UTC
Hello,
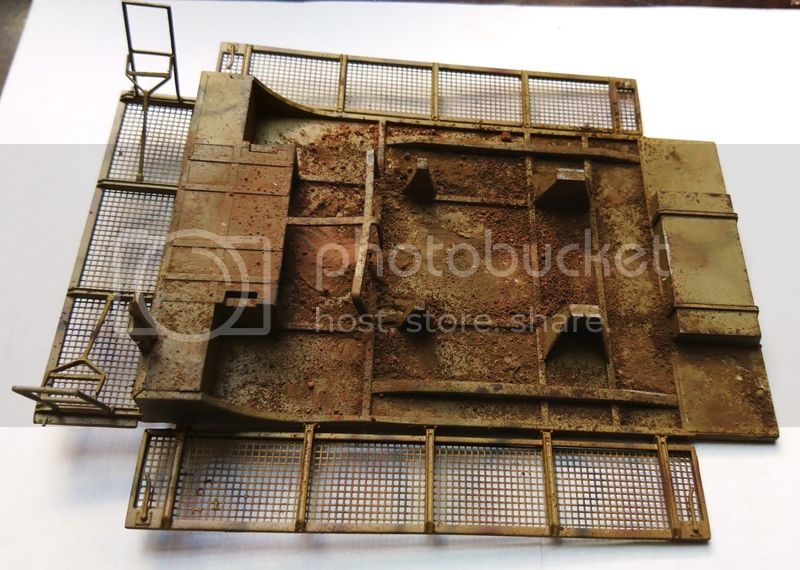
Another weathering steps was completed
The platform

Platform with the mounting of the Flak

And with the Flak itself

At the moment the rear part of the vehicle looks like that:


Nil satis nisi Optimus :)
Wojewodztwo Slaskie, Poland
Joined: March 26, 2015
KitMaker: 255 posts
Armorama: 254 posts
Posted: Monday, May 22, 2017 - 01:16 AM UTC
Nil satis nisi Optimus :)

#424
Queensland, Australia
Joined: April 23, 2015
KitMaker: 4,648 posts
Armorama: 2,248 posts
Posted: Monday, May 22, 2017 - 02:03 AM UTC
"Artillery adds dignity, to what would otherwise be an ugly brawl."
Frederick The Great
Wojewodztwo Slaskie, Poland
Joined: March 26, 2015
KitMaker: 255 posts
Armorama: 254 posts
Posted: Monday, May 22, 2017 - 12:31 PM UTC
Nil satis nisi Optimus :)
England - East Midlands, United Kingdom
Joined: January 17, 2006
KitMaker: 1,694 posts
Armorama: 1,584 posts
Posted: Monday, May 22, 2017 - 03:15 PM UTC
That is a lovely build. Just the right amount of weathering and really nicely done. I built the Tamiya version with the Flak 37 and really enjoyed building it as it's an interesting vehicle. Any plans to install a crew?
Nothing is so exhilarating in life as to be shot at with no result.
- Winston Churchill
Wojewodztwo Slaskie, Poland
Joined: March 26, 2015
KitMaker: 255 posts
Armorama: 254 posts
Posted: Wednesday, May 24, 2017 - 11:15 AM UTC
Not sure I'll do any crew or vigniette with this veicle.
Nil satis nisi Optimus :)
New South Wales, Australia
Joined: May 04, 2016
KitMaker: 1,476 posts
Armorama: 1,463 posts
Posted: Thursday, May 25, 2017 - 08:53 AM UTC
Wojewodztwo Slaskie, Poland
Joined: March 26, 2015
KitMaker: 255 posts
Armorama: 254 posts
Posted: Thursday, May 25, 2017 - 11:23 AM UTC
Hello Tim,
I just fixed this and a left side armor plate which was little too far from the main gun.
Nil satis nisi Optimus :)
Wojewodztwo Slaskie, Poland
Joined: March 26, 2015
KitMaker: 255 posts
Armorama: 254 posts
Posted: Wednesday, June 07, 2017 - 12:27 PM UTC
Nil satis nisi Optimus :)
#521
Kentucky, United States
Joined: April 13, 2011
KitMaker: 9,465 posts
Armorama: 8,695 posts
Posted: Wednesday, June 07, 2017 - 06:07 PM UTC
Beautiful build all-in-all. Great camo and weathering effects!
However hood still looking uneven. Rear driver's side corner of hood is higher than on co-driver's side. Seams are uneven between hood and radiator cowl also between hood and engine side panel.
#521
Kentucky, United States
Joined: April 13, 2011
KitMaker: 9,465 posts
Armorama: 8,695 posts
Posted: Wednesday, June 07, 2017 - 06:27 PM UTC
Another question: Why do you have the spare tire mounted to the back wall of the cab? I admit it looks great as you have it there, but there is already a bracket frame located under the rear end of the gun deck that is intended to hold the spare. The area behind the cab actually has, I believe, a fold down bench seat. Which provides a small, somewhat sheltered area for the gun crew for rest, shelter from the elements as well as some shelter from flying shrapnel.
This area is necessary to be clear and open for proper operation of the ammo loading crew when firing the guns to the rear of the vehicle. Feeding this beast is quite a job when firing at the maximum rate. Adiquate clearance for movement of the gun crew can be an issue here.
Jakarta Raya, Indonesia
Joined: August 22, 2012
KitMaker: 599 posts
Armorama: 527 posts
Posted: Wednesday, June 07, 2017 - 06:55 PM UTC
Nice touch on the interior and engine detail, keep up the good work, mate! Can't wait to see the completed applied camo

Warm regards from Indonesia,
Garry
From A Dream Becomes A Vision
From A Vision Becomes A Reality
(Hiram Maxim)
#521
Kentucky, United States
Joined: April 13, 2011
KitMaker: 9,465 posts
Armorama: 8,695 posts
Posted: Wednesday, June 07, 2017 - 07:36 PM UTC
Crew seat in folded position on un-armored Sd.Kfz. 7 Flakvierling: (Modified Tamiya model)

Spare tire stowage on Sd.Kfz. 7 MWS:*

______________________________________________________________________________________________________
Below is your photo of underbody detail showing spare tire mounting bracket:
 * Exact mounting means of spare tire, to my knowledge, may have varied but tire always carried in this general location, out of the way, not taking up valuable crew space.
 #521
Kentucky, United States
Joined: April 13, 2011
KitMaker: 9,465 posts
Armorama: 8,695 posts
Posted: Wednesday, June 07, 2017 - 08:10 PM UTC
By the way, your model photography is excellent!
Florida, United States
Joined: November 23, 2012
KitMaker: 1,277 posts
Armorama: 1,254 posts
Posted: Wednesday, June 07, 2017 - 09:47 PM UTC
Nicely done indeed!

IPMS number 506
AMPS number 711
bill_c
 Campaigns Administrator
New Jersey, United States
Joined: January 09, 2008
KitMaker: 10,553 posts
Armorama: 8,109 posts
Posted: Wednesday, June 07, 2017 - 10:44 PM UTC
Excellent. My only improvement would be PE tool clamps, especially on the hood where they are so prominent.

Wojewodztwo Slaskie, Poland
Joined: March 26, 2015
KitMaker: 255 posts
Armorama: 254 posts
Posted: Thursday, June 08, 2017 - 11:37 AM UTC
Thanks for Your comments.
The hood gave me some troubles. I noticed that it is not even after painting so I decided to not remove it as it would cause extra damage.
as for the spare tire, I know about storage bracket under the platform but decided to make it some more interesting showing it just on the top of the platform in this sheltered section. Also there is a wooden bench in closed position (see previous posts with foto during my build).
Nil satis nisi Optimus :)