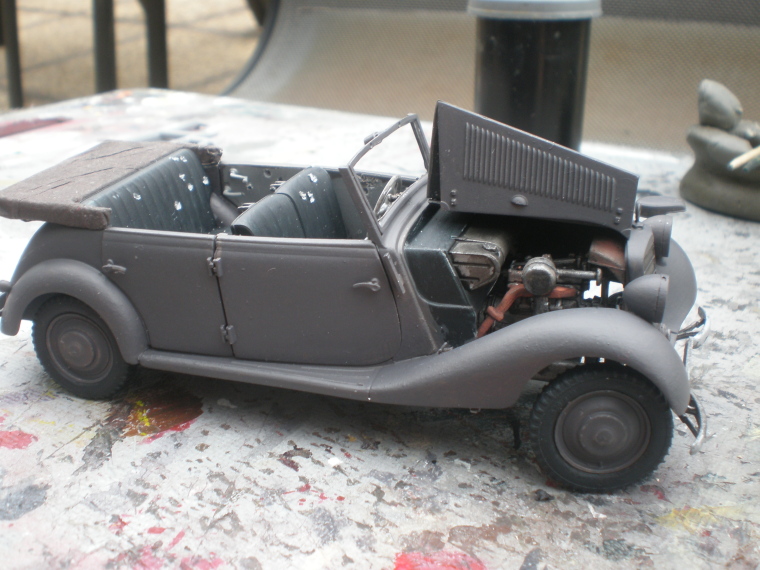
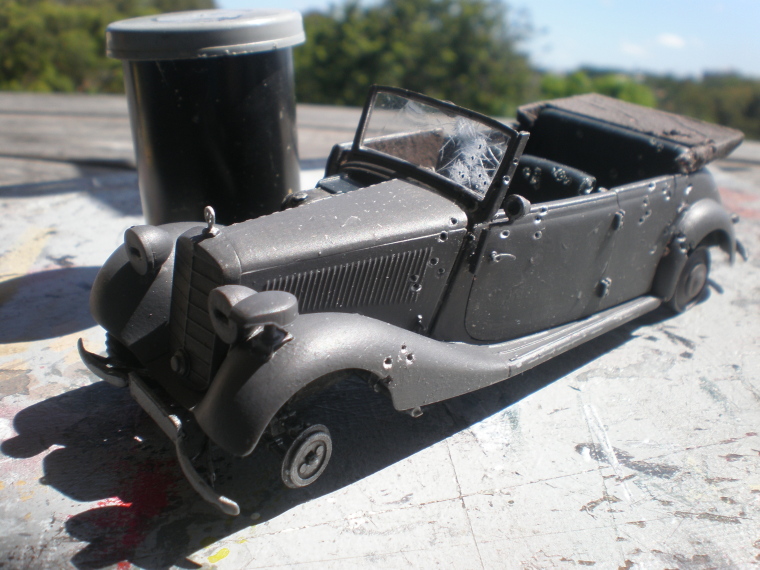
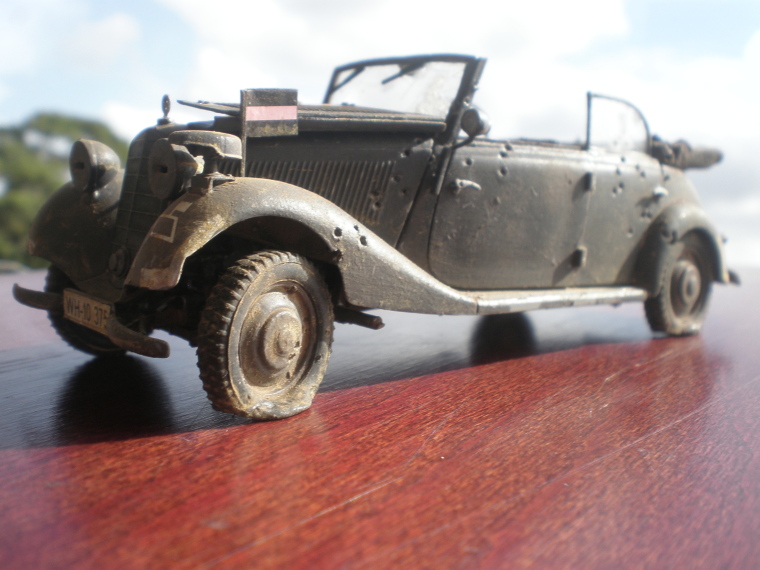
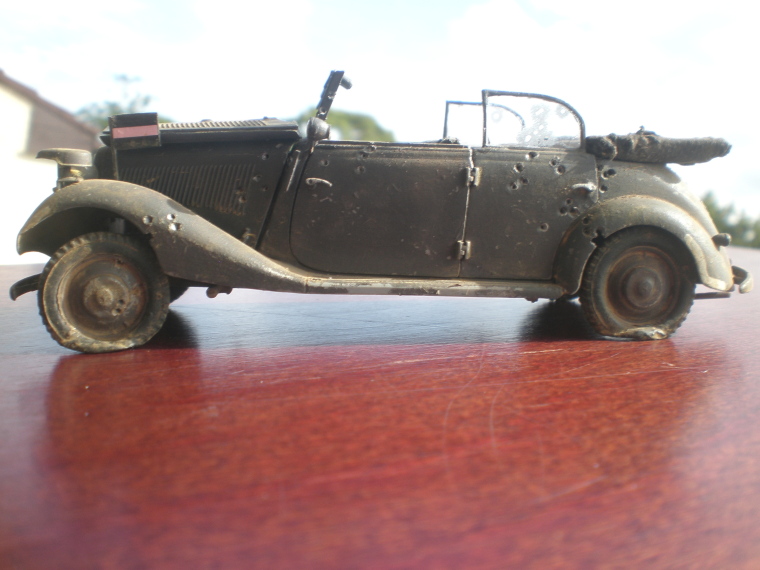
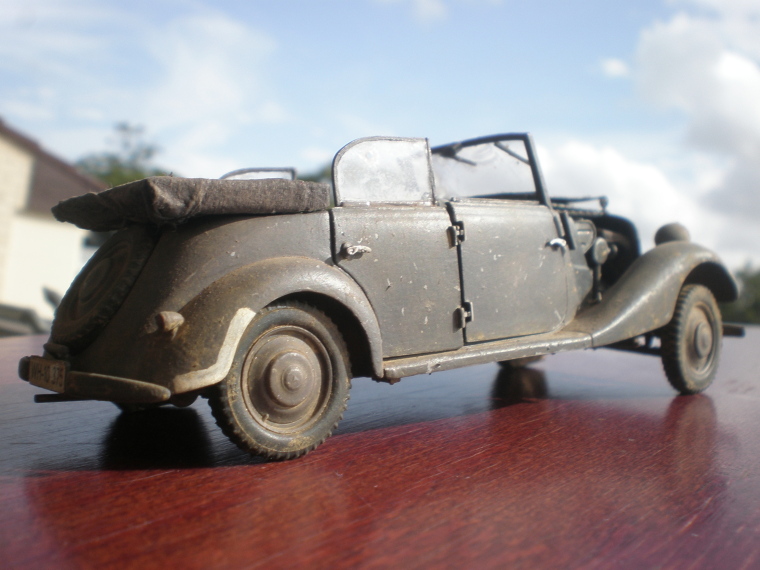
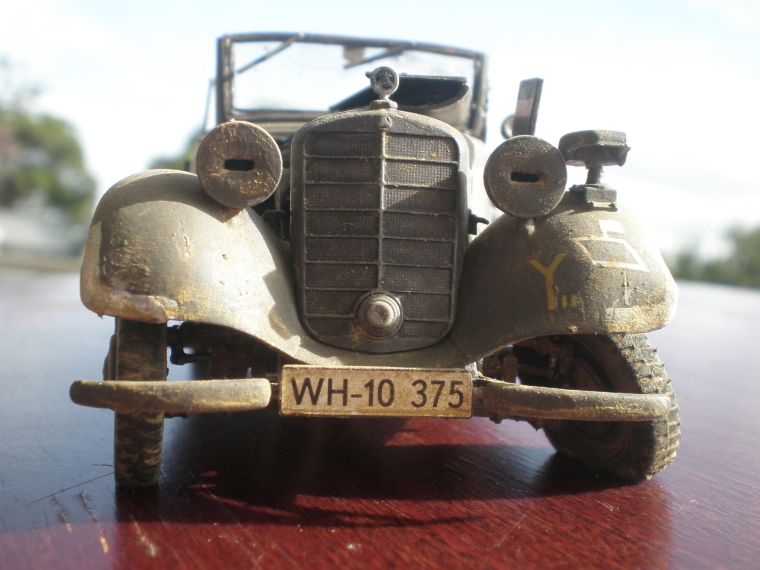
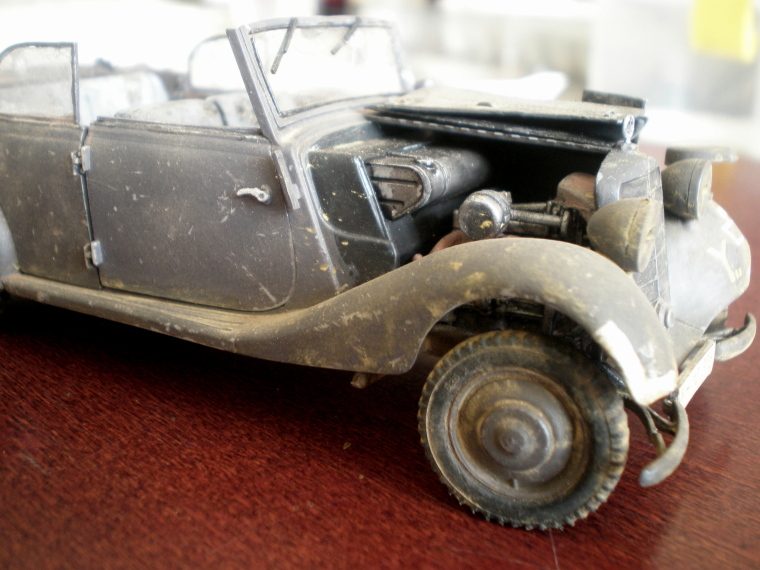
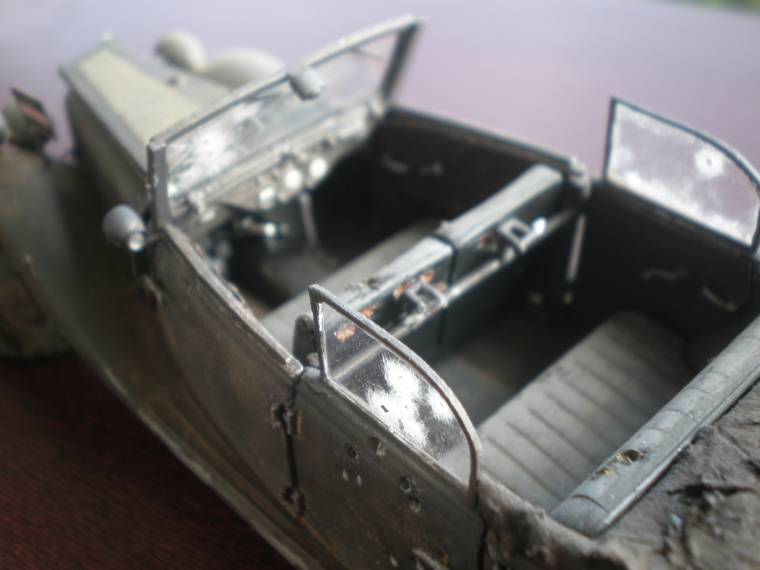
Last week I posted (to the AFV forum) a less-than-whelmed review (“Oh Lord dontcha buy me a Mercedes Benz”) of Master Box’s German Military Car. Even so, I’ve decided the little monster might just redeem itself in a dio of some kind. Just for fun I’m winging it, meaning I don’t have a plan or goal other than it’ll probably depict some aspect of Kursk 1943. The above post showed earlier construction so here’s where it’s at now…
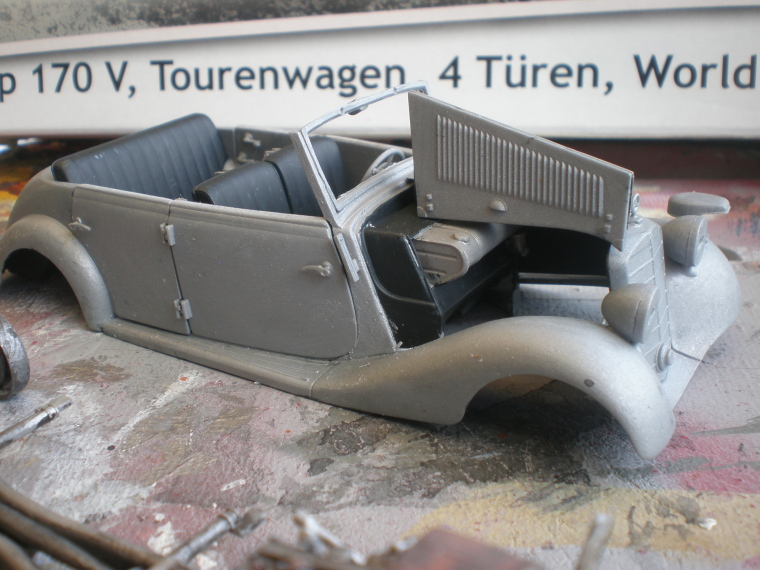
Not much of the engine will be visible even with one side of the hood up, so basic work only.
The fit-problems with the doors mostly resolved…
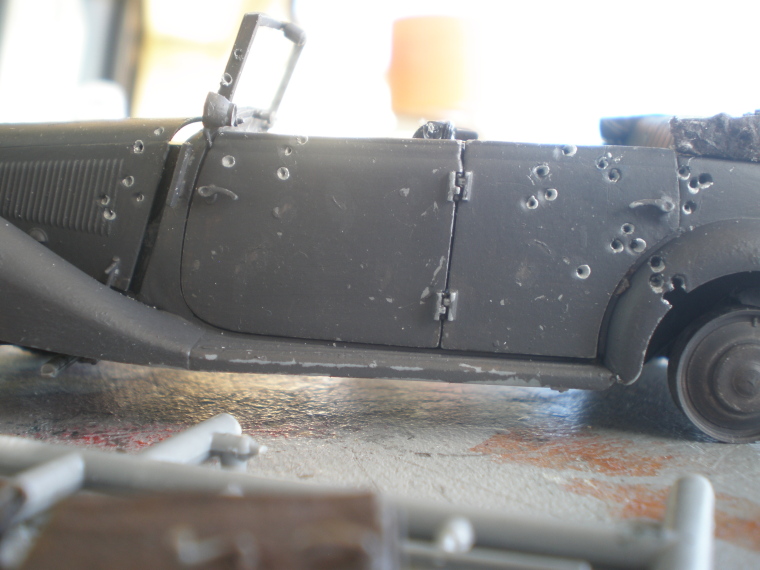
…so it was off to the 1/35th Scale Firing Range to empty a Soviet PPSH41 magazine into it – seemed like an appropriate fate.
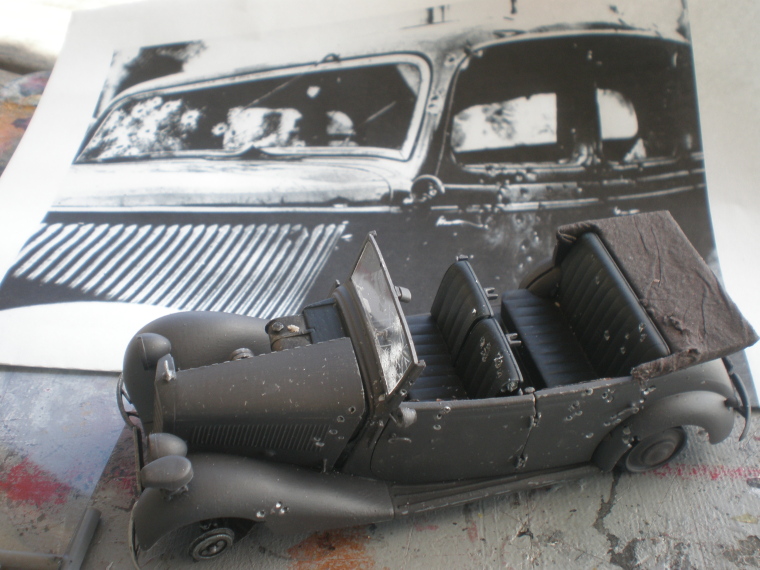
Maybe the holes are slightly over-sized for 7.62mm shells but after painting and re-touching them with “steel” paint they’ll shrink slightly. The inside door panels and seats were fabric so I tried to leave some material “burr”. I was reminded of Prohibition-era images of shot-up gangsters’ cars, and an idea formed – German officers en route to a field conference ambushed by Soviet partisans? I played around with the other doors to suggest that the right-hand side passengers tried to bail out…
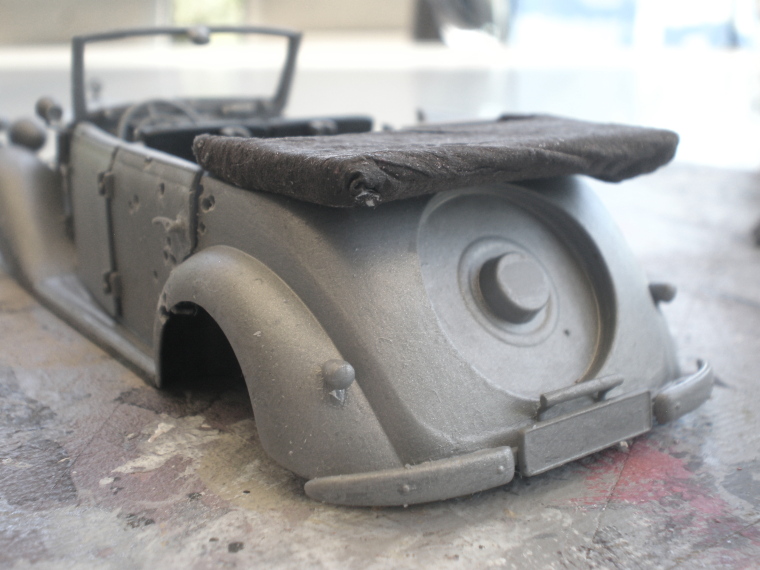
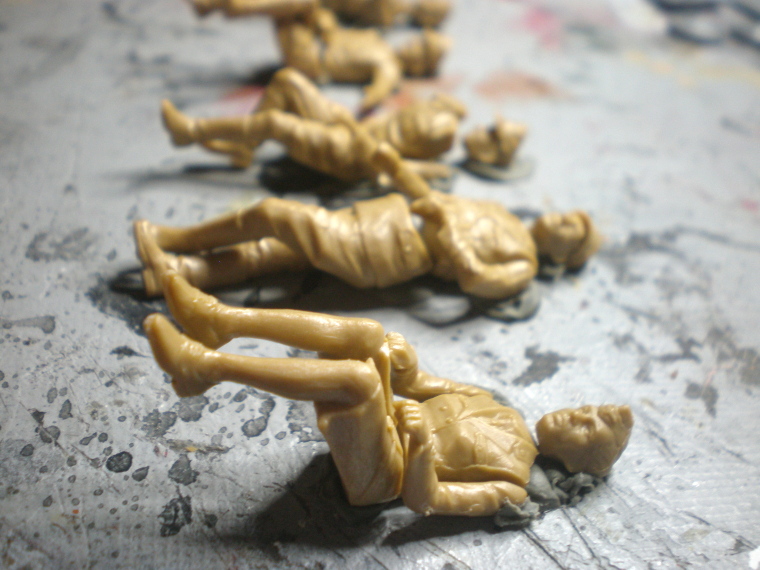
I haven’t a clue which figures might work – the offiziers will probably have to be microwave- or candle-molded to sag into lifeless positions, a tricky proposition. The figures MB unexpectedly provided might be fit for purpose, they’re still on the sprue. I’ve yet to search for standing partisan figures, they’d be checking for plans etc in briefcases and liberating useful spares from the open engine bay…but I’m getting ahead of myself, next I have to deal with the laughably minimalist folded tilt.
Tim
Dioramas
Do you love dioramas & vignettes? We sure do.
Hosted by Darren Baker, Mario Matijasic
Mercedes Type 170 dio – a shot in the dark
Dioramartin
New South Wales, Australia
Joined: May 04, 2016
KitMaker: 1,476 posts
Armorama: 1,463 posts
Joined: May 04, 2016
KitMaker: 1,476 posts
Armorama: 1,463 posts
Posted: Friday, January 13, 2017 - 07:17 PM UTC
jrutman
Pennsylvania, United States
Joined: April 10, 2011
KitMaker: 7,941 posts
Armorama: 7,934 posts
Joined: April 10, 2011
KitMaker: 7,941 posts
Armorama: 7,934 posts
Posted: Friday, January 13, 2017 - 08:00 PM UTC
Great concept for a dio for sure. A lot like the ambush scenario where Heydrich was killed.
J
J
dioman13
Indiana, United States
Joined: August 19, 2007
KitMaker: 2,184 posts
Armorama: 1,468 posts
Joined: August 19, 2007
KitMaker: 2,184 posts
Armorama: 1,468 posts
Posted: Friday, January 13, 2017 - 11:14 PM UTC
Hey Tim, look up ICM's Russian partisans. Two standing and two kneeling. Might just fit the idea you were thinking.
cheyenne
New Jersey, United States
Joined: January 05, 2005
KitMaker: 2,185 posts
Armorama: 1,813 posts
Joined: January 05, 2005
KitMaker: 2,185 posts
Armorama: 1,813 posts
Posted: Friday, January 13, 2017 - 11:47 PM UTC
Great start Tim , love shot up stuff , lookin good , will be watchin .
Blaubar
Rheinland-Pfalz, Germany
Joined: December 15, 2016
KitMaker: 261 posts
Armorama: 246 posts
Joined: December 15, 2016
KitMaker: 261 posts
Armorama: 246 posts
Posted: Tuesday, January 17, 2017 - 02:59 PM UTC
Pretty nice one there so far. The car for sure received a beating^^.
/Stefan
/Stefan
Dioramartin
New South Wales, Australia
Joined: May 04, 2016
KitMaker: 1,476 posts
Armorama: 1,463 posts
Joined: May 04, 2016
KitMaker: 1,476 posts
Armorama: 1,463 posts
Posted: Wednesday, January 18, 2017 - 03:21 PM UTC
Thanks gents…
Jerry – crossed my mind too but Heydrich’s ride was a stretch limo compared to this jalopy. Although thinking about a variation…if these officers were driving at night and pulled over for a comfort stop when ambushed…would Darren let me call it A Sh*t in the Dark?
Bob – thanks for spotting, looks like that ICM set is the only one especially clothes-wise given it’s a summer setting. Now that I’ve searched a bit too I like Corsar’s Red Army Medical Sister (CR35006) in a skirt letting loose with a burp gun – cute, never seen her before but alas this is looking like an aftermath dio. Maybe I can Russify some other-nationality partisan types as extras.
Cheyenne – I guess now I’ll have to put my money where my mouth was on your thread recently, and attempt shattered glass in the windscreen…
Stef – maybe it needs more damage - a second shooter…from a grassy knoll perhaps (don’t get me started, I know what happened & it wasn’t from there), because I’m discovering chassis-to-body fit problems now.
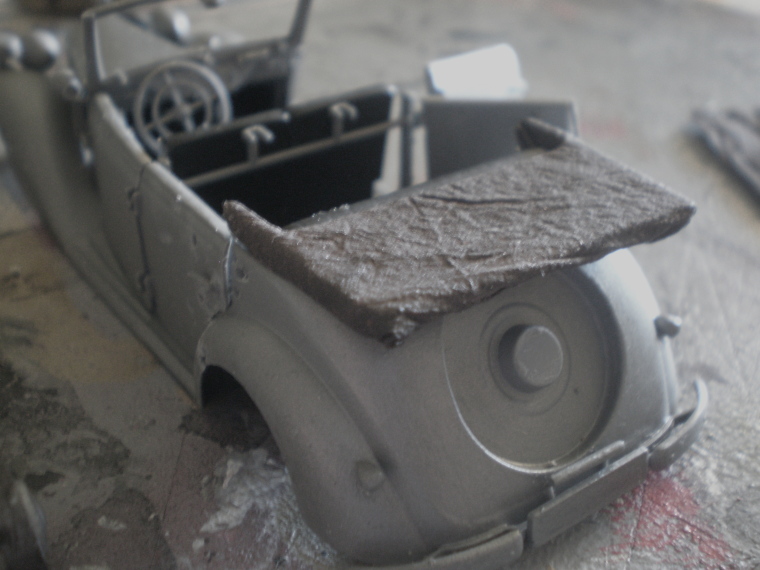
So now to do something/anything with the folded tilt, as seen in the first image at the top of this thread in the bottom right corner, looking like some miniature constructivist sculpture - assumed to be a fitted material cover intended to protect the concertina’d rig. I’m doing this in some detail in case it helps others with a more realistic representation of fabric & material in general.
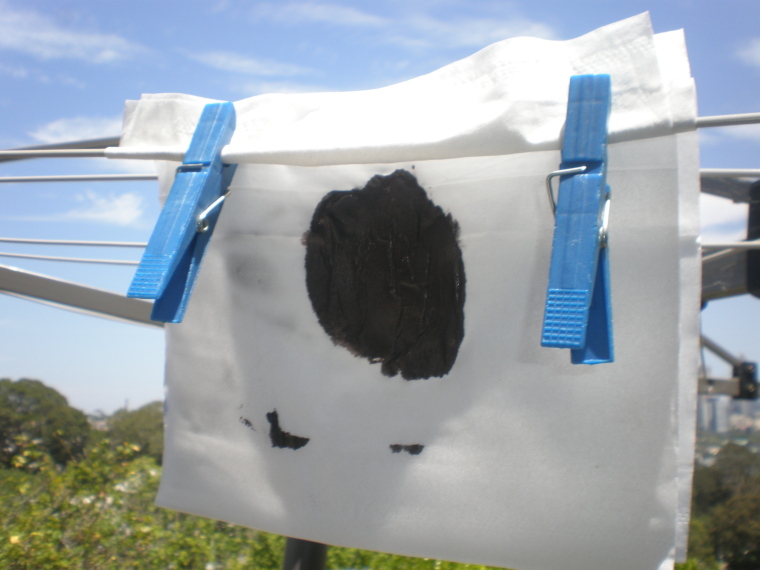
Step 1 – assembling the entire Acrylic Paints Inventory (because every colour/shade/tone in the visible spectrum is here), a worm-let of pigment from each tube seasoned with a dab of Tamiya X21 Flat Base to take away the sheen when dry…maybe a sheen would be more correct (water-proofed material?) but in photos it can look seriously unrealistic.
Step 2 – Add water to taste and stir into a thickish darkish nameless colour. My point being there’s rarely any such thing as “black” (Colour Theory 101) – at least at 1/35th scale. At its darkest it’s usually a dark blue/green/brown (Tamiya’s enamel “Rubber Black” is dark blue-green, used here on the seats as a base coat) and even if the real item started out as near-black, after a couple of years in Russia it’s going to be faded/dirty/dusty. The final shade can always be adjusted later with a wash of paint and/or pastel dust. Besides, student-quality acrylic paints dry a couple of shades darker than when wet so there’s no point obsessing about colour-accuracy yet.
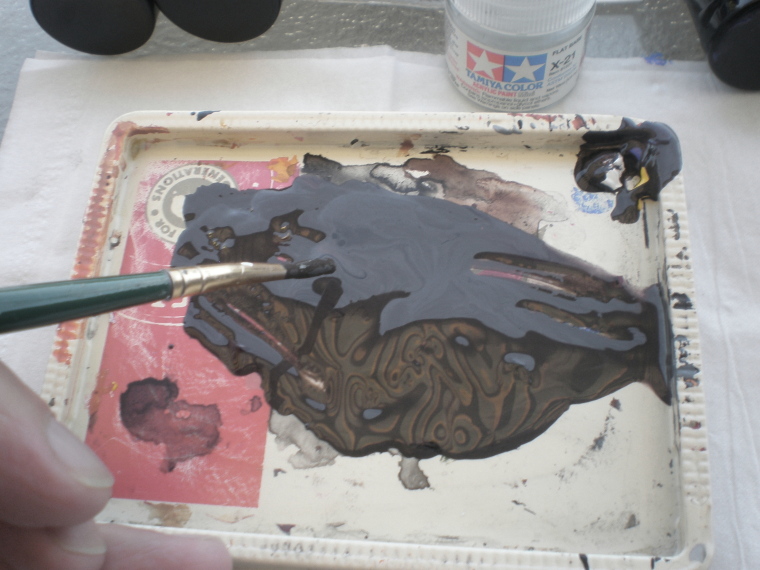
Step 3 – laying 2 sheets of plain 2-ply tissue over the mix and gently pressing with a soft brush until it soaks through, then peeling away and allowing to dry.
(hey it’s high summer here so I can do this for quick-drying)
Step 4 – Releasing The Blob – wrinkling/creases have occurred naturally, enhance-able by re-soaking with clean water and gently working it around with a soft brush.
Step 5 – The blob’s big enough so that if the first attempt failed/tore, I had enough left for another try. Cutting to shape and gluing to the kit's plastic tilt with pva/Elmers - only a very thin layer necessary, otherwise it’ll soak right through and leave shiney patches on the surface.
Step 6 - test-fit…
Needs fine-tuning - and bullet damage - but it’ll do for now.
Maybe this technique has potential for individual figures (particularly large-scale); even a matt/flat topcoat can leave crease-edges unrealistically reflecting light because the paint’s always being applied to a smooth plastic surface. The grain of a single 2-ply tissue breaks up that smoothness – maybe even 1-ply for ultra thin-ness, and although very delicate to handle while wet the acrylic paint will hold it together when dry. A large “bolt” of dried “fabric” could be then tailored to fit arms, legs, torso etc., re-wetted to make it pliable and applied with a thin solution of Elmers. When dry again, adjusting colour-washes can always be applied if necessary. Then open a Bespoke Emporium for the Smaller Man.
Yeah I know it, shouldn’t be mixing my drinks.
Next time: Murk-y paint-job.
Jerry – crossed my mind too but Heydrich’s ride was a stretch limo compared to this jalopy. Although thinking about a variation…if these officers were driving at night and pulled over for a comfort stop when ambushed…would Darren let me call it A Sh*t in the Dark?
Bob – thanks for spotting, looks like that ICM set is the only one especially clothes-wise given it’s a summer setting. Now that I’ve searched a bit too I like Corsar’s Red Army Medical Sister (CR35006) in a skirt letting loose with a burp gun – cute, never seen her before but alas this is looking like an aftermath dio. Maybe I can Russify some other-nationality partisan types as extras.
Cheyenne – I guess now I’ll have to put my money where my mouth was on your thread recently, and attempt shattered glass in the windscreen…
Stef – maybe it needs more damage - a second shooter…from a grassy knoll perhaps (don’t get me started, I know what happened & it wasn’t from there), because I’m discovering chassis-to-body fit problems now.
So now to do something/anything with the folded tilt, as seen in the first image at the top of this thread in the bottom right corner, looking like some miniature constructivist sculpture - assumed to be a fitted material cover intended to protect the concertina’d rig. I’m doing this in some detail in case it helps others with a more realistic representation of fabric & material in general.
Step 1 – assembling the entire Acrylic Paints Inventory (because every colour/shade/tone in the visible spectrum is here), a worm-let of pigment from each tube seasoned with a dab of Tamiya X21 Flat Base to take away the sheen when dry…maybe a sheen would be more correct (water-proofed material?) but in photos it can look seriously unrealistic.
Step 2 – Add water to taste and stir into a thickish darkish nameless colour. My point being there’s rarely any such thing as “black” (Colour Theory 101) – at least at 1/35th scale. At its darkest it’s usually a dark blue/green/brown (Tamiya’s enamel “Rubber Black” is dark blue-green, used here on the seats as a base coat) and even if the real item started out as near-black, after a couple of years in Russia it’s going to be faded/dirty/dusty. The final shade can always be adjusted later with a wash of paint and/or pastel dust. Besides, student-quality acrylic paints dry a couple of shades darker than when wet so there’s no point obsessing about colour-accuracy yet.
Step 3 – laying 2 sheets of plain 2-ply tissue over the mix and gently pressing with a soft brush until it soaks through, then peeling away and allowing to dry.
(hey it’s high summer here so I can do this for quick-drying)
Step 4 – Releasing The Blob – wrinkling/creases have occurred naturally, enhance-able by re-soaking with clean water and gently working it around with a soft brush.
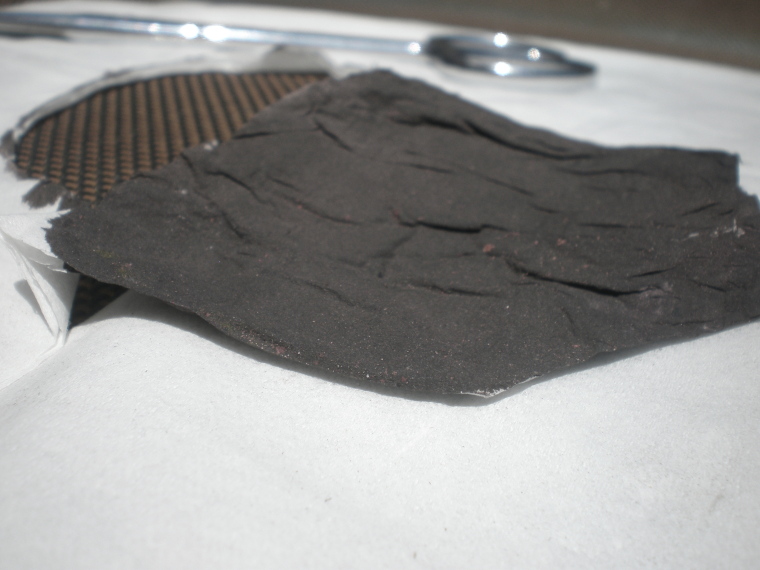
Step 5 – The blob’s big enough so that if the first attempt failed/tore, I had enough left for another try. Cutting to shape and gluing to the kit's plastic tilt with pva/Elmers - only a very thin layer necessary, otherwise it’ll soak right through and leave shiney patches on the surface.
Step 6 - test-fit…
Needs fine-tuning - and bullet damage - but it’ll do for now.
Maybe this technique has potential for individual figures (particularly large-scale); even a matt/flat topcoat can leave crease-edges unrealistically reflecting light because the paint’s always being applied to a smooth plastic surface. The grain of a single 2-ply tissue breaks up that smoothness – maybe even 1-ply for ultra thin-ness, and although very delicate to handle while wet the acrylic paint will hold it together when dry. A large “bolt” of dried “fabric” could be then tailored to fit arms, legs, torso etc., re-wetted to make it pliable and applied with a thin solution of Elmers. When dry again, adjusting colour-washes can always be applied if necessary. Then open a Bespoke Emporium for the Smaller Man.
Yeah I know it, shouldn’t be mixing my drinks.
Next time: Murk-y paint-job.
cheyenne
New Jersey, United States
Joined: January 05, 2005
KitMaker: 2,185 posts
Armorama: 1,813 posts
Joined: January 05, 2005
KitMaker: 2,185 posts
Armorama: 1,813 posts
Posted: Wednesday, January 18, 2017 - 06:22 PM UTC
justsendit
Colorado, United States
Joined: February 24, 2014
KitMaker: 3,033 posts
Armorama: 2,492 posts
Joined: February 24, 2014
KitMaker: 3,033 posts
Armorama: 2,492 posts
Posted: Thursday, January 19, 2017 - 04:27 AM UTC
Hi Tim,
Nice spray-job! You went totally gangsta’ on that scoot!💥💥💥💥💥💥💥💥💥 Lol!
Funny, with all the open-top vehicles from the period … makes me wonder why we’re left to our own devices to get a realistic looking folded-down top, or how you say … “folded tilt.” That’s a new one on me … I like it! 😄
Looking forward to what you do with the tires … or is it “tyres” down there? 🤔
Cheers!
—mike🍺
joepanzer
North Carolina, United States
Joined: January 21, 2004
KitMaker: 803 posts
Armorama: 740 posts
Joined: January 21, 2004
KitMaker: 803 posts
Armorama: 740 posts
Posted: Thursday, January 19, 2017 - 04:43 AM UTC
Butterface
Dioramartin
New South Wales, Australia
Joined: May 04, 2016
KitMaker: 1,476 posts
Armorama: 1,463 posts
Joined: May 04, 2016
KitMaker: 1,476 posts
Armorama: 1,463 posts
Posted: Thursday, January 19, 2017 - 03:33 PM UTC
Hmm thanks Cheyenne but I’d rather stick with what I know more about & leave the La Resistance to the experts – besides, that figurette looks more like Big Arnie in drag (“A Shot in the Thigh”?)…at least it gave JoeP a shot in the arm, or somewhere below the neck.
Mike – well it was called a tilt pre-WW2 hence “full-tilt” meaning headlong speed, although it’s dropped out of most dictionaries now. Tires/tyres, now you’re luring me into an argument about why Americans can’t spell aren’t you? OK I’ll bite & this might surprise some people who give a…
While you certainly can’t spell a bunch of words including tyres (“tires” = becomes fatigued e.g. “He tires of changing…tires”?) it was England’s Dr Johnson back in the late 18th century who compiled the first English Dictionary and to standardise pronunciation he stuck a “U” in words like armor, favor etc. to make them sound more French i.e. cultured. It was intended more as a phonetic device (to iron out the 500+ different English/Scottish/Irish/Welsh accents) than to define spelling. Soon after the French Revolution started & then the Brits went to war against Napoleon, so screw the cultured pronunciation but they forgot to revert to the original generally accepted spelling…which was without the “U”. However before you set off some July 4 fireworks, remember that because you Colonials got into bed with Lafayette and his countrymen in 1776 against the Brits, if anything U guys should be using the “U”! Churchill – half Brit, half Yank – put it best as usual: “Friends divided by a common language”.
Back on topic, spooky you mentioned t*res because yesterday I learned it ain’t so easy to make a realistic flat as I’d thought
joepanzer
North Carolina, United States
Joined: January 21, 2004
KitMaker: 803 posts
Armorama: 740 posts
Joined: January 21, 2004
KitMaker: 803 posts
Armorama: 740 posts
Posted: Thursday, January 19, 2017 - 04:58 PM UTC
yes Americans can't spell.
Apparently we don't know how to vote either.
I like the technique for creating the tarp covering the car top. Learn something new every day!
Apparently we don't know how to vote either.
I like the technique for creating the tarp covering the car top. Learn something new every day!
Dioramartin
New South Wales, Australia
Joined: May 04, 2016
KitMaker: 1,476 posts
Armorama: 1,463 posts
Joined: May 04, 2016
KitMaker: 1,476 posts
Armorama: 1,463 posts
Posted: Saturday, January 21, 2017 - 03:22 PM UTC
Thanks Joe, I don’t claim to be the inventor but just evolved it out of desperation.
Waiting for better painting conditions for the Merc body, meanwhile turns out the free (?) gift of figures in the bottom of the kit-box was Master Box’s set 3570 “Fraulein what are you doing today?” - google it if you dare.
Finding them included reminded me of back in the day when they put plastic toys in cereal packets…and it looks like the same sculptor’s still going strong, they’re right up there with those dark green Italeri figures from 30+ years ago.
But hey as for the subject matter I can sure recommend this set to anyone out there who’ve been yearning to do a er ground-breaking sexual harassment dio. Their time has come it seems, what better title than er… “Guten Tag, kann ich Ihre Katze Kupplung?”
No wonder MB’s been quietly dumping excess stock in other kit boxes - matches the quality of the car. Being a true Gentleman Modeller I’ll spare the lady of course, but those guys deserve ventilating. First they’ll need articulating, I’ve never used Tamiya’s 2-part Epoxy Putty before so expect a bunch of Creatures from the Black Lagoon looming sometime soon. (Yes Jerry I’m studying your two zonked guys very closely)
Schwarzadler
Joined: May 12, 2014
KitMaker: 68 posts
Armorama: 58 posts
KitMaker: 68 posts
Armorama: 58 posts
Posted: Saturday, January 21, 2017 - 04:25 PM UTC
Quoted Text
But hey as for the subject matter I can sure recommend this set to anyone out there who’ve been yearning to do a er ground-breaking sexual harassment dio. Their time has come it seems, what better title than er… “Guten Tag, kann ich Ihre Katze Kupplung?”
A soldier in the German army asking that question would be immediately arrested. Not for sexual harassment but for being a English spy trying to talk German and actually talking gibberisch.
Dioramartin
New South Wales, Australia
Joined: May 04, 2016
KitMaker: 1,476 posts
Armorama: 1,463 posts
Joined: May 04, 2016
KitMaker: 1,476 posts
Armorama: 1,463 posts
Posted: Wednesday, January 25, 2017 - 04:05 PM UTC
(OK my use of heavy irony and that euphemism got lost in translation – it referred to an alternative English word for “cat”, and its recent appearance in world news). But let’s move on…
The body shell got its nondescript grey by mixing primary colours with some balancing black & white. The priming/base coat was enamel steel brushed on to make it thicker than with an airbrush, so that during normal handling the thin grey acrylic top coat will get scraped or scuffed to reveal the metal beneath– auto-weathering in every way.
The photo image balances haven’t been tweaked at all, so depending on the colour-veracity of your screen settings and eyes, this is the true shade. It all depends on the lighting conditions but maybe it’s apparent here that it isn’t the “dead” grey that results from simply mixing black & white - the high proportion of red/yellow/blue in it (90%) allows it to reflect other colours in close proximity. For example in the image above you might see it picking up a reddish/purplish tinge, particularly on the side of the front mudguard from the red splash in the foreground. The point being that it’s harmonising with its surroundings - it’s more obvious by its absence, such as when a vehicle looks like it landed from outer-space into a diorama because its colour jars with its surroundings, resulting in a toy-like appearance.
After decals I’ll fade it with a light sanding (the colour’s OK but the tone’s a tad too “new”/ intense) & put on some dilute weathering washes of black, dirt/mud etc. Undecided about the tilt colour, references suggest it should be more blackish. All main components are still dry-fitted, I usually only glue when absolutely necessary during a build…so why I already stuck the driver’s lamp on beats me, miraculous it hasn’t snapped off yet.
Next – shrinking those bullet holes with mini-blobs of “steel” on the end of a pin. (As desired the grey paint’s already coming off mostly in the right places too)
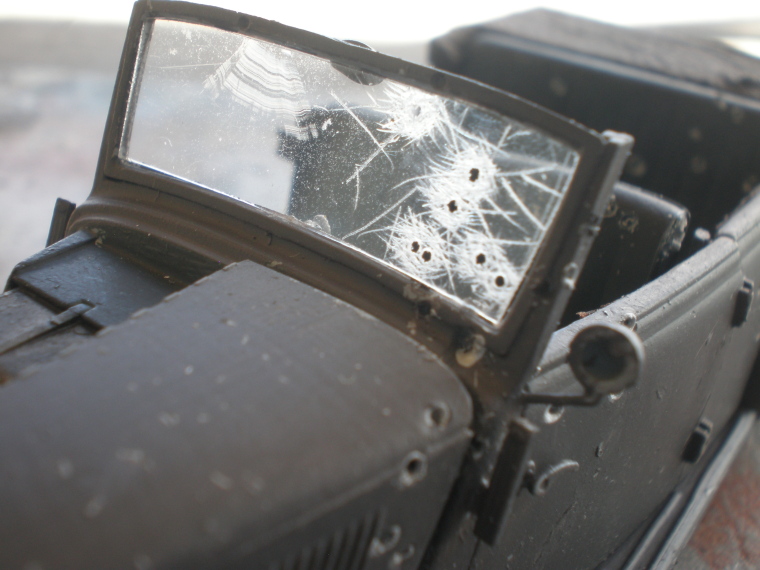
It was about time I did some proper research on those mobster/G-men shootout police photos - Cheyenne sorry to pike out of shattering some glass, I was surprised how 1930’s auto-glass responded to sub-machine bullets in photo references – seems it just let slugs through.
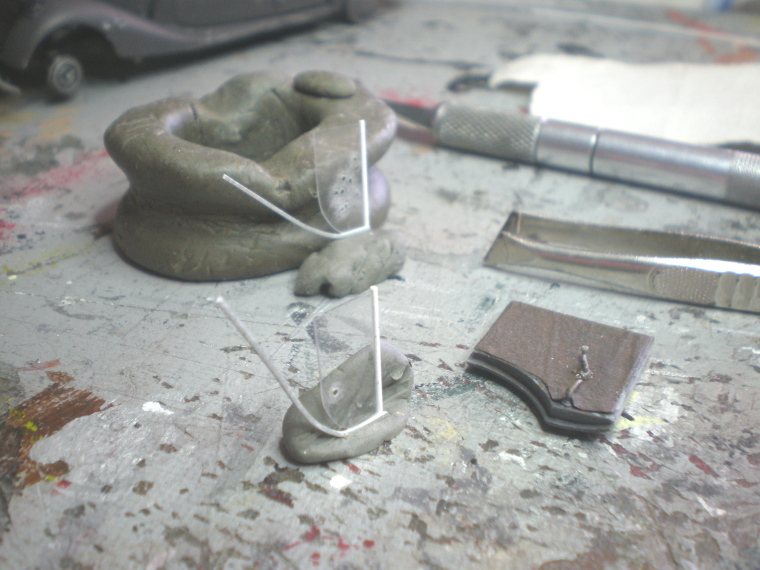
The “glass” is thin acetate as found in stationery shops for use as covers on official reports– it can hold a shallow curve when necessary but also stays rigid enough for 1/35 sized window panes, cuts cleanly with (sharp) scissors, and bonds moderately well with strip-styrene window frames. (It also comes in cool colours, ideal for tinted glass e.g. on 1/24 Le Mans super-cars)
I used Tamiya’s Limonene extra-thin cement because of its invisibility - that property was more important than the weak bond. Cyano/super-glue works better for strength but is hard to conceal on clear stuff, although the good news is that it doesn’t mysteriously fog up the acetate.
…the frosting around each hole needs more ultra-fine scratching to stand up to this close scrutiny. And yes that’s a failed attempt at wiper-wear using a worn-out blade – the first practice on a square off-cut worked perfectly though. Maybe another burst from the partisans is the best way to hide it. Any suggestions as to what to use for the rubber seal around the screen would be welcome. Do they make black dental floss?
So here’s the wagon now, in front of an antique film-cartridge drum containing the grey mix for later detailing & touch-ups.
Next time – T*res and other panes in the glass.
Taylortony
United Kingdom
Joined: November 30, 2010
KitMaker: 126 posts
Armorama: 102 posts
Joined: November 30, 2010
KitMaker: 126 posts
Armorama: 102 posts
Posted: Sunday, January 29, 2017 - 08:37 PM UTC
For really good looking glass I have been ponder using some of those thin glass screen protectors for phones, you would need to be careful, but a cut of section bent and twisted shatters and looks awesome, it is on a plastic backing so hold most of the glass in place. Just wear some gloves glasses when doing it and hoover up the residual glass, Its also very thin, so was pondering having a go at using it for screens etc..
yours looks superb BTW
justsendit
Colorado, United States
Joined: February 24, 2014
KitMaker: 3,033 posts
Armorama: 2,492 posts
Joined: February 24, 2014
KitMaker: 3,033 posts
Armorama: 2,492 posts
Posted: Monday, January 30, 2017 - 06:18 AM UTC
Quoted Text
… Tamiya’s Limonene extra-thin cement …
Hey Martin,
That’s another new one on me. This is becoming a “word of the day” sort of thing with you! No need to explain, I Googled it up already.
The 170 is looking real good! Personally, I like the "tilt" color. I would claim artistic license and leave it as-is.
Good on ya!’ ... Have a Sheaf Stout!🍺
—mike
Dioramartin
New South Wales, Australia
Joined: May 04, 2016
KitMaker: 1,476 posts
Armorama: 1,463 posts
Joined: May 04, 2016
KitMaker: 1,476 posts
Armorama: 1,463 posts
Posted: Monday, January 30, 2017 - 07:46 AM UTC
Maaaate, howd’ya know about Sheaf - have you been here?? Personally I prefer Coopers Extra Stout but today isn’t the weather for the black stuff, it’s just topped 40 deg. C (that’s right) with a possible 42 peak so I’m quaffing a lunchtime Squire’s Swindler summer ale before poolside total immersion. Yeah I can feel the waves of sympathy from here.
Back on topic…
I only discovered Limonene very recently in my local hobby store, I was assured it’s specifically designed for clear-plastic cementing but also serves for standard kit plastic. Only caution is you probably need to keep your respirator on, it has an evil chemical stench that’s probably carcinogenic or will get you stoned in seconds, I hold my breath every time I use it. Haznt offectud muy attt alllll…
Ha! I darkened the tilt yesterday, but still not happy with it…. I was hoping to take some outdoor update pics this arvo but (and this is a modeling hazard I don’t think you have at present ) there’s a dead-serious risk the car will start melting if I take more than 5 minutes – and so will I. Maybe later today.
PS thanks Tony, yes no doubt there’s several alternatives for glass, this is just one I serendipitously discovered so thought I’d share it.
Cheers,
Tim
Dioramartin
New South Wales, Australia
Joined: May 04, 2016
KitMaker: 1,476 posts
Armorama: 1,463 posts
Joined: May 04, 2016
KitMaker: 1,476 posts
Armorama: 1,463 posts
Posted: Tuesday, January 31, 2017 - 03:06 PM UTC
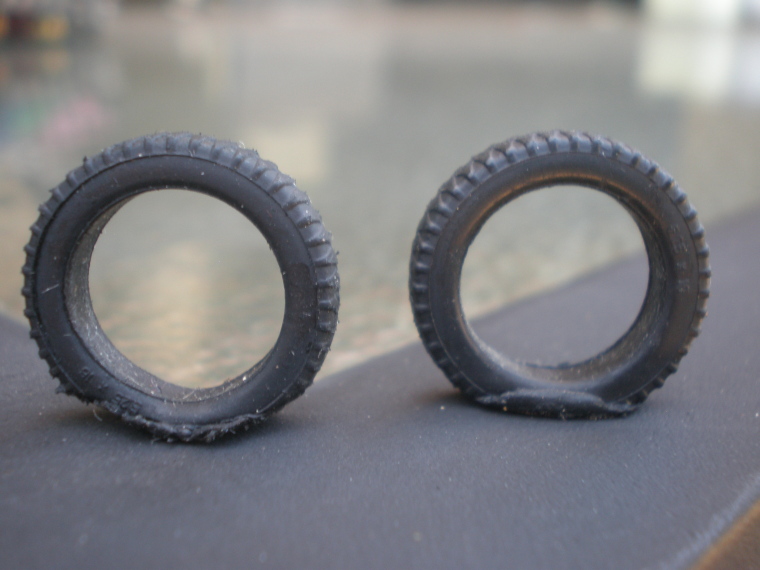
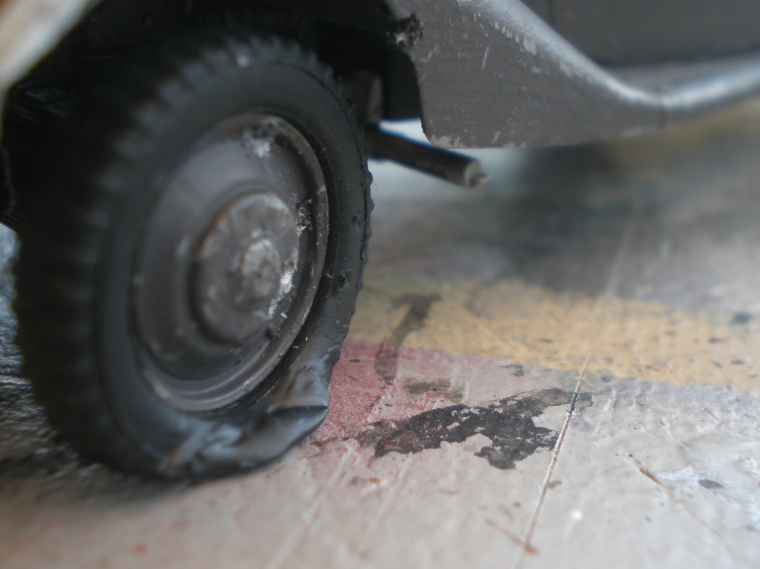
Progress of a kind - there were issues making flat t*res. Being the vinyl type, my Patent Prototype Portable Candle-Powered Plastic-Permutating Hot-Plate (PPPCPPPHP for short) didn’t work as well as it does softening ordinary plastic
so I sliced off most of what had melted and replaced it with a blob of Blu-tac covered in a thick coat of black acrylic paint. Because it’ll stay soft it should be easy to press the flat-spotted parts into the ground of the diorama when the car’s in place
The kit-supplied side-windows were as uselessly heavy/thick as the windscreen so also had to be scratched. Very tedious waiting for the Limonene (or rather the Evergreen strip it had melded to the acetate) to completely dry on one section before bending it a little more, & gluing again…problem being the glue then supersonically capilliarised (new word?) back into the previous section and boing! all fall apart again.
But it was the only way because the strip couldn’t hold the complete curve when pre-bent, it was too tight & eventually fatigue-snapped even when warmed up. The two rear windows took over 3 hours all up but hey the Primal Scream therapy helped. They’re not perfect but I’m over it & the front ones are staying down. In between times I upgraded the doors’ featureless inner surfaces using the tilt off-cuts. Further research showed I wasn’t quite right about the window-winder position, it was even closer to the door handle because apparently the arm was pulled out at 90 deg first and then the winding done around the long axis of the arm. MB probably didn’t have a clue themselves so “forgot” to show their position in any of the instruction diagrams.
This kit fights back every step of the way – the steering wheel just fell off because of the 5 micron diameter contact point with the steering column, & the driver’s lamp keeps gazing at me malevolently…
Next time – I get over the strange looks from pharmacists when asked if they stocked black dental floss, and find an alternative for the rubber windscreen seal
justsendit
Colorado, United States
Joined: February 24, 2014
KitMaker: 3,033 posts
Armorama: 2,492 posts
Joined: February 24, 2014
KitMaker: 3,033 posts
Armorama: 2,492 posts
Posted: Tuesday, January 31, 2017 - 07:52 PM UTC
G’day Tim!
Looking really good!
I have a small suggestion for the flat “tyres” … Remember, they're only flat on the bottom! ... old joke! Haha! But seriously folks: I did something similar to a Knocked-out Soviet BA-10 (Zvezda kit with Vinyl tyres). I lit ‘em up with a Bic Lighter and pressed them down onto a piece of glossy tile — singed fingers and almost my eyebrows! Anyway, I pushed some of the tyres inboard, leaving a little of the more rim edge exposed. HTH.
The next time I visit my dentist, I'll ask about black dental floss. One of my dental hygienists wears black latex gloves to perform her craft — known to scare the crap outa' the kiddies! ... When I learned of it, I nicknamed her "Morticia!"
Chill-a-hoo-hoo!🍺
—mike
jrutman
Pennsylvania, United States
Joined: April 10, 2011
KitMaker: 7,941 posts
Armorama: 7,934 posts
Joined: April 10, 2011
KitMaker: 7,941 posts
Armorama: 7,934 posts
Posted: Tuesday, January 31, 2017 - 07:55 PM UTC
I really like all of the solutions that you come up with. I am always a fan of low-tech!! Most of,if not all,of the expensive modeling accessories and products we use can be replaced by really cheap stuff if you look hard enough.
This is very cool. I love the tires,for instance. Very convincing. I use Elmers' white glue for the clear stuff. It dries clear and is really cheap and nose friendly.
I used crushed sea salt for the shattered glass on my busted windshield for the Falaise dio I did last year. That car can be seen in the gallery here. Just an idea.
J
J
pnance26
California, United States
Joined: January 22, 2016
KitMaker: 766 posts
Armorama: 518 posts
Joined: January 22, 2016
KitMaker: 766 posts
Armorama: 518 posts
Posted: Tuesday, January 31, 2017 - 08:40 PM UTC
Like all of this!
Wish I could post the photo of the Windshield in my big ol' Payhauler. It has the scratched swipe of crappy windscreen blades. Maybe when I am not at work...
Anyway, I digress. The same technique for doing the tilt cover can be used to do tarps, etc. I am sure all you guys know this. I have even used paper towel with a white glue/H2O combo to make the overhead liner in a car which is always overlooked.
Looking to forward to seeing more.
How did you make the indentations for the bullet holes? I need to do some on a TBD-1... thanks!
Dioramartin
New South Wales, Australia
Joined: May 04, 2016
KitMaker: 1,476 posts
Armorama: 1,463 posts
Joined: May 04, 2016
KitMaker: 1,476 posts
Armorama: 1,463 posts
Posted: Wednesday, February 01, 2017 - 04:35 PM UTC
Thanks gents,
Mike – nah I have to say dental hygiene manufacturers have missed a major marketing opportunity by failing to offer a range of rainbow-coloured floss (plus black) but I’ll take my customary 25% cut now I’ve given them the idea. Thanks for your link, great BA-10 btw and took a tour of your P-bucket while I was there - fantastic work all over the place, you should charge admission!…and does Pam look like Morticia by any chance? I was in 2 minds about how much “flat” is showing, there’s less on the rear one. Depending on the eventual lurched position of the car in the dio (likely into a ditch) the weight of the car might be bearing on the inner rim so could look plausible as is. But the blu-tack’s always going to be malleable, so as you say I could push some inboard if it doesn’t look right…once I’ve cyano’d the fff wheel back on, snapped off last night. Did I mention this kit’s an absolute
Jerry – you bet improvisation is where the best fun is…although maybe we need to be more careful, the Armorama accessories advertisers might get us blacklisted. I use Elmers whenever possible too for all those reasons, it just wasn’t strong or invisible enough in this case. Ah the old Crushed Salt Ploy, I’d never have thought of that - many thanks that’s the answer. Just wait, someone out there’s now going to start marketing “Broken/pulverized glass” for dios @ $30 per tiny packet. Jeez that’s the 2nd fortune-making concept I’ve just given away in one post.
Patrick – yes tissue’s ideal for tarps, there’s a cute little RSO near the top of Constructive Feedback right now which uses it pretty well. Bullet holes – you could use a tiny drill, but I just used my knife with a new pointed blade, veeery slowly & gently (so as not to snap off the point) turning/drilling it into the plastic, then with the edge of the blade at its point scraping around the hole to make the indentation effect. I thought I’d blown it by making the holes too big but the steel-paint follow-up came to the rescue. I’d suggest practicing on some scrap first, a lot depends on the thickness (and plastic-quality) of your “target”. Shep Paine used to recommend thinning/hollowing it out from the inside if it’s a thickish piece (hold it up to the light until it’s nearly transparent) & that’s still best advice - I would have followed it but was already half-built before deciding to shoot it up. I’d only add that as soon as you’ve broken through enough and the hole’s circular STOP & resist the temptation to give it a couple more turns.
Happy Groundhog Day
Tim
Happy Groundhog Day
Tim
justsendit
Colorado, United States
Joined: February 24, 2014
KitMaker: 3,033 posts
Armorama: 2,492 posts
Joined: February 24, 2014
KitMaker: 3,033 posts
Armorama: 2,492 posts
Posted: Wednesday, February 01, 2017 - 10:37 PM UTC
Haha! “Pennsylvania’s Punxsutawney Phil!” … I never tire of saying his name!
To answer your earlier question … Sorry to say, I’ve not been Down Under. 🇦🇺 Believe I had Vegemite once, but can’t remember … or maybe I don’t want to! Haha! And on that note, you must try the tasty treat from Pennsylvania known as “Scrapple.”
Back on topic: I like the Blu-Tak idea and if I decide to slice-up somebody’s tires in the future, I’ll keep that one in mind. Jerry’s “Crushed Salt” shattered glass is priceless. As you can see, his Citroen came out "smashingly!" Unfortunately, I don’t use salt, but I am known for repurposing (dumpster-diving!) all sorts of items from around the house.
Yas' done real good. Keep dem updates coming, Machine-gun Kelly!
Chill-a-hoo-hoo!🍺
—mike
Stop the presses! The modeling world is about to turn on its heels, but you're not gonna' get rich … Black dental floss does exist — rainbow colors too! I simply must tell Morticia!
Dioramartin
New South Wales, Australia
Joined: May 04, 2016
KitMaker: 1,476 posts
Armorama: 1,463 posts
Joined: May 04, 2016
KitMaker: 1,476 posts
Armorama: 1,463 posts
Posted: Thursday, February 02, 2017 - 04:51 PM UTC
Mike – well everyone should experience this unique country at least once in a lifetime (particularly Sydney) if at all possible. But yes Vegemite is for sure a crime against humanity, alas my wife’s been addicted to the stuff all her life & some days I don’t know which of her three heads to talk to. But then there’s your Scrapple, which is clearly what’s been administered to vegetarian terrorists to make them sing...along with Turducken of course (yes Moderator that is the correct spelling) – Holy Disambiguation you guys have a lot to answer for too…
So they DO make technicolour floss …and from 2004 a floss that changes colour when in use?! Glad I didn’t find any of that for the windscreen.
Meanwhile in other news the Merc’s basically finished now that several items have fallen off, currently being pastel-whipped & if the Venusian climate here abates I’ll post pics in a couple of days. The chainsaw massacre on the German lounge-lizards has already begun & my six Partisans arrived yesterday…looks like yet another challenge is to prevent them looking like a chorus line from Fiddler on the Roof.
Dioramartin
New South Wales, Australia
Joined: May 04, 2016
KitMaker: 1,476 posts
Armorama: 1,463 posts
Joined: May 04, 2016
KitMaker: 1,476 posts
Armorama: 1,463 posts
Posted: Saturday, February 04, 2017 - 05:32 PM UTC
Apart from the disassembled items currently comprising front left wheel, steering wheel, gear lever, and probably the driver’s lamp anytime soon, I can do no more with this thing. Now I can get to grips with the next stage, figure work – not my favourite aspect of dio-making but compared to this it should be a walk in the park.
The markings & flag I’ve cobbled together (only the number plates from MB’s decal set) identify it as a Panzer Regiment HQ-Staff vehicle of the 9th Pz Div, ambushed by partisans somewhere behind the front line of the northern salient at Kursk in July 1943. Not the CO’s limo but a workhorse for other HQ officers which has seen some service.
The windows configuration was entirely forced by reaching the limits of my patience/ability with the rear ones but this arrangement is valid – even MiniArt’s version of the same kit shows it on their box art. I guess the guys in front liked the wind-in-the-hair experience while the officers in back didn’t want their hats blown off or maps fluttering across the fields?
The above accidental photo (the propped-up wheel collapsed as I set up to take it) gave me the idea that having been riddled while on the move, it went out of control into a ditch or hit a roadside object. So the cyano’s on hold until I work out what the dio’s going to look like – regarding the ambush tactic, maybe an obstacle of some kind placed in the road around a blind bend to slow or stop the target. I’m thinking tethered horse or cow but I want it grazing on grass at the edge of the road – the animals I’ve seen are all heads-up staring into the distance.
Weathering comprised a dilute wash of kids’ powder paint (yellow/red/black mix), later modified with dry artists’ pastel chalk powder brushed all over. There was so much dust in my head I completely forgot to give it a customary dilute black wash first, but it doesn’t seem to have mattered. I’d already darkened the tilt but the dust made that irrelevant too – this car was travelling all through spring/summer on unsealed Russian roads & trackways. The “auto-weathering” seemed to work OK i.e. all scrapes and scuffs happened naturally while I was wrestling with it.
The windscreen rubber-seal problem was eventually solved – as best I could – with stretched sprue, enamel-blacked and applied with more Limonene. Strange how photos show things the naked eye misses - I now see the small gap at top left corner…
…but I did correct the open hood panels, firstly thinning their edges & secondly I found references showing it folded right over onto the other side, previously I’d thought it stood vertical. Still not glued down yet, hence the gap, & the engine needs a bit more belated work.
Seating got a light grey/blue covering, yet another course-correction in this journey into the unknown…
The square clamp behind each front seat was supposed to hold an upstanding rifle but they looked naff, out-of-scale & seriously cramped my unfortunates’ leg room. On the other hand would they have been travelling unarmed? Unlikely, so maybe a couple of MP40s will fit in them.
Jerry’s patent crushed sea-salt will be one of the last inclusions - after the bodies are in place…