Hi all,
Usually don't post many builds on here. My builds are usually slow and every time I start one work decides that is the perfect time to get in the way.
Have been waiting for a T30 model for a long time so when Takom released the T34/30 kit I had to get it in the stash.
I made a start last night and got into the suspension.
Takom have provided a jig to build the tracks on which is a fantastic idea. Better still it lines up the suspension rods for you and the model can sit on them while in progress.
I love the idea as I usually build the tracks last but always have to balance the model during the build.
Armor/AFV
For discussions on tanks, artillery, jeeps, etc.
Hosted by Darren Baker, Mario Matijasic
My Takom T30
DazzaD
South Australia, Australia
Joined: June 17, 2007
KitMaker: 235 posts
Armorama: 232 posts
Joined: June 17, 2007
KitMaker: 235 posts
Armorama: 232 posts
Posted: Monday, February 20, 2017 - 01:45 PM UTC
TankSGT
New Jersey, United States
Joined: July 25, 2006
KitMaker: 1,139 posts
Armorama: 946 posts
Joined: July 25, 2006
KitMaker: 1,139 posts
Armorama: 946 posts
Posted: Monday, February 20, 2017 - 04:19 PM UTC
I just started the T29E3, I hope to follow your build,
Tom
Tom
JSSVIII
Massachusetts, United States
Joined: March 28, 2007
KitMaker: 1,169 posts
Armorama: 1,067 posts
Joined: March 28, 2007
KitMaker: 1,169 posts
Armorama: 1,067 posts
Posted: Tuesday, February 21, 2017 - 03:35 AM UTC
Looking forward to your build, I'm curious to see how well that track/suspension jig works!
DazzaD
South Australia, Australia
Joined: June 17, 2007
KitMaker: 235 posts
Armorama: 232 posts
Joined: June 17, 2007
KitMaker: 235 posts
Armorama: 232 posts
Posted: Tuesday, February 21, 2017 - 07:15 AM UTC
Hi TankSGT, I am looking forwards to seeing all the T34/30 and T29 builds start appearing as everyone's kits turn up.
I am thinking about what Cammo scheme I want to use rather than the plan army green. The scheme option on the box looks much better than expected so that might be the one I go with.
Then again, I might be getting ahead of myself, Looks great on the box and on Armorama... My skills of painting are not the greatest!
I will get into that track rig soon JSSVIII. I usually build the tracks last but will make sure I post it. I am not 100% convinced about the tracks yet. They are in sections in the kit. So not individual and not strips. All the straight track sections are prebuilt and looks like we just get to join them to smaller sections around the front/rear sprocket. Will see when I get to it.
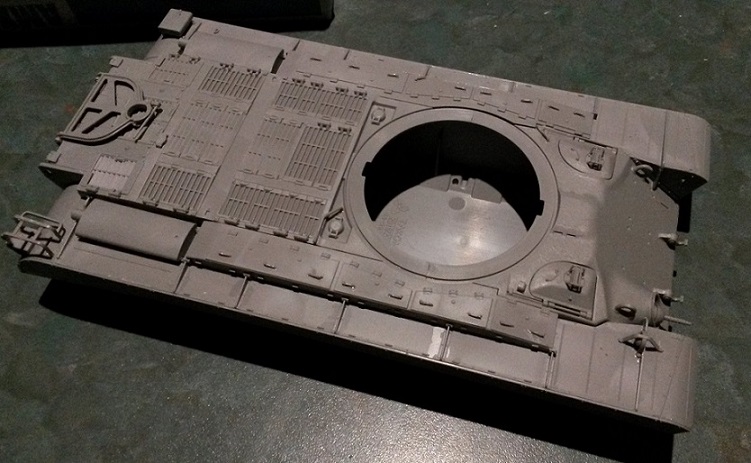
Got a little more done last night. I was a little worried when I saw the frontal armor and rear deck were 2 separate parts. They join in the center of the turret ring... The weakest point, with the lest plastic to join them together!
Anyway, turns out I was worrying about nothing. The frontal armor and rear deck are a PERFECT fit. Both to the hull and to each other. I don't think I have ever built a model that the top deck fit perfectly with no cleaning, sanding or modification at all! Top marks to Takom on this one.
laikneth
Singapore / 新加坡
Joined: September 24, 2013
KitMaker: 75 posts
Armorama: 63 posts
Joined: September 24, 2013
KitMaker: 75 posts
Armorama: 63 posts
Posted: Tuesday, February 21, 2017 - 03:00 PM UTC
Hi,
I've done the tracks for the t30 kit using the jigs. very easy build. If you look at the jigs, there are small guide pins protruding on one side of the jig. use this pins to guide the placement of the various sections. you wont go wrong.
Also on the individual links, please follow the instructions on the links to use cos the track guides are all slightly bent to account for the curvature of the tracks around the sprocket and idler.
One thing to note. the idler and sprocket fits tightly onto the jig. so make sure the tracks are fully set before you remove them. You will need a bit of strength to remove from the jig. If the tracks are not fully set, you may end up with the tracks not set in the proper shape and may have to reassemble again.
Also, the jig will allow you to make sure all the suspension form the road wheels are levelled so that when you assemble the tracks on the wheels everything is level. but if you want to make variations in the suspension, then some am tracks and modification of the suspension arms will be require.
What i did to ease assembly was to first assemble the inside of the return rollers. the assemble the tracks on the jig with the sprocket and idler. while waiting for the tracks to set, you can use this time to paint the hull, road wheels and return rollers.
When the tracks is set, i then assembled the track, idler and sprocket onto the hull. It fits perfectly. Once this is done, i then assemble the outer part of the return rollers and the small track tensioning roller between the sprocket and the last road wheel. (this is not needed for the t29e3)
thereafter i installed the road wheels. Be very careful cause you need a bit of maneuvering to fit in the first and last road wheel.
The jig, link and length sections of the tracks makes the build much more faster and easier especially for new builders. Overall i spent 4 hours to assemble and paint both tracks and road wheels.
Ken
I've done the tracks for the t30 kit using the jigs. very easy build. If you look at the jigs, there are small guide pins protruding on one side of the jig. use this pins to guide the placement of the various sections. you wont go wrong.
Also on the individual links, please follow the instructions on the links to use cos the track guides are all slightly bent to account for the curvature of the tracks around the sprocket and idler.
One thing to note. the idler and sprocket fits tightly onto the jig. so make sure the tracks are fully set before you remove them. You will need a bit of strength to remove from the jig. If the tracks are not fully set, you may end up with the tracks not set in the proper shape and may have to reassemble again.
Also, the jig will allow you to make sure all the suspension form the road wheels are levelled so that when you assemble the tracks on the wheels everything is level. but if you want to make variations in the suspension, then some am tracks and modification of the suspension arms will be require.
What i did to ease assembly was to first assemble the inside of the return rollers. the assemble the tracks on the jig with the sprocket and idler. while waiting for the tracks to set, you can use this time to paint the hull, road wheels and return rollers.
When the tracks is set, i then assembled the track, idler and sprocket onto the hull. It fits perfectly. Once this is done, i then assemble the outer part of the return rollers and the small track tensioning roller between the sprocket and the last road wheel. (this is not needed for the t29e3)
thereafter i installed the road wheels. Be very careful cause you need a bit of maneuvering to fit in the first and last road wheel.
The jig, link and length sections of the tracks makes the build much more faster and easier especially for new builders. Overall i spent 4 hours to assemble and paint both tracks and road wheels.
Ken
laikneth
Singapore / 新加坡
Joined: September 24, 2013
KitMaker: 75 posts
Armorama: 63 posts
Joined: September 24, 2013
KitMaker: 75 posts
Armorama: 63 posts
Posted: Tuesday, February 21, 2017 - 03:08 PM UTC
Hi,
A correction, i meant the track ends are slightly bent no the track guides to account of the curvature of the tracks at the idler and sprocket.
In this kit i will advise not to assemble the track last. You may wish to leave assembling the sponsons til after you assemble the tracks. it will make the track assembly more easier.
Ken
DazzaD
South Australia, Australia
Joined: June 17, 2007
KitMaker: 235 posts
Armorama: 232 posts
Joined: June 17, 2007
KitMaker: 235 posts
Armorama: 232 posts
Posted: Wednesday, February 22, 2017 - 12:50 PM UTC
Thanks for the detailed info laikneth. Sounds like the tracks will not be as bad as first thought, mainly because for the jig they have supplied. I was worried they have made the track in sections, not individual links, it would have that too perfect, rough, too perfect look.
I got a little more done last night. Both side sponsons are done but as you mentioned I will not be gluing them on until I have the tracks squared away. I have just BluTacked them on for test fit.
Again, I am surprised how well they fit with no cleaning up!
I got a little more done last night. Both side sponsons are done but as you mentioned I will not be gluing them on until I have the tracks squared away. I have just BluTacked them on for test fit.
Again, I am surprised how well they fit with no cleaning up!
DazzaD
South Australia, Australia
Joined: June 17, 2007
KitMaker: 235 posts
Armorama: 232 posts
Joined: June 17, 2007
KitMaker: 235 posts
Armorama: 232 posts
Posted: Thursday, February 23, 2017 - 03:02 AM UTC
OK, had some issues uploading pics to the Kitmaker site but now have a work around!
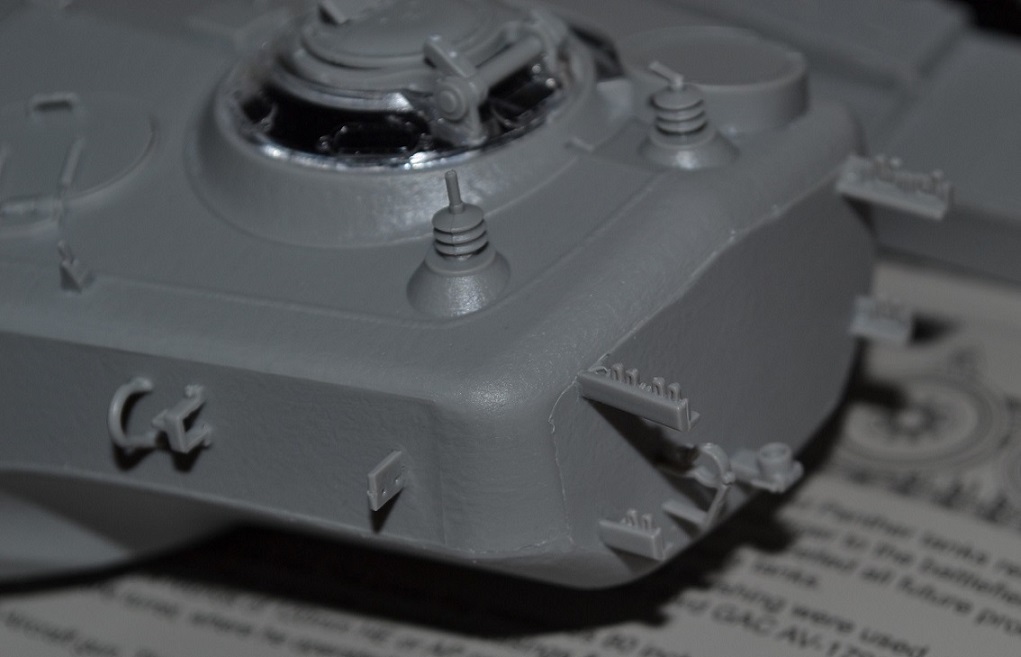
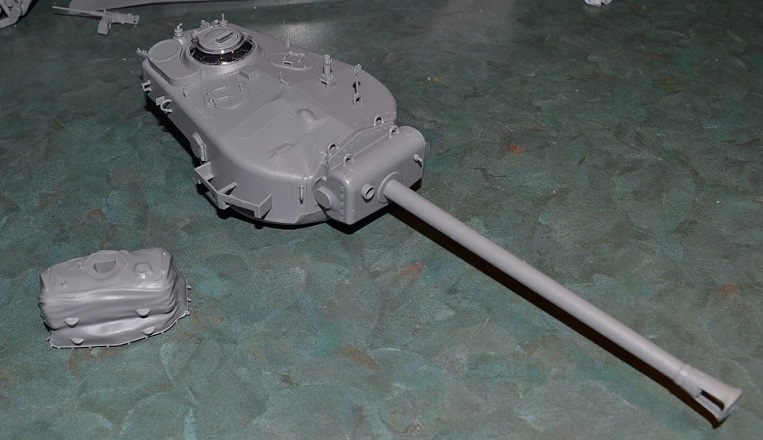
I got the Turret done last night and a few other bits.
The armor block in the rear of the turret was a total PITA! Everything has been such a good fit, I was lured into a false sense of complacency.
One of the steps joined the upper/lower turret together. That was a good fit. The next step was to insert the rear turret plate into the hole between them. Not so good fit. I had (stupidly) attached all the small fiddly parts to that rear plate first to get them straight. Needless to say, by the time I got the part in there, there was not much straight anymore.
If you are building this one, just try a dry fit with the upper, lower and rear plate before glue. Mine will now need a clean up.
The Turret has good clean crisp detail. If you are going the T34 model you get the choice of the canvas cover parts (which look fantastic!). I almost changed the build from a T30 to the T34 to go with that option!
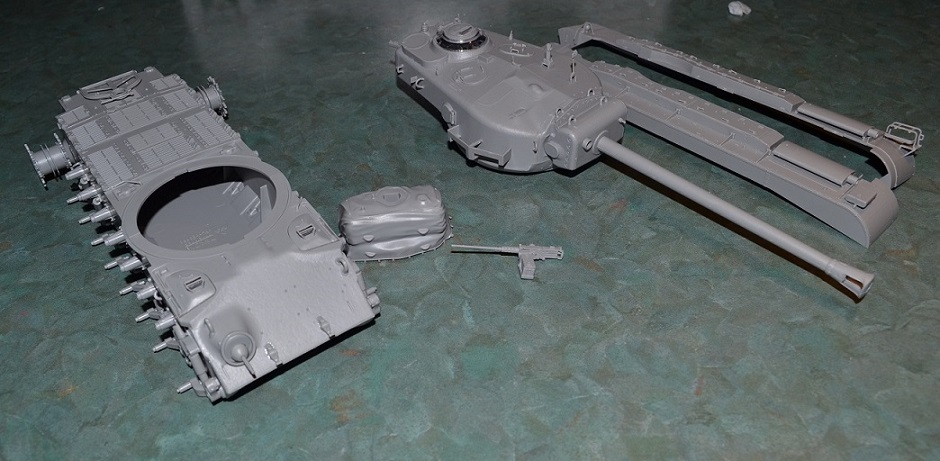
Lastly all the bits together minus the ones that will be in the way when painting. The kit so far has been a smooth and easy build.
DazzaD
South Australia, Australia
Joined: June 17, 2007
KitMaker: 235 posts
Armorama: 232 posts
Joined: June 17, 2007
KitMaker: 235 posts
Armorama: 232 posts
Posted: Thursday, February 23, 2017 - 03:16 AM UTC
DazzaD
South Australia, Australia
Joined: June 17, 2007
KitMaker: 235 posts
Armorama: 232 posts
Joined: June 17, 2007
KitMaker: 235 posts
Armorama: 232 posts
Posted: Sunday, February 26, 2017 - 11:57 AM UTC
Shellshock2
Minnesota, United States
Joined: February 07, 2017
KitMaker: 11 posts
Armorama: 11 posts
Joined: February 07, 2017
KitMaker: 11 posts
Armorama: 11 posts
Posted: Wednesday, March 01, 2017 - 04:41 PM UTC
I have the T29 and its an ugly duck in comparison to the T30
DazzaD
South Australia, Australia
Joined: June 17, 2007
KitMaker: 235 posts
Armorama: 232 posts
Joined: June 17, 2007
KitMaker: 235 posts
Armorama: 232 posts
Posted: Friday, March 03, 2017 - 12:06 AM UTC
Hi Shellshock, do you mean the T29 kit or the tanks Looks?
I have to admit i like the look of the T30. The real thing must be impressive to see. I was never able to get to the Aberdeen site before it was all moved
By the time I was travelling in the right area with work I was told not to bother, every thing was gone. Murphy's law!
I would imagine it would have the same presence as the Conqueror, M103 or AMX50.
Still trying to find the time to setup the paint kit to get this one finished. Grand plans for paint and camo... the work schedule disagrees
Tedwards252
South Carolina, United States
Joined: July 12, 2012
KitMaker: 72 posts
Armorama: 70 posts
Joined: July 12, 2012
KitMaker: 72 posts
Armorama: 70 posts
Posted: Sunday, March 05, 2017 - 09:23 AM UTC
JSSVIII
Massachusetts, United States
Joined: March 28, 2007
KitMaker: 1,169 posts
Armorama: 1,067 posts
Joined: March 28, 2007
KitMaker: 1,169 posts
Armorama: 1,067 posts
Posted: Sunday, March 05, 2017 - 05:12 PM UTC
Any chance you measured the space between the road wheels?
DazzaD
South Australia, Australia
Joined: June 17, 2007
KitMaker: 235 posts
Armorama: 232 posts
Joined: June 17, 2007
KitMaker: 235 posts
Armorama: 232 posts
Posted: Monday, March 06, 2017 - 07:06 AM UTC
Very cool Tedwards252, is there public access to the tanks or are they in storage? Where are they now?
I hope to get back there one day, if I am lucky they will all be in a museum accessible to those that want to see the real thing!
As for the model I might clean my turret up further. I left a little of the rear turret seam behind thinking it was 2 pieces. You picture clearly shows it is one solid piece.
Shellshock2
Minnesota, United States
Joined: February 07, 2017
KitMaker: 11 posts
Armorama: 11 posts
Joined: February 07, 2017
KitMaker: 11 posts
Armorama: 11 posts
Posted: Monday, March 06, 2017 - 12:40 PM UTC
I was considering motorizing the tank. There is plenty of room.I did the Meng tortoise and the HB super pershing.
Unfortunately,I have already started on the wheels so I will build it as is.
Has anyone had any luck with after market tracks?
Unfortunately,I have already started on the wheels so I will build it as is.
Has anyone had any luck with after market tracks?
DazzaD
South Australia, Australia
Joined: June 17, 2007
KitMaker: 235 posts
Armorama: 232 posts
Joined: June 17, 2007
KitMaker: 235 posts
Armorama: 232 posts
Posted: Monday, March 06, 2017 - 01:12 PM UTC
Sorry mate, I just used the box tracks. They done the job for a static model but no good for motorized.
Tedwards252
South Carolina, United States
Joined: July 12, 2012
KitMaker: 72 posts
Armorama: 70 posts
Joined: July 12, 2012
KitMaker: 72 posts
Armorama: 70 posts
Posted: Wednesday, March 08, 2017 - 02:31 AM UTC
Quoted Text
Any chance you measured the space between the road wheels?
Yes. Each spacing was different. None were the same.
Tedwards252
South Carolina, United States
Joined: July 12, 2012
KitMaker: 72 posts
Armorama: 70 posts
Joined: July 12, 2012
KitMaker: 72 posts
Armorama: 70 posts
Posted: Wednesday, March 08, 2017 - 02:33 AM UTC
Quoted Text
Very cool Tedwards252, is there public access to the tanks or are they in storage? Where are they now?
I hope to get back there one day, if I am lucky they will all be in a museum accessible to those that want to see the real thing!
As for the model I might clean my turret up further. I left a little of the rear turret seam behind thinking it was 2 pieces. You picture clearly shows it is one solid piece.
I was lucky enough to get on with a private tour held in connection with the AMPS Atlanta regional show. The tanks are not publicly accessible. The museum is being privately funded and the goal is to be open by 2020 from what I understand. Also, the T-Series is about to be repainted.
Also, the weld connecting the upper and lower turret halves was extremely gnarly. I've got more photos coming. So hold on for those.
Tedwards252
South Carolina, United States
Joined: July 12, 2012
KitMaker: 72 posts
Armorama: 70 posts
Joined: July 12, 2012
KitMaker: 72 posts
Armorama: 70 posts
Posted: Wednesday, March 08, 2017 - 02:43 AM UTC
JSSVIII
Massachusetts, United States
Joined: March 28, 2007
KitMaker: 1,169 posts
Armorama: 1,067 posts
Joined: March 28, 2007
KitMaker: 1,169 posts
Armorama: 1,067 posts
Posted: Wednesday, March 08, 2017 - 04:28 AM UTC
Quoted Text
Quoted TextAny chance you measured the space between the road wheels?
Yes. Each spacing was different. None were the same.
I'm sure there were slight differences (obviously there was the larger gap between the first and second road wheels), but do you have an approximate average size? 1" - 2" - 3", there has been considerable discussion about how close together the road wheels look on the kit, compared to the real thing, but nobody had a measurement on the actual tank.
DazzaD
South Australia, Australia
Joined: June 17, 2007
KitMaker: 235 posts
Armorama: 232 posts
Joined: June 17, 2007
KitMaker: 235 posts
Armorama: 232 posts
Posted: Wednesday, March 08, 2017 - 04:32 AM UTC
So, if I just postpone my next work trip to the US for 3 more years, I might get a chance to see them!
They actually let you climb on the tanks!?! That is awesome. The only place I have had that privilege, was a museum in the UK (Norfolk Tank Museum). One of the very few places I have been, where they encouraged you to get in and have a look. So much better than the the usual 'please do not climb on the exhibits'
Fantasic pics mate, thanks for posting.
Kelley
Georgia, United States
Joined: November 21, 2002
KitMaker: 1,966 posts
Armorama: 1,635 posts
Joined: November 21, 2002
KitMaker: 1,966 posts
Armorama: 1,635 posts
Posted: Wednesday, March 08, 2017 - 05:36 PM UTC
Quoted Text
I spent most of my time on the T29E3, but I was able to get these. I have at least 80 pics.
Great pics "Ted" I had planned to go over to Benning that day, but had a small family emergency come up and had to cancel. I'd love to see all of your pics of the T series tanks. Maybe submit them to the site as a feature?
Dazza, I went over there a few years ago on the same type of tour, associated w the AMPS national. It was great, they let us climb all over the tanks, just asked us to be careful.
Cheers guys,
Mike
ninjrk
Alabama, United States
Joined: January 26, 2006
KitMaker: 1,381 posts
Armorama: 1,347 posts
Joined: January 26, 2006
KitMaker: 1,381 posts
Armorama: 1,347 posts
Posted: Wednesday, March 08, 2017 - 06:46 PM UTC
Quoted Text
Quoted TextI spent most of my time on the T29E3, but I was able to get these. I have at least 80 pics.
Great pics "Ted" I had planned to go over to Benning that day, but had a small family emergency come up and had to cancel. I'd love to see all of your pics of the T series tanks. Maybe submit them to the site as a feature?
Dazza, I went over there a few years ago on the same type of tour, associated w the AMPS national. It was great, they let us climb all over the tanks, just asked us to be careful.
Cheers guys,
Mike
Yeah, I would very much second the request for a feature or upload them to photobucket or the like. When I photographed them at Ft. Knox I made the mistake of spending most of my time climbing around on the T29E3 and have been kicking myself ever since for not taking more photos of the turret of the T29 and T30. . .
Tedwards252
South Carolina, United States
Joined: July 12, 2012
KitMaker: 72 posts
Armorama: 70 posts
Joined: July 12, 2012
KitMaker: 72 posts
Armorama: 70 posts
Posted: Wednesday, March 08, 2017 - 08:04 PM UTC
Quoted Text
Quoted TextQuoted TextI spent most of my time on the T29E3, but I was able to get these. I have at least 80 pics.
Great pics "Ted" I had planned to go over to Benning that day, but had a small family emergency come up and had to cancel. I'd love to see all of your pics of the T series tanks. Maybe submit them to the site as a feature?
Dazza, I went over there a few years ago on the same type of tour, associated w the AMPS national. It was great, they let us climb all over the tanks, just asked us to be careful.
Cheers guys,
Mike
Yeah, I would very much second the request for a feature or upload them to photobucket or the like. When I photographed them at Ft. Knox I made the mistake of spending most of my time climbing around on the T29E3 and have been kicking myself ever since for not taking more photos of the turret of the T29 and T30. . .
There is T30 here in Columbia at Ft. Jackson that I think is publicly accessible. I should be able to get there one day soon to photograph it. Where my class schedule allows...