Armor/AFV
For discussions on tanks, artillery, jeeps, etc.
For discussions on tanks, artillery, jeeps, etc.
Hosted by Darren Baker, Mario Matijasic
Dragon King Tiger with Zimmerit on the desk
erichvon

Joined: January 17, 2006
KitMaker: 1,694 posts
Armorama: 1,584 posts

Posted: Friday, July 07, 2017 - 07:36 PM UTC
Rob, I'll have to keep a look out for that as I could quite get into King Tigers.
erichvon

Joined: January 17, 2006
KitMaker: 1,694 posts
Armorama: 1,584 posts

Posted: Saturday, July 08, 2017 - 11:54 AM UTC
Contrary to my earlier cynicism about the individual track links I have been pleasantly surprised! I'd never have believed that possible on a DML build but it's happened lol. Sometimes with DML kits, especially the Sdkfz 251 range, there is an option of tracks. A pack of track parts off the sprue in a presslock plastic bag and the traditional tracks on the sprue that usually have hundreds of little tin can sized bits of plastic attached to them which must be removed then the part cleaned up. Incredibly tedious. As there is only the sprues in the bag for the King Tiger I've had to go for that option.
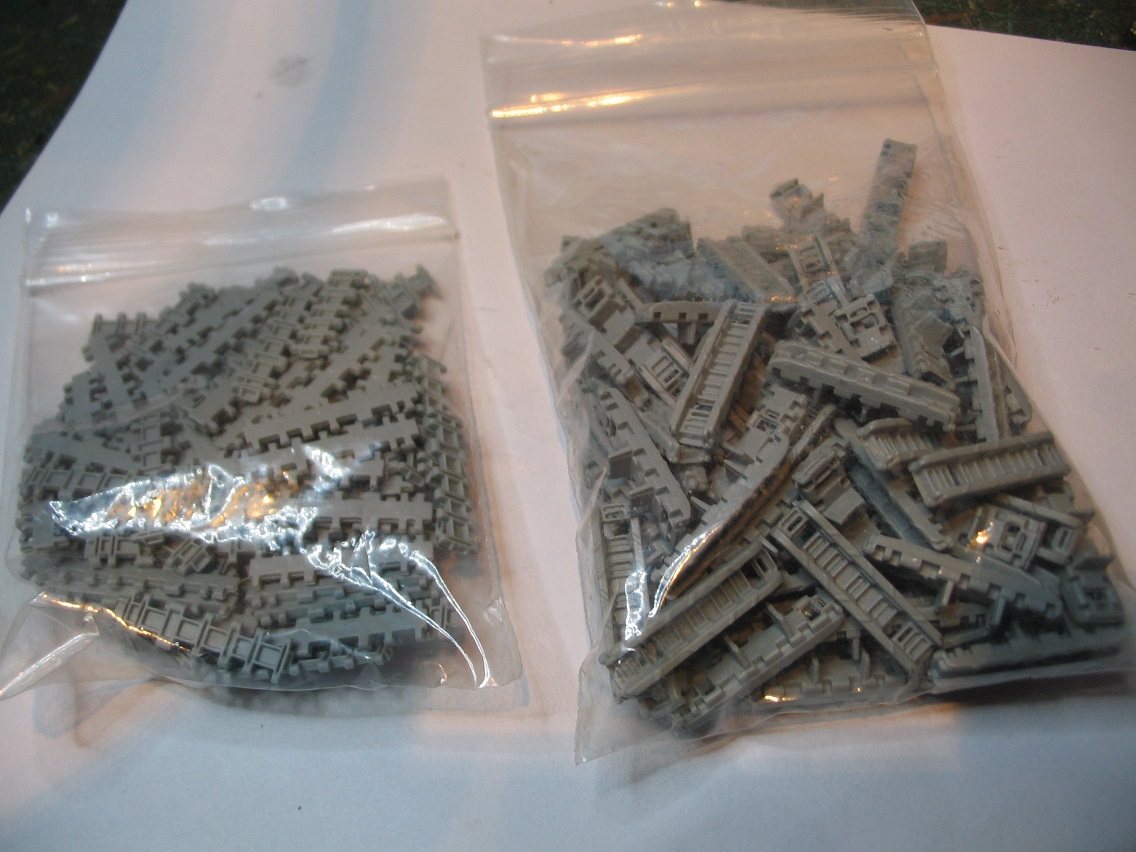
I was shocked! (The bags aren't full above as I'd made a start). No clean up required. There is however a small lump in the centre of the larger part of the links inside but as the finished kit is destined for a diorama and will have muddy tracks (I need to invest in one of the many paint on mud gloops on the market now so any suggestions as to which ones you've used and found to be good please let me know) I couldn't face sitting and sanding a couple of hundred track links when the offending lump won't be seen. It'll probably be hidden by the wheels and shadows anyway.
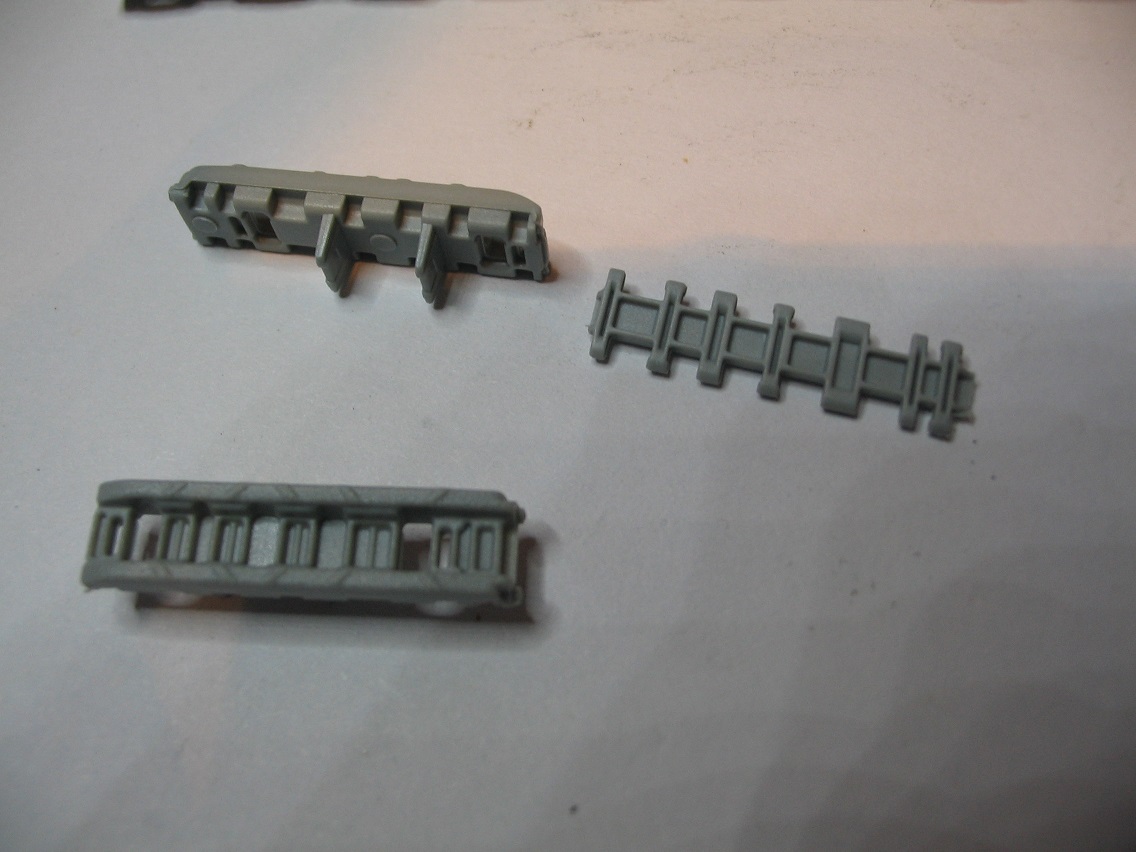
As you can see the detail on the links is very good. Nice and sharp. The recesses that the male part of the track fits into are a good depth so no vague fitting here. A bit of liquid poly and they slot into place with no bother. Every so often I'd put a metal rule across the tracks, the blade edge on, with a little pressure just to check that they were seated properly. No problems at all. Very impressed. I actually found it quite relaxing if I'm honest and could have sat there all day doing it. The two lengths pictured here are running across the bottom of the road wheels and are just about to make the turn upwards so I'll do the top run next.
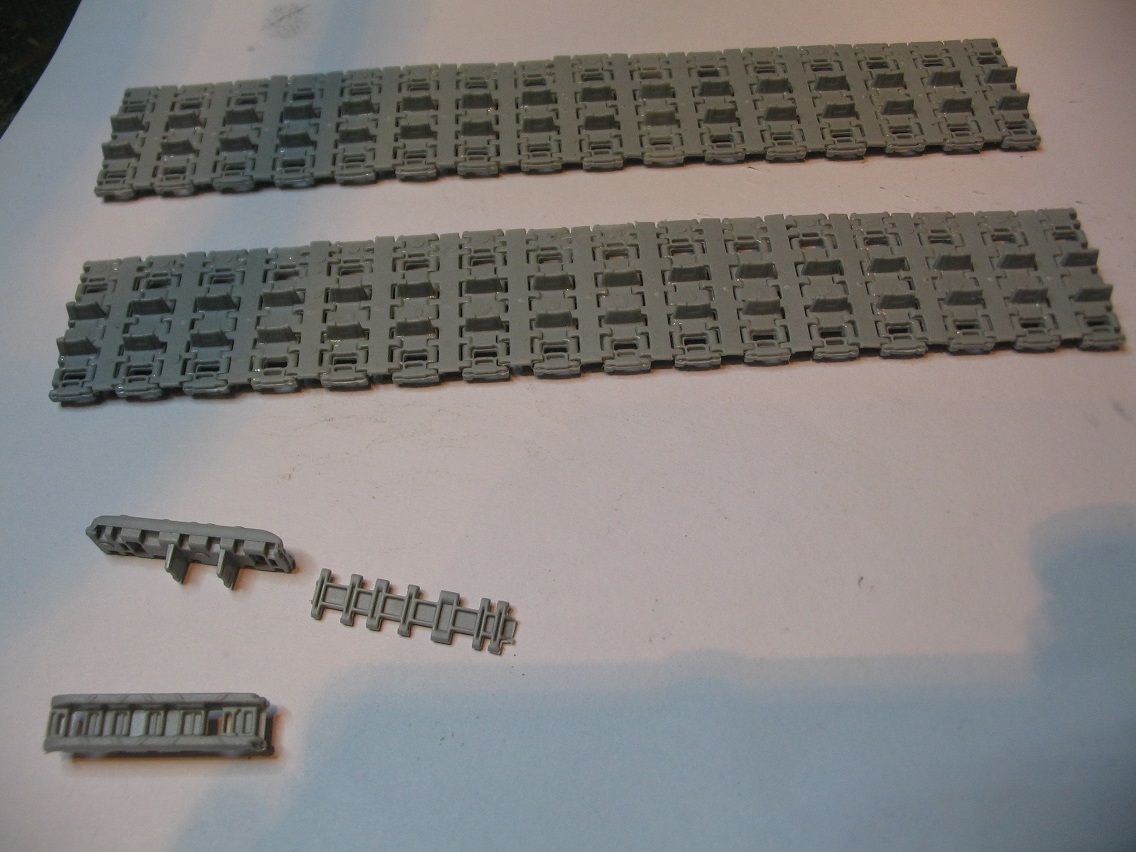
I didn't time it but I reckon it probably took about 30 minutes to do the two lengths which for indy links is incredible. As you can see when they're built up they do look good. What I'll do next is build the top lengths and work out how many links I need to join the two lengths together at each end. I'll airbrush the longer lengths and paint the other links by hand prior to assembly. That way I won't get paint all over the wheels and once they're in place I can touch them up then weather them. I know I have an unusual way of doing things that some modellers will cringe at but doing it this way works for me. As you've noticed I paint things as I'm going along as I'd make a complete hash of it if I waited till it was altogether. I admire the guys who can build a whole kit then paint it all at the end but it wouldn't work for me. Also I can see my progress so I don't get too disheartened when things aren't going as planned. I know doing it this way that I get full paint coverage. That's my weird style explained. Once the tracks are on then it should be plain sailing from there as I've already built the top of the hull,bar the tiny parts I worry about knocking off, which according to the instructions should be started after the wheels and track go on
There's quite a bit of PE will come into use once the two hull halves are together. This is not only for the tools but wingnuts (???) and the hull turret hangers for spare tracks. Having looked at these I'm going to go with the plastic ones in the kit. That's a positive in there being generic sprues. The PE ones would look too flimsy and I'm sure that they would bend in reality having felt the weight of track links smaller than a King Tiger's.
I'm still undecided whether to use the kits skirting or use some PE ones I've got. I suppose with it being a review blog I should use the kit's parts but I'll decide when I get there. It's still a way off yet. I'm going to crack on with the tracks today so next update they'll be on and I can make a start on the final assembly.

I was shocked! (The bags aren't full above as I'd made a start). No clean up required. There is however a small lump in the centre of the larger part of the links inside but as the finished kit is destined for a diorama and will have muddy tracks (I need to invest in one of the many paint on mud gloops on the market now so any suggestions as to which ones you've used and found to be good please let me know) I couldn't face sitting and sanding a couple of hundred track links when the offending lump won't be seen. It'll probably be hidden by the wheels and shadows anyway.

As you can see the detail on the links is very good. Nice and sharp. The recesses that the male part of the track fits into are a good depth so no vague fitting here. A bit of liquid poly and they slot into place with no bother. Every so often I'd put a metal rule across the tracks, the blade edge on, with a little pressure just to check that they were seated properly. No problems at all. Very impressed. I actually found it quite relaxing if I'm honest and could have sat there all day doing it. The two lengths pictured here are running across the bottom of the road wheels and are just about to make the turn upwards so I'll do the top run next.

I didn't time it but I reckon it probably took about 30 minutes to do the two lengths which for indy links is incredible. As you can see when they're built up they do look good. What I'll do next is build the top lengths and work out how many links I need to join the two lengths together at each end. I'll airbrush the longer lengths and paint the other links by hand prior to assembly. That way I won't get paint all over the wheels and once they're in place I can touch them up then weather them. I know I have an unusual way of doing things that some modellers will cringe at but doing it this way works for me. As you've noticed I paint things as I'm going along as I'd make a complete hash of it if I waited till it was altogether. I admire the guys who can build a whole kit then paint it all at the end but it wouldn't work for me. Also I can see my progress
 so I don't get too disheartened when things aren't going as planned. I know doing it this way that I get full paint coverage. That's my weird style explained. Once the tracks are on then it should be plain sailing from there as I've already built the top of the hull,bar the tiny parts I worry about knocking off, which according to the instructions should be started after the wheels and track go on
There's quite a bit of PE will come into use once the two hull halves are together. This is not only for the tools but wingnuts (???) and the hull turret hangers for spare tracks. Having looked at these I'm going to go with the plastic ones in the kit. That's a positive in there being generic sprues. The PE ones would look too flimsy and I'm sure that they would bend in reality having felt the weight of track links smaller than a King Tiger's.
I'm still undecided whether to use the kits skirting or use some PE ones I've got. I suppose with it being a review blog I should use the kit's parts but I'll decide when I get there. It's still a way off yet. I'm going to crack on with the tracks today so next update they'll be on and I can make a start on the final assembly.
Posted: Saturday, July 08, 2017 - 02:30 PM UTC
The track pieces look good. I'm not fond of cleaning pieces of track or removing them from the sprue. I've been lazy lately and buying Friuls.
At least you didn't have to add guide horns. That's just over-engineering in my eyes.
Keep up the good work!
Few tanks look as good as the Henschel Tiger II.
Gaz
At least you didn't have to add guide horns. That's just over-engineering in my eyes.
Keep up the good work!
Few tanks look as good as the Henschel Tiger II.
Gaz

Tojo72

Joined: June 06, 2006
KitMaker: 4,691 posts
Armorama: 3,509 posts

Posted: Saturday, July 08, 2017 - 03:18 PM UTC
Nice work,cant believe yo had to go thru that with the wheels.
erichvon

Joined: January 17, 2006
KitMaker: 1,694 posts
Armorama: 1,584 posts

Posted: Saturday, July 08, 2017 - 07:40 PM UTC
Thanks guys. Just thought I'd take a look in while I'm having a break from sticking links together.
Gary- I've never tried the Fruil tracks as I can never justify spending as much on gucci bits that cost almost as much as the kit lol. These are really nice to work with and with using liquid poly you've still got a certain amount of flexibility while it dries. At the moment I've got the top track drying around the drive sprocket. As far as I can see it the only tricky bit is going to be working against gravity when I add the rest of them on the underside but so far all's good.
Anthony- Neither can I! You occasionally get a part that's the wrong size but 55 parts ie all of the wheel parts??? That's just really bad designing. As Shell mentioned earlier in the thread it would appear that there's very little communication at DML between departments. It would make sense to me that before they do an initial run, build the kit to see if there are any problems with fit or the instructions. It appears that they don't bother checking that the parts match up to the design otherwise the wheels would have fitted properly. You don't expect to have to modify large amounts of parts just to get them to fit! It makes me wonder if there are different hull bottoms and different wheel sets floating between all the King Tigers they've brought out. All you need is a tiny difference in the circumference of the bar on the swing arms. We know that they're swapping sprues about as some could be classed as generic so that's what it looks like to me. Not what you'd expect when parting with your hard earned cash to do a relaxing hobby!
erichvon

Joined: January 17, 2006
KitMaker: 1,694 posts
Armorama: 1,584 posts

Posted: Thursday, July 13, 2017 - 04:11 AM UTC
I've had a good couple of days working on the KT. I say good as in I've got quite a lot done. Not good in other ways which will become apparent.
I'd deceided to build the tracks up into top and bottom lengths using liquid poly so I could shape it around the sprocket and end wheel, leaving a gap to fill when I was ready to mount them. The advantage of doing it this way is it means that I can paint them and weather them before I put them on the tank. I gave them a coat of dark iron, followed by a dark brown metallic I'd mixed for tracks. Once this had dried I applied a weak rusty coloured wash and to finish them off dry brushed the raised part of the track with metallic greay. I also drybrushed the guide teeth inside the track to show wear on them where they rub against the road wheels. I tried not to overdo it as I thought subtlety worked better.
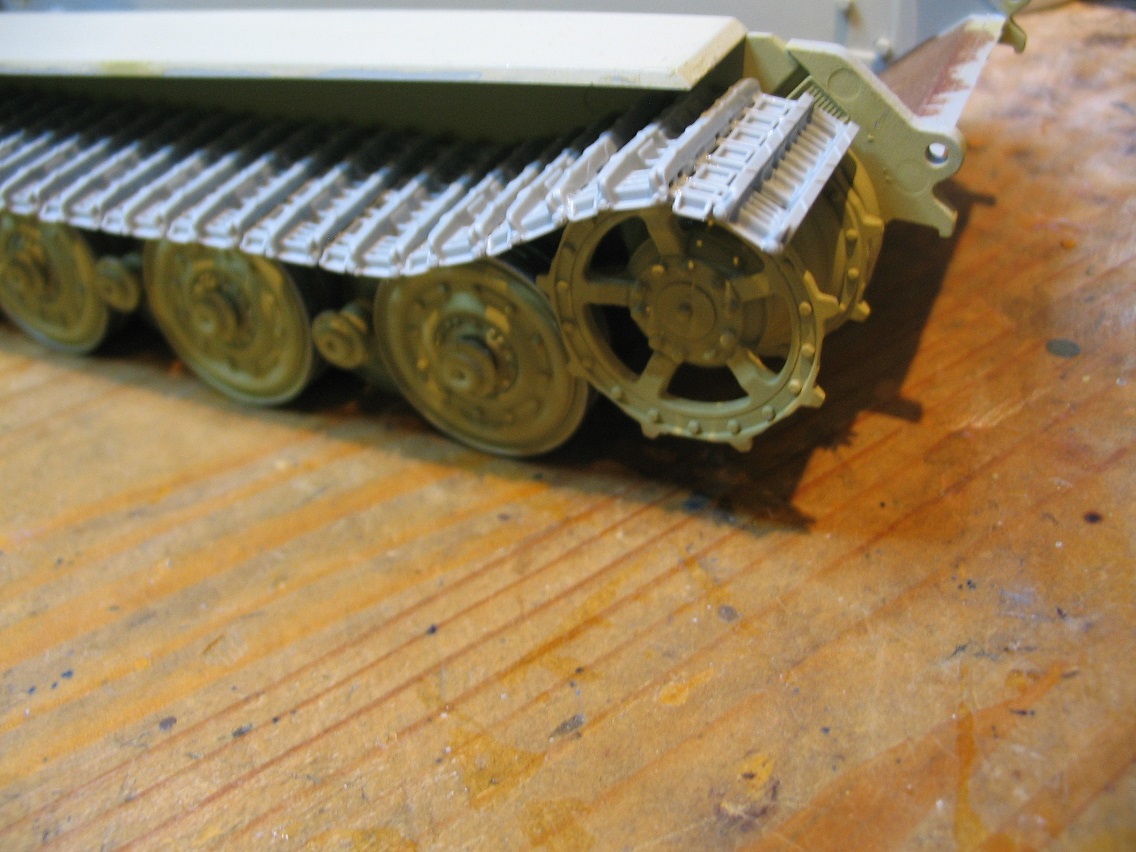
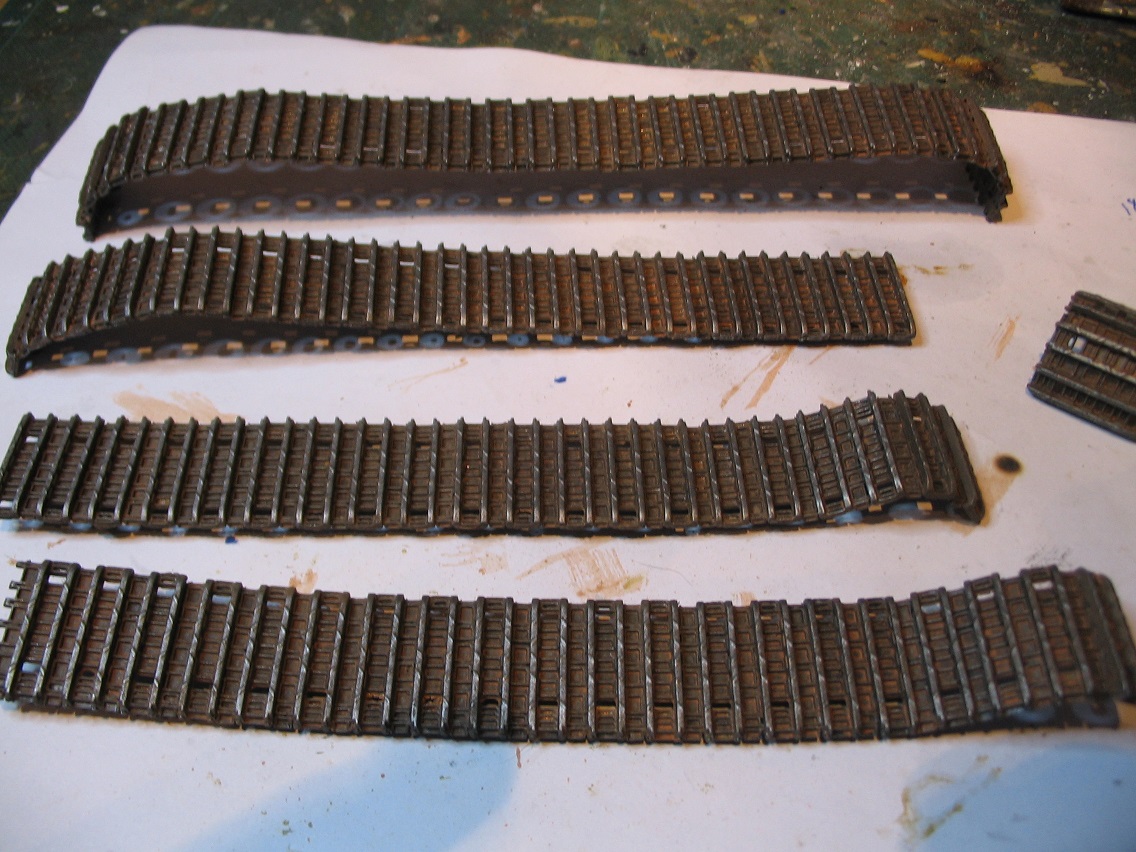
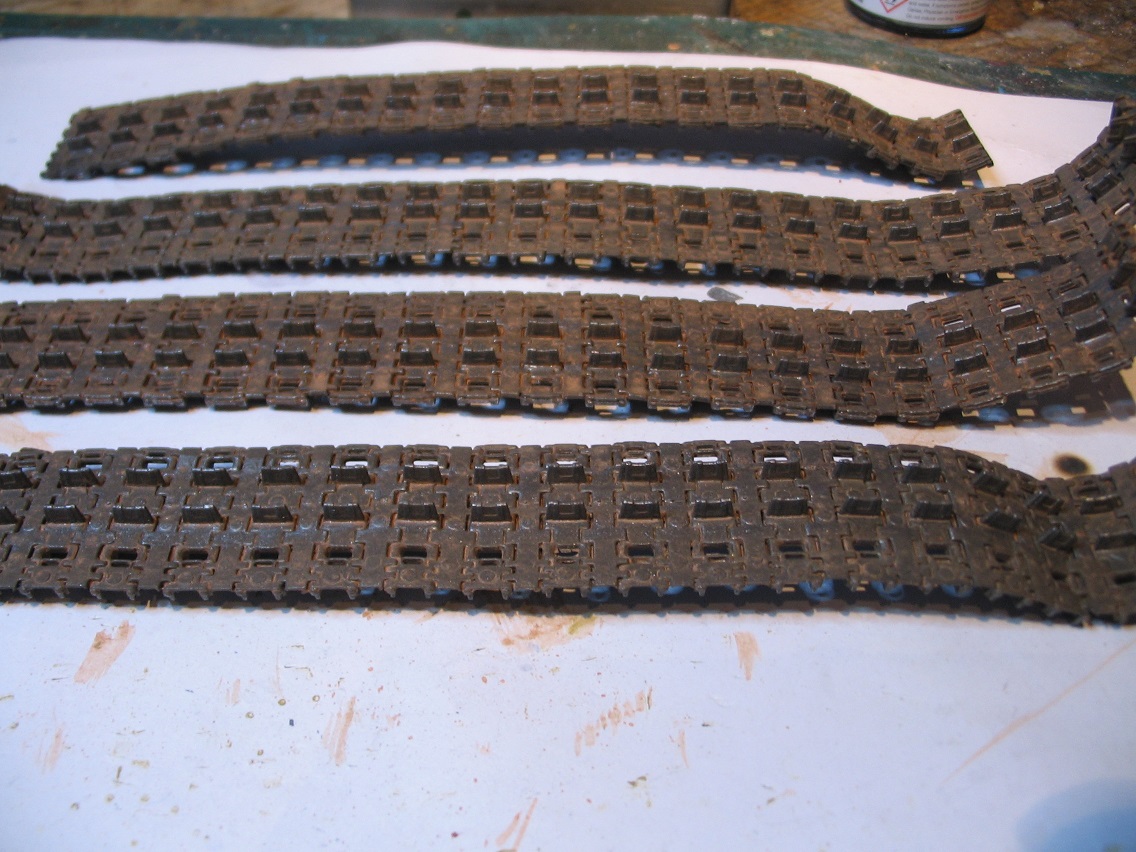
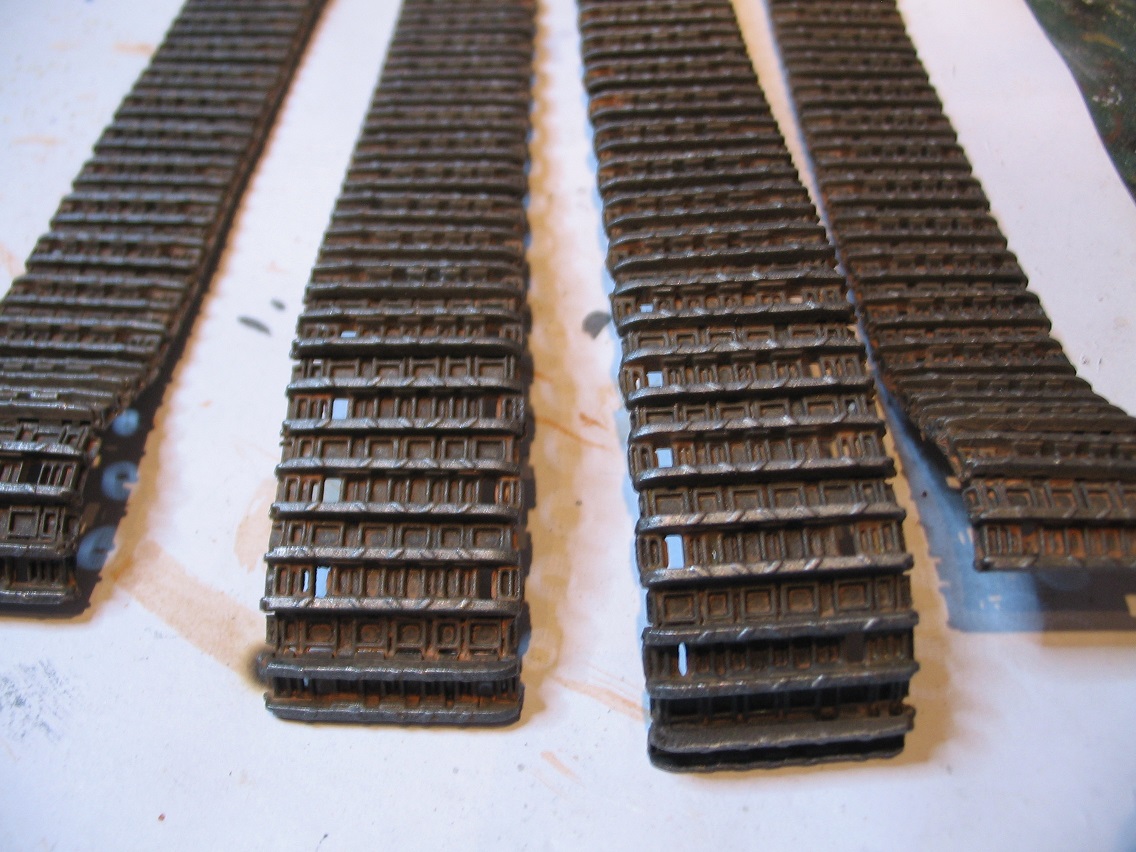
As you can see the detail on the tracks is nice and sharp and they do go together very easily. Putting them on was a bit trickier than I'd anticipated as you only need one wheel to be slightly out and you end up wrestling with the tracks. Due to this I took the easy option and used CA as I worked my way along so it would hold them in place. There's nothing in the instructions to tell you how many links you need either side so it's a question of guesswork. Fortunately my guesstimation had worked and I only needed to slip three track links in. To make this easier I clipped off the mating lugs and glued end to end. Unorthodox but it worked okay.
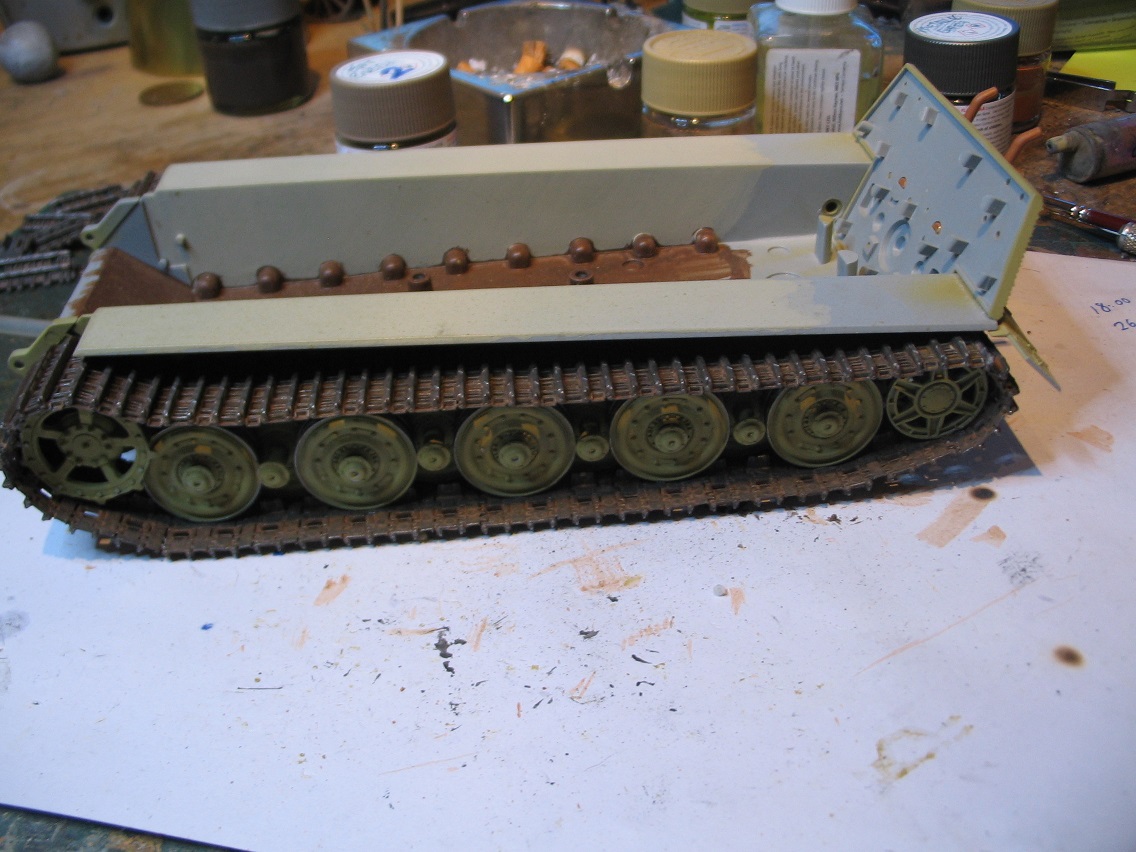
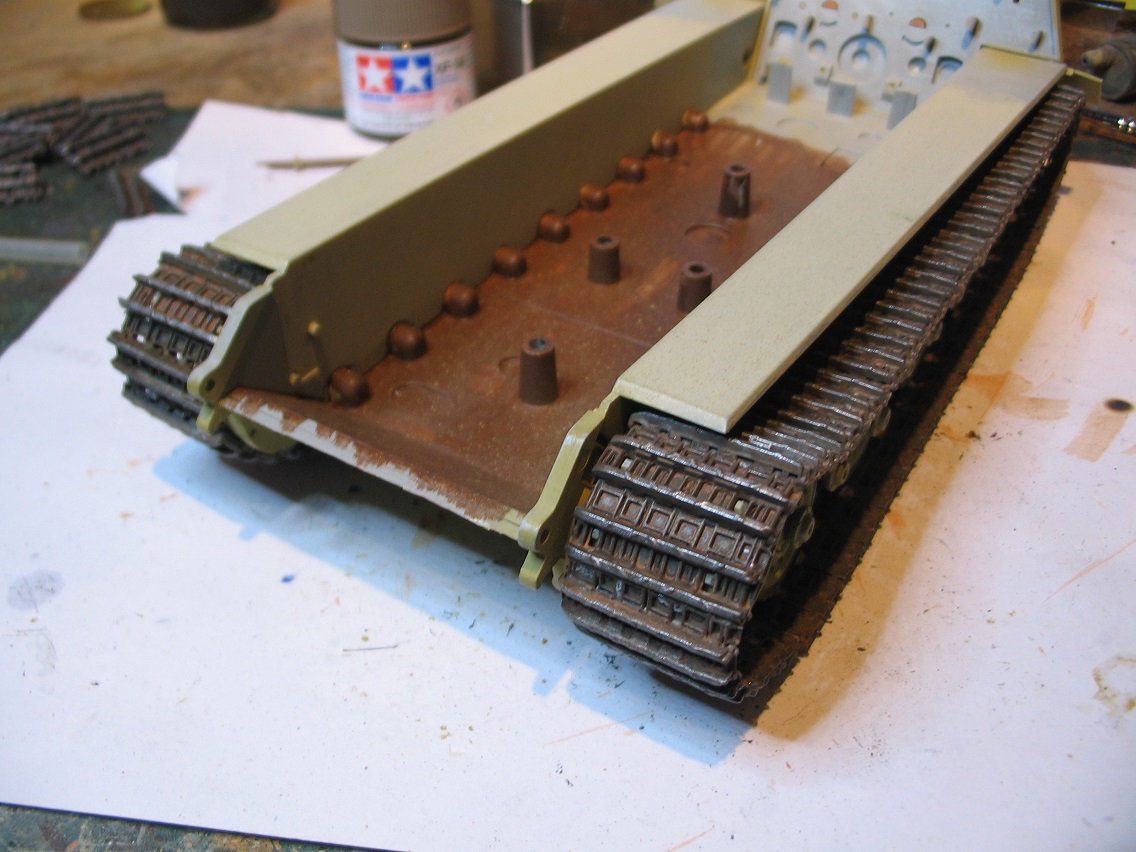
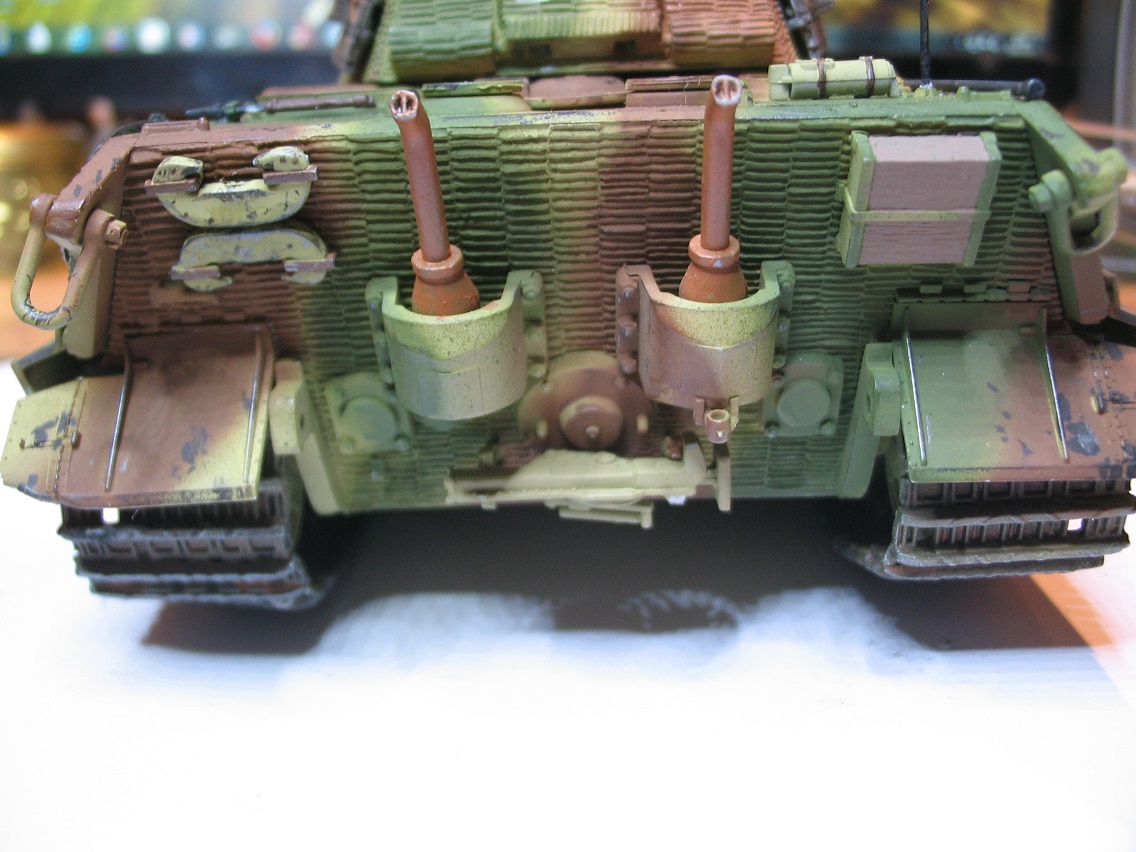
Withe the tracks on it's now beginning to look like a tank. Final stage before mating the hull was to add the backplate. There's some very nice detail on here with the numerous nuts and bolts. Construction of this was straightforward without any problems as such. If you look at the plate on the left you'll see a small bar halfway up. It makes absolutely no mention of this part K2 in the instructions but as I don't trust the instructions I tend to look at parts left and see where they're likely to go Paid off in this case. The istructions tell you to use PE parts for the jack bracket which I ignored and used the plastic ones the instructions tell you not to use which are probably off another kit. The reason being tank jacks are heavy beasts by the very nature of what they've got to lift. The PE parts would bend and snap eventually carrying that weight scalewise and are way too thin when compared to the real thing. PE for the sake of it again by the looks of it. It also tells you to use B8 as the tow cable hooks. Oddly enough it tells you to use the same part on the front but there are only two B8's. There is however a B15 which is the same part so pas de probleme. Does anyone actually check these instructions before they send them to the printers? It certainly doesn't look like it with the amount of inaccuracies as well as vagueness. That's three mistakes on one section!
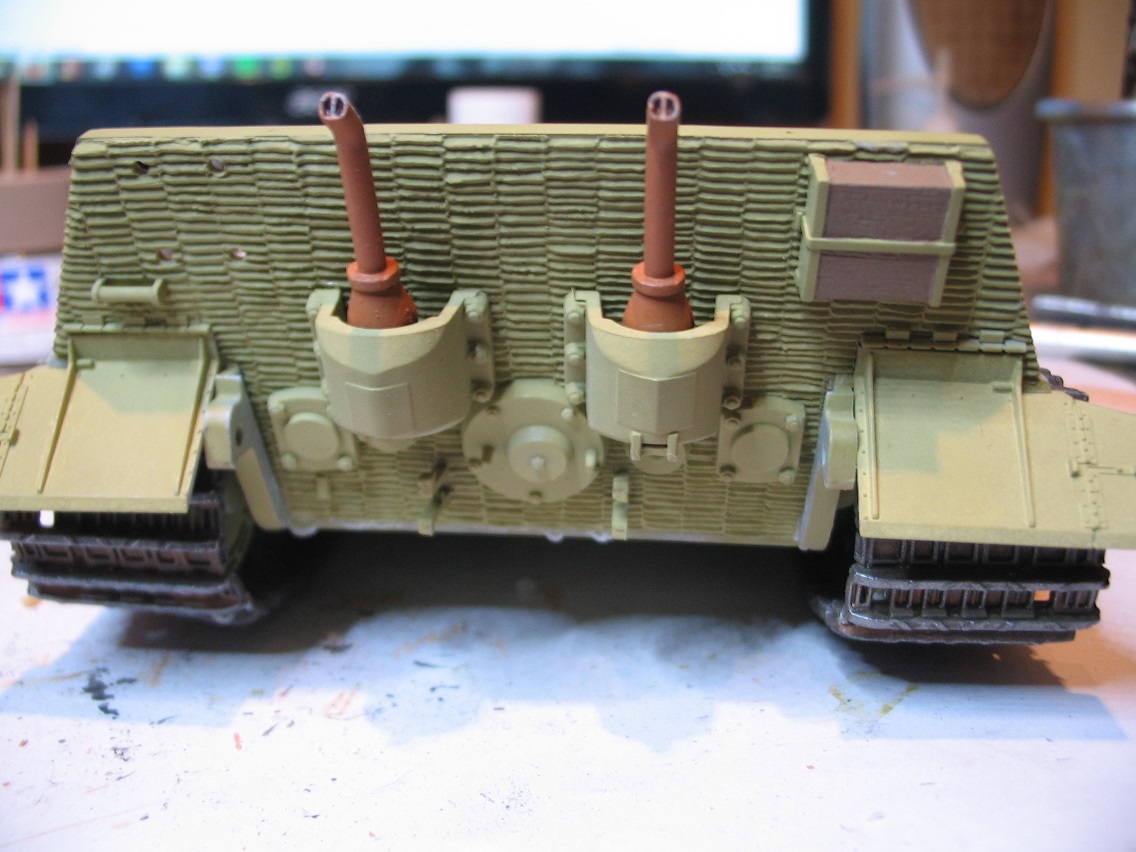
I've left a few bits off until after I've sprayed it fully. Next step was attaching the top of the hull. It was going together well until I tried to get the front end down. It didn't fit.
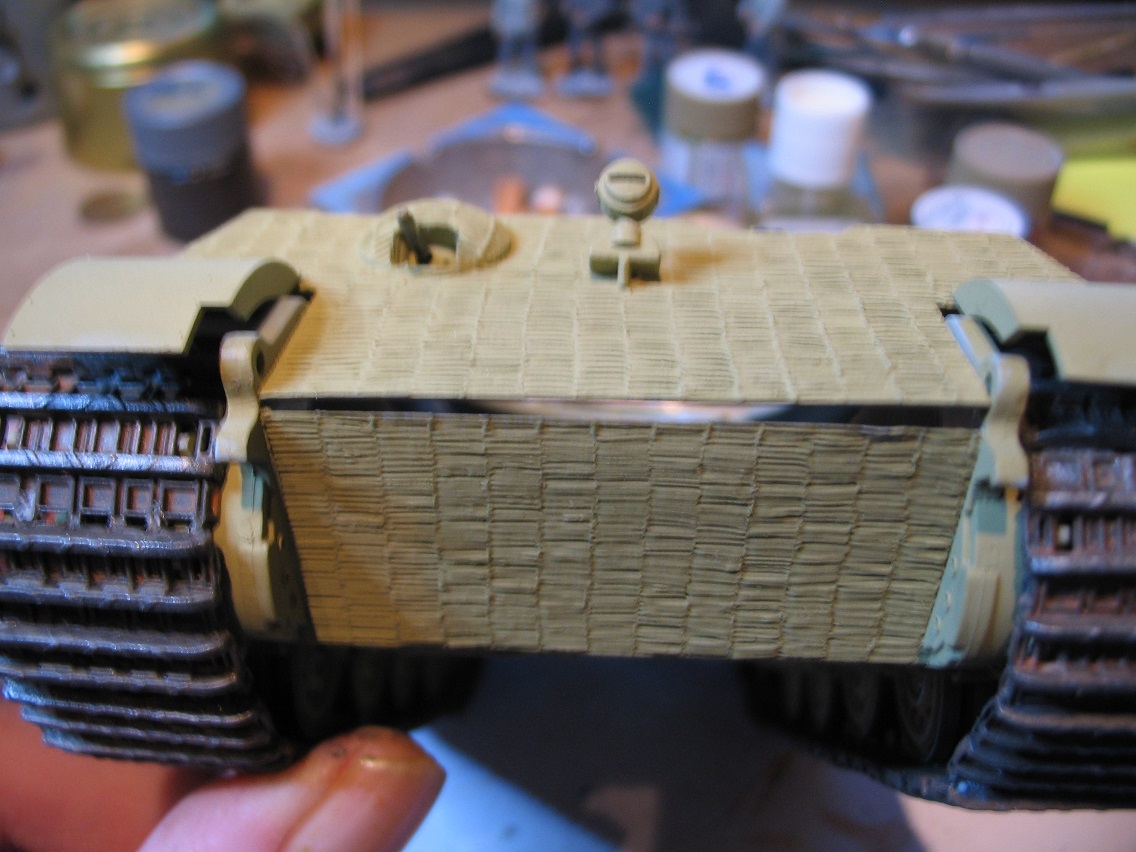
Fortunately this was a simple fix as I just sanded the edges with an emery board until it slotted in. I attached the mudguards and sat back to admire it. Then realised that the front end looked completely wrong!
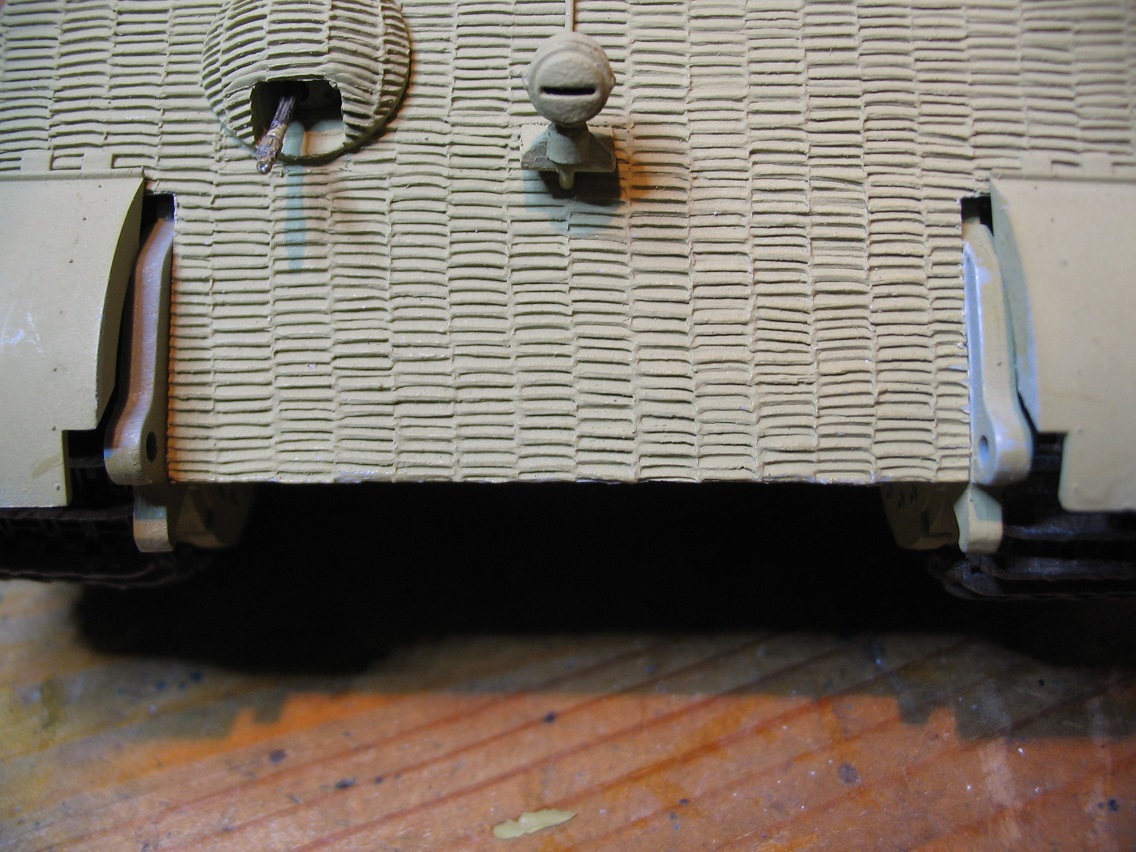
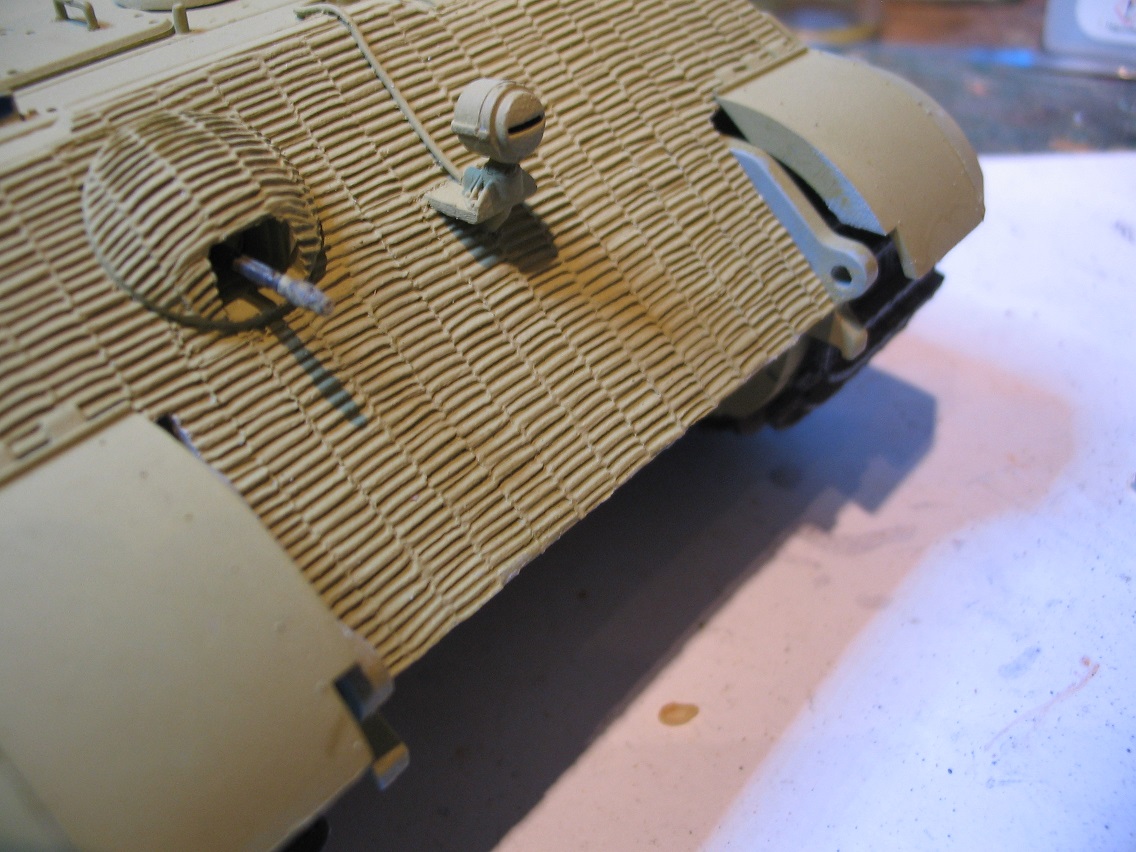
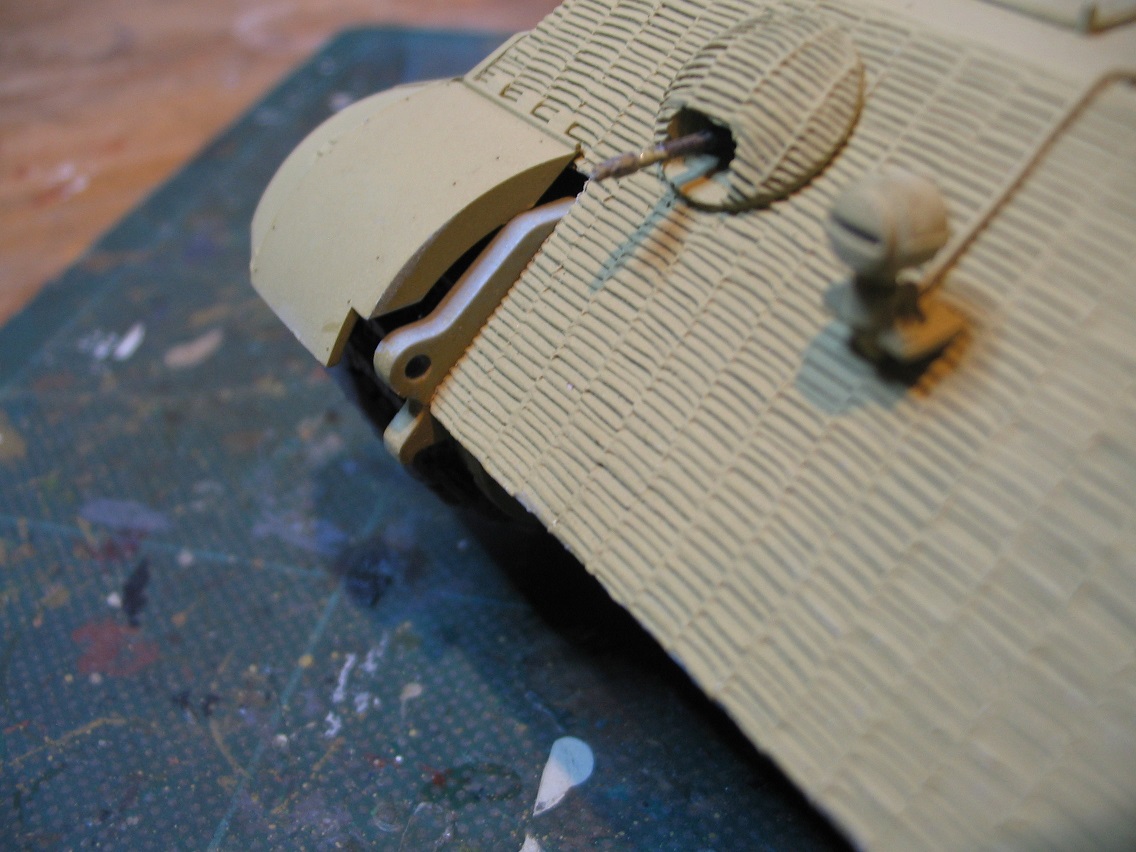
My immediate thought was "How've I managed to do that?" then realised it wasn't me it was the kit.As you can see there are huge gaps, not only on the glacis plate but at the sides where the mudguards are. My immediate thought was filler and very thin plastic card to rectify it, groaning at the same time. I'd just checked this one against a Tamiya one I'm redoing to see how it should look and remembered I'd got a scrap Tamiya King Tiger in the cupboard I could use to solve the problem. Out came the X-Acto saw and cut off the two raised parts that hold the towing eyes and attached the two liberated Tamiya bits. Not only did they hide the glacis holes but also the side of the mudguard as they should.
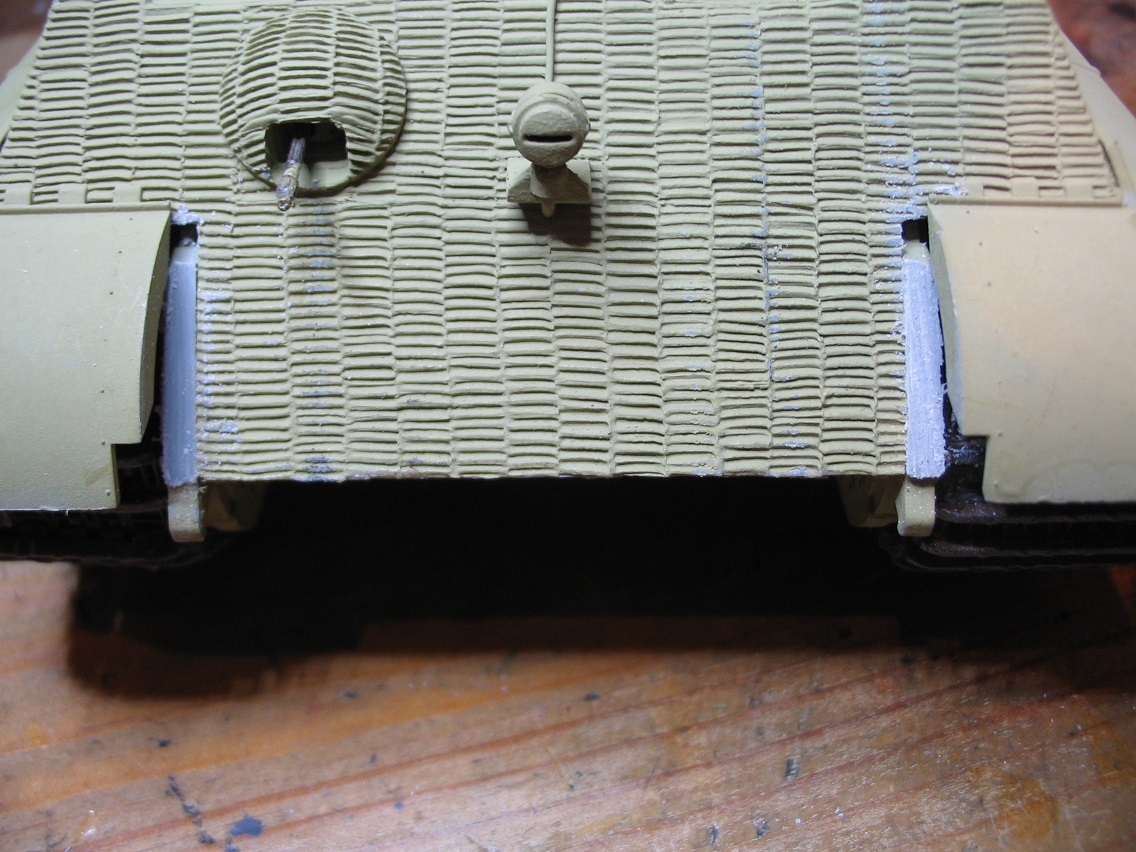
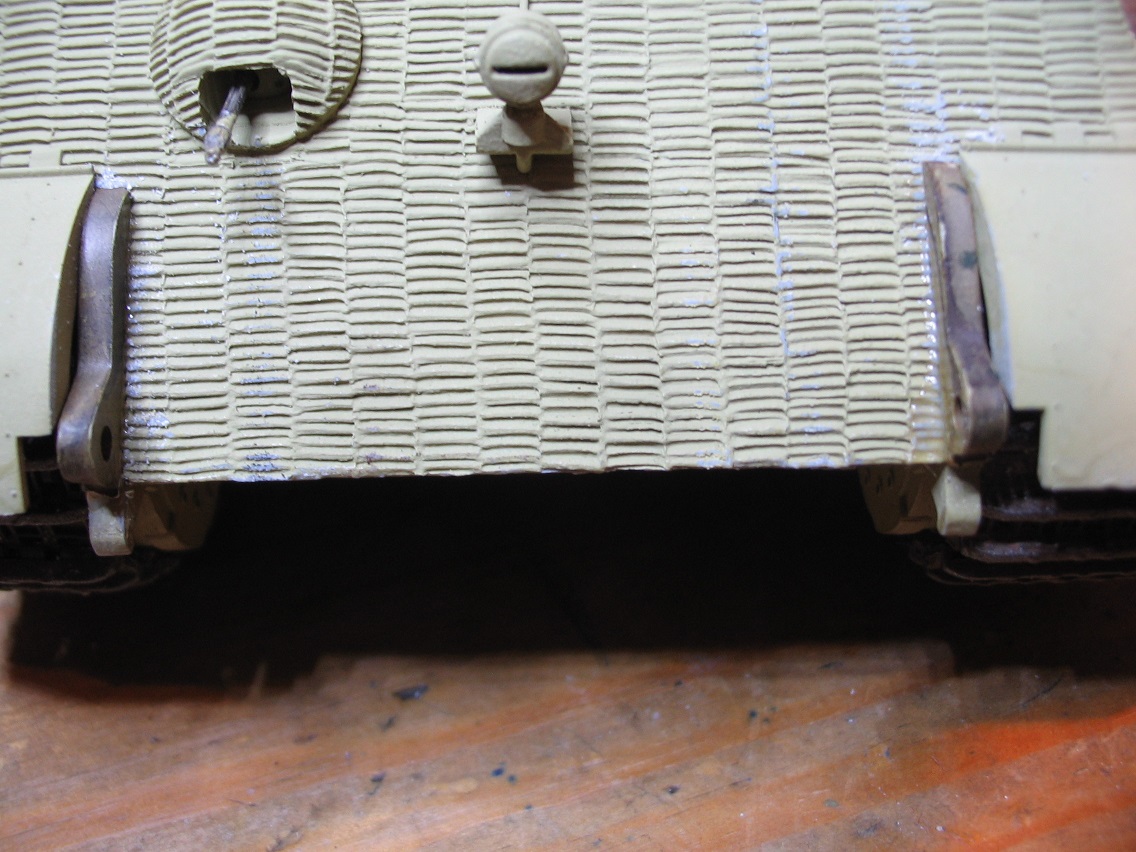
Not only are they the right size but they look more substantial. The thickness of the original ones looked like the thickness of something you'd find ona Panzer I or II not something as big and power ful as a King Tiger. Below is a comparison of the two parts just so you can see what I'm moaning about.
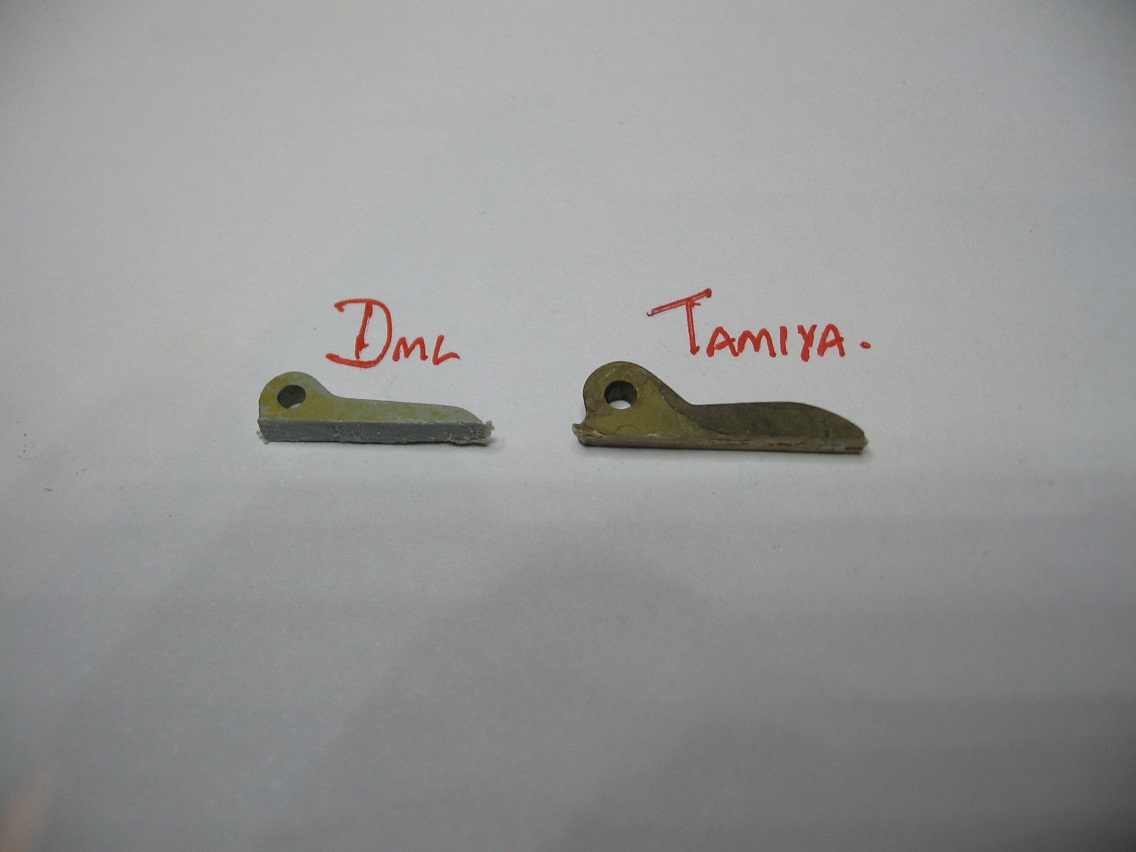
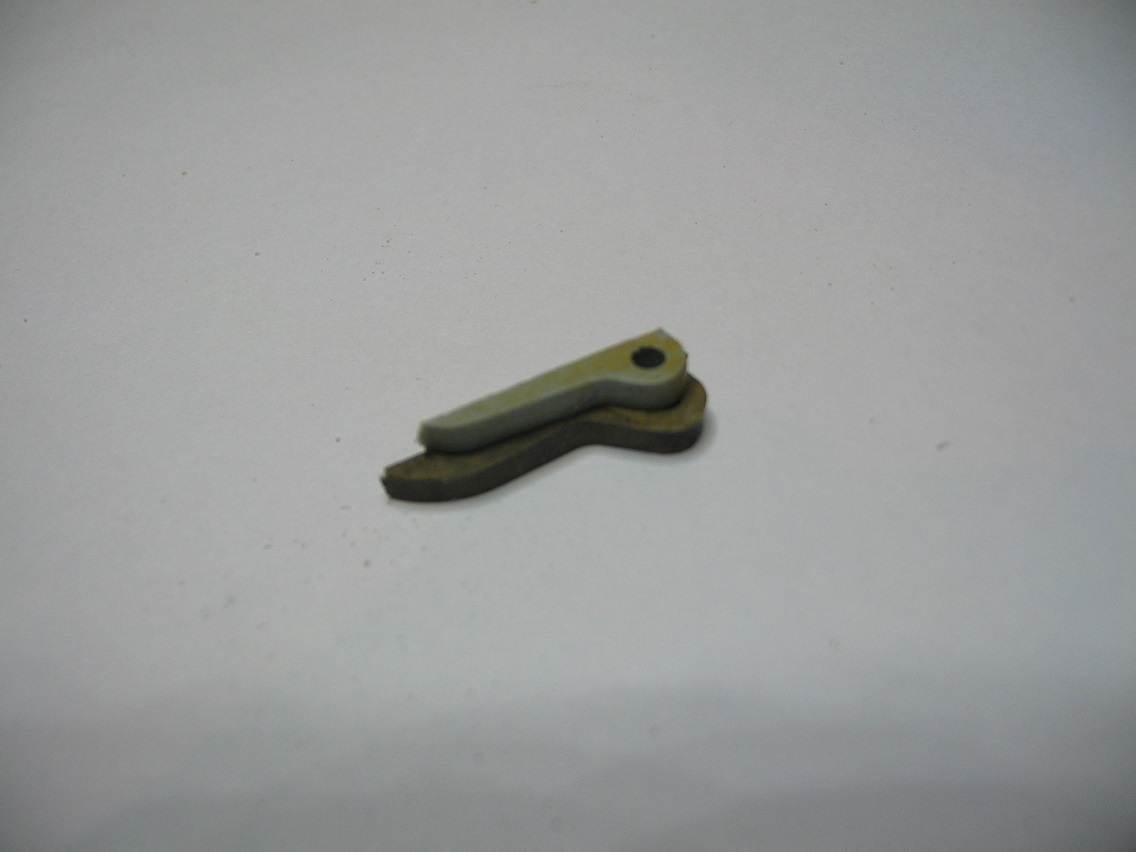
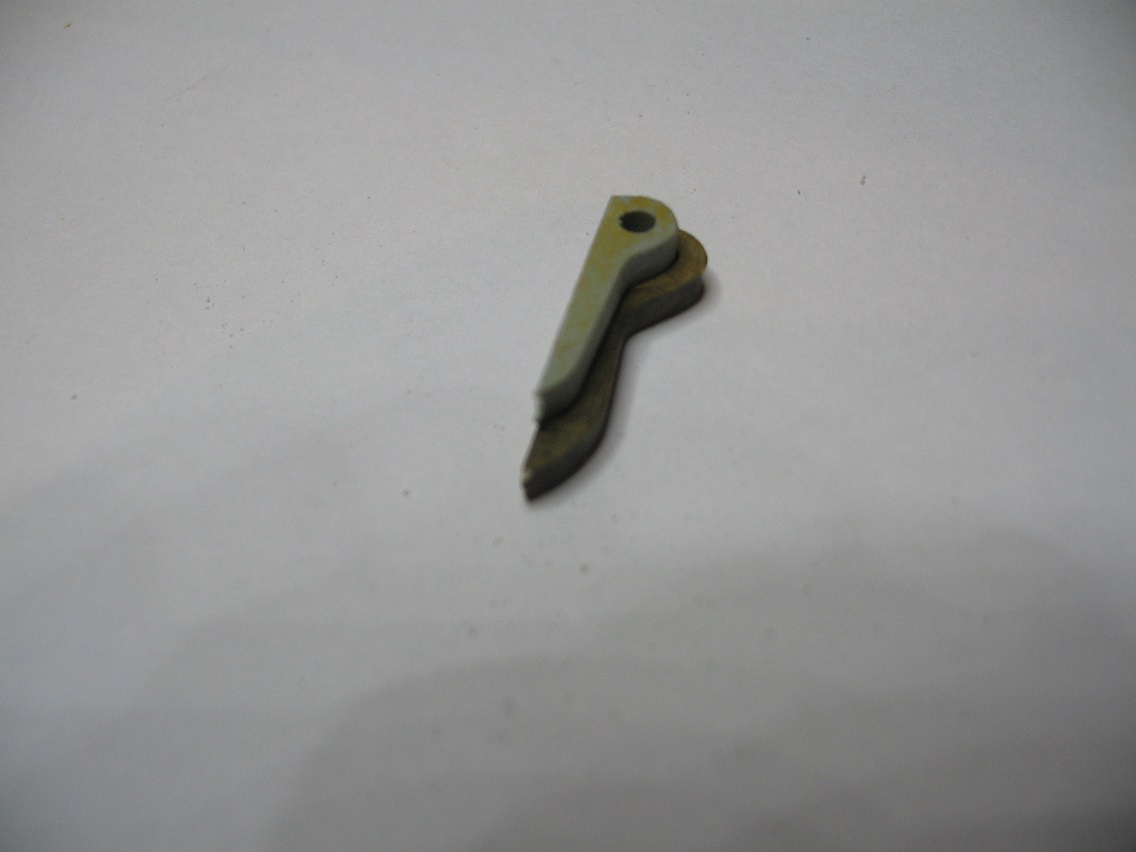
As you can see it's miles too small. How could they make such a glaring mistake? How many people globally have bought this kit and found that they either can't finish the kit as they've not got the skills to make a replacement or have not been as fortunate as myself to have something in the cupboard that can be cannibalised to fix it. This to me is totally unacceptable. This should have been picked up preproduction which leads me back to the question has anyone at DML actually built this kit. Not as a test piece but as a retail kit. If they had it would have gone back to the literal drawing board.
I've got to wait for the glue to dry on this before I can give it a touch up before I carry on and I've reached a natural break.
Hopefully tomorrow won't be as annoying as today...

I'd deceided to build the tracks up into top and bottom lengths using liquid poly so I could shape it around the sprocket and end wheel, leaving a gap to fill when I was ready to mount them. The advantage of doing it this way is it means that I can paint them and weather them before I put them on the tank. I gave them a coat of dark iron, followed by a dark brown metallic I'd mixed for tracks. Once this had dried I applied a weak rusty coloured wash and to finish them off dry brushed the raised part of the track with metallic greay. I also drybrushed the guide teeth inside the track to show wear on them where they rub against the road wheels. I tried not to overdo it as I thought subtlety worked better.


As you can see the detail on the tracks is nice and sharp and they do go together very easily. Putting them on was a bit trickier than I'd anticipated as you only need one wheel to be slightly out and you end up wrestling with the tracks. Due to this I took the easy option and used CA as I worked my way along so it would hold them in place. There's nothing in the instructions to tell you how many links you need either side so it's a question of guesswork. Fortunately my guesstimation had worked and I only needed to slip three track links in. To make this easier I clipped off the mating lugs and glued end to end. Unorthodox but it worked okay.


Withe the tracks on it's now beginning to look like a tank. Final stage before mating the hull was to add the backplate. There's some very nice detail on here with the numerous nuts and bolts. Construction of this was straightforward without any problems as such. If you look at the plate on the left you'll see a small bar halfway up. It makes absolutely no mention of this part K2 in the instructions but as I don't trust the instructions I tend to look at parts left and see where they're likely to go Paid off in this case. The istructions tell you to use PE parts for the jack bracket which I ignored and used the plastic ones the instructions tell you not to use which are probably off another kit. The reason being tank jacks are heavy beasts by the very nature of what they've got to lift. The PE parts would bend and snap eventually carrying that weight scalewise and are way too thin when compared to the real thing. PE for the sake of it again by the looks of it. It also tells you to use B8 as the tow cable hooks. Oddly enough it tells you to use the same part on the front but there are only two B8's. There is however a B15 which is the same part so pas de probleme. Does anyone actually check these instructions before they send them to the printers? It certainly doesn't look like it with the amount of inaccuracies as well as vagueness. That's three mistakes on one section!

I've left a few bits off until after I've sprayed it fully. Next step was attaching the top of the hull. It was going together well until I tried to get the front end down. It didn't fit.

Fortunately this was a simple fix as I just sanded the edges with an emery board until it slotted in. I attached the mudguards and sat back to admire it. Then realised that the front end looked completely wrong!


My immediate thought was "How've I managed to do that?" then realised it wasn't me it was the kit.As you can see there are huge gaps, not only on the glacis plate but at the sides where the mudguards are. My immediate thought was filler and very thin plastic card to rectify it, groaning at the same time. I'd just checked this one against a Tamiya one I'm redoing to see how it should look and remembered I'd got a scrap Tamiya King Tiger in the cupboard I could use to solve the problem. Out came the X-Acto saw and cut off the two raised parts that hold the towing eyes and attached the two liberated Tamiya bits. Not only did they hide the glacis holes but also the side of the mudguard as they should.


Not only are they the right size but they look more substantial. The thickness of the original ones looked like the thickness of something you'd find ona Panzer I or II not something as big and power ful as a King Tiger. Below is a comparison of the two parts just so you can see what I'm moaning about.


As you can see it's miles too small. How could they make such a glaring mistake? How many people globally have bought this kit and found that they either can't finish the kit as they've not got the skills to make a replacement or have not been as fortunate as myself to have something in the cupboard that can be cannibalised to fix it. This to me is totally unacceptable. This should have been picked up preproduction which leads me back to the question has anyone at DML actually built this kit. Not as a test piece but as a retail kit. If they had it would have gone back to the literal drawing board.
I've got to wait for the glue to dry on this before I can give it a touch up before I carry on and I've reached a natural break.
Hopefully tomorrow won't be as annoying as today...

Posted: Thursday, July 13, 2017 - 07:44 AM UTC
Good fix! Sadly, you should have never needed it. Before the sell a kit, they should at least have a roomful of people slapping them together to check fit.
tetleyteaman

Joined: December 27, 2003
KitMaker: 15 posts
Armorama: 11 posts

Posted: Thursday, July 13, 2017 - 12:09 PM UTC
Yes, Dragon really made a mess of this kit with those front parts.
I am at work at the moment so don't have the kit numbers but when Dragon prepared this they used the lower halves from their first issue King Tigers. These parts were modified for the Zimmerit ones that came out in 2008 (ish) but Dragon simply put the older, incorrect, parts in the box.
If you look at the CAD on the box bottom you will see that the bits that should be in the box are shown on the CAD. What is in the box doesn't match the contents shown!
The correct parts are included as spares in one of the Cyberhobby boxings but why Dragon didn't give the builder the correct parts (despite showing them on the box) is a mystery to put it mildly.
Enjoying your build of this kit though, despite Dragon not making it easy
Edit - thanks to the wonders of Dropbox I can confirm that this kit is a re-box of 6400 and Dragon should have used Sprue 'D' from that kit. If you have the Cyberhobby kit 6349 (King Tiger Initial Production) then you have a spare Sprue 'D' to get the correct parts from. Hope this information helps.
I am at work at the moment so don't have the kit numbers but when Dragon prepared this they used the lower halves from their first issue King Tigers. These parts were modified for the Zimmerit ones that came out in 2008 (ish) but Dragon simply put the older, incorrect, parts in the box.
If you look at the CAD on the box bottom you will see that the bits that should be in the box are shown on the CAD. What is in the box doesn't match the contents shown!
The correct parts are included as spares in one of the Cyberhobby boxings but why Dragon didn't give the builder the correct parts (despite showing them on the box) is a mystery to put it mildly.
Enjoying your build of this kit though, despite Dragon not making it easy

Edit - thanks to the wonders of Dropbox I can confirm that this kit is a re-box of 6400 and Dragon should have used Sprue 'D' from that kit. If you have the Cyberhobby kit 6349 (King Tiger Initial Production) then you have a spare Sprue 'D' to get the correct parts from. Hope this information helps.
erichvon

Joined: January 17, 2006
KitMaker: 1,694 posts
Armorama: 1,584 posts

Posted: Thursday, July 13, 2017 - 02:53 PM UTC
Gaz- You're spot on there mate. I'm sure that before BMW put a car on the market they drive it round for a good few months to make sure it works properly before selling it to the public. It would appear that DML in their rush to get something on the market don't seem to bother actually checking that a kit destined for modellers has all the correct parts or at the very least fits together properly. When you consider how long it would take them to build it and check that it's satisfactory it's nothing in the greater scheme of things. Whatever happened to customer satisfaction?
Graham- That's really interesting to know. It would appear then that they've not checked whether this kit will fit together properly due to laziness if the correct parts are available in another box. You're right about the instructions. What they show and how it looks in reality are two completely different things. In the instructions the CAD shows how it looks now with the Tamiya parts used as a replacement. Incredible isn't it. I've had to use a competitors parts from a very old kit to fix their new kit. For the sake of including a couple of extra parts as replacements but neglecting to do it they've turned what could have been a great kit into an uphill struggle. This goes to show that their policy of releasing a dozen variants of the same tank using material that's already available is severely flawed. I thought doing the wheels was bad enough but this? It's unforgivable. I wonder how many others in the range are this much trouble?
Graham- That's really interesting to know. It would appear then that they've not checked whether this kit will fit together properly due to laziness if the correct parts are available in another box. You're right about the instructions. What they show and how it looks in reality are two completely different things. In the instructions the CAD shows how it looks now with the Tamiya parts used as a replacement. Incredible isn't it. I've had to use a competitors parts from a very old kit to fix their new kit. For the sake of including a couple of extra parts as replacements but neglecting to do it they've turned what could have been a great kit into an uphill struggle. This goes to show that their policy of releasing a dozen variants of the same tank using material that's already available is severely flawed. I thought doing the wheels was bad enough but this? It's unforgivable. I wonder how many others in the range are this much trouble?

Tojo72

Joined: June 06, 2006
KitMaker: 4,691 posts
Armorama: 3,509 posts

Posted: Thursday, July 13, 2017 - 09:33 PM UTC
Really appreciate all your input on this kit,it's absolutley unexcusable,I really have not had big problems with Dragon kits,especially their Tigers and KT's,in fact I built 6303,and it was very good,I thought this was a rebox,but man your blog has got me thinking twice about jumping into this one.
Good luck as you forge ahead.
Good luck as you forge ahead.
erichvon

Joined: January 17, 2006
KitMaker: 1,694 posts
Armorama: 1,584 posts

Posted: Friday, July 14, 2017 - 05:13 AM UTC
Anthony, I'm glad it's of some use. At the beginning I did say I'd point out the negatives as well as the positives otherwise there's no point in reviewing a kit. I've read reviews on other sites where they've gushed about a kit making it seem the best thing since sliced bread and on buying one have found it to be a nightmare or just crap hence me being so blunt on this one. I've built quite a few of DML's Sdkfz 250 and 251's which have the usual anomalies with fit problems every so often but nothing on this scale and parts of those builds have been enjoyable. Not so with this King Tiger. DML's cutting of corners by putting in sprues from other vehicles has bitten them in the arse this time by the looks of it. Realistically they could have used the original KT with zimmerit kit which I would imagine is okay (that's a guess and being optimistic as I've not built one or read any build reviews on it)although you said the one you built was okay and just put in the alternative turret part as that and the decals are the only things that should be different on this kit. There's not a huge amount left to do constructionwise now so I'm hoping (fingers crossed) there's no more nasty surprises.
erichvon

Joined: January 17, 2006
KitMaker: 1,694 posts
Armorama: 1,584 posts

Posted: Wednesday, July 19, 2017 - 08:03 AM UTC
Finally got back to the desk after drop kicking teddy into the corner after the apalling issues the other night. The last couple of sessions have been pretty straightforward as it didn't involve the instructions or having to glue anything. Yes, I finally had chance to start painting it. There are still a few little bits and bobs to put on like tool clamps, turret hangers etc but I can paint these and add them as I go along. I'd already given it a base coat of dunkel gelb so gave it another coat allowed it to dry overnight (I'd had enough and was tired) then onto the camo scheme. I'm not 100% where I'm having the vehicle yet as I'm going to use it in a small dio. I've got a pile of Miniart buildings so may as well use one of those as a backdrop. Possibly Hungary 1945 or a German street scene rearming and refuelling late 1944. I've got four buildings completed for a German street I had planned which so far has had three different changes of usage so this may end up on there. I've got to finish the bloody thing yet!. Alternatively I may place it in the Ardennes December 1944 transporting Fallschirmjager. There are a couple of classic photos that I can work to on that one. I resprayed the Tamiya King Tiger that I've been revamping at the same time so I can do a couple I suppose 
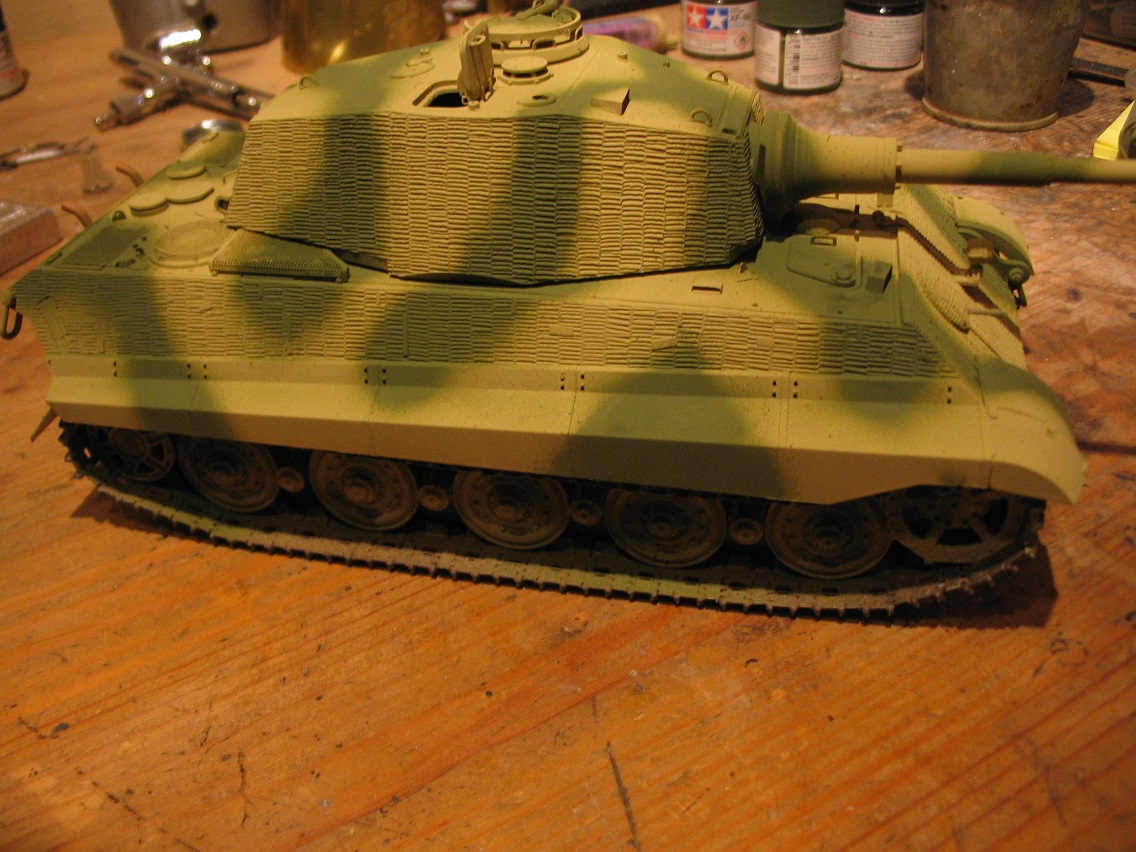
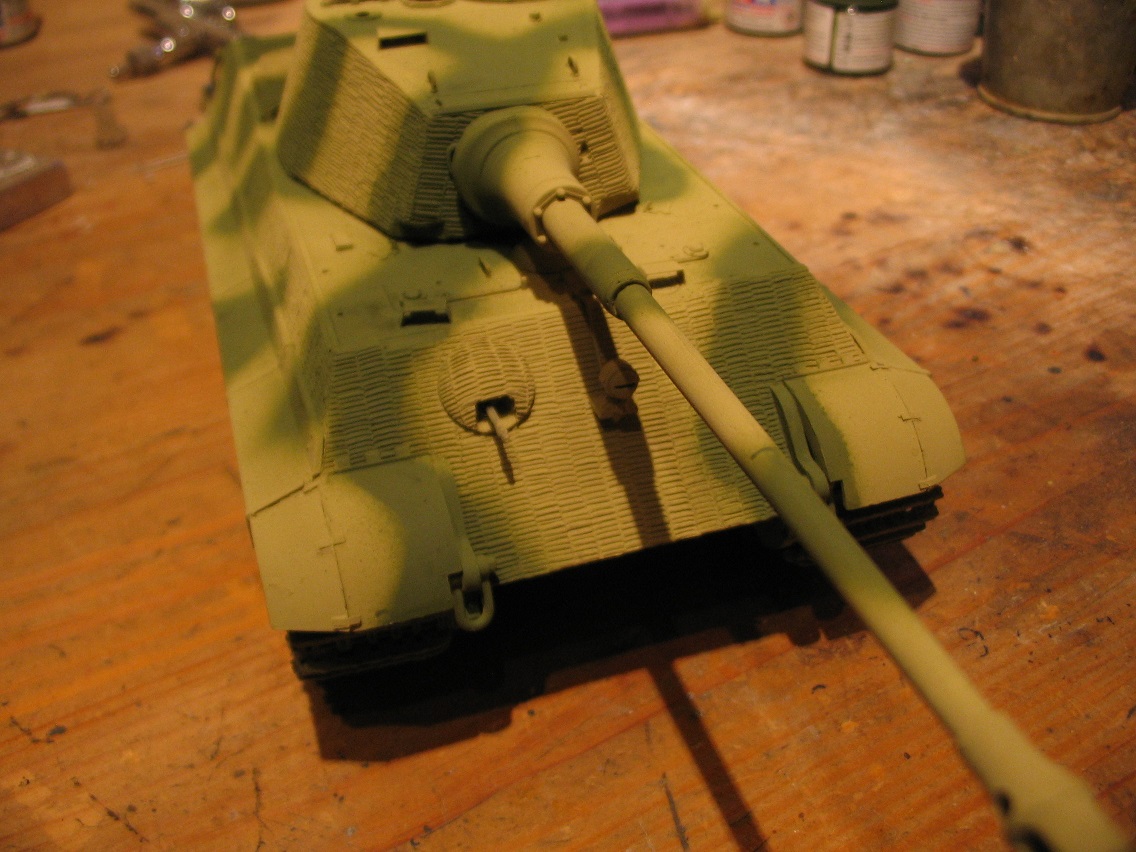
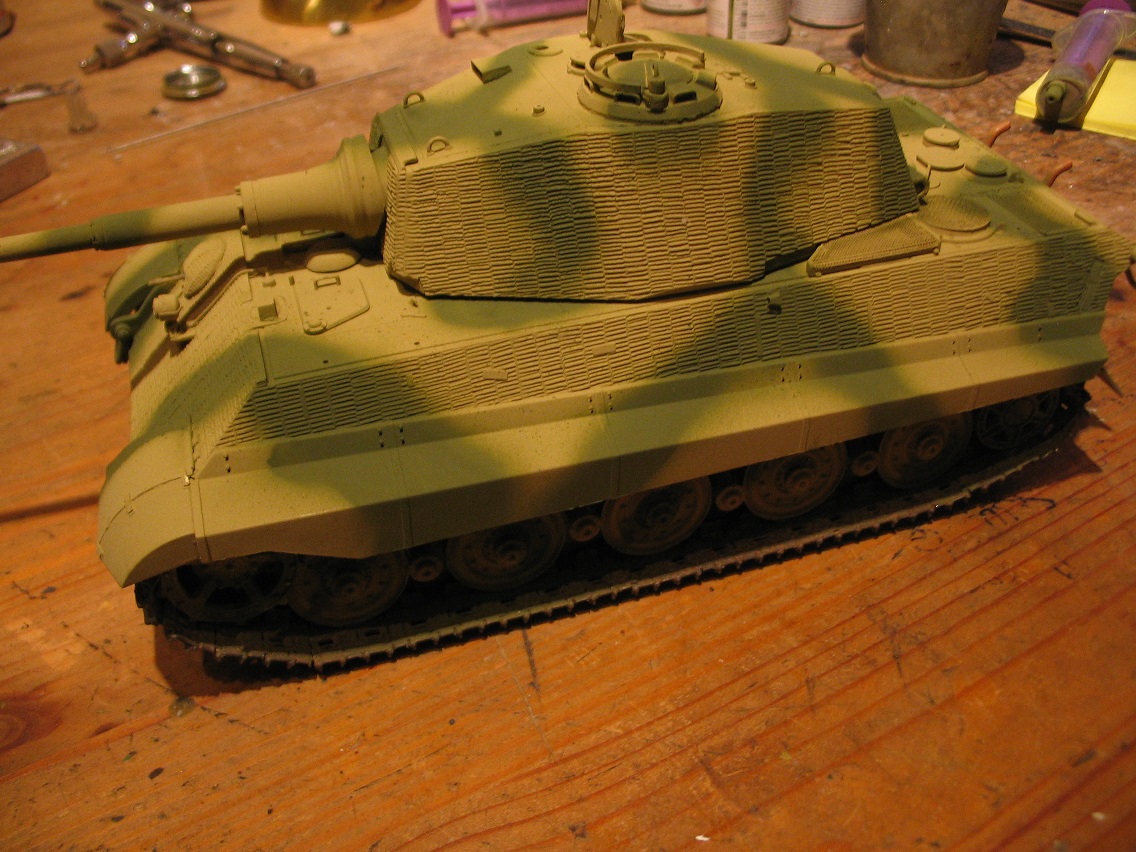
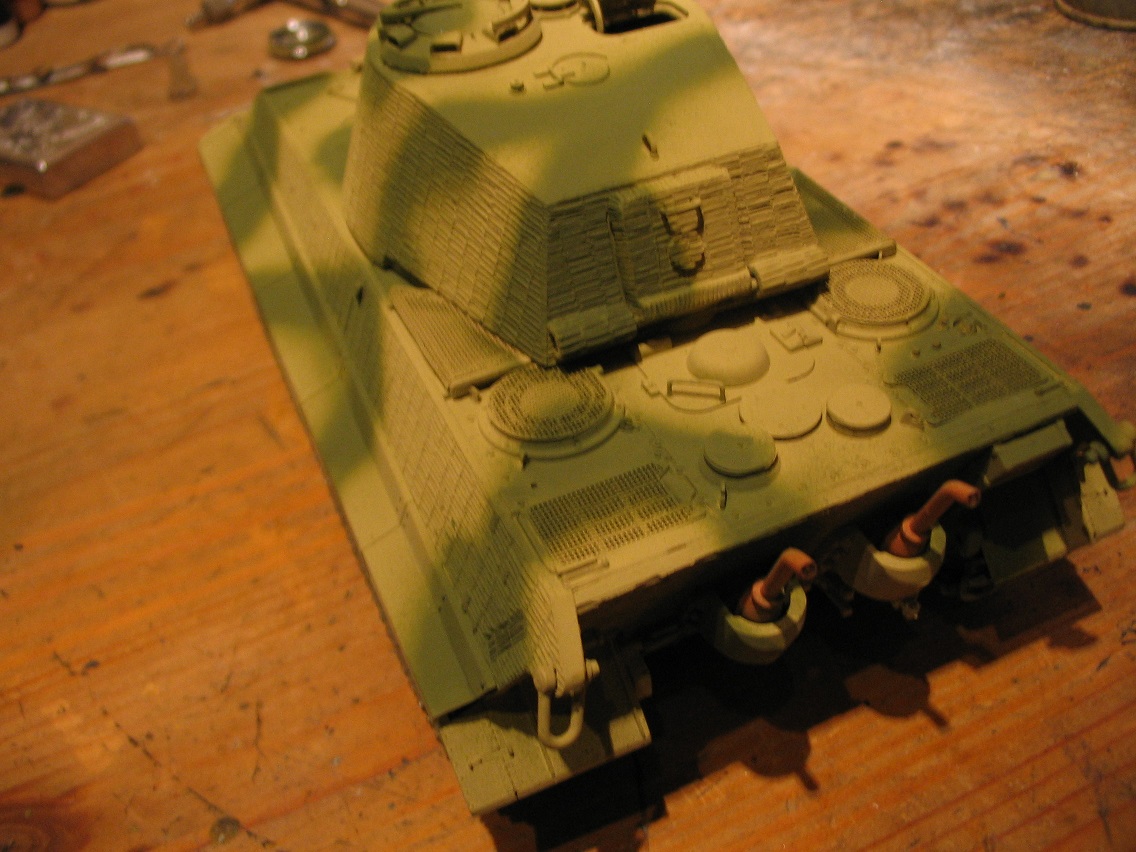
One thing I have noticed , which I like, is that the zimmerit is still nice and deep even with three coats of paint on it. I mentioned earlier on in the artcile about using some Eduard zimmerit once which was so shallow that once you applied paint it pretty much disappeared. Obviously with PE you're limited with depth but I like to be able to see it. No problems here. One gripe some people will inevitably make is that the zimerrit is too healthy with no chunks knocked off in action etc and too universal. I don't see that as a problem. Yes, everybody who builds this kit will have exactly the same zimmerit finish unless/until they sand areas flat to illustrate damage. It's not difficult to modify it and it certainly means that those of us who flinch at the thought of doing our own zimeritt can now have zimmed up vehicles to work with and personalise. Just for a change I diluted the paint just right and it went on without any problems. I've painted it as a panzer that has been camouflaged in the field by it crew as that gives me a lot more choice as where to place it timewise and battlewise.
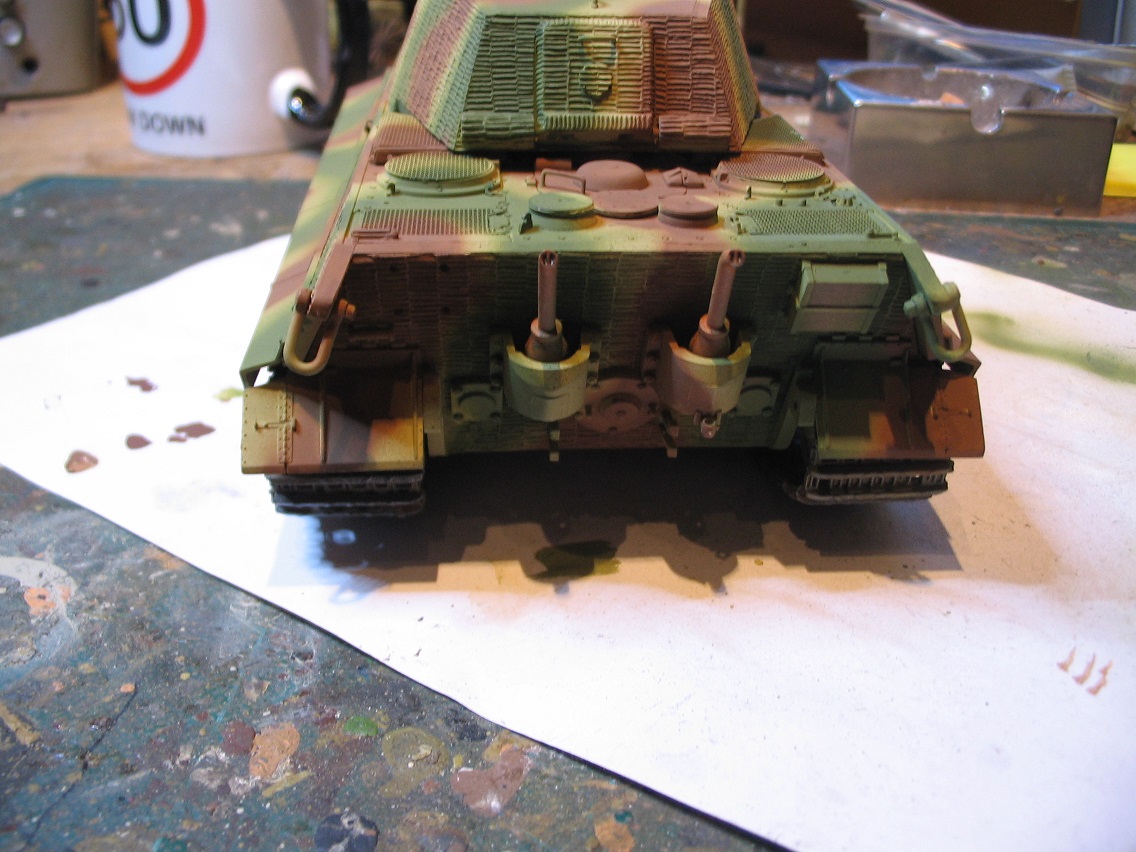
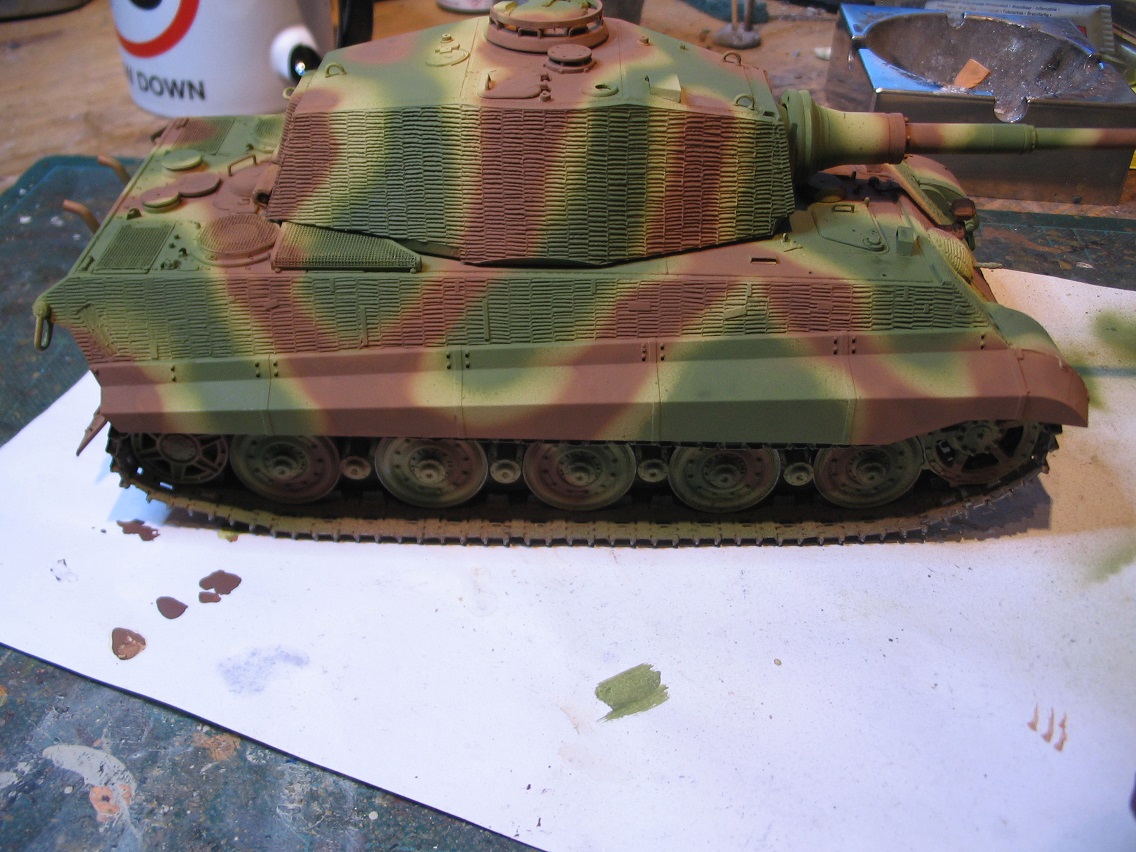
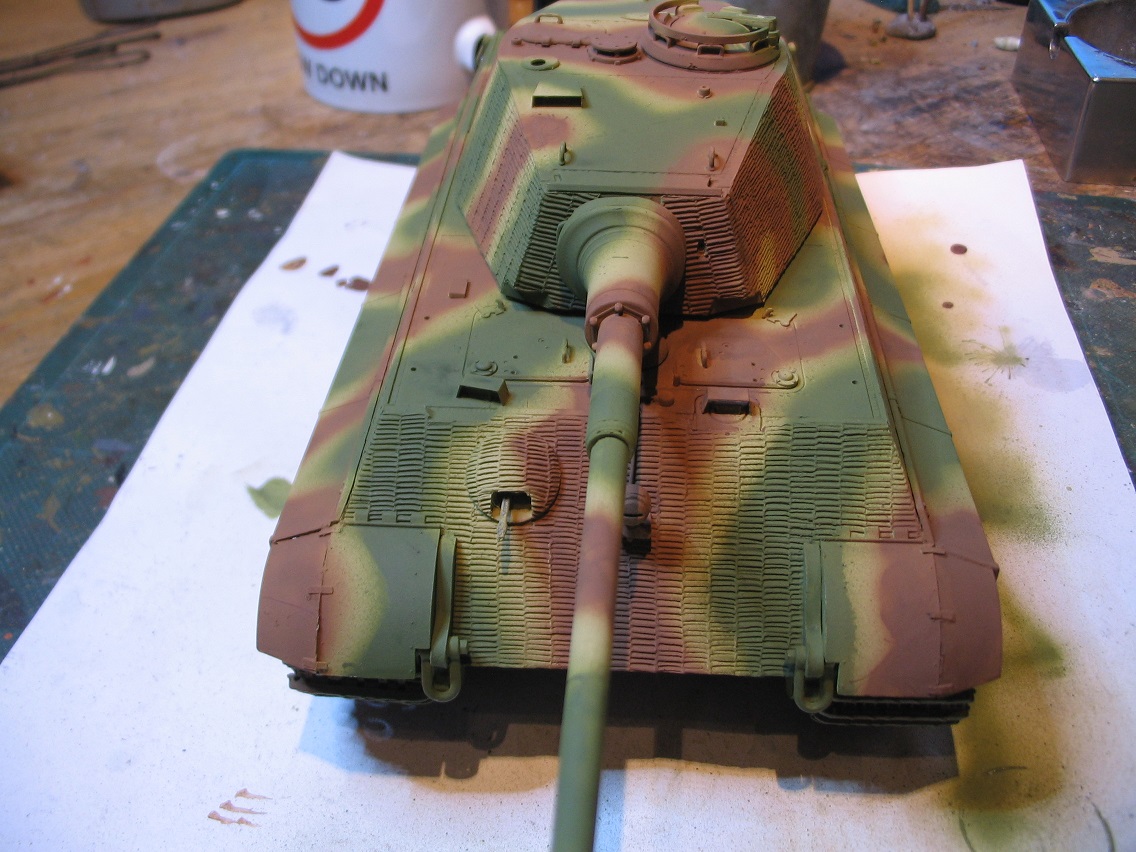
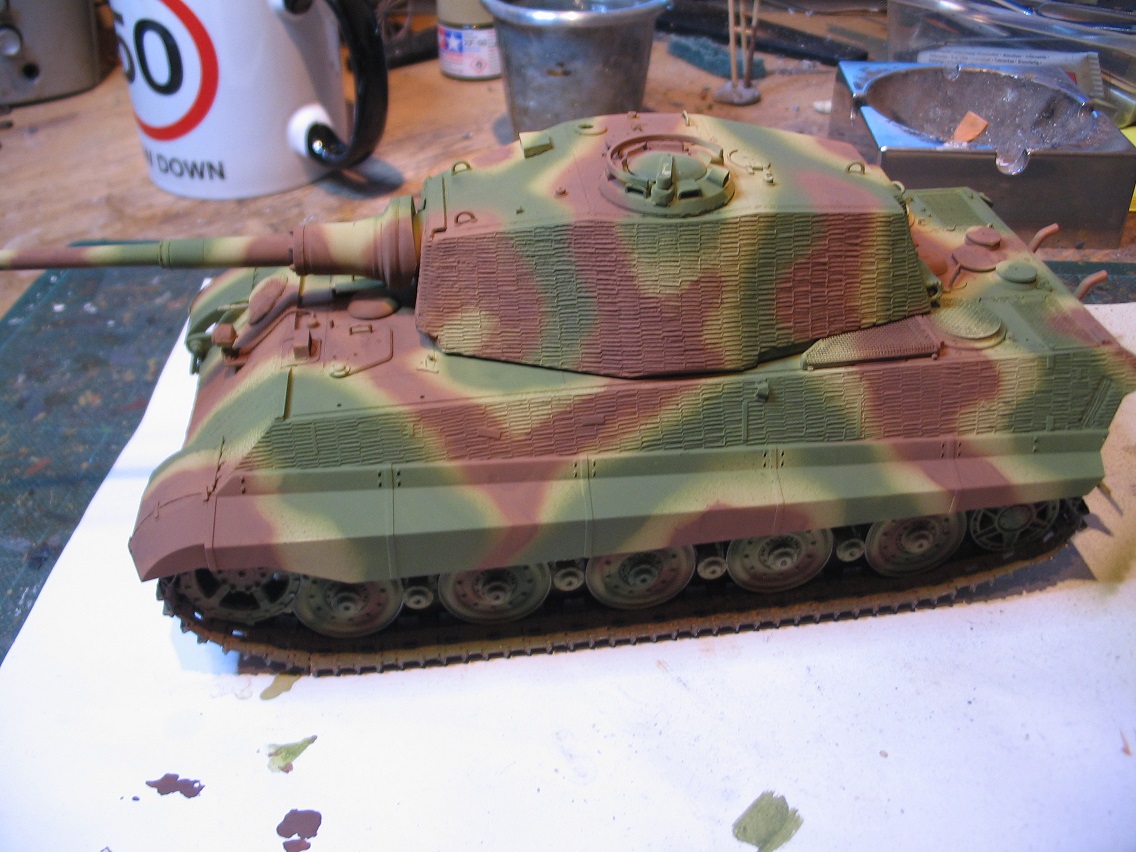
I used Tamiya paints for the spraying. I tend to use Tamiya quite a lot as they're ideal if you're having to work on a low budget and you get good coverage with them. The colours used here are Tamiya XF67 NATO Green and XF68 NATO Brown which I think work quite well together. Panzers sprayed in the field vary a lot in shade depending on what was used to dilute the paint which came in a thick paste form. In theory it should have been thinned with petrol but in reality was thinned with whatever was available. Oil, water, wine, urine are all supposed to have been used at some point prior to painting which resulted in widely varying colours. So that's it for today. I need to do some touching up like the tracks as there's quite a bit of overspray and then make a start on the weathering.
I've had to make a handle for the rear hatch as there was nothing to suit in the left over bits so another piece missing because they've put the wrongs sprues in. Straightforward enough as I used a piece of fuse wire bent around a pair of tweezers but it's not the point. It should be there when you open the box to build it. Another anomaly on the rear deck is the small tie down hooks. They obviously got bored part way doing the instructions or went for lunch here as they don't bother telling you to attach all of them despite them being visible in the instructions Thankfully there's not a lot left to do now so I'll hopefully be finishing this off in the next few days. At least this session was enjoyable.


One thing I have noticed , which I like, is that the zimmerit is still nice and deep even with three coats of paint on it. I mentioned earlier on in the artcile about using some Eduard zimmerit once which was so shallow that once you applied paint it pretty much disappeared. Obviously with PE you're limited with depth but I like to be able to see it. No problems here. One gripe some people will inevitably make is that the zimerrit is too healthy with no chunks knocked off in action etc and too universal. I don't see that as a problem. Yes, everybody who builds this kit will have exactly the same zimmerit finish unless/until they sand areas flat to illustrate damage. It's not difficult to modify it and it certainly means that those of us who flinch at the thought of doing our own zimeritt can now have zimmed up vehicles to work with and personalise. Just for a change I diluted the paint just right and it went on without any problems. I've painted it as a panzer that has been camouflaged in the field by it crew as that gives me a lot more choice as where to place it timewise and battlewise.


I used Tamiya paints for the spraying. I tend to use Tamiya quite a lot as they're ideal if you're having to work on a low budget and you get good coverage with them. The colours used here are Tamiya XF67 NATO Green and XF68 NATO Brown which I think work quite well together. Panzers sprayed in the field vary a lot in shade depending on what was used to dilute the paint which came in a thick paste form. In theory it should have been thinned with petrol but in reality was thinned with whatever was available. Oil, water, wine, urine are all supposed to have been used at some point prior to painting which resulted in widely varying colours. So that's it for today. I need to do some touching up like the tracks as there's quite a bit of overspray and then make a start on the weathering.
I've had to make a handle for the rear hatch as there was nothing to suit in the left over bits so another piece missing because they've put the wrongs sprues in. Straightforward enough as I used a piece of fuse wire bent around a pair of tweezers but it's not the point. It should be there when you open the box to build it. Another anomaly on the rear deck is the small tie down hooks. They obviously got bored part way doing the instructions or went for lunch here as they don't bother telling you to attach all of them despite them being visible in the instructions Thankfully there's not a lot left to do now so I'll hopefully be finishing this off in the next few days. At least this session was enjoyable.
Posted: Wednesday, July 19, 2017 - 08:45 AM UTC
Karl,
Looks nice painted!
Gaz
Looks nice painted!
Gaz
erichvon

Joined: January 17, 2006
KitMaker: 1,694 posts
Armorama: 1,584 posts

Posted: Wednesday, July 19, 2017 - 09:24 PM UTC
Thanks Gaz, at least there's finally something that's stress free 

erichvon

Joined: January 17, 2006
KitMaker: 1,694 posts
Armorama: 1,584 posts

Posted: Wednesday, July 26, 2017 - 10:36 AM UTC
Well I've had a few days beavering away at the kit and am glad to say it's finally finished. The problems however didn't stop even though I was so close to the end.
All that was really left to do was attach the smaller parts such as tools etc which I thought would be straightforward.
First call was the turret as I decided to put the AA mount on. One oversight in the kit is that there is the mount but no MG34 which I thought was odd. The actual bracket that the MG34 locks onto via a pin is grossly overscale as you can see in the photo below.
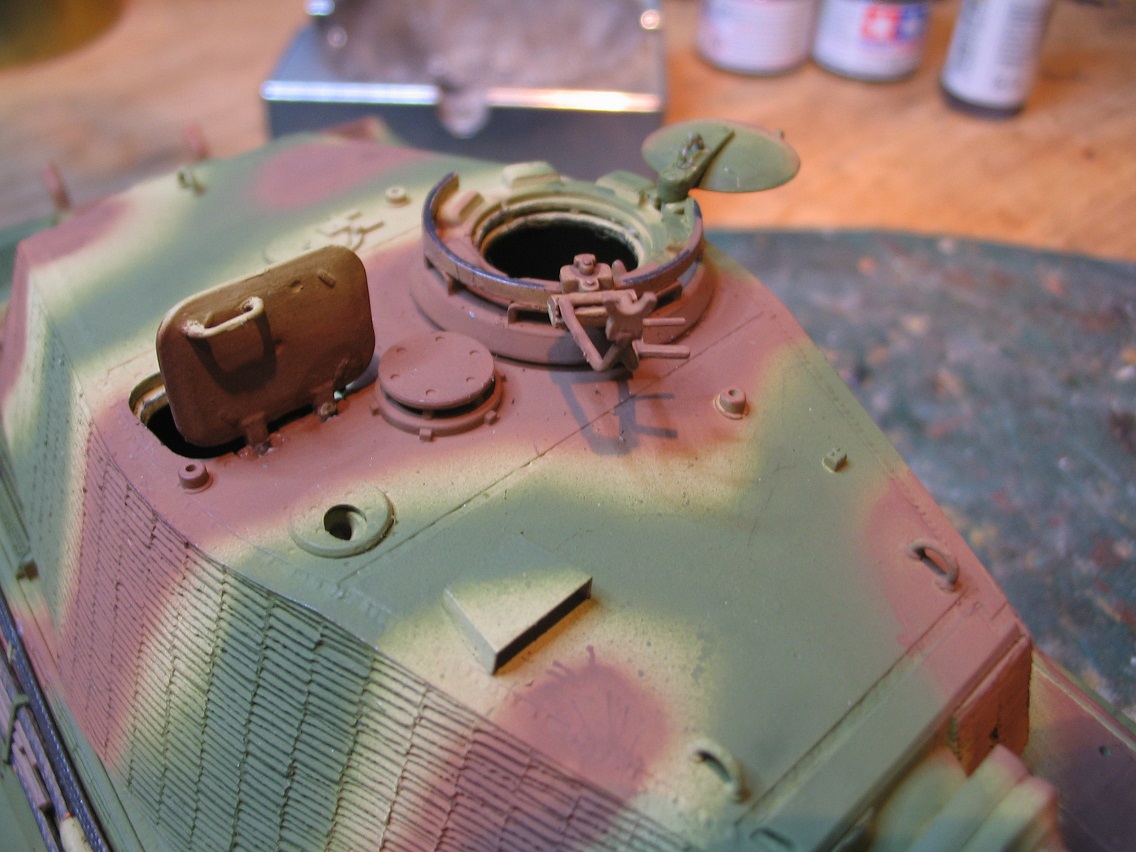
If there was an opportunity to use PE this would have been it yet there's loads of PE which is completely unsuitable for it's intended use. I used an 8B pencil on the AA mount ring to show wear where it had been moved round engaging targets. As there was no MG in the kit I used a Gen2 MG34 out of one of my figure sets. I've got to say even though it's not part of the kit, these Gen2 machine guns are really nice and really finish off a panzer. Because it's higher up you can actually see the hollowed out muzzle.
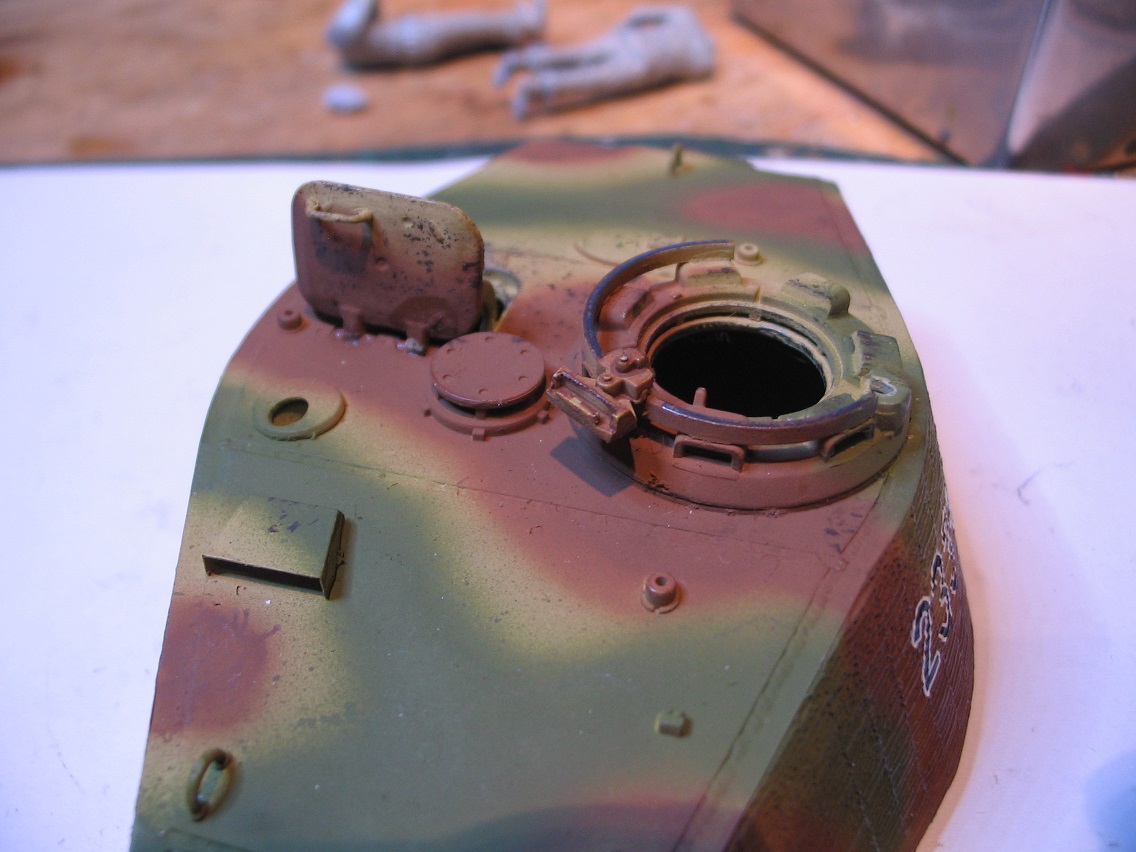
I did a bit of chipping on the turret roof and the hatches to show usage but haven't gone mad as you can see.
One thing you will need if buying this kit is some Micro Sol and Micro Set. As the zimmerit is quite pronounced, unless you use these two the decal will not adhere to the surface due to the ridges. I gave it a liberal dose of microsol to the surface, applied the decal, liberal application to the decal, let it soften for a couple of minutes and then gently pressed it on using some tissue. I found that the decal had softened enough to now go into the ridges and gives it quite a realistic look.
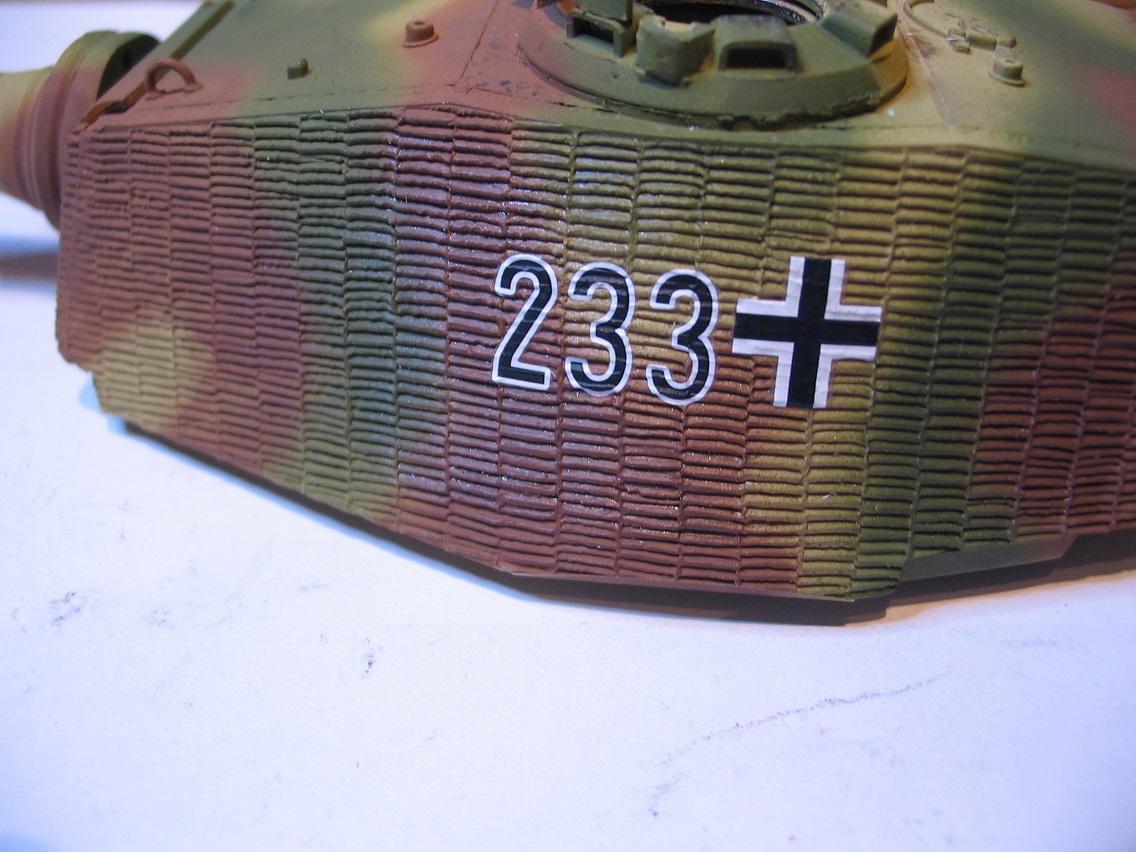
Although not a great photo it does show how much the decal sinks into the ridges giving it a painted on appearance.
Another omission was seats inside the turret. If you wanted to put crew standing in the turret they would have to levitate as there are no seats for them to stand on. Fortunately the scrap Tamiya KT supplied two so my intended crew did not have to perform feats of magic.
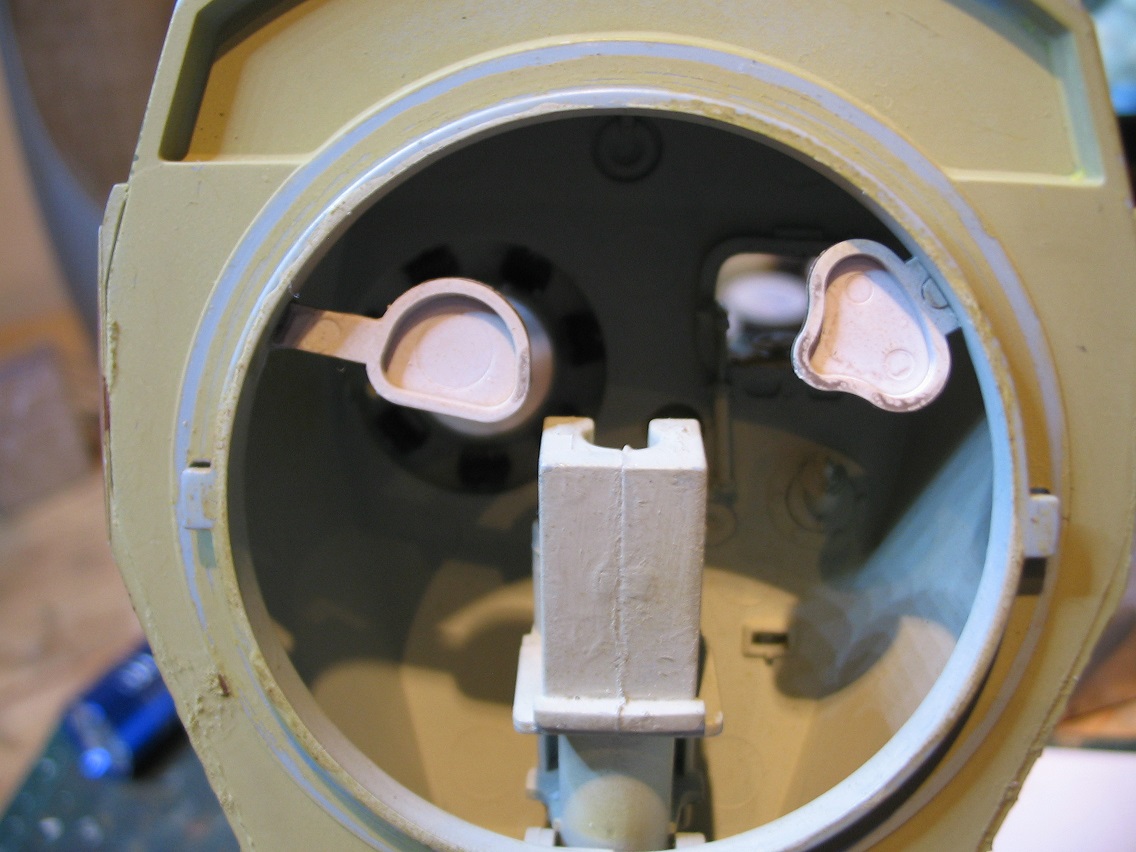
Basic but they do the job. You won't see them as there'll be a crewman standing on them but considering just how many really good panzer crews DML have released over the years, you would think that they'd realise that modellers actually like to crew their vehicles. Maybe not?
Onto the cables.DML have provided two lengths of cable of different thickness to make the towing cables. Seperate ends are provided with a recess to glue the cable into. Great idea. One drawback is this.

The cable they've provided is completely unsuitable for the job. You can't bend it into anything but straight angles due to it's rigidity. It actually looks like the gear cables on my Vespa! It's the same thickness and behaves exactly the same. I've used the wire and seperate ends type cables before made by Eureka XXL and found them to be superb. The metal is soft enough to bend easily and will retain the shape/curve that you've bent it into. With this cable it has no flexibility at all. I have a feeling that the Eureka cable is copper whereas this appears to be steel. I couldn't be bothered to wait for cable if I'd ordered it so just used the cables off, wait for it, the scrap Tamiya King Tiger.Surely someone in the design or production team must have tried using this cable but then again if they had they would have known that it's rubbish and can't be used. I kept the loops for future use and ditched the cable as it's no use for anything. There were etched metal fittings to attach the cables to the side of the tank but as I wasn't using the cable supplied they've gone into the spares box.
The next thing was attaching the tools. Now this was an area that left me quite baffled. There are two sets of tools. Some on sprue TA don't have the clamps moulded on as there are PE clamps to be made up to use. On the other hand some of the tools that you have to use already have them moulded on. I could understand it if there was a full set without but there isn't. There are two shovels. One with and one without but there is no PE clamp for the shovel blade so you have to use the one with moulded clamps anyway. In the end the only things I could use the PE clamps for were the axe and the sledgehammer. There were three sets of wirecutters. Two without clamps and one with moulded on. Great I thought I can use a PE clamp. Wrong! The instructions tell you to use the one with the moulded clamp and there's no PE clamp for the others anyway. It just smacks of inconsistency. the clamps however are tiny and very fiddly. To show just how small they are I put a 1/35th scale PPK next to them to show a size comparison.

I found it impossible to build the clamp as per the instructions as my fingers were too big so ended up making them on the tool. Not a great job at all due to the size but they just about pass muster. Considering quite how long it took me to do I did wonder if it was actually worth it in the end.
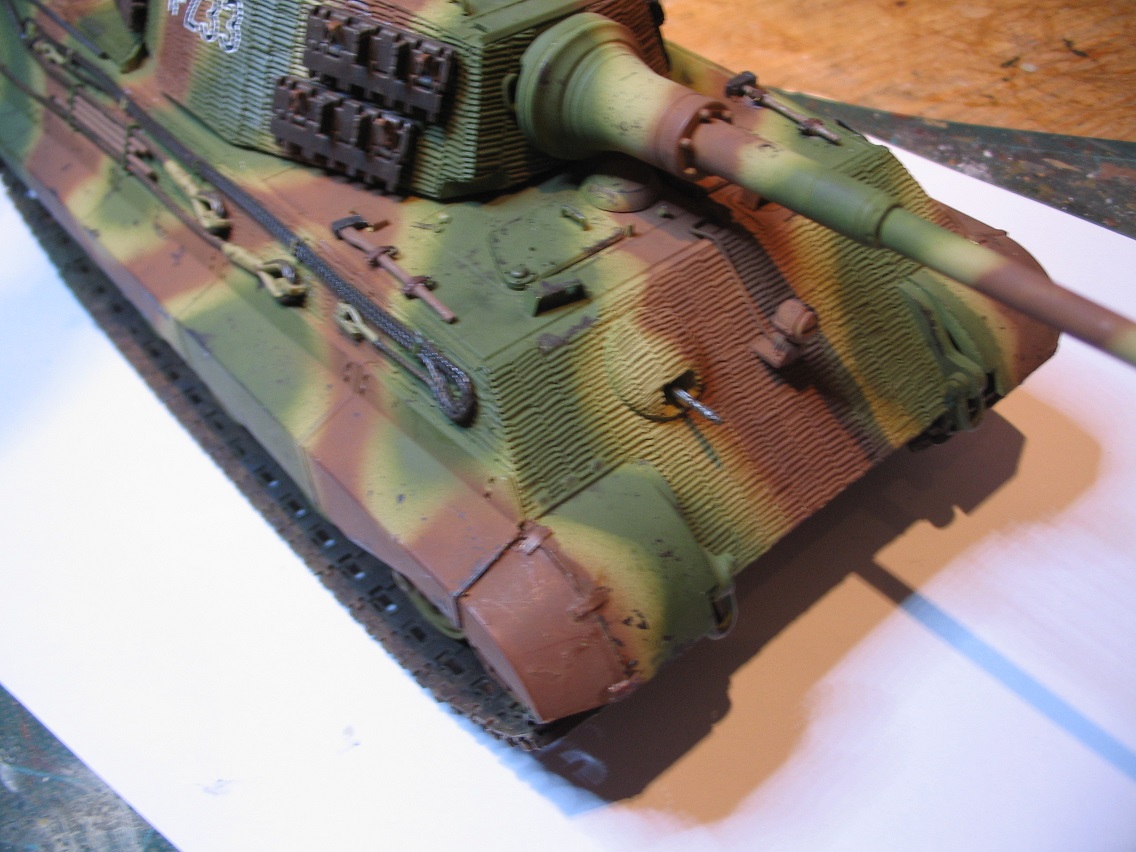
Not especially happy with them but it was the best I could do unfortunately.
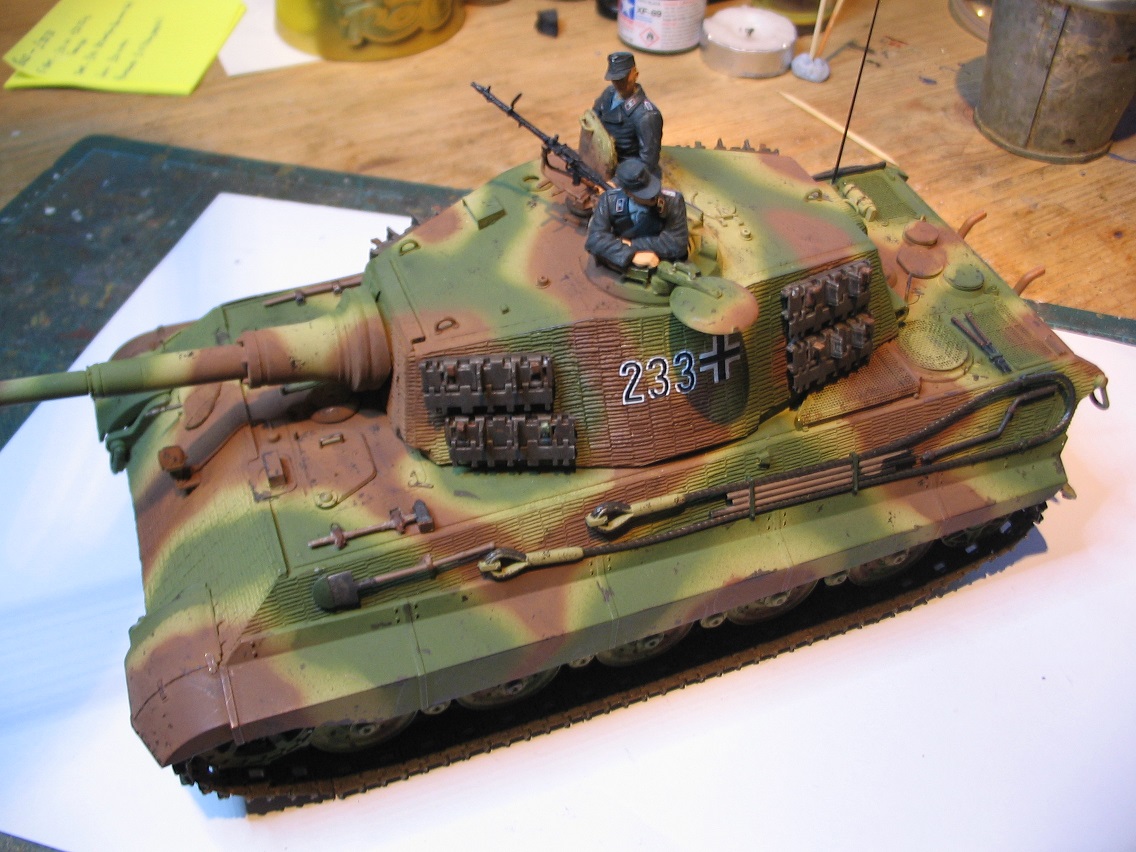
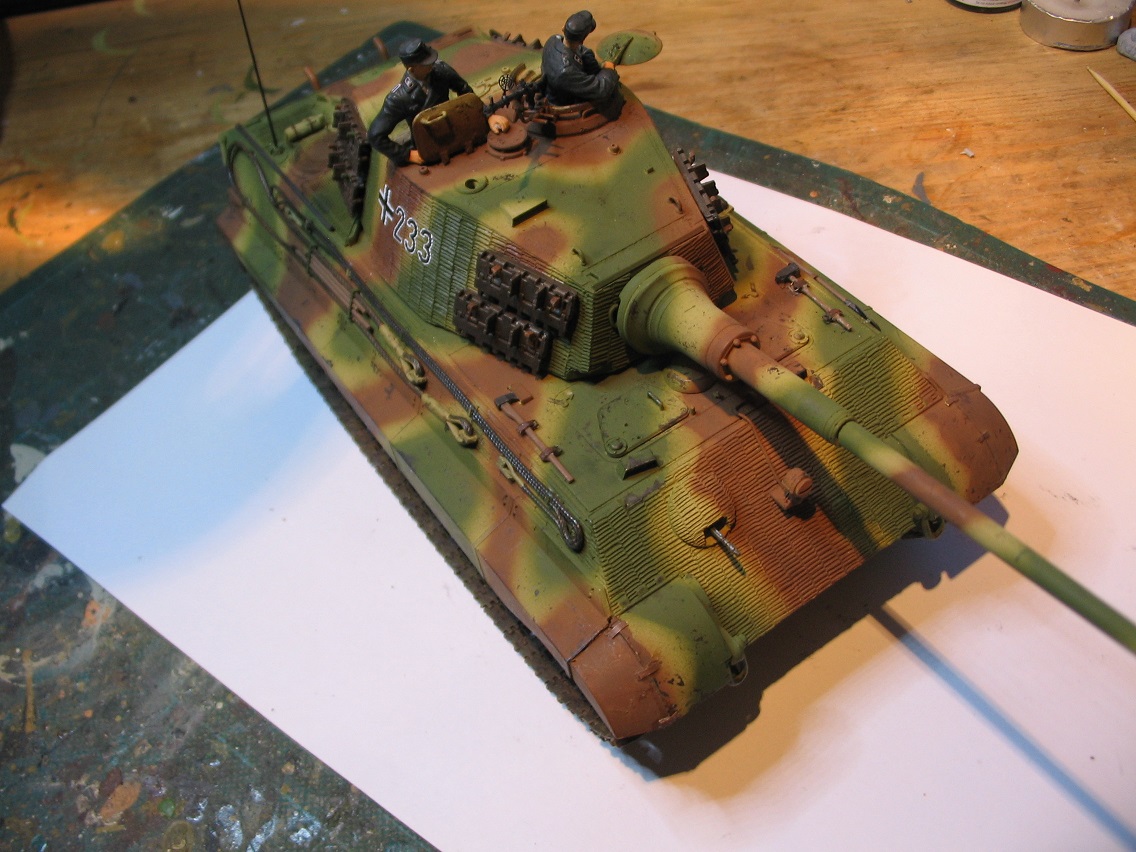
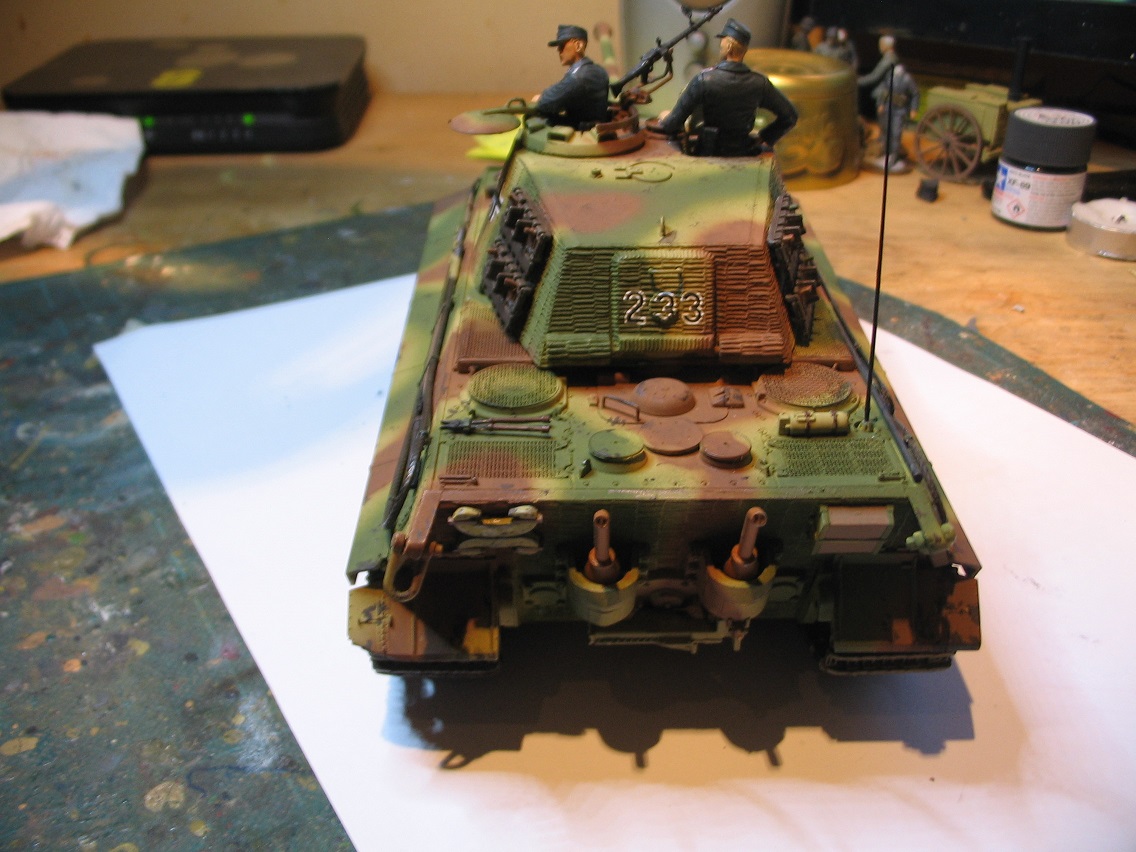
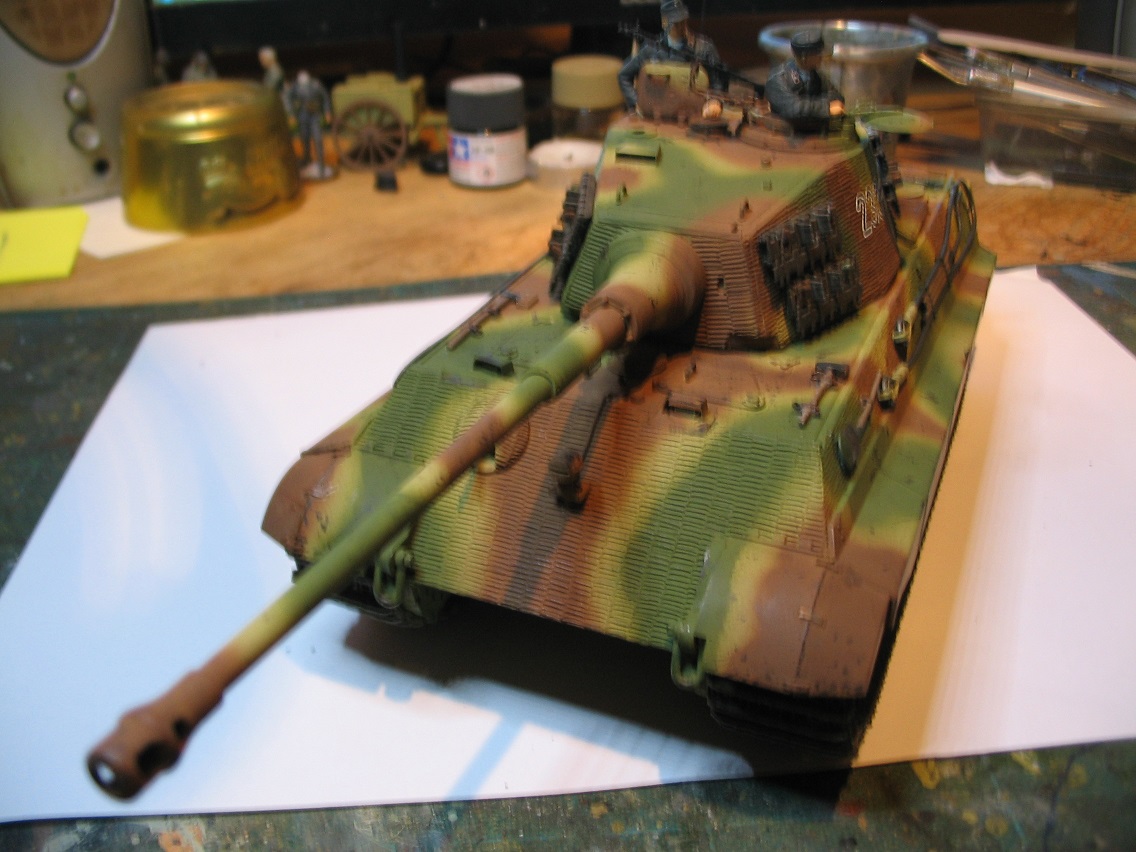
After the tools it was just a case of tidying up really. I added two crewmen as I intend to use this in a dio. I've marked it up as King Tiger 233 which is the subject of numerous photos in Budapest 1945. I went for a Wehrmacht panzer in the end. The aerial and ring sight on the MG were out of my spares box.
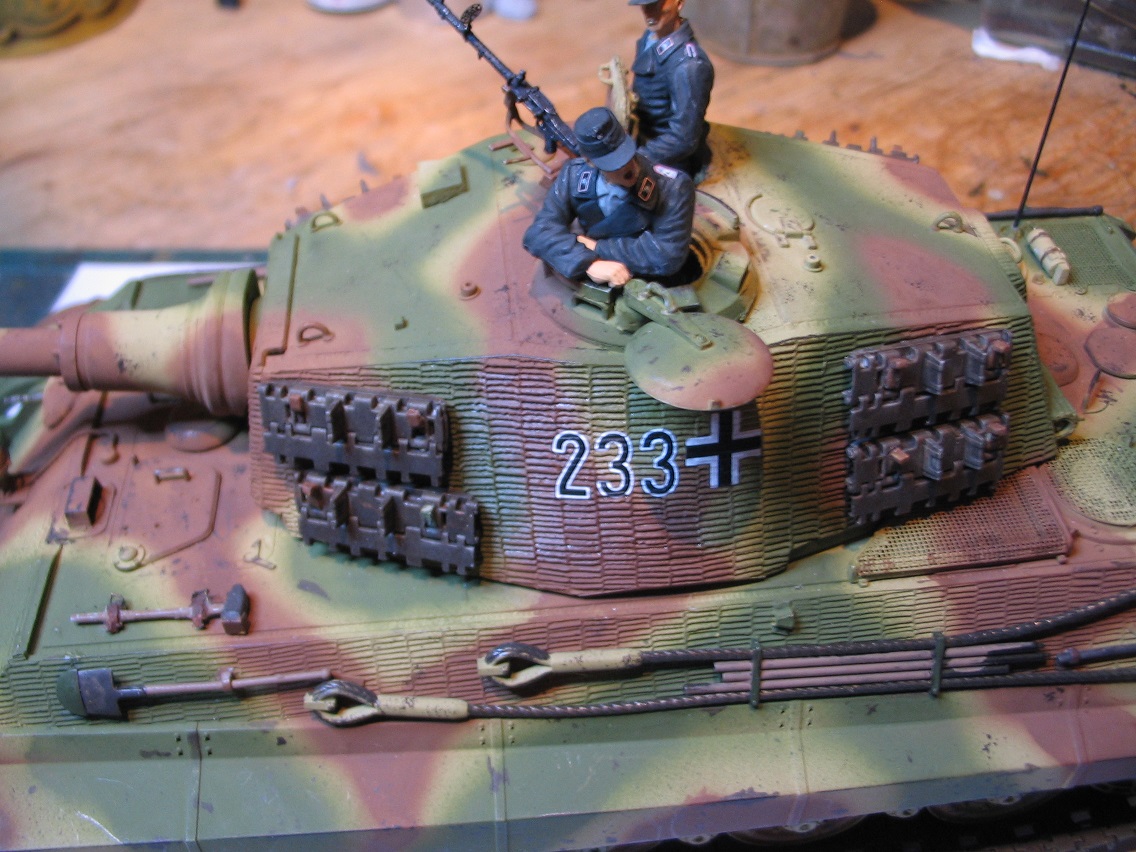
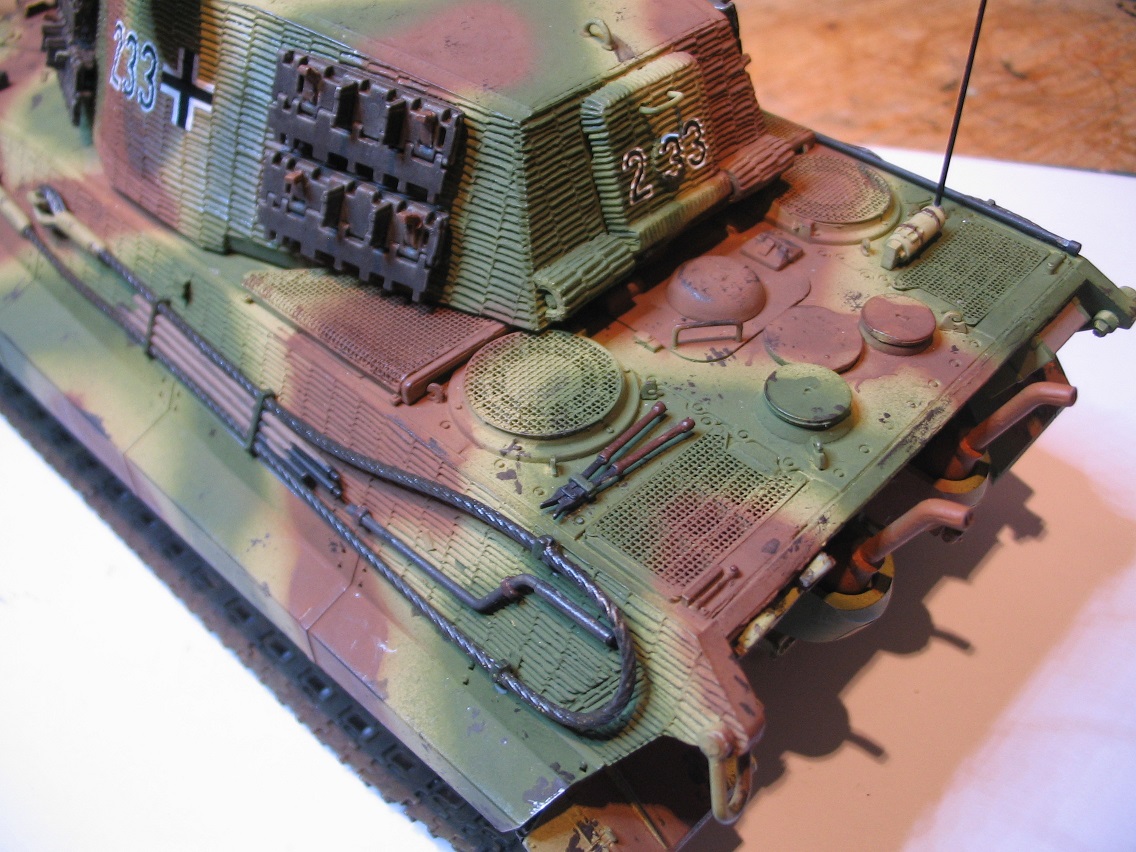
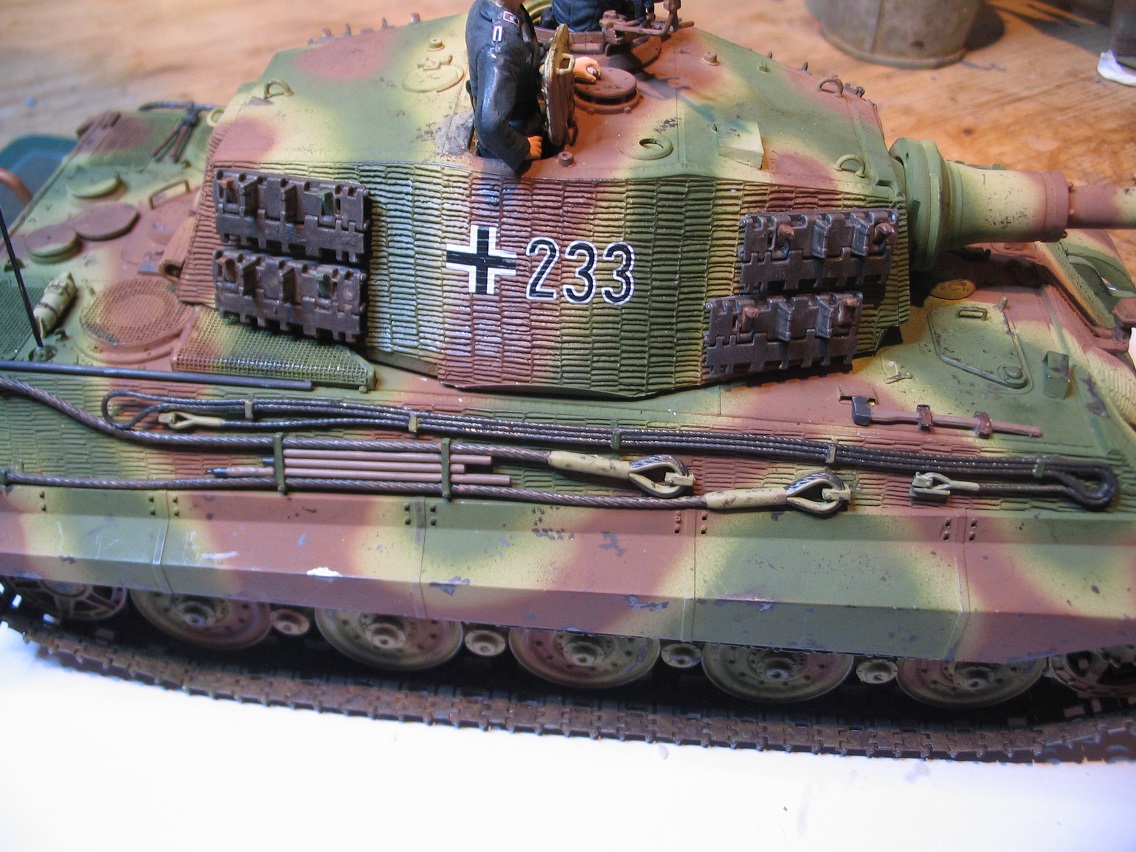
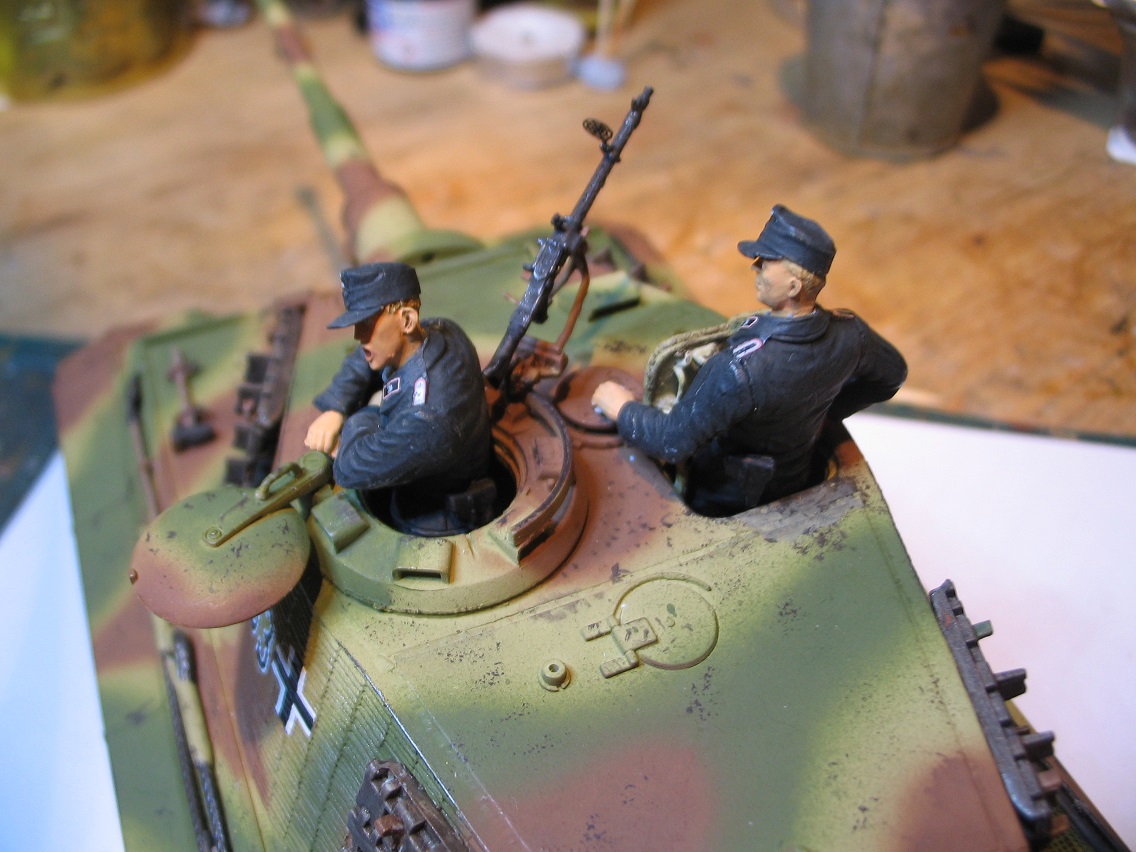
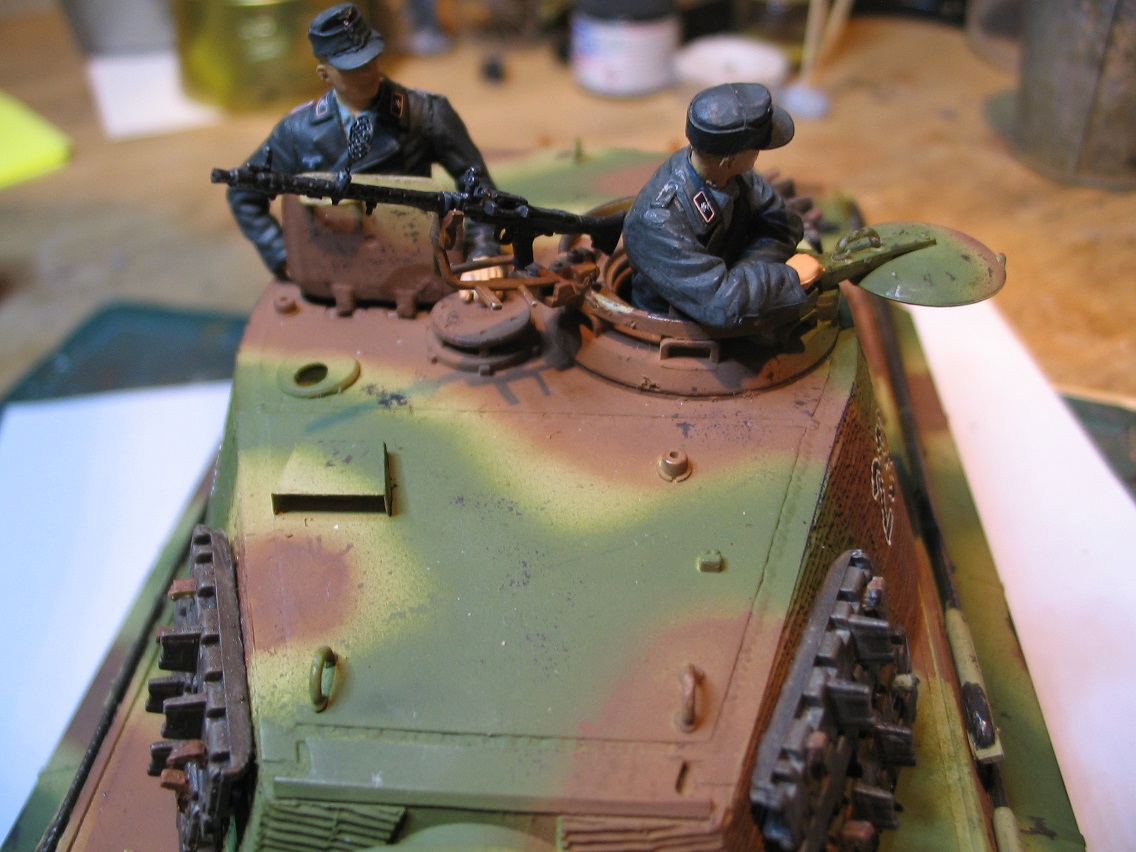
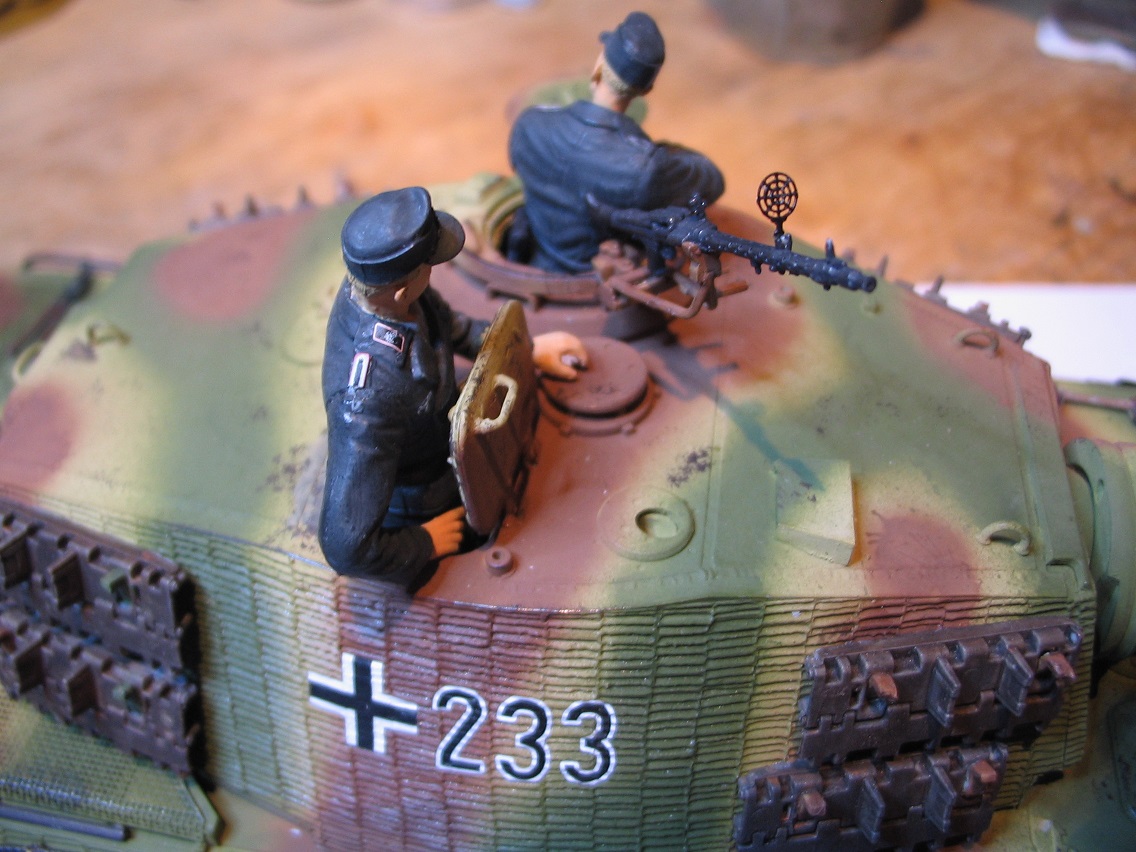

You'll notice that I've used the plastic track hangers. The instructions tell you to use the PE ones but they would not hold the weight of a track in real life as they would snap off at the weld on the turret they'd be that thin.
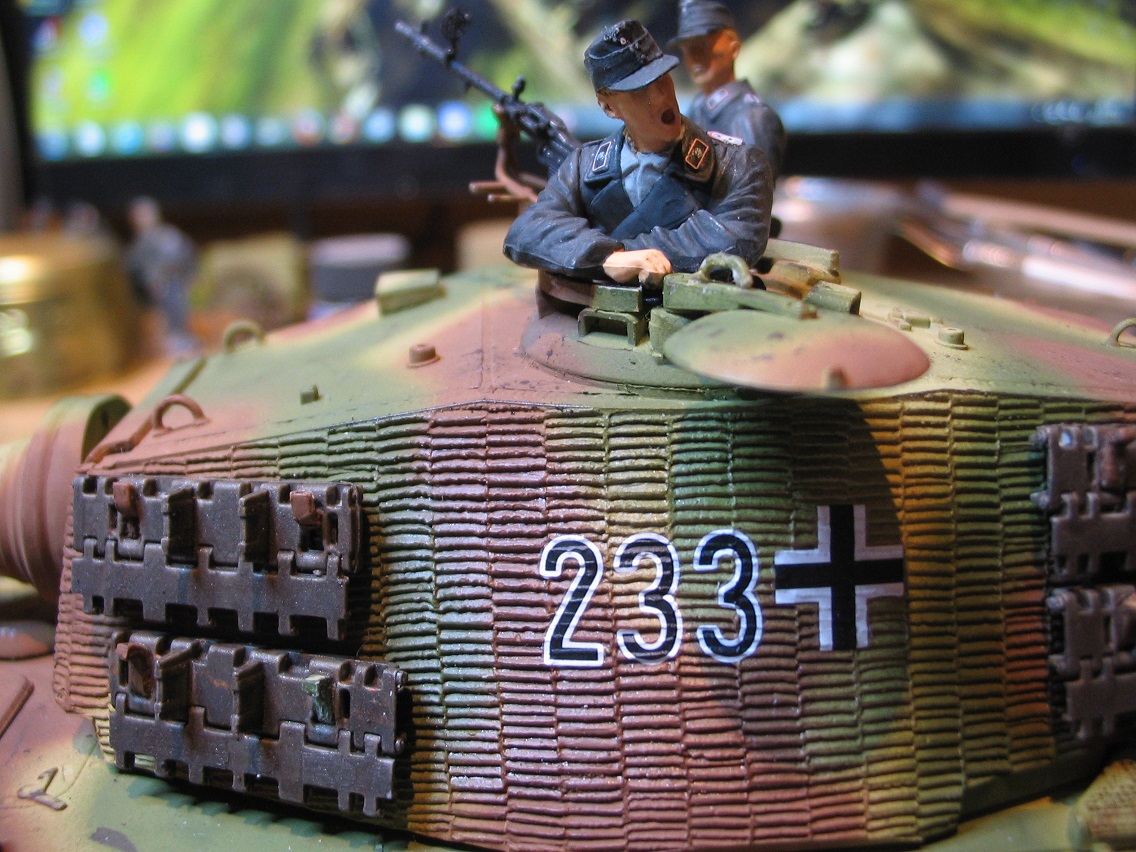
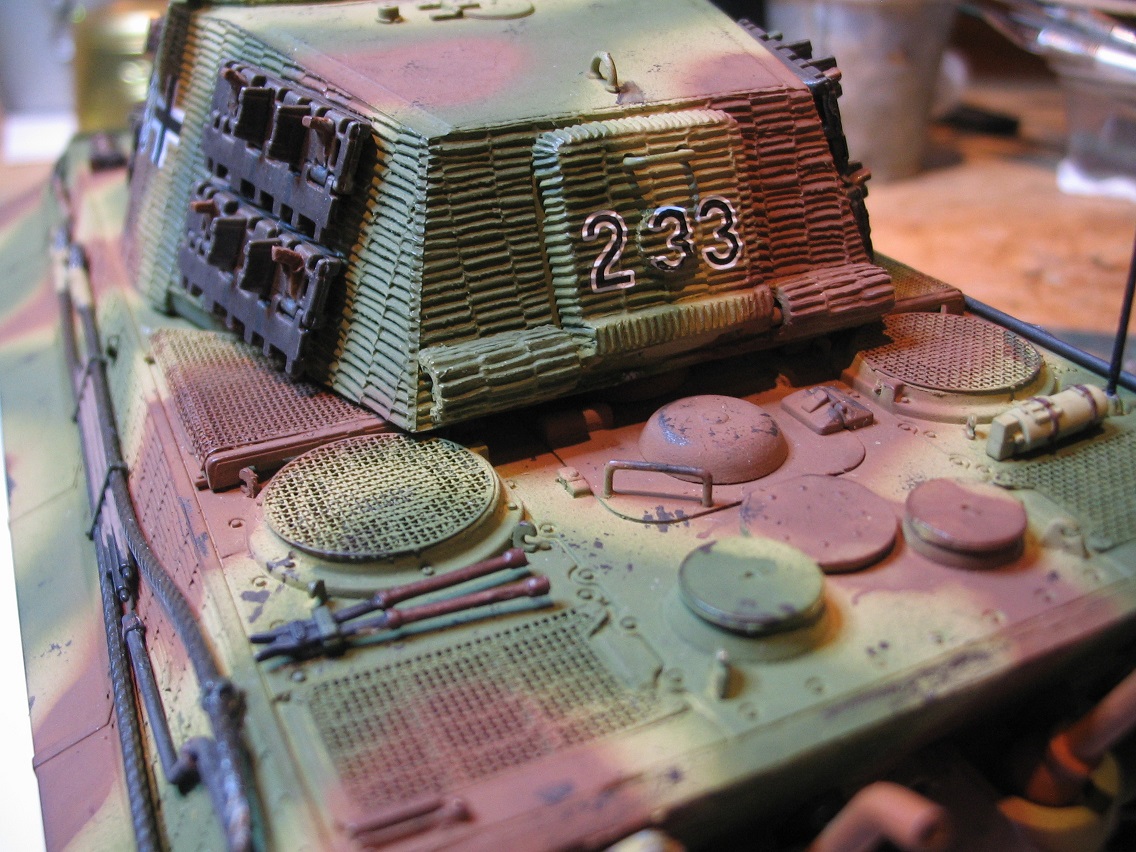
So this is what it looks like completed.
My thoughts on the kit. Hmmm...where do I start. When you open the box there are a lot of sprues but there's also a lot of stuff that you won't use as they're sprues from other King Tiger kits that DML have released. The transparency sprue is a bit of a waste of time really. It tells you to use one transparent part for the headlight but if you put that in you can't get the front on so I ditched it. You wouldn't be able to see it anyway. The periscopes in the commanders cupola while a nice idea, unless you actually pick the kit up and squint inside the periscope guards you won't see them.
The PE? Complete waste of time. There's very little that you can actually use. The crews periscope guards are PE but I couldn't help thinking that they were far too thin. There were no options on this. As I mentioned, the instructions tell you to use the PE brackets for the spare tracks on the turret. They're far too thin and would snap off in real life as they wouldn't take the weight of a single track link. The tool clamps area is inconsistent Some tools are with, some without so you end up with a mix of PE clamps and moulded on clamps. To me it would have made sense to have one or the other not mixed. The grilles are the only piece of PE that is genuinely useful. The largest grilles that go under the back of the turret had to be bent to shape but not a real problem. I think I read somewhere that some of their other kits have these preformed which would have made things easier.
What would have been useful and to me is the really obvious thing to put in as far as PE is concerned would have been the mudguards and side skirts. How many photos do you see where KT's are missing part of their skirt? I'd hazard a good percentage but no you just get plastic ones which takes for granted you've got an X-Acto saw if you want to do a modification. Having said that there were two instances early in the build where you have to cut about a centimetre off the gun mount and the end part of the barrel. What happens if you buy this as a gift for someone who's just started modelling? You shouldn't need a saw to build a kit out of the box. As it is the two parts that needed cutting could simply have been made shorter! As fas as PE is concerned I think they just put this in the box so they could say "contains PE" irrespective of whether you can use it or not.
The body work? Generally good. The turret went together with no problems. I was disappointed that there were no ammo racks in the back of the turret as I'd have liked to leave the back door open but as there weren't it had to be buttoned up. There was no pedestal/seat for the turret crew to stand on which would have been useful.
Initially the front of the hull wouldn't fit together so I had to file down both sides to get it to fit but it would now appear that DML have used all sorts of bits and bobs from different kits to make this one so it's not surprising that there was a fit issue.
The issue of the two front towing hooks is one of the worst errors I've seen in a kit in all the years I've been modelling. They were miles too small leaving the modeller with huge gaps and two inaccurate parts which made the front end look stupid. If I'd not had a scrap King Tiger from one of their competitors I don't know how I'd have got around that. If it was slightly small it could be forgiven but as you saw in the photos they're timy compared to the correct size. Unforgivable mistake!
The instructions are the usual DML gibberish. Whoever puts these instructions together has obviously not built the kit. There are pieces that aren't featured on the instructions, items numbered incorrectly. pieces missing ie never been on the sprue not lost. These days I find it a lot easier to work from a photograph of the real thing as I work at my PC desk it's easy to do. That way I can work out how parts fit. If all the other manufacturers can get it right why can't DML? It's not as if they're a new company that's finding it's feet. They've been about for about 30 years and still can't do clear instructions.
The indy tracks are nice and may put some people off but they are already off their sprues and reasonably clean. A minor lump from the moulding process but easily filed off. The tracks fit together nicely so no complaints on those.
The decals are sharp and give you the option of three different vehicles from SPz Abteilung 505. Each of the three different companies has a different coloured knight so the decals contain the three to give you the option of which you want to use. I didn't use the decals but having used their decals before they go on very smoothly and the printing and colour definition is superb.
As a finished kit it does look good and does appear to be accurate. The surface detail is sharp and the nuts on the back plate look like nuts rather than blobs as on some kits. The zimmerit is a nice depth and looks right.
My thoughts on the kit? I was dreading this bit. Did I enjoy building it? No I didn't..
There was the issue of the instructions to start off with. They're vague, give wrong part numbers, miss parts out completely even though you can see them on the sprue and also fitted in the instructions. How can they get the instructions so wrong? Does noone at DML sit down and build one of these to check the instructions make sense before they release it to the great modelling public?
Then there was the issue of parts not being with the kit despite them being neccessary for an accurate representation. Or parts that were completely wrong! It would appear that the reason for this is down to them mish mashing a kit out of others. A couple of sprues from this one and a couple from another one. You can interchange parts on a weapon (sometimes) but it has significantly less pieces than a kit. Mixing up lots of bits from several kits is asking for trouble.
In my opinion what DML should have done here is released the turret as a seperate complete kit then if someone wanted to build a KT as one from the 505th they could just buy the earlier zimmeritted one and add the new turret. Instead they've released a badly put together package of sprues. It's not a kit per se just an assortment of sprues that you can build a kit out of as there's only the turret that's dedicated to the box.
Would I build this kit again? I often build kits more than once as sometimes I like to have a couple of the same vehicle in the same dio ie refuelling, rearming, conversations between crews, that sort of thing. This kit does not fall into that category. At times it became a chore rather than enjoyable due to the various issues. I actually saw this kit on ebay for sale at £19.99 as a start price. Needless to say I did not bid on it cheap or not. I wasn't going through this again!
If you're thinking of buying a King Tiger in the future think long and hard about what you want from a kit and balance up what they offer you for the money. Lets face it there are enough out there to choose from now. This has a retail price around the £50 mark in the UK and I know that if I paid that much for it I would be both angry and disappointed. As a kit it's nothing special in regard to features. It's a pretty basic King Tiger and if it didn't have the zimmerit it would be roundabout the level of Tamiya's old King Tiger (but with issues). With that kit at least you know it will fit together properly lol.
I've not had a look at the Takom or Meng King Tigers in real life but as they're around the same sort of price with a complete interior I'd be leaning towards that.
In summary I can't reccomend this kit as it has too many serious issues. I'd been looking forward to building this and was very disappointed with it. It could have been a great kit if DML had thought about it and hadn't just thrown it together using sprues from other kits. As it is they've released a badly thought out, untested kit that will annoy more people than it will please.
Thanks to Kitmaker for giving me the opportunity to review this kit. If anyone has any questions about the kit that I've not covered or I forgot to mention please feel free to ask as after all this review is for your benefit and to help you make a decision on which King Tiger to buy and build. Hope you enjoyed reading the build blog and hope it will be of some use to you.
All that was really left to do was attach the smaller parts such as tools etc which I thought would be straightforward.
First call was the turret as I decided to put the AA mount on. One oversight in the kit is that there is the mount but no MG34 which I thought was odd. The actual bracket that the MG34 locks onto via a pin is grossly overscale as you can see in the photo below.

If there was an opportunity to use PE this would have been it yet there's loads of PE which is completely unsuitable for it's intended use. I used an 8B pencil on the AA mount ring to show wear where it had been moved round engaging targets. As there was no MG in the kit I used a Gen2 MG34 out of one of my figure sets. I've got to say even though it's not part of the kit, these Gen2 machine guns are really nice and really finish off a panzer. Because it's higher up you can actually see the hollowed out muzzle.
I did a bit of chipping on the turret roof and the hatches to show usage but haven't gone mad as you can see.

One thing you will need if buying this kit is some Micro Sol and Micro Set. As the zimmerit is quite pronounced, unless you use these two the decal will not adhere to the surface due to the ridges. I gave it a liberal dose of microsol to the surface, applied the decal, liberal application to the decal, let it soften for a couple of minutes and then gently pressed it on using some tissue. I found that the decal had softened enough to now go into the ridges and gives it quite a realistic look.

Although not a great photo it does show how much the decal sinks into the ridges giving it a painted on appearance.
Another omission was seats inside the turret. If you wanted to put crew standing in the turret they would have to levitate as there are no seats for them to stand on. Fortunately the scrap Tamiya KT supplied two so my intended crew did not have to perform feats of magic.

Basic but they do the job. You won't see them as there'll be a crewman standing on them but considering just how many really good panzer crews DML have released over the years, you would think that they'd realise that modellers actually like to crew their vehicles. Maybe not?
Onto the cables.DML have provided two lengths of cable of different thickness to make the towing cables. Seperate ends are provided with a recess to glue the cable into. Great idea. One drawback is this.

The cable they've provided is completely unsuitable for the job. You can't bend it into anything but straight angles due to it's rigidity. It actually looks like the gear cables on my Vespa! It's the same thickness and behaves exactly the same. I've used the wire and seperate ends type cables before made by Eureka XXL and found them to be superb. The metal is soft enough to bend easily and will retain the shape/curve that you've bent it into. With this cable it has no flexibility at all. I have a feeling that the Eureka cable is copper whereas this appears to be steel. I couldn't be bothered to wait for cable if I'd ordered it so just used the cables off, wait for it, the scrap Tamiya King Tiger.Surely someone in the design or production team must have tried using this cable but then again if they had they would have known that it's rubbish and can't be used. I kept the loops for future use and ditched the cable as it's no use for anything. There were etched metal fittings to attach the cables to the side of the tank but as I wasn't using the cable supplied they've gone into the spares box.
The next thing was attaching the tools. Now this was an area that left me quite baffled. There are two sets of tools. Some on sprue TA don't have the clamps moulded on as there are PE clamps to be made up to use. On the other hand some of the tools that you have to use already have them moulded on. I could understand it if there was a full set without but there isn't. There are two shovels. One with and one without but there is no PE clamp for the shovel blade so you have to use the one with moulded clamps anyway. In the end the only things I could use the PE clamps for were the axe and the sledgehammer. There were three sets of wirecutters. Two without clamps and one with moulded on. Great I thought I can use a PE clamp. Wrong! The instructions tell you to use the one with the moulded clamp and there's no PE clamp for the others anyway. It just smacks of inconsistency. the clamps however are tiny and very fiddly. To show just how small they are I put a 1/35th scale PPK next to them to show a size comparison.

I found it impossible to build the clamp as per the instructions as my fingers were too big so ended up making them on the tool. Not a great job at all due to the size but they just about pass muster. Considering quite how long it took me to do I did wonder if it was actually worth it in the end.

Not especially happy with them but it was the best I could do unfortunately.
After the tools it was just a case of tidying up really. I added two crewmen as I intend to use this in a dio. I've marked it up as King Tiger 233 which is the subject of numerous photos in Budapest 1945. I went for a Wehrmacht panzer in the end. The aerial and ring sight on the MG were out of my spares box.


You'll notice that I've used the plastic track hangers. The instructions tell you to use the PE ones but they would not hold the weight of a track in real life as they would snap off at the weld on the turret they'd be that thin.


So this is what it looks like completed.


My thoughts on the kit. Hmmm...where do I start. When you open the box there are a lot of sprues but there's also a lot of stuff that you won't use as they're sprues from other King Tiger kits that DML have released. The transparency sprue is a bit of a waste of time really. It tells you to use one transparent part for the headlight but if you put that in you can't get the front on so I ditched it. You wouldn't be able to see it anyway. The periscopes in the commanders cupola while a nice idea, unless you actually pick the kit up and squint inside the periscope guards you won't see them.
The PE? Complete waste of time. There's very little that you can actually use. The crews periscope guards are PE but I couldn't help thinking that they were far too thin. There were no options on this. As I mentioned, the instructions tell you to use the PE brackets for the spare tracks on the turret. They're far too thin and would snap off in real life as they wouldn't take the weight of a single track link. The tool clamps area is inconsistent Some tools are with, some without so you end up with a mix of PE clamps and moulded on clamps. To me it would have made sense to have one or the other not mixed. The grilles are the only piece of PE that is genuinely useful. The largest grilles that go under the back of the turret had to be bent to shape but not a real problem. I think I read somewhere that some of their other kits have these preformed which would have made things easier.
What would have been useful and to me is the really obvious thing to put in as far as PE is concerned would have been the mudguards and side skirts. How many photos do you see where KT's are missing part of their skirt? I'd hazard a good percentage but no you just get plastic ones which takes for granted you've got an X-Acto saw if you want to do a modification. Having said that there were two instances early in the build where you have to cut about a centimetre off the gun mount and the end part of the barrel. What happens if you buy this as a gift for someone who's just started modelling? You shouldn't need a saw to build a kit out of the box. As it is the two parts that needed cutting could simply have been made shorter! As fas as PE is concerned I think they just put this in the box so they could say "contains PE" irrespective of whether you can use it or not.
The body work? Generally good. The turret went together with no problems. I was disappointed that there were no ammo racks in the back of the turret as I'd have liked to leave the back door open but as there weren't it had to be buttoned up. There was no pedestal/seat for the turret crew to stand on which would have been useful.
Initially the front of the hull wouldn't fit together so I had to file down both sides to get it to fit but it would now appear that DML have used all sorts of bits and bobs from different kits to make this one so it's not surprising that there was a fit issue.
The issue of the two front towing hooks is one of the worst errors I've seen in a kit in all the years I've been modelling. They were miles too small leaving the modeller with huge gaps and two inaccurate parts which made the front end look stupid. If I'd not had a scrap King Tiger from one of their competitors I don't know how I'd have got around that. If it was slightly small it could be forgiven but as you saw in the photos they're timy compared to the correct size. Unforgivable mistake!
The instructions are the usual DML gibberish. Whoever puts these instructions together has obviously not built the kit. There are pieces that aren't featured on the instructions, items numbered incorrectly. pieces missing ie never been on the sprue not lost. These days I find it a lot easier to work from a photograph of the real thing as I work at my PC desk it's easy to do. That way I can work out how parts fit. If all the other manufacturers can get it right why can't DML? It's not as if they're a new company that's finding it's feet. They've been about for about 30 years and still can't do clear instructions.
The indy tracks are nice and may put some people off but they are already off their sprues and reasonably clean. A minor lump from the moulding process but easily filed off. The tracks fit together nicely so no complaints on those.
The decals are sharp and give you the option of three different vehicles from SPz Abteilung 505. Each of the three different companies has a different coloured knight so the decals contain the three to give you the option of which you want to use. I didn't use the decals but having used their decals before they go on very smoothly and the printing and colour definition is superb.
As a finished kit it does look good and does appear to be accurate. The surface detail is sharp and the nuts on the back plate look like nuts rather than blobs as on some kits. The zimmerit is a nice depth and looks right.
My thoughts on the kit? I was dreading this bit. Did I enjoy building it? No I didn't..
There was the issue of the instructions to start off with. They're vague, give wrong part numbers, miss parts out completely even though you can see them on the sprue and also fitted in the instructions. How can they get the instructions so wrong? Does noone at DML sit down and build one of these to check the instructions make sense before they release it to the great modelling public?
Then there was the issue of parts not being with the kit despite them being neccessary for an accurate representation. Or parts that were completely wrong! It would appear that the reason for this is down to them mish mashing a kit out of others. A couple of sprues from this one and a couple from another one. You can interchange parts on a weapon (sometimes) but it has significantly less pieces than a kit. Mixing up lots of bits from several kits is asking for trouble.
In my opinion what DML should have done here is released the turret as a seperate complete kit then if someone wanted to build a KT as one from the 505th they could just buy the earlier zimmeritted one and add the new turret. Instead they've released a badly put together package of sprues. It's not a kit per se just an assortment of sprues that you can build a kit out of as there's only the turret that's dedicated to the box.
Would I build this kit again? I often build kits more than once as sometimes I like to have a couple of the same vehicle in the same dio ie refuelling, rearming, conversations between crews, that sort of thing. This kit does not fall into that category. At times it became a chore rather than enjoyable due to the various issues. I actually saw this kit on ebay for sale at £19.99 as a start price. Needless to say I did not bid on it cheap or not. I wasn't going through this again!
If you're thinking of buying a King Tiger in the future think long and hard about what you want from a kit and balance up what they offer you for the money. Lets face it there are enough out there to choose from now. This has a retail price around the £50 mark in the UK and I know that if I paid that much for it I would be both angry and disappointed. As a kit it's nothing special in regard to features. It's a pretty basic King Tiger and if it didn't have the zimmerit it would be roundabout the level of Tamiya's old King Tiger (but with issues). With that kit at least you know it will fit together properly lol.
I've not had a look at the Takom or Meng King Tigers in real life but as they're around the same sort of price with a complete interior I'd be leaning towards that.
In summary I can't reccomend this kit as it has too many serious issues. I'd been looking forward to building this and was very disappointed with it. It could have been a great kit if DML had thought about it and hadn't just thrown it together using sprues from other kits. As it is they've released a badly thought out, untested kit that will annoy more people than it will please.
Thanks to Kitmaker for giving me the opportunity to review this kit. If anyone has any questions about the kit that I've not covered or I forgot to mention please feel free to ask as after all this review is for your benefit and to help you make a decision on which King Tiger to buy and build. Hope you enjoyed reading the build blog and hope it will be of some use to you.

Tojo72

Joined: June 06, 2006
KitMaker: 4,691 posts
Armorama: 3,509 posts

Posted: Wednesday, July 26, 2017 - 03:46 PM UTC
Very nice finish up,figures look great.
Thanks for all of your input.
Thanks for all of your input.
erichvon

Joined: January 17, 2006
KitMaker: 1,694 posts
Armorama: 1,584 posts

Posted: Wednesday, July 26, 2017 - 04:25 PM UTC
Thanks Anthony. I hope it's of some use to someone. I'd never given reviews any real thought until doing this as a build blog. You can look inside the box and everything may look great but it's only when you actually build it that you get the facts about a kit. Positive and negative. A kit may look great in the box. Lots of sprues, fancy colour booklets. photo etch and metal barrels etc but it's only when you actually build it you learn whether it's as good as it looked or is a dog. If I'm allowed to do another review I'll do the same again, a build blog. It's the only way you can get a real idea what the kit's like. Personally I'll be looking for build reviews now as opposed to box reviews as they don't tell me a lot really. I rarely buy a kit these days without reading some reviews first. With the cost of kits these days I want as much information as possible about the kit I'm looking at buying. Hopefully people can look at this objectively, as I've tried to be, and make an informed decision now 

tetleyteaman

Joined: December 27, 2003
KitMaker: 15 posts
Armorama: 11 posts

Posted: Wednesday, July 26, 2017 - 04:52 PM UTC
That is a good, honest, review Karl.
I came to the same conclusions with my kit in that, had Dragon simply re-issued the older kit with new decals, they would have had a winner. Instead they choose to make a right pig's ear of it by putting incorrect parts in the box, tooling up new parts that look like they came from a plasticine mold and persisting with sub-standard instructions. Leading the buyer astray with box CAD drawings that do not represent what is in the box is, in my opinion, probably infringing some advertising legislation as well.
You have been too kind with this one. Dragon produce some fantastic kits - their new Ke-Nu is a fine example - but they then come out with rubbish like this.
Regardless, you did a great job with the finished article and I look forward to following your next blog.
erichvon

Joined: January 17, 2006
KitMaker: 1,694 posts
Armorama: 1,584 posts

Posted: Thursday, July 27, 2017 - 02:21 AM UTC
Thanks Graham, that means a lot. I'm glad someone can back me up on this one as my worry was that I would be seen as being too negative but as you say it really is justly deserved criticism. If Dragon had any sense and more importantly any decency they'd pull this kit off the market and then reissue it once it's right.Having said that, what are the odds that if they did they'd charge another £20 for it and put some sort of spin on it as if it's brand new with new additional features People like ourselves who can think outside the box with years of experience can manage to find solutions to the apalling errors but my concern is someone who doesn't have a lot of money and is relatively new to the hobby will buy this kit and be unable to finish it due to the glaring errors, incorrect parts etc. It will go in the bin, they'll be £50 down and they'll give up on the hobby perhaps blaming themselves for not being able to finish it. That means one less modeller and probably more important to DML one less person to buy their kits. While I appreciate that they want to make money there's no point in releasing something that essentially is a crap kit. A car company wouldn't sell a car that had no steering wheel and odd sized wheels. To release something that you know is defective is just stupid. But then again it asks the question has anyone at DML actually sat down and tried to build this kit? Not the master kit but one of the retail ones. Going on what an abortion the kit is I'd say not otherwise someone at DML would have put their hand up and said "Excuse me but this kit doesn't have the right parts in it" or "These instructions make no sense whatsoever. It's showing bits on the tank but they're not mentioned in the instructions. Are they these bits on the sprue as I'm not sure what they're for?". Over the last couple of years I've built quite a few of their half tracks as I have a fondness for the Sdkfz 250 and 251 and all the various versions. Whilst the instructions leave a lot to be desired they're relatively trouble free builds, enjoyable and look great when finished so I know, as you pointed out, DML can perform and produce some great kits. They've really let themselves down on this one. The only thing that I can think of to explain it is either laziness ie they've not checked the kit out before releasing it or greed. They didn't want the expense of making a new set of moulds so have tried to make do very unsuccessfully with sprues they'd already got. It's not put me off their kits, in fact I've started another one today, but it has made me wary of them. I won't trust an out of the box review again as most importantly they don't tell me how the kit builds up. Thanks for the kind words Graham. It's good to know that my thoughts and observations have been echoed by someone who's had the same experience with this kit. Hopefully I'll do another build review soon 

Posted: Thursday, July 27, 2017 - 02:54 AM UTC
Karl,
Great job! Too bad you had to put in so much effort to make it come to a great finish.
Gaz
Great job! Too bad you had to put in so much effort to make it come to a great finish.
Gaz
erichvon

Joined: January 17, 2006
KitMaker: 1,694 posts
Armorama: 1,584 posts

Posted: Thursday, July 27, 2017 - 10:36 AM UTC
Thanks Gaz. Thanks for following the build. I refuse to be beaten by a lump of plastic even though at times it came close. As I was doing it as a review I couldn't shove it to the back of the cupboard and come back to it in five to ten years time like I normally do when a kit's this problematic lol. I'm glad you like the final build. I'm quite pleased with how it looks now but it's a shame that there were so many problems along the way. If I hadn't had a scrap Tamiya one, realistically I could not have completed it which when you think about it that's really bad. Having to use a competitors kit to complete theirs! The two tow cable bars on the front would have put paid to that straight away. I still can't believe those parts. They would have been wrong on any King Tiger so I have no idea why they were there even if that particular sprue is out of another box. Even though the kit was horrendous to build I enjoyed doing the write up. Living on my own it gave me opportunity to vent my spleen only without swearing as much lol. In all seriousness though DML really need to pull this kit and rethink it. Also if they continue swapping sprues about they need to actually build a kit as it stands pre production so that they can tackle any problems which appear so that the modeller isn't left both perplexed and disappointed. One or two problems is only to be expected of any kit but major mistakes like with this kit really has done them a great disservice. Having said that I've requested a couple more DML kits to review and will be doing the same with those if I get them, doing them as a build blog/review so warts and all are shown. To my mind it's the fairest and most accurate way to do a review and hope that if I do get the opportunity you'll be along for the ride again 

MrCompletely

Joined: February 12, 2016
KitMaker: 128 posts
Armorama: 120 posts

Posted: Thursday, July 27, 2017 - 12:17 PM UTC
Thanks for the honest appraisal. I'm currently dithering over which K.T. to shell out for as I have none in the stash. Being working poor I have to shop to a budget so REALLY don't want to get ripped off! Being forewarned I shall avoid this like the plague. To be honest, of late at least, I don't think Dragon gives a toss about us and I'm happy to spend my precious funds elsewhere.
erichvon

Joined: January 17, 2006
KitMaker: 1,694 posts
Armorama: 1,584 posts

Posted: Thursday, July 27, 2017 - 04:04 PM UTC
Paul, glad to be of help. Like yourself I have a very limited budget due to me not working anymore so every kit bought is the result of poring over reviews, doing comparisons and shopping around for the best price. I'm quite plainly spoken anyway but I see little point in doing a review of something unless it paints an honest and balanced appraisal of something, which I hope I've achieved here, rather than just paint a glossy picture to prevent upsetting a manufacturer. DML produce some great kits (albeit with dreadful instructions) so I don't know what's happened here. I've not been able to find any build reviews of their other King Tigers as they all seem to be in the box reviews so I have no idea what they're like. Anthony said he'd built 6303, the straightforward Henschel turreted KT with zimmerit and that was okay so how they've made such a mess of this one I don't know. You would have thought they'd have just put the seperate 505 turret in with 6303 with a new box top rather than mish mash sprues from all sorts of kits to bodge together a new release? That approach has clearly failed. Let's hope they shelve that idea in future.
ivanhoe6

Joined: April 05, 2007
KitMaker: 2,023 posts
Armorama: 1,234 posts

Posted: Thursday, July 27, 2017 - 05:09 PM UTC
Karl, Thanks for the build log ! You turned a PIA project into a great looking KT. It inspired me to dig out my Porsche KT, #6302 and get working on it. With your tutorial hopefully I won't have the grief that you endured. Fore warned is fore armed !
PLEASE, post some pictures when you get your dio done.
Thanks again for your efforts !


PLEASE, post some pictures when you get your dio done.
Thanks again for your efforts !


Invincible

Joined: May 03, 2017
KitMaker: 148 posts
Armorama: 122 posts
Posted: Friday, July 28, 2017 - 12:02 AM UTC
Karl, thanks for posting this review and maintaining the will to live whilst sanding the inside of the road wheels. A sure sign that dragon feels like it has too many customers would be this kit. I've been considering parting with £30 on a dragon WW2 US howitzer, but, after what I've been hearing, I might go for something else. (I've never bought a dragon kit, and probably won't for the foreseeable future)
 |


