

I can't tell if the plate was only stamped with very shallow indentations in the first place, or whether it's been worn down by past polishing. Some paint is missing from one corner and it isn't brass. Dark brownish colour, but not rusty. Bronze, maybe? The lower line has a flat blank space for the number to be hammer-stamped. This one really is No7, so very early.
Assuming it to be not very deeply stamped, you wouldn't see the text in 1/35: it's a fraction of a millimetre in real life and almost invisible when painted over. Doubtless it could be etched in an after-market set: I'm sure some will appear soon. Archer 3D decal, perhaps? Maybe they'll do some M3 casting and foundry numbers and symbols.
Hosted by Darren Baker
Takom M3 Grant

Das_Abteilung

Joined: August 31, 2010
KitMaker: 365 posts
Armorama: 351 posts
Posted: Friday, October 27, 2017 - 02:42 AM UTC
petbat

Joined: August 06, 2005
KitMaker: 3,353 posts
Armorama: 3,121 posts
Posted: Friday, October 27, 2017 - 03:23 AM UTC
Excellent work here Gary. Very interesting thread.
One thing I noticed is that all the screw slots line up exactly the same direction like they do on the M3 halftrack, but here, the kit ones have the screw slots horizontal, while the pic of the Bovington beast has them vertical.
Anyone know if every Grant had them the same way?
One thing I noticed is that all the screw slots line up exactly the same direction like they do on the M3 halftrack, but here, the kit ones have the screw slots horizontal, while the pic of the Bovington beast has them vertical.
Anyone know if every Grant had them the same way?


rockmart

Joined: November 10, 2013
KitMaker: 127 posts
Armorama: 71 posts
Posted: Friday, October 27, 2017 - 03:32 AM UTC
The Grant and the Lee featured in the Squadron/Signal Walk Around both have the screws at a 45 degree angle.
petbat
Joined: August 06, 2005
KitMaker: 3,353 posts
Armorama: 3,121 posts
Posted: Friday, October 27, 2017 - 06:49 AM UTC
Quoted Text
The Grant and the Lee featured in the Squadron/Signal Walk Around both have the screws at a 45 degree angle.
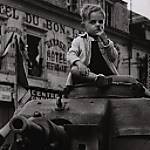
Thanks Peter. I kind of answered my own question later by searching and found this pic

Intersting how every screw lines up, but at different angles on different vehicles..

KurtLaughlin
Joined: January 18, 2003
KitMaker: 2,402 posts
Armorama: 2,377 posts
Posted: Friday, October 27, 2017 - 07:39 AM UTC
Quoted Text
Intersting how every screw lines up, but at different angles on different vehicles..
They were probably assembled by two men, one on the outside had a screwdriver blade and one on the inside had a socket wrench or nut driver. The outside guy never turned his tool, just moved from screw to screw while the inside guy turned the nut.
Screws that were removed in the field, like those on the plate behind the M1 gun mount, weren't nearly as tidy.
KL
gastec

Joined: February 03, 2014
KitMaker: 1,042 posts
Armorama: 871 posts
Posted: Saturday, October 28, 2017 - 01:06 PM UTC
Camo colours are now on followed by a filter and then a pin wash. A bit garish at this stage, but the OPR will help tone things down and blend everything together....


Gary
Gary

GazzaS

#424
Joined: April 23, 2015
KitMaker: 4,648 posts
Armorama: 2,248 posts

Posted: Saturday, October 28, 2017 - 01:44 PM UTC
Looks great!
JSSVIII
Joined: March 28, 2007
KitMaker: 1,169 posts
Armorama: 1,067 posts
Posted: Saturday, October 28, 2017 - 03:54 PM UTC
excellent work Gary, that's the light at the end of the tunnel we're seeing.
Removed by original poster on 10/29/17 - 13:02:16 (GMT).

165thspc

#521
Joined: April 13, 2011
KitMaker: 9,465 posts
Armorama: 8,695 posts
Posted: Saturday, October 28, 2017 - 05:56 PM UTC
OUTSTANDING!


easyco69

Joined: November 03, 2012
KitMaker: 2,275 posts
Armorama: 2,233 posts
Posted: Saturday, October 28, 2017 - 06:02 PM UTC
Nice paint job!! You can get a .30 cal tripod from this Academy kit.
I also bought this kit..plus the Academy version. Comes in such a tiny box lol

I also bought this kit..plus the Academy version. Comes in such a tiny box lol
Afroman

Joined: April 04, 2007
KitMaker: 152 posts
Armorama: 137 posts

Posted: Saturday, October 28, 2017 - 07:21 PM UTC
Very nice, what product (If any) did you use for the pin wash? Or was it the good 'ole' fashioned way?

panamadan
Joined: July 20, 2004
KitMaker: 1,513 posts
Armorama: 1,449 posts
Posted: Saturday, October 28, 2017 - 07:23 PM UTC
Great job Gary!
Dan
Dan
mmarchioli
Joined: March 18, 2008
KitMaker: 173 posts
Armorama: 168 posts
Posted: Sunday, October 29, 2017 - 10:08 AM UTC
This is a really fantastic build. I am just about to start mine, hope it turns out half as good!
What paints did you use for the camo?
Mike
What paints did you use for the camo?
Mike
Bravo1102
Joined: December 08, 2003
KitMaker: 2,864 posts
Armorama: 2,497 posts

Posted: Sunday, October 29, 2017 - 03:58 PM UTC
Really comin together well. Always liked that particular scheme since I first saw it in ancient Osprey Vanguard.

d6mst0
#453
Joined: August 28, 2016
KitMaker: 1,925 posts
Armorama: 601 posts

Posted: Sunday, October 29, 2017 - 04:50 PM UTC
Great looking camo. First time I seen it done that way.
gastec
Joined: February 03, 2014
KitMaker: 1,042 posts
Armorama: 871 posts
Posted: Saturday, November 04, 2017 - 12:28 AM UTC
Thanks guys.
Weathering is progressing slowly, but have finished fitted the suspension and getting ready to paint the Bronco indi link tracks...


Gary
Weathering is progressing slowly, but have finished fitted the suspension and getting ready to paint the Bronco indi link tracks...
Gary
gastec
Joined: February 03, 2014
KitMaker: 1,042 posts
Armorama: 871 posts
Posted: Saturday, November 04, 2017 - 01:03 PM UTC
Almost there. Headlight lenses still to be added along with some tidying up of the weathering...

Gary
Gary
Bravo1102
Joined: December 08, 2003
KitMaker: 2,864 posts
Armorama: 2,497 posts
Posted: Saturday, November 04, 2017 - 03:45 PM UTC
Astounding. Very nice.

ColinEdm

Joined: October 15, 2013
KitMaker: 1,355 posts
Armorama: 1,229 posts
Posted: Saturday, November 04, 2017 - 06:54 PM UTC
Great job Gary! The weathering has really brought the three tone camo together. 

JoeOsborne
Joined: October 08, 2013
KitMaker: 111 posts
Armorama: 67 posts
Posted: Sunday, November 05, 2017 - 01:42 AM UTC
Great job, Gary! I can only hope mine comes out so well.
gastec
Joined: February 03, 2014
KitMaker: 1,042 posts
Armorama: 871 posts
Posted: Monday, November 06, 2017 - 10:05 AM UTC
Thanks guys.
Am thinking the lower half needs to be weathered more....


Gary
Am thinking the lower half needs to be weathered more....
Gary
petbat
Joined: August 06, 2005
KitMaker: 3,353 posts
Armorama: 3,121 posts
Posted: Monday, November 06, 2017 - 01:09 PM UTC
Maybe a tad more, but it does look great as it is

Hederstierna
#247

Joined: January 03, 2008
KitMaker: 1,102 posts
Armorama: 1,018 posts
Posted: Monday, November 06, 2017 - 05:59 PM UTC
Great build and excellent finish.
Jacob
Jacob
Das_Abteilung
Joined: August 31, 2010
KitMaker: 365 posts
Armorama: 351 posts
Posted: Tuesday, November 07, 2017 - 06:47 AM UTC
It's amazing how the original bold strong colours have come together in the finished effect. Which shows that it pays to be bold and brave or the overall effect risks being completely washed-out. Perhaps the running gear could do with a little more dust in the nooks and crannies?
A bit late for this build, but for the benefit of others I finally managed to snag a decent pic of the sprocket wear "hooking".


A bit late for this build, but for the benefit of others I finally managed to snag a decent pic of the sprocket wear "hooking".
 |

WEB HOSTING BY


Copyright ©2021 Armorama and Kitmaker Network, a subsidiary of Silver Star Enterprises
All Rights Reserved. Please read our Conditions of Use and Privacy Policy.
All Rights Reserved. Please read our Conditions of Use and Privacy Policy.