Hello model builders.
While you all have been actively posting and building great stuff, well...I've been building a little, posting very little, and working too much....What I have been working on as a dio is inspired by a package kit I purchased a while ago. A Takom T-55 AMV with a hauler - for a good price. I didn't have particular interest or knowledge of the T-55 AMV; it was just a good deal.
Eventually I tried to find out about the tank, and found that it is playing a pretty prominent role in Syria today - for all sides tho...and in many geographies and circumstances. It appears to be able to withstand all sorts of surface damage and keep going:
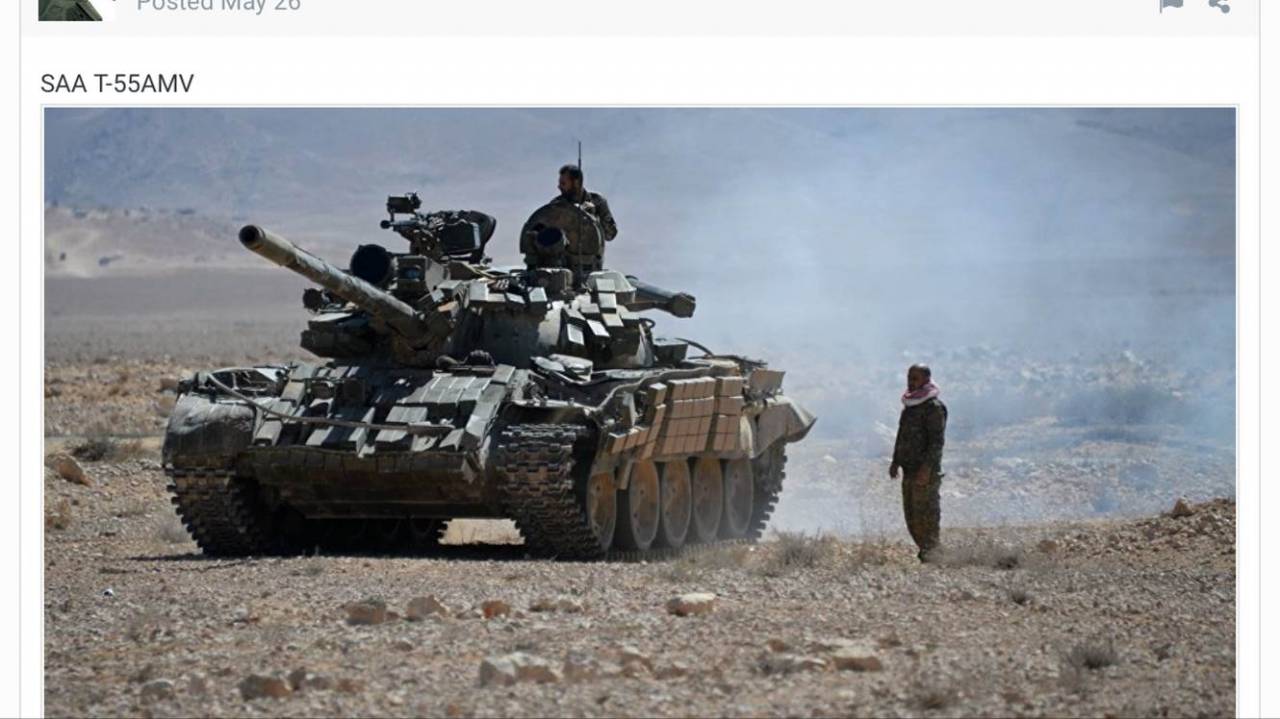
Above is an SSA example, but I found just as many from the FSA, Peshmerga (many pics of the Peshmerga versions being moved on lowboys) and many others that I'm not at all familiar with.
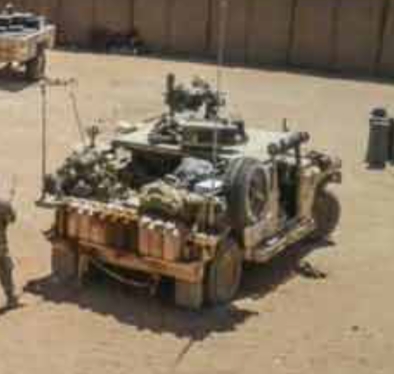
During my search I also came across the image below - I don't know what it's doing as I can't read most of the language on the web site - so I won't show it all. As I don't know what's actually going on in the pic, I won't speculate. Some time ago I built a dio focused on SOCOM / Peshmerga events - the Battle of Debecka Pass, which is a clearly documented event, so , I suspect it not altogether impossible to see these two together in other events, and the hypothetical subject of this dio.
The pic did say Northern Syria spring 2017 in English - I've since cropped all that off - the point instead is the vehicle and era:
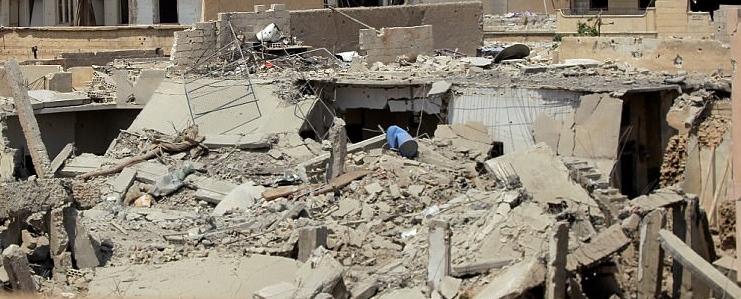
Sadly, there are also many images of the destruction that's occurring in this general area....which I'm drawing from for this project:
[
Below, you'll see some of what I've built so far - first up, T55 number 1:
As some of you know, I'm not an armor expert at all - and usually build soft skins - but - this was fun build! I've posted some of the work over on Mike Koenig's Conversions Blog - around pages 15 and 16 - along with a few of this:
This is the new version of the GMV - for reference I used Rob Skipper's resource CD - which is great, and appears to be very close to the vehicle in the pic - note the right rear spare mount.
I've also been working on buildings along one side of a street:
Above - I tried to keep this fairly simple and focused on the end result - some of you might remember a build I did a while ago - "Big Punch Big Push" - the D9R and Bradley working through an urban neighborhood - the layers of debris in this context are multiple - and, unlike reality, don't get applied at once...so...patience (and keep it random - thanks to Romain and Jerry for the tip/requirement on that!!)...and I keep adding layers of debris, paint, pumice gel, paint, pigment, wire...and so on....
And then, attached it to some ground plane:
And, while lots has happened...nowhere near done!! haha - more debris, pigment, trash....and so on...the truck isn't glued -
And, to keep from getting burned out on debris, I'm making another AMV! I of course couldn't find the right kit at the time
so I'm converting a different Takon kit - adding the ERA blocks etc - less easy done than said, but a fun build:
The ERA blocks are attached to framing - as I didn't get the AMV kit - I built the framing out of evergreen - the blocks are from Minimarm
and Etch from Aber and Eduard.
So, that's what I'm up to these days - thanks for having a look!
cheers
Nick
Hosted by Darren Baker
Somewhere North
Posted: Thursday, November 09, 2017 - 02:43 AM UTC
El_Patron
Madrid, Spain / España
Joined: October 28, 2017
KitMaker: 30 posts
Armorama: 28 posts
Joined: October 28, 2017
KitMaker: 30 posts
Armorama: 28 posts
Posted: Thursday, November 09, 2017 - 02:46 AM UTC
Incredible scene. I hope I get the same quality level seen in your pictures. By the way, where did you get the conversion kit for the Humvee?
Posted: Thursday, November 09, 2017 - 02:54 AM UTC
Hi Agustin, thanks - It has a long way to go!
The GMV conversion is scratch built, plus trips to the junk box, some new tires/wheels, and some Live Resin:
Thanks for dropping by!
Nick
The GMV conversion is scratch built, plus trips to the junk box, some new tires/wheels, and some Live Resin:
Thanks for dropping by!
Nick
El_Patron
Madrid, Spain / España
Joined: October 28, 2017
KitMaker: 30 posts
Armorama: 28 posts
Joined: October 28, 2017
KitMaker: 30 posts
Armorama: 28 posts
Posted: Thursday, November 09, 2017 - 02:58 AM UTC
Scratchbuilt???? OMG
I have a M1114 from Bronco, and I don´t know if use a conversion kit or leave it in its original concept, it is supposed to carry five S.F operators in a patrol.
18Bravo
Colorado, United States
Joined: January 20, 2005
KitMaker: 7,219 posts
Armorama: 6,097 posts
Joined: January 20, 2005
KitMaker: 7,219 posts
Armorama: 6,097 posts
Posted: Thursday, November 09, 2017 - 03:28 AM UTC
With a proper backdrop, the photo of the gun truck and the demolished building could be real. Excellent job. And I believe yours is the first GMV I've seen to tackle that 5th Group bumper.
ReconTL3-1
Texas, United States
Joined: June 07, 2006
KitMaker: 726 posts
Armorama: 687 posts
Joined: June 07, 2006
KitMaker: 726 posts
Armorama: 687 posts
Posted: Thursday, November 09, 2017 - 04:28 AM UTC
Holy crap, Nick! All you have done so far looks outstanding and incredibly realistic. At first quick glance I thought the picture of the GMV near the structure was a reference photo you were using for this project until I read through this thread and looked more closely at it. I agree with Rob that with a proper background one could think the picture of your work was the real thing. I always enjoy seeing your work and find it inspiring.
Cheers,
James
Cheers,
James
Posted: Thursday, November 09, 2017 - 04:39 AM UTC
Oh, man Nick so much to like about this one! Definitely top notch work thus far. I remember going by buildings like that back in '03 and '06, you seriously captured the feel of a wrecked building. Another one to be following the progress of closely, this is gonna be good.
Dioramartin
New South Wales, Australia
Joined: May 04, 2016
KitMaker: 1,476 posts
Armorama: 1,463 posts
Joined: May 04, 2016
KitMaker: 1,476 posts
Armorama: 1,463 posts
Posted: Thursday, November 09, 2017 - 06:34 AM UTC
cheyenne
New Jersey, United States
Joined: January 05, 2005
KitMaker: 2,185 posts
Armorama: 1,813 posts
Joined: January 05, 2005
KitMaker: 2,185 posts
Armorama: 1,813 posts
Posted: Thursday, November 09, 2017 - 03:01 PM UTC
Cool Nick , nice work .
Maki
Senior Editor
Croatia Hrvatska
Joined: February 13, 2002
KitMaker: 5,579 posts
Armorama: 2,988 posts
Joined: February 13, 2002
KitMaker: 5,579 posts
Armorama: 2,988 posts
Posted: Thursday, November 09, 2017 - 04:04 PM UTC
Wow! I remember the Battle for Debreck Pass, but you managed to take this Humvee to a whole new level. Wow!
Mario
Mario
jrutman
Pennsylvania, United States
Joined: April 10, 2011
KitMaker: 7,941 posts
Armorama: 7,934 posts
Joined: April 10, 2011
KitMaker: 7,941 posts
Armorama: 7,934 posts
Posted: Thursday, November 09, 2017 - 10:43 PM UTC
Classic Nick,
He isn't around for a little bit and then BAM....a boatload of awesome realism is displayed. Don't know how you do it man,
J
He isn't around for a little bit and then BAM....a boatload of awesome realism is displayed. Don't know how you do it man,
J
Trisaw
California, United States
Joined: December 24, 2002
KitMaker: 4,105 posts
Armorama: 2,492 posts
Joined: December 24, 2002
KitMaker: 4,105 posts
Armorama: 2,492 posts
Posted: Friday, November 10, 2017 - 12:02 AM UTC
Amazing! That's quality work that belongs in a museum!
SF-07-18D
Madrid, Spain / España
Joined: December 19, 2016
KitMaker: 366 posts
Armorama: 300 posts
Joined: December 19, 2016
KitMaker: 366 posts
Armorama: 300 posts
Posted: Friday, November 10, 2017 - 03:06 AM UTC
No words. It's simply amazing.
I'll follow this thread closely.
strongarden
Florida, United States
Joined: May 14, 2012
KitMaker: 730 posts
Armorama: 624 posts
Joined: May 14, 2012
KitMaker: 730 posts
Armorama: 624 posts
Posted: Friday, November 10, 2017 - 05:04 AM UTC
Nick only one word from me: WOW.
I really look frwd to what else you're gonna create w/ this awesome project!
Very cool indeed amigo
Regards Dave
I really look frwd to what else you're gonna create w/ this awesome project!
Very cool indeed amigo
Regards Dave
JSSVIII
Massachusetts, United States
Joined: March 28, 2007
KitMaker: 1,169 posts
Armorama: 1,067 posts
Joined: March 28, 2007
KitMaker: 1,169 posts
Armorama: 1,067 posts
Posted: Friday, November 10, 2017 - 06:48 PM UTC
Fantastic work!
turkeyshot
New South Wales, Australia
Joined: February 06, 2012
KitMaker: 138 posts
Armorama: 133 posts
Joined: February 06, 2012
KitMaker: 138 posts
Armorama: 133 posts
Posted: Sunday, November 12, 2017 - 03:47 PM UTC
Incredible accuracy and realism on all parts of this build so far. Fantastic work! I'll be following the rest of this build with great interest.
parrot
Ontario, Canada
Joined: March 01, 2002
KitMaker: 1,607 posts
Armorama: 1,581 posts
Joined: March 01, 2002
KitMaker: 1,607 posts
Armorama: 1,581 posts
Posted: Tuesday, November 14, 2017 - 01:29 AM UTC
Quoted Text
Incredible accuracy and realism on all parts of this build so far. Fantastic work! I'll be following the rest of this build with great interest.
Same thoughts.
Totally great work.
Tom
Posted: Tuesday, November 14, 2017 - 05:42 AM UTC
Hi guys - thanks to all of you for taking some time to look, and leave some comments!
This one still has a long way to go, so the positive words are really appreciated! - As all of you know, large scale tedious and repetitive tasks....take a lot of time and energy - and can become downright demoralizing!
Agustin - yep, it's a scratch build - converting the Academy M1151 into an M1165A1, then the elements that make it the SOCOM expanded capacity version. The bedrails, pioneering tools on the hood, and front bumper are among the most apparent changes from the previous versions. A deep junkbox is helpful for this conversion....haha!
Hi Rob - I'm glad you noticed that bumper! I have been looking for a reason to try and build it. As for the overall image, thanks alot - I'm glad it "almost" passed your "eye" test. Backdrops are always hard - I've concluded that I prefer a generally similar, but obscure background over something more precise - as a viewer you might be less likely to pick up on problems with scale or perspective. We'll see what happens here...and, your reference images helped this built a lot.
Hi James - thanks very much! I appreciate it! The process that we all take to get it where we want it - it seems different each time - and how it will settle out? - I'm not sure how I'll resolve the backdrop question...we'll see!
Hi John - thanks - and i appreciate your word choice - that it "captures a feeling" - seems on some projects, that's more relevant than including EVERY detail...per above, you never know! It is a strange challenge -to show enough...if not, that's really obvious - or, showing too much...can be fine, but also unnecessary - ask me how I figured that out!! haha
Tim and Cheyenne!! haha!thanks, brothers! Lets hope it flies when it's done!
Hi Mario - I'm glad you recall that build - it was a lot of GMV's! - each inspired on some level by your outstanding work! - similar, but not near yours. This one is getting better I think - I tried to tighten up a few details, and be less fussy a bout others - thanks!
Hey Jerry - haha - you know my pattern: finish a project, get a bit burned out, obsessively start something new...then start a post...and hope for the best! Seeking the convincing realism is a fun part too - looking for ways to convey real scale from small scale is fun- And - as I noted above - a key to this, is your fundamental rule: keep random stuff random - not as easy as it sounds....
Peter, Nacho, Dave, John, Jason, and Tom - thanks very much for taking sometime to leave a comment - I really appreciate it! Let's hope it turns out ok!
OK - on to today's post. I have not been following a particularly rational sequence with this build - As the building and debris have been going, I've had a few vehicles underway too.
Below - an "other" guy's vehicle damaged by unknown sources - but, the result is a broken front axle and burned tires. Continuing my self-imposed tradition of making some things harder than they have to be, this one received scratch built stand off armor. My reference photos typically show slat armor - but, having scratch built a few of those, I opted for bar armor. While not all that easy to do, substantially less bad than the alternative - Please take a look:
Yes...tedious. With some color, and as just finished:
This will wind up amidst the rubble, in front of the damaged building. For an "el cheapo" kit - as I recall, less than $25 usd, plus some extras, I'm pleased with it!
On the other side of the spectrum, I'm still working on T-55 number two (converting to a T55 AMV) - and still enjoy it! not easy at all:
Like the first one, this will receive more parts and much more damage - you can see missing ERA blocks up front and damaged sub frame.
Thanks for having a look!
cheers
Nick
Dioramartin
New South Wales, Australia
Joined: May 04, 2016
KitMaker: 1,476 posts
Armorama: 1,463 posts
Joined: May 04, 2016
KitMaker: 1,476 posts
Armorama: 1,463 posts
Posted: Tuesday, November 14, 2017 - 03:49 PM UTC
Positively stupefying work Nick...I lost count of how many holes you had to drill in the el cheapo kit’s bar-armor stanchions when I passed 320...in fact I think I passed out
Bricksy1969
England - North West, United Kingdom
Joined: September 19, 2006
KitMaker: 262 posts
Armorama: 251 posts
Joined: September 19, 2006
KitMaker: 262 posts
Armorama: 251 posts
Posted: Tuesday, November 14, 2017 - 04:30 PM UTC
Love it
HeavyArty
Florida, United States
Joined: May 16, 2002
KitMaker: 17,694 posts
Armorama: 13,742 posts
Joined: May 16, 2002
KitMaker: 17,694 posts
Armorama: 13,742 posts
Posted: Tuesday, November 14, 2017 - 08:02 PM UTC
Looks like it is shaping up to be another masterpiece, as usual. Great job Nick.
Posted: Tuesday, November 14, 2017 - 08:35 PM UTC
Nick - you must have gotten tired of building straight lines and square corners in the Bladerunner dio so you decided to blow something up!
Amazing - NO WORDS!
p.s. Those high angle vehicle photos on that piece of "pavement" in natural sunlight are out-of-this-world REAL!
Amazing - NO WORDS!
p.s. Those high angle vehicle photos on that piece of "pavement" in natural sunlight are out-of-this-world REAL!
justsendit
Colorado, United States
Joined: February 24, 2014
KitMaker: 3,033 posts
Armorama: 2,492 posts
Joined: February 24, 2014
KitMaker: 3,033 posts
Armorama: 2,492 posts
Posted: Tuesday, November 14, 2017 - 09:52 PM UTC
Hi Nick … Your Holy Randomness!
I was beginning to think … these images of "wherever-gaph-raq-stan-land" are getting a little boring. When is he gonna' build some stuff again? … wait a minute, those are models! Holy crap!!! You've gone and done it again, my friend — blurred that "reality line" thingy which totally messes with my already blurry vision and what's left of my 60's-fried brain!
Your photography is so amazingly convincing that I pause to wonder what kind of "ground-pounder" was it that actually leveled that Structure. … Oh wait … an X-Acto blade surgical strike! … Really love the battle damage on that vehicle too!
Too much coffee for me this morning! … Cheers!☕️
—mike
j76lr
New Jersey, United States
Joined: September 22, 2006
KitMaker: 1,081 posts
Armorama: 1,066 posts
Joined: September 22, 2006
KitMaker: 1,081 posts
Armorama: 1,066 posts
Posted: Wednesday, November 15, 2017 - 02:36 AM UTC
Looking very good !! keep posting
strongarden
Florida, United States
Joined: May 14, 2012
KitMaker: 730 posts
Armorama: 624 posts
Joined: May 14, 2012
KitMaker: 730 posts
Armorama: 624 posts
Posted: Saturday, November 18, 2017 - 05:01 AM UTC
Great idea Nick and smartly executed. Your vehicles here are something special.
Looking frwd to how it all comes together.
Regards Dave
Looking frwd to how it all comes together.
Regards Dave