_GOTOBOTTOM
Constructive Feedback
For in-progress or completed build photos. Give and get contructive feedback!
U.S.M.C. M4A3E8 105mm, Korean War
young_sven
Visit this Community
Skåne, Sweden
Joined: May 14, 2010
KitMaker: 749 posts
Armorama: 743 posts
Posted: Saturday, November 11, 2017 - 07:10 PM UTC
First of all, my apologies that this is not a continuation of the Gama Goat build, I know some of you are following this and asking to see more. I promise you, that will happen.

After a rather long break from modelling (from May until October), I needed to prove something to myself: that I can build and finish a model in a reasonable period of time. This model is this first time I have tried to put all my fussy behaviour aside, avoid any form of scratchbuilding whatsoever and NO INTERIORS OR ENGINES! :-)

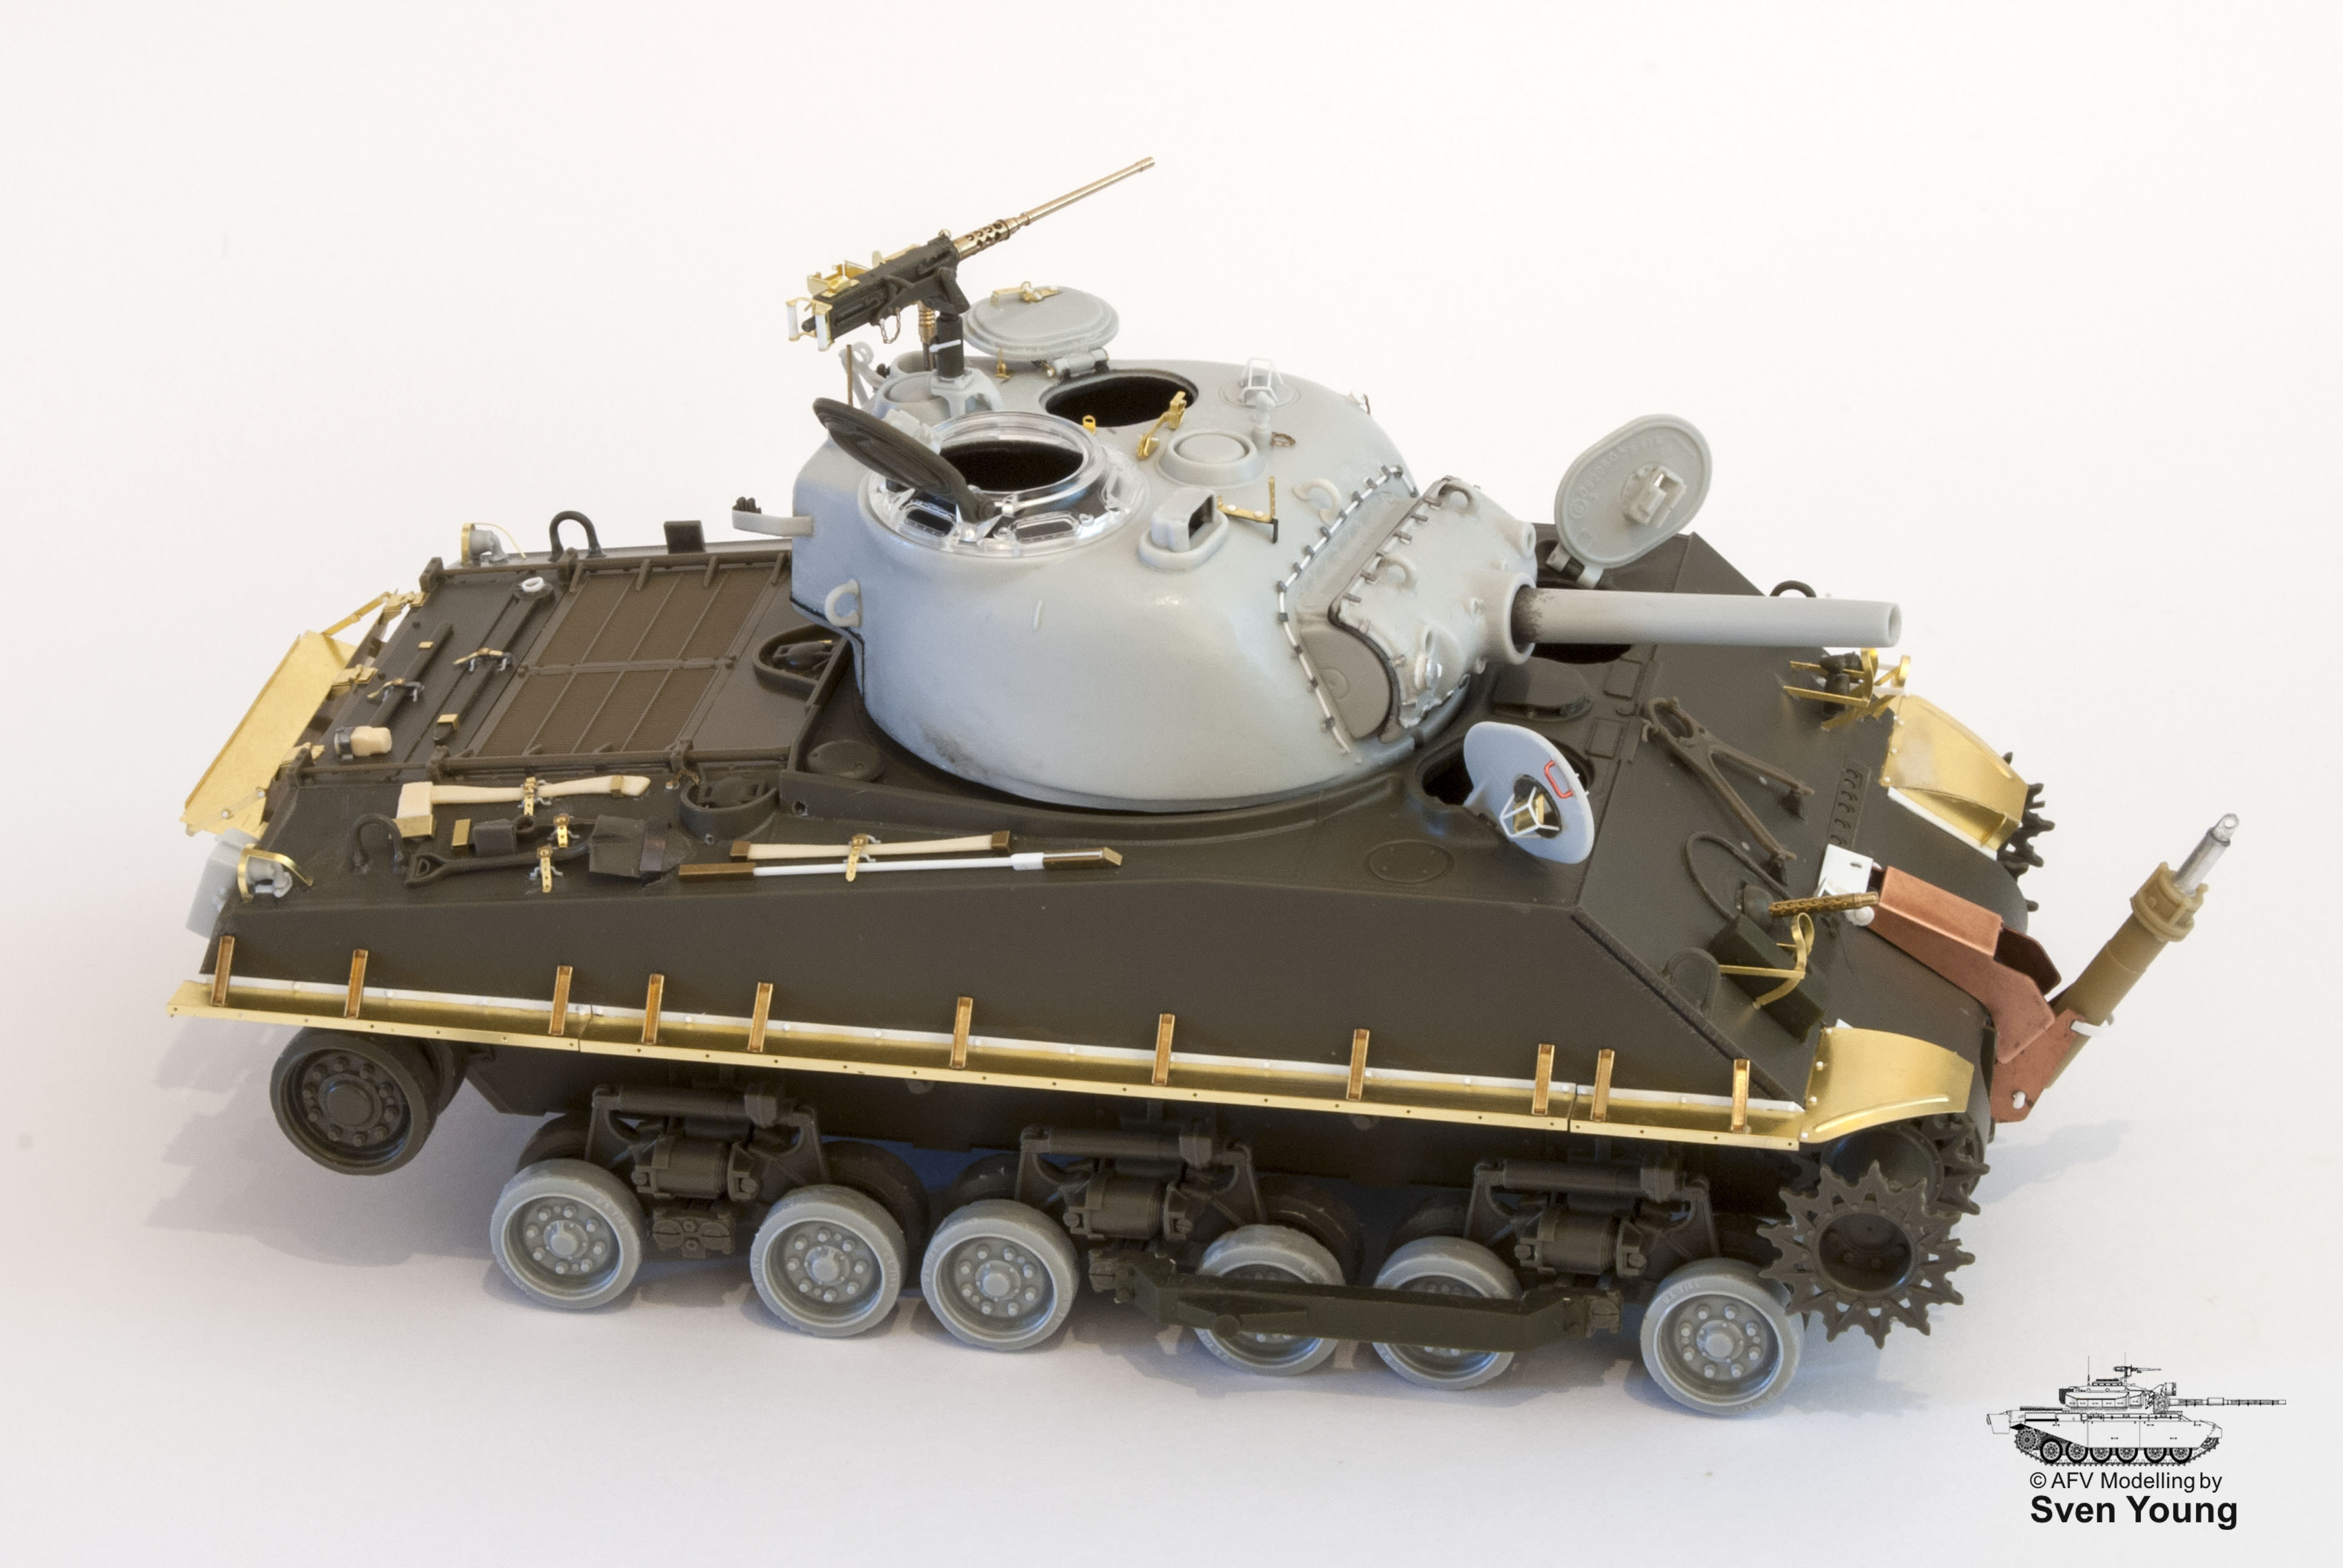
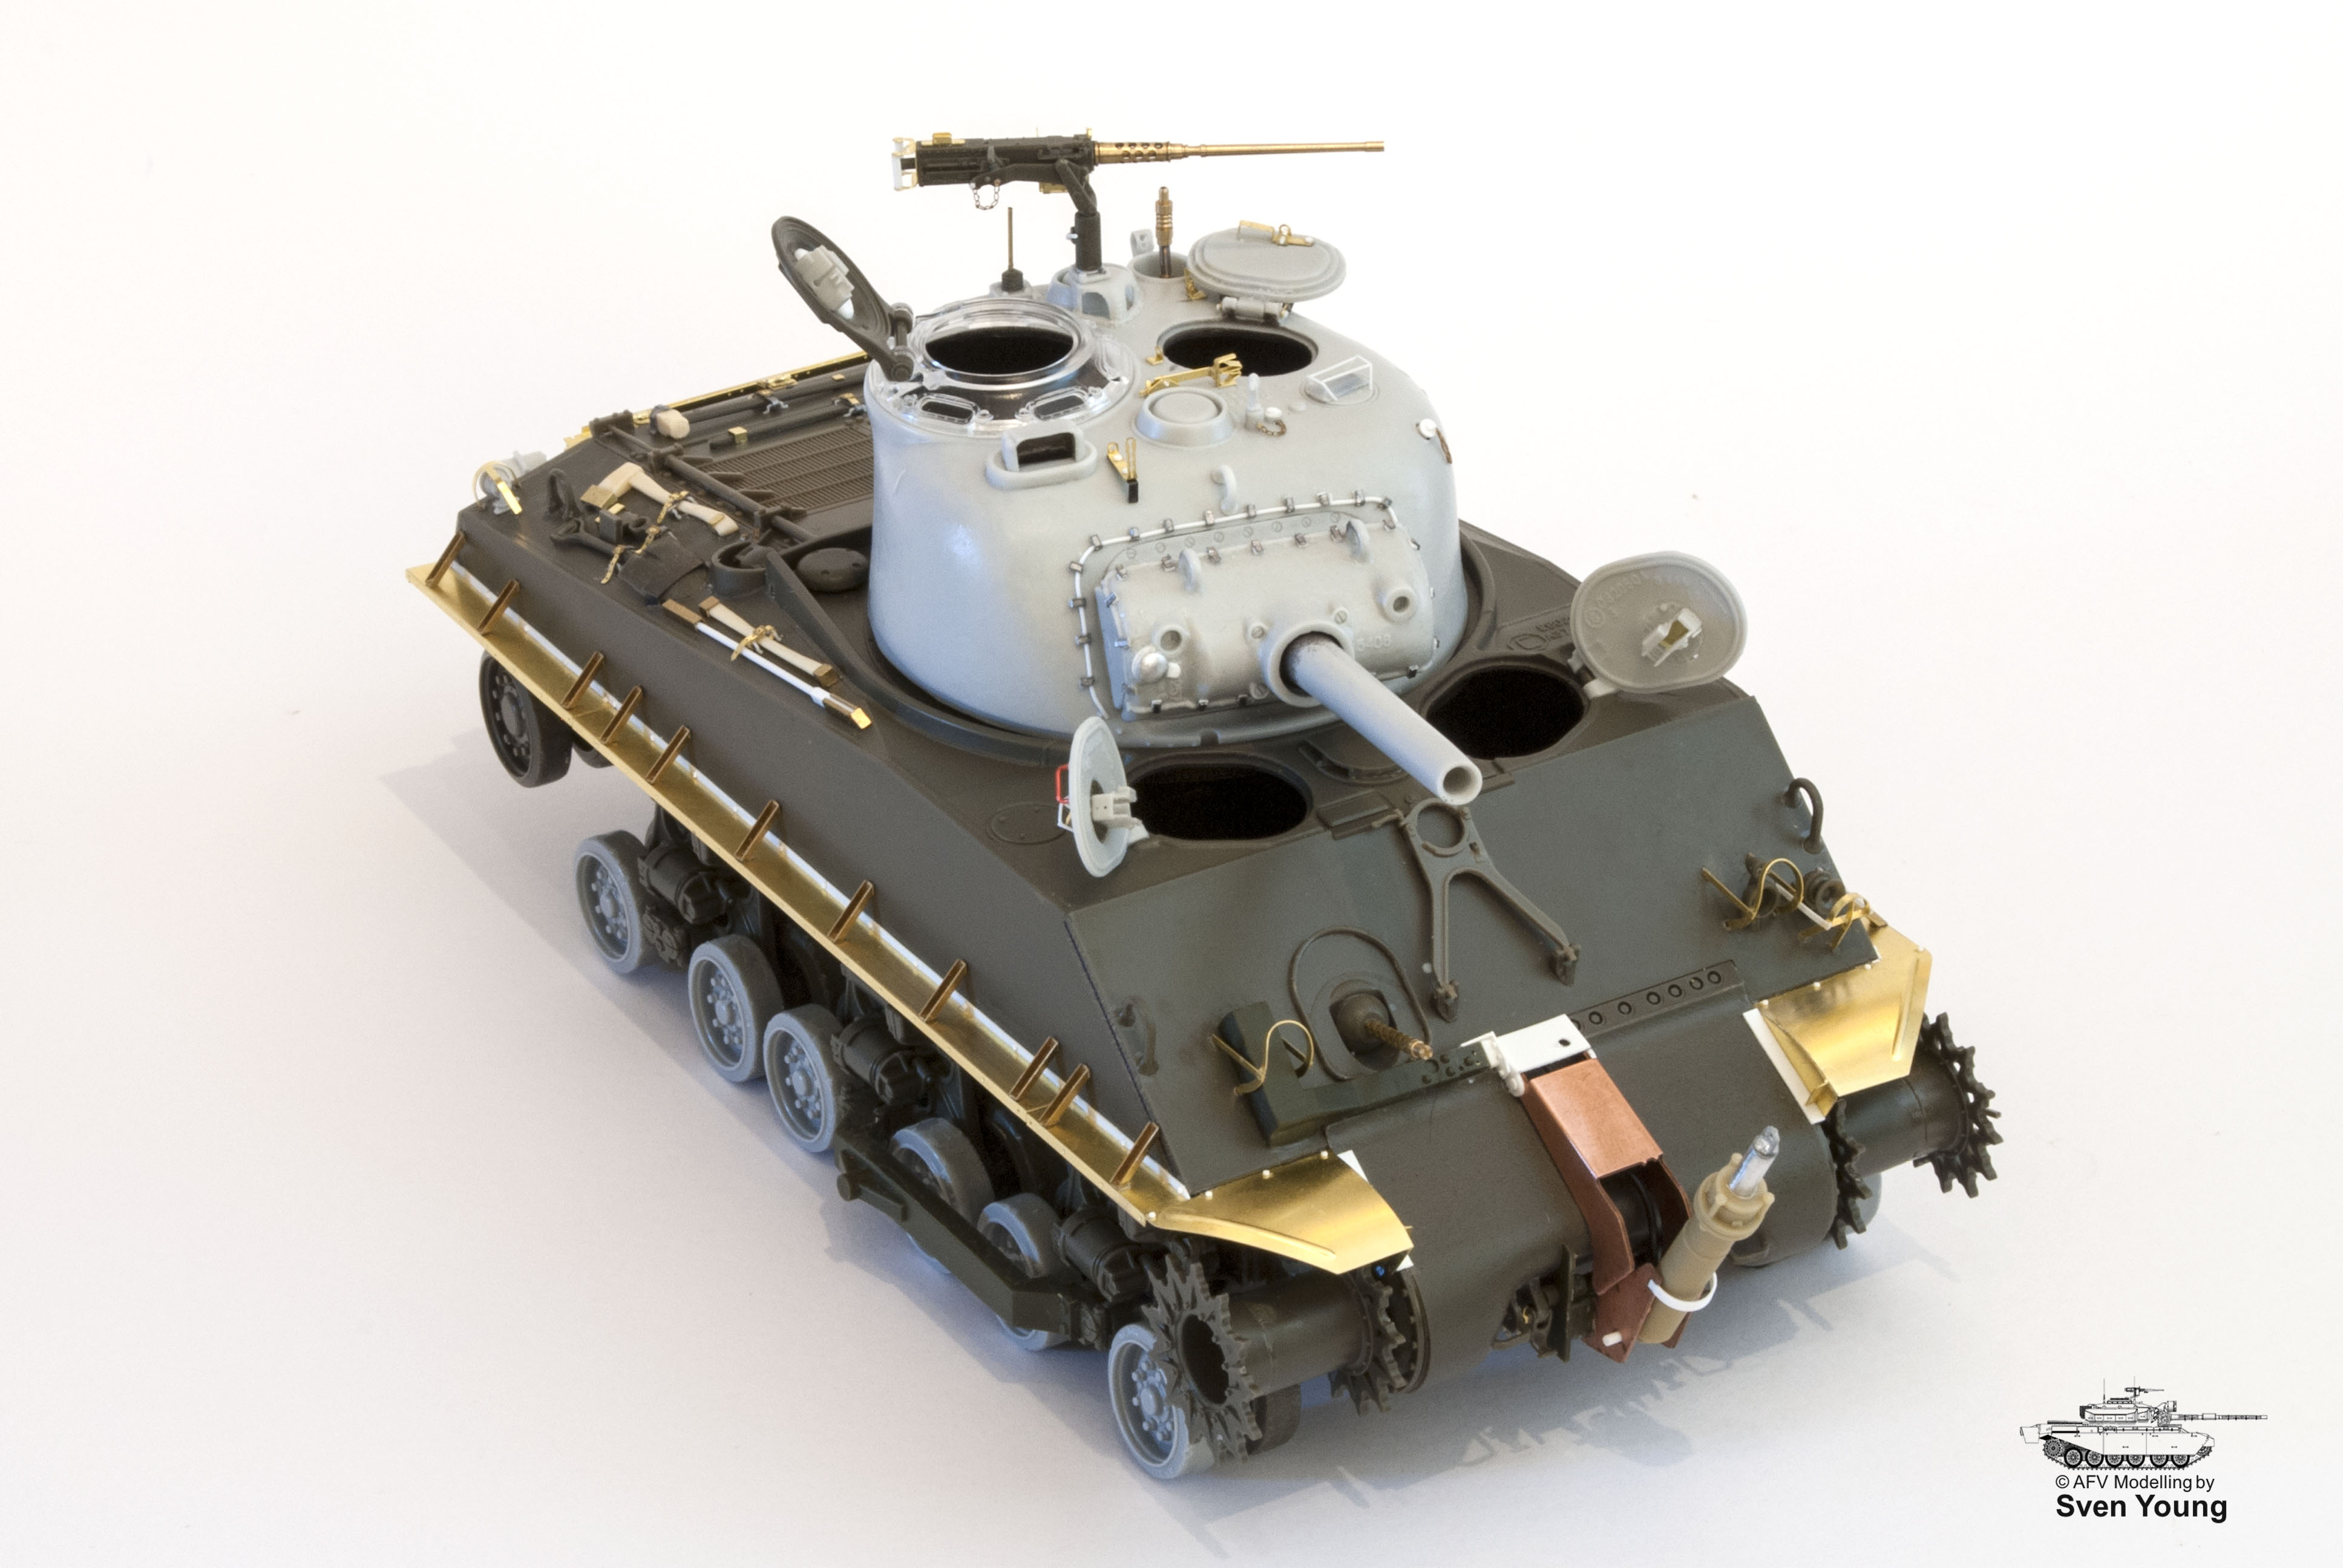
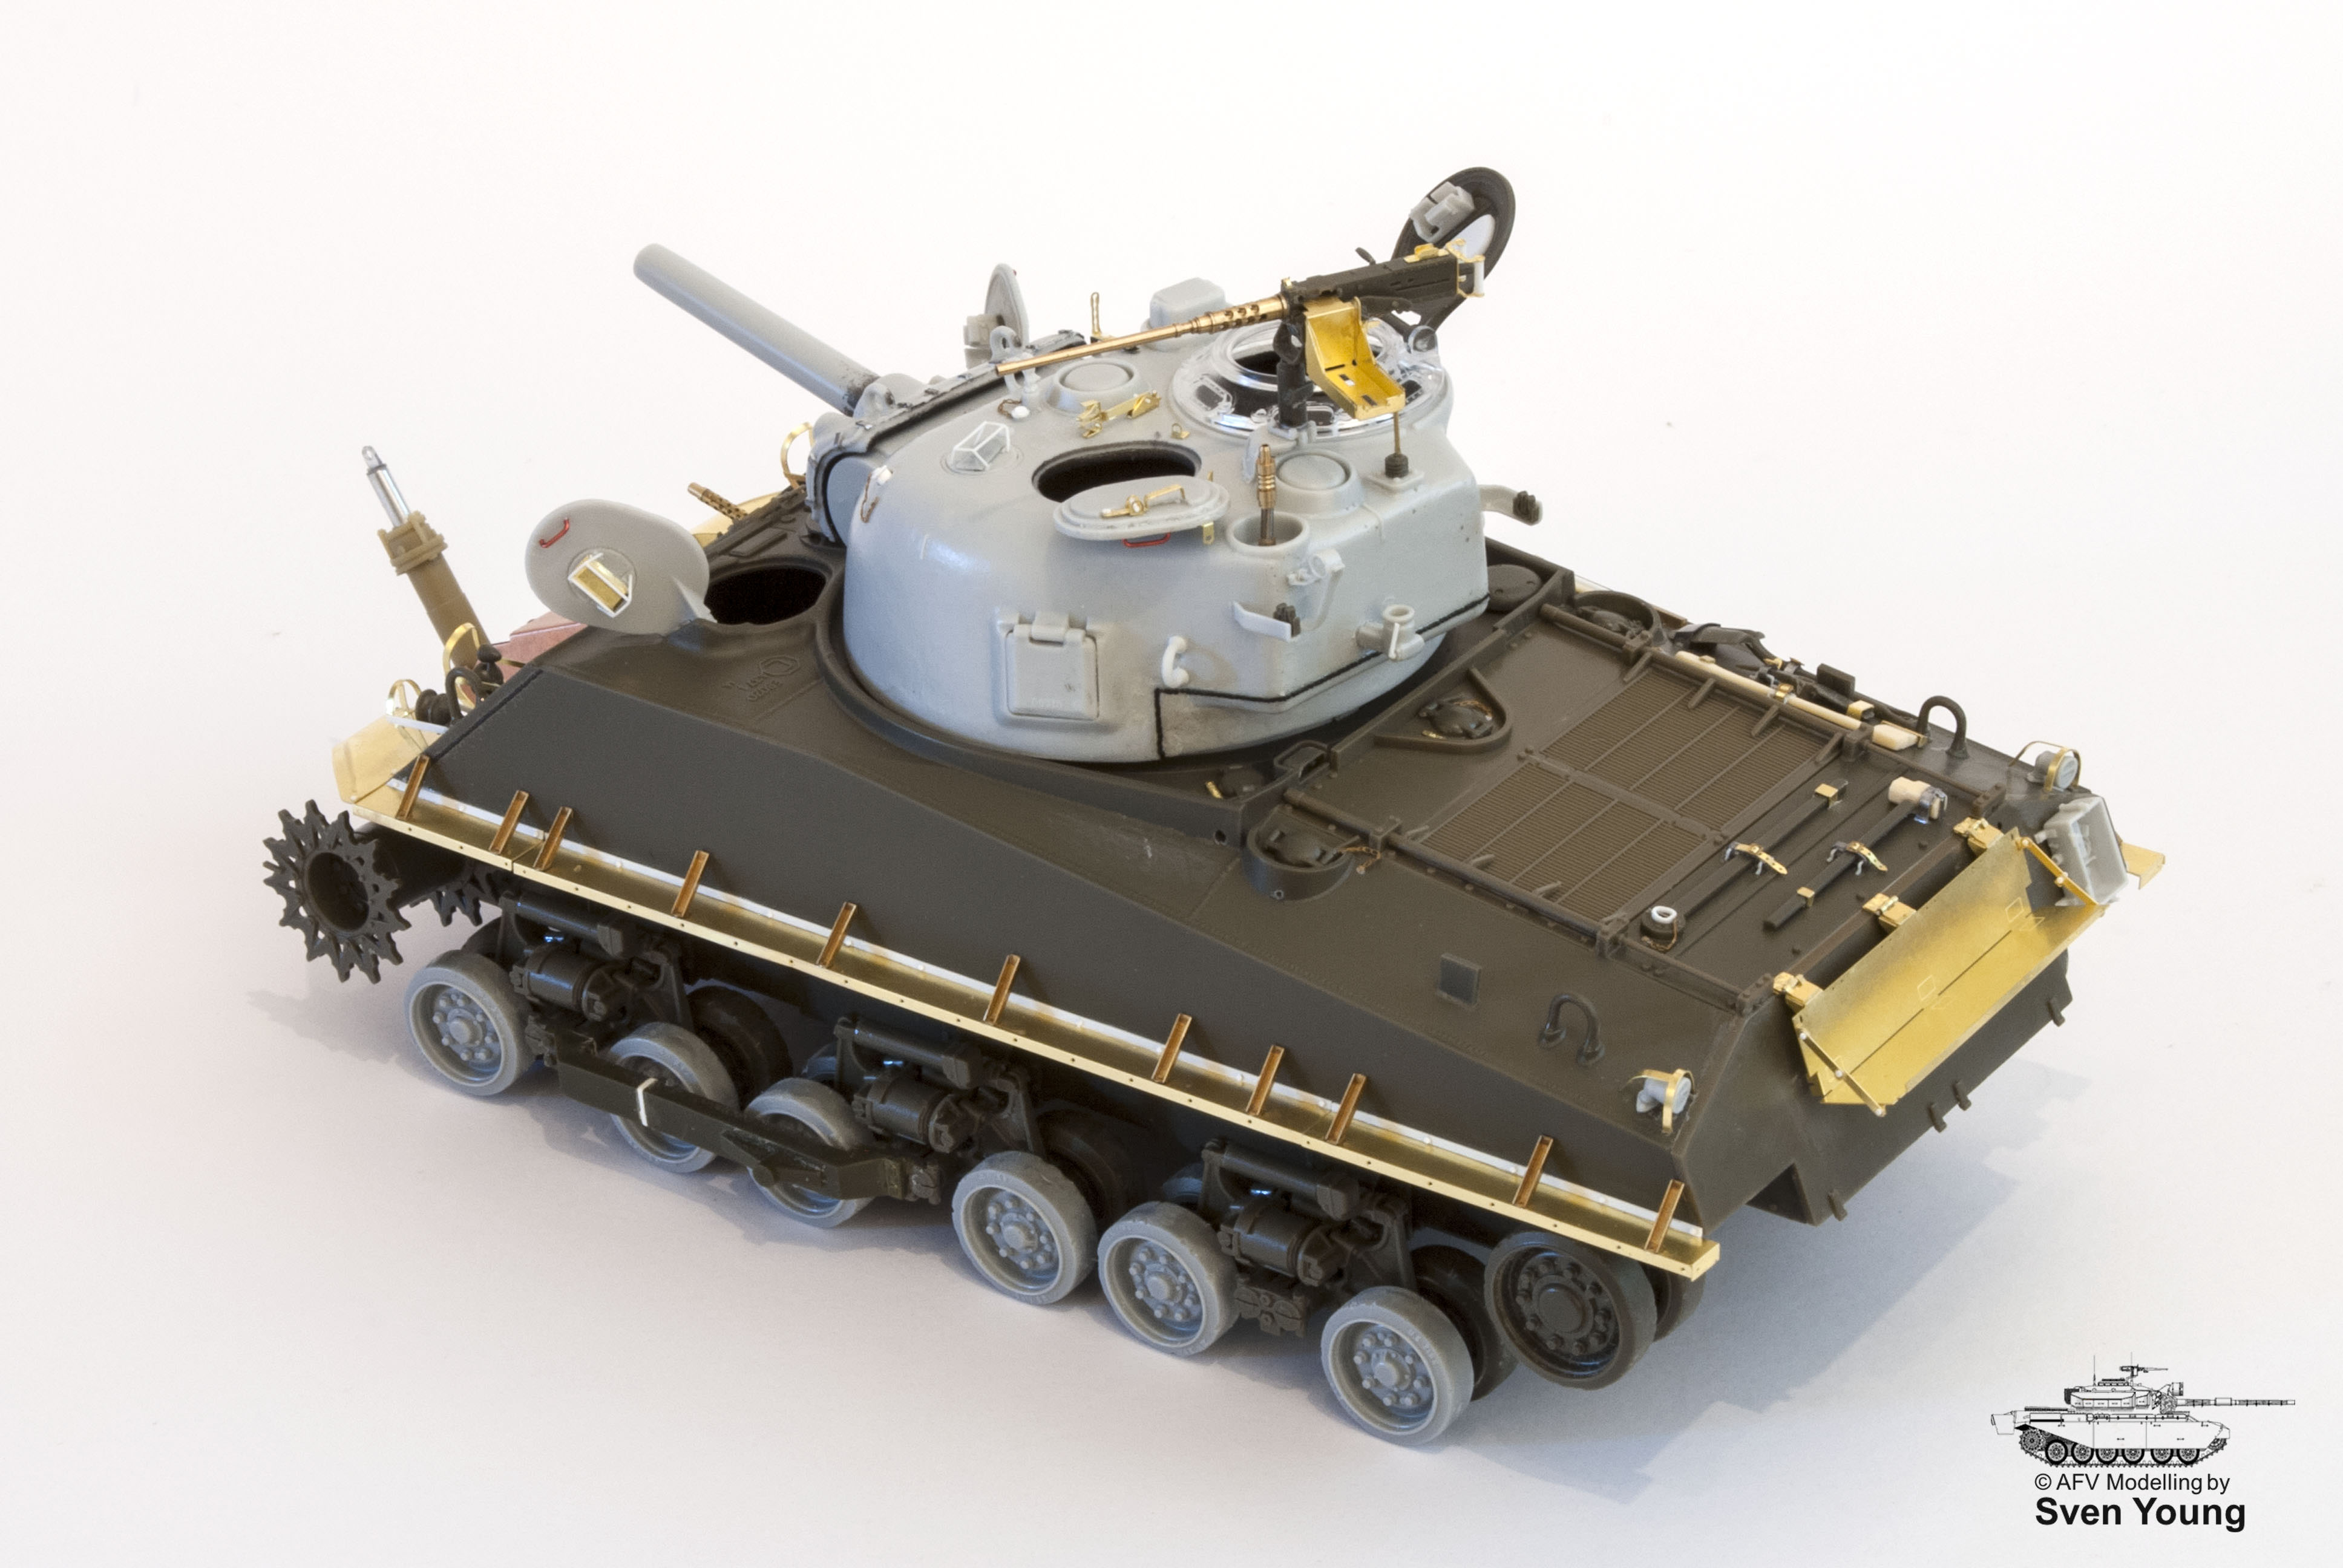
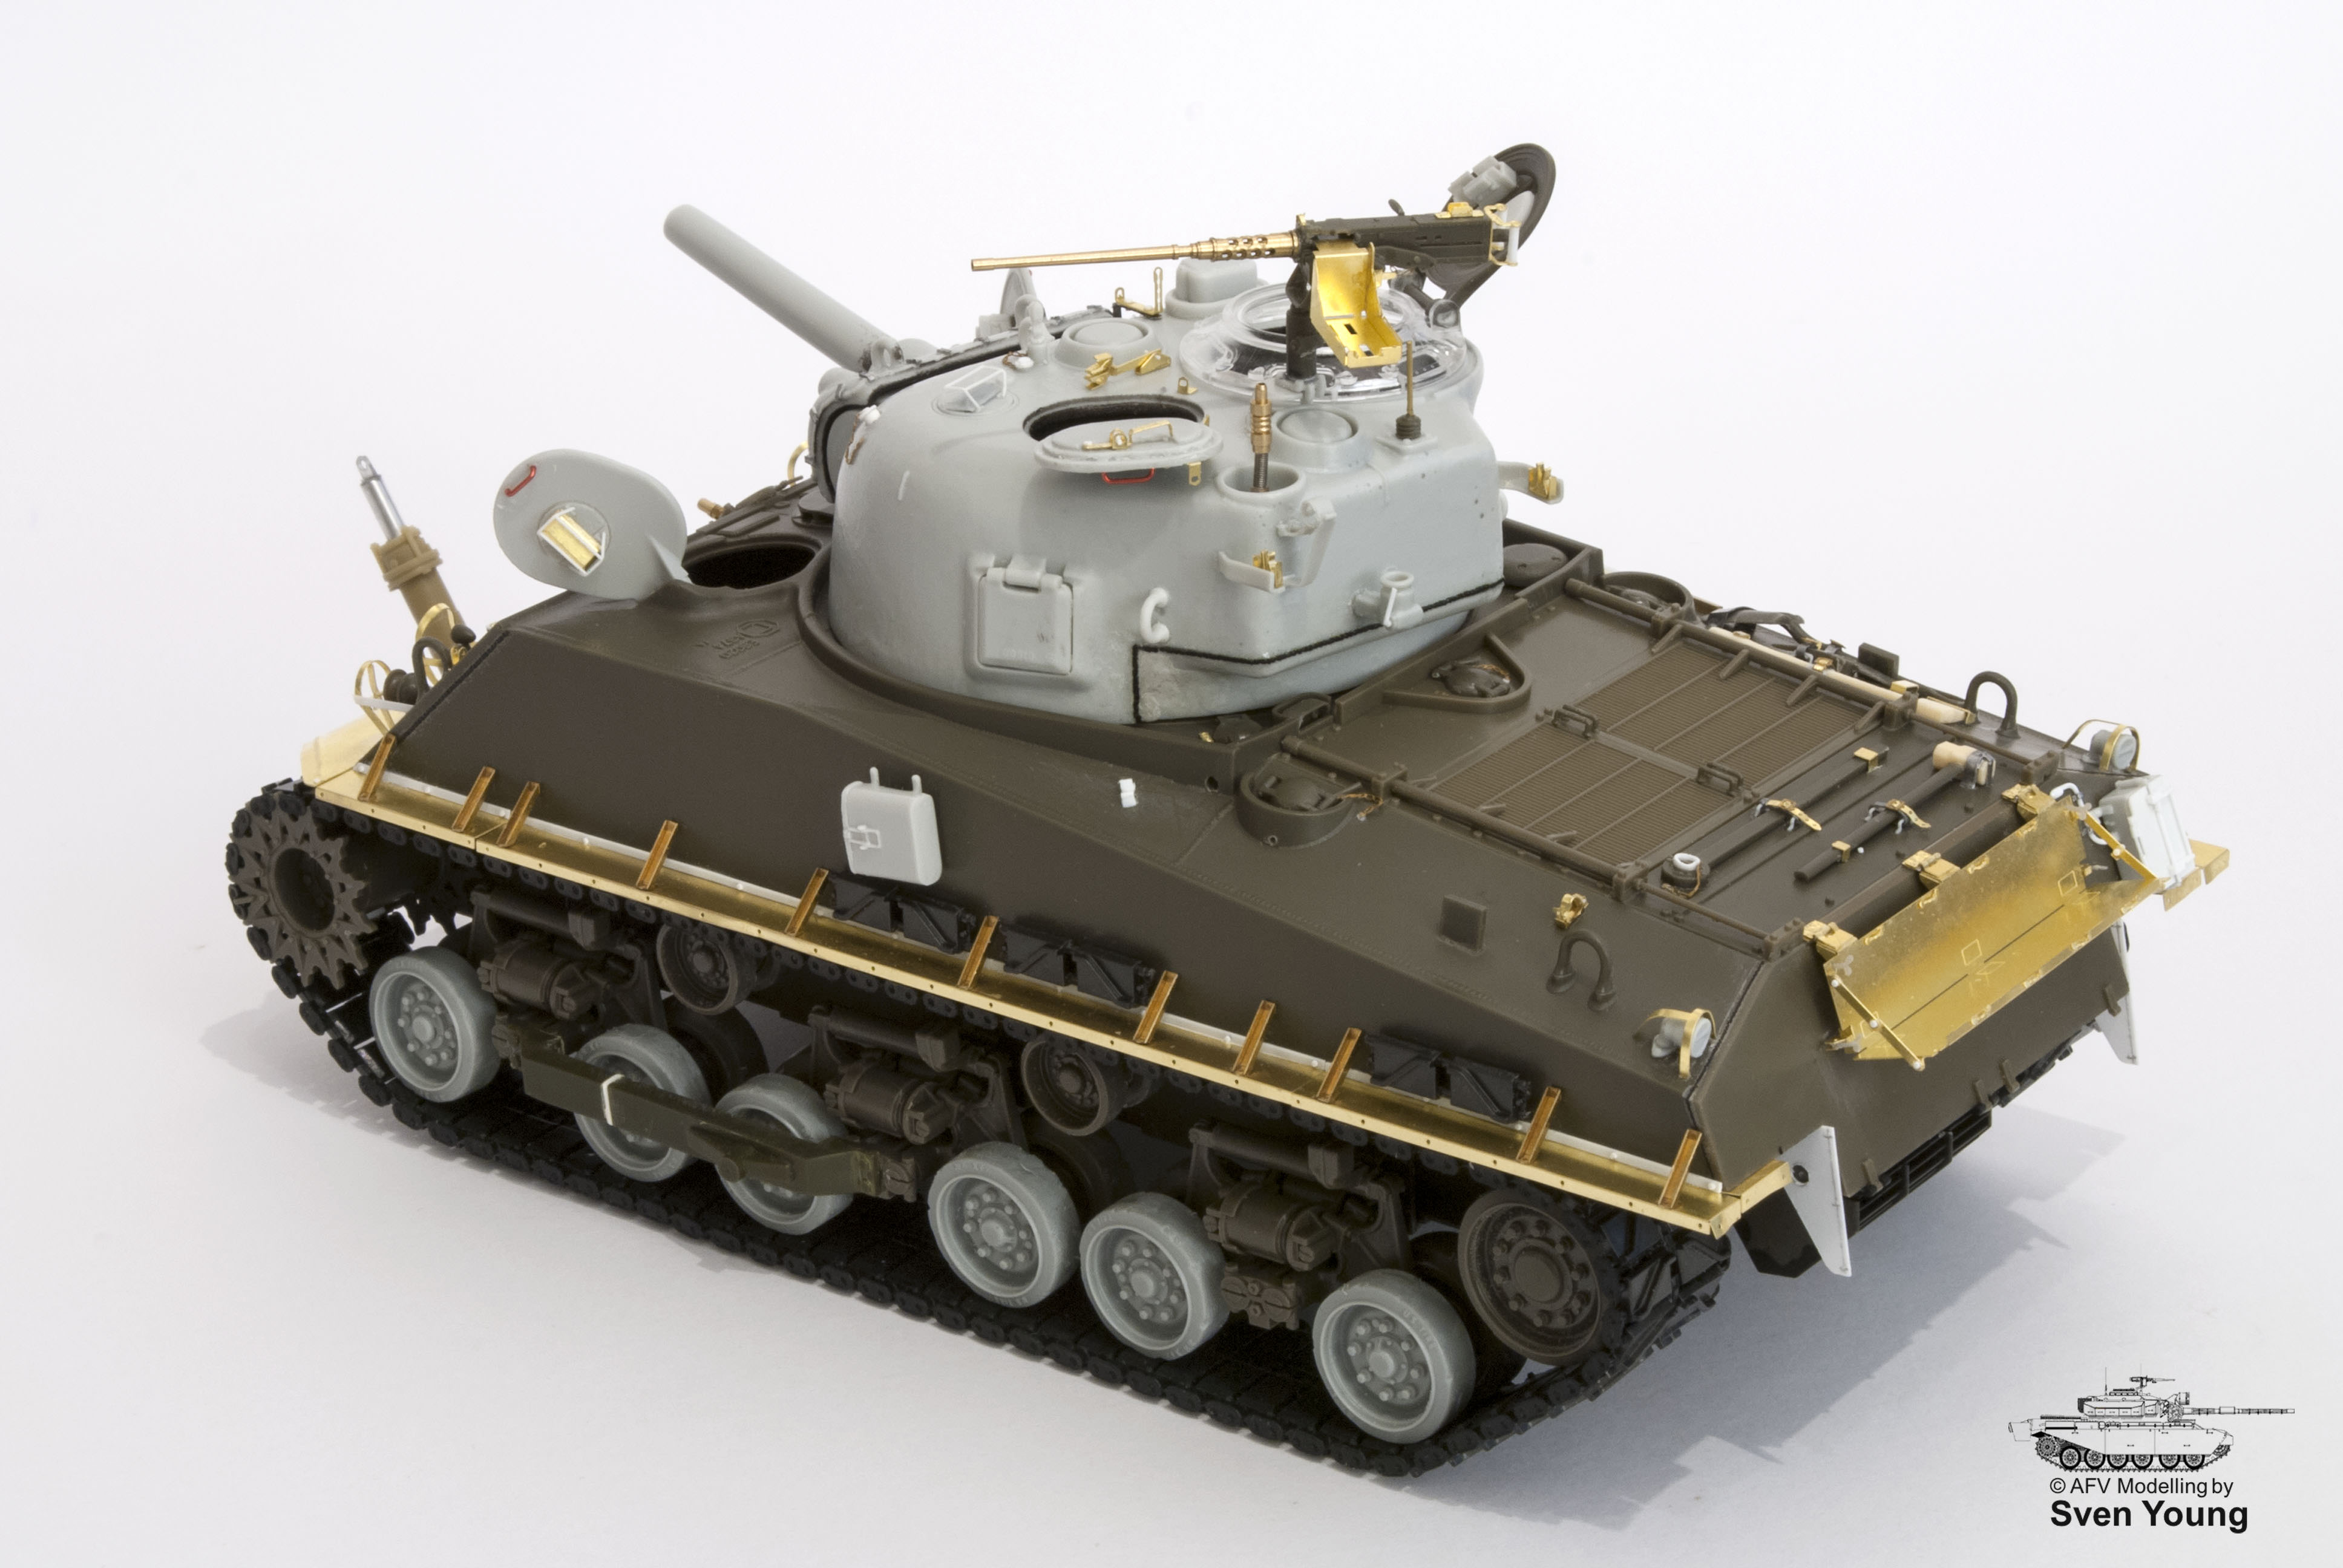
This is a vehicle I have been wanting to build for years, inspired by an image in the Squadron/Signal publication "Armor in Korea - A Pictorial History" in which there is a picture of two USMC M4A3E8 105mm howitzer tanks, with a few dozer fittings remaining on the vehicles (no dozer blades mounted).
For those of you who own the book, you can turn to page 34, it is the second tank in the background I am building (D43).

So, now was the time to get on with it!

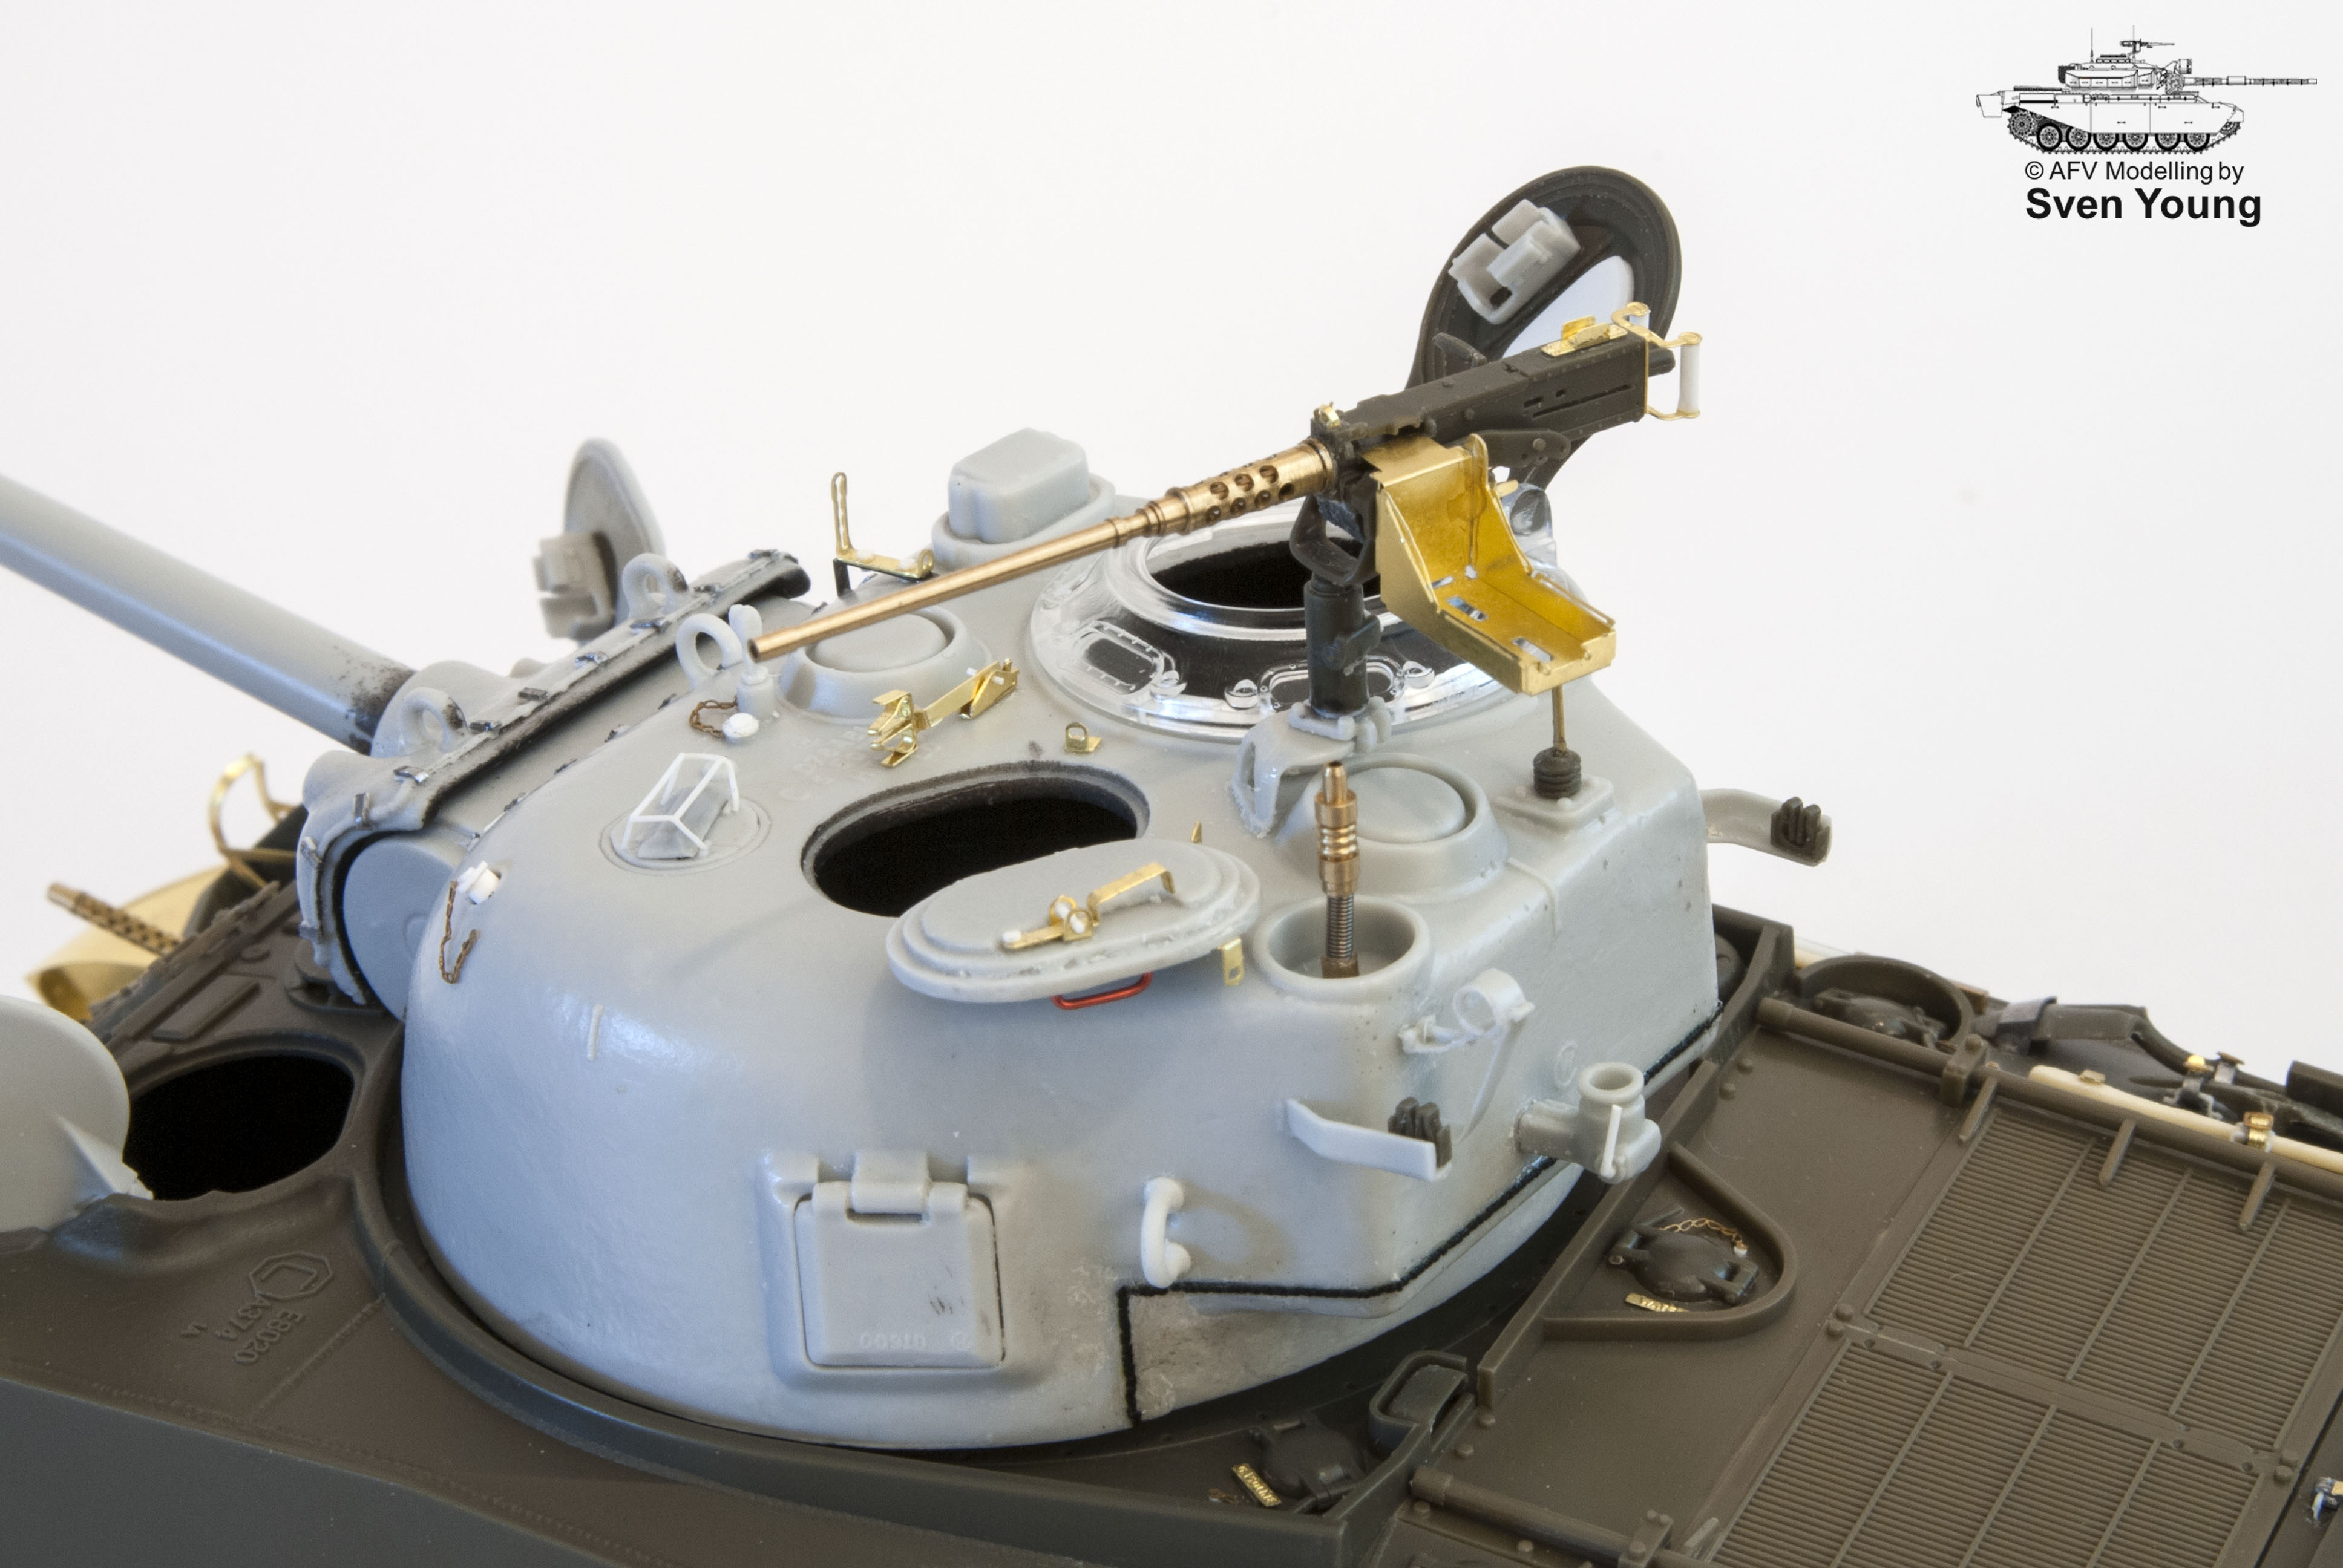
I started the build three weeks ago, and tried to keep the tempo going and not stop for anything. The pictures attached are the result so far. There is still a little work left to, the turret texture needs some work, the Cal .50 is not finished etc etc.

This is an "out of the box (OOB) build" in the sense that I have used only commercially available parts which I had in my stash (well, they all come in boxes don't they, that counts as "OOB" doesn't it? ;-) )

The following have been used:

* Tasca M4A3E8 Korean War

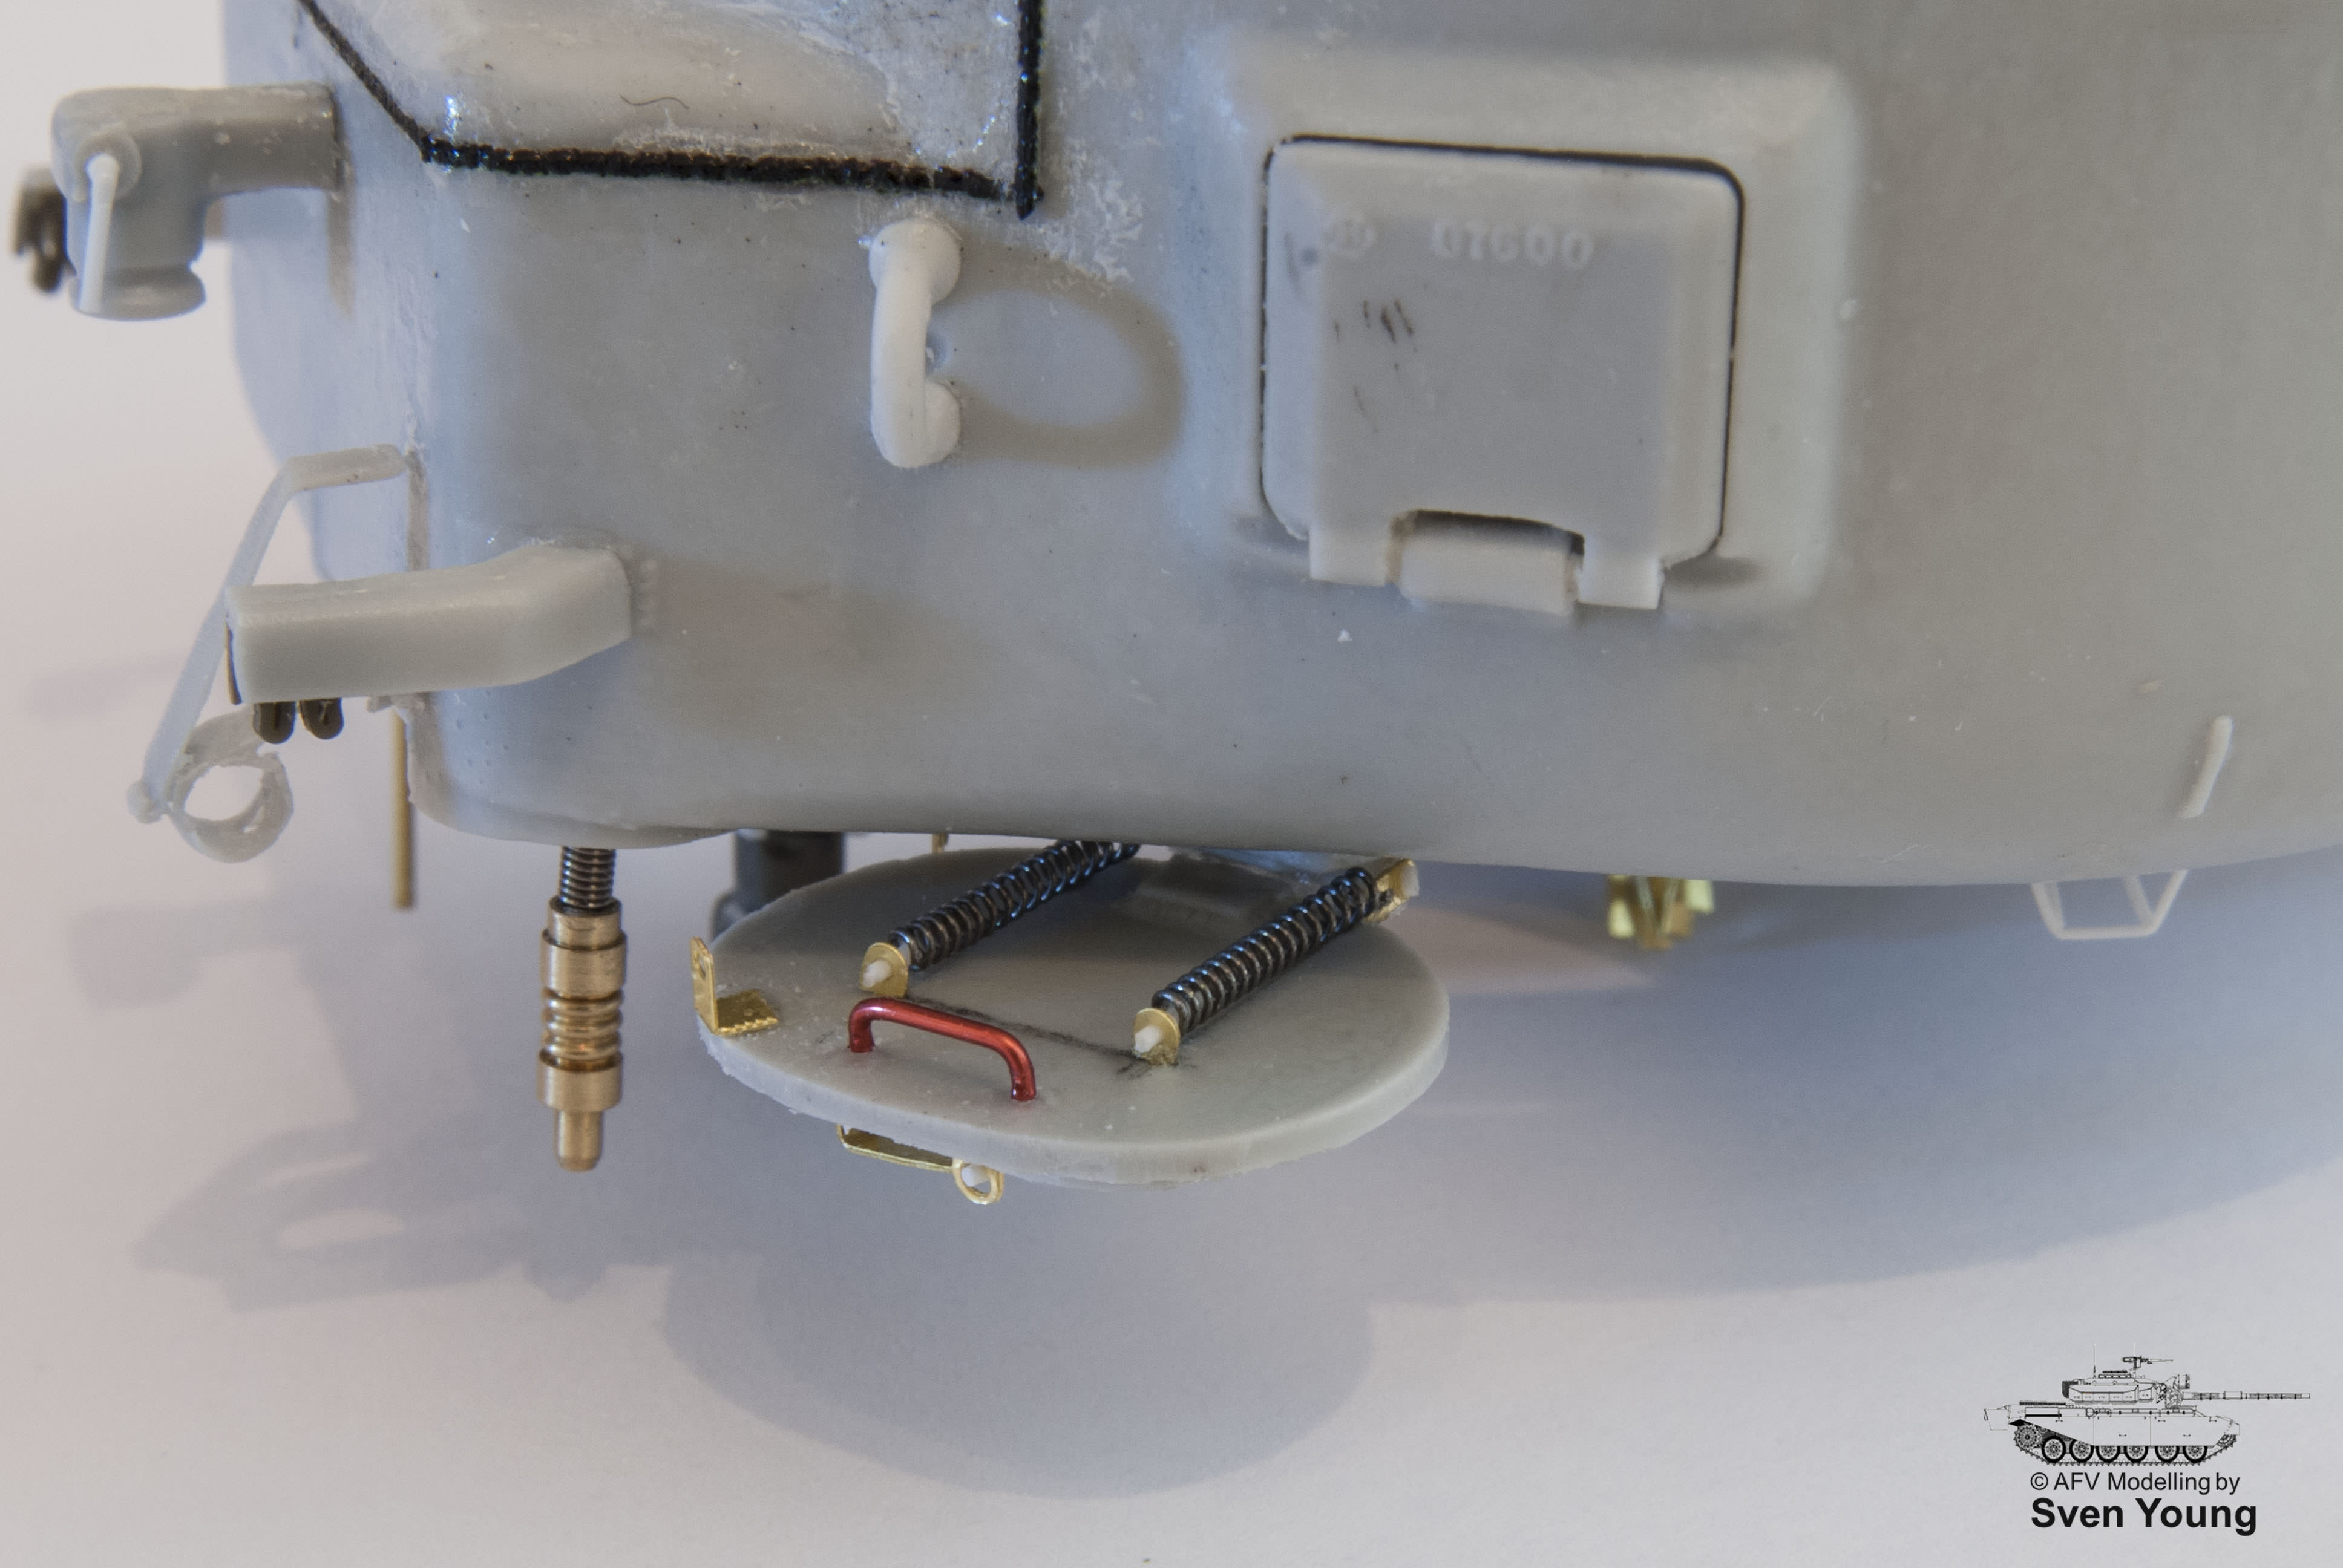
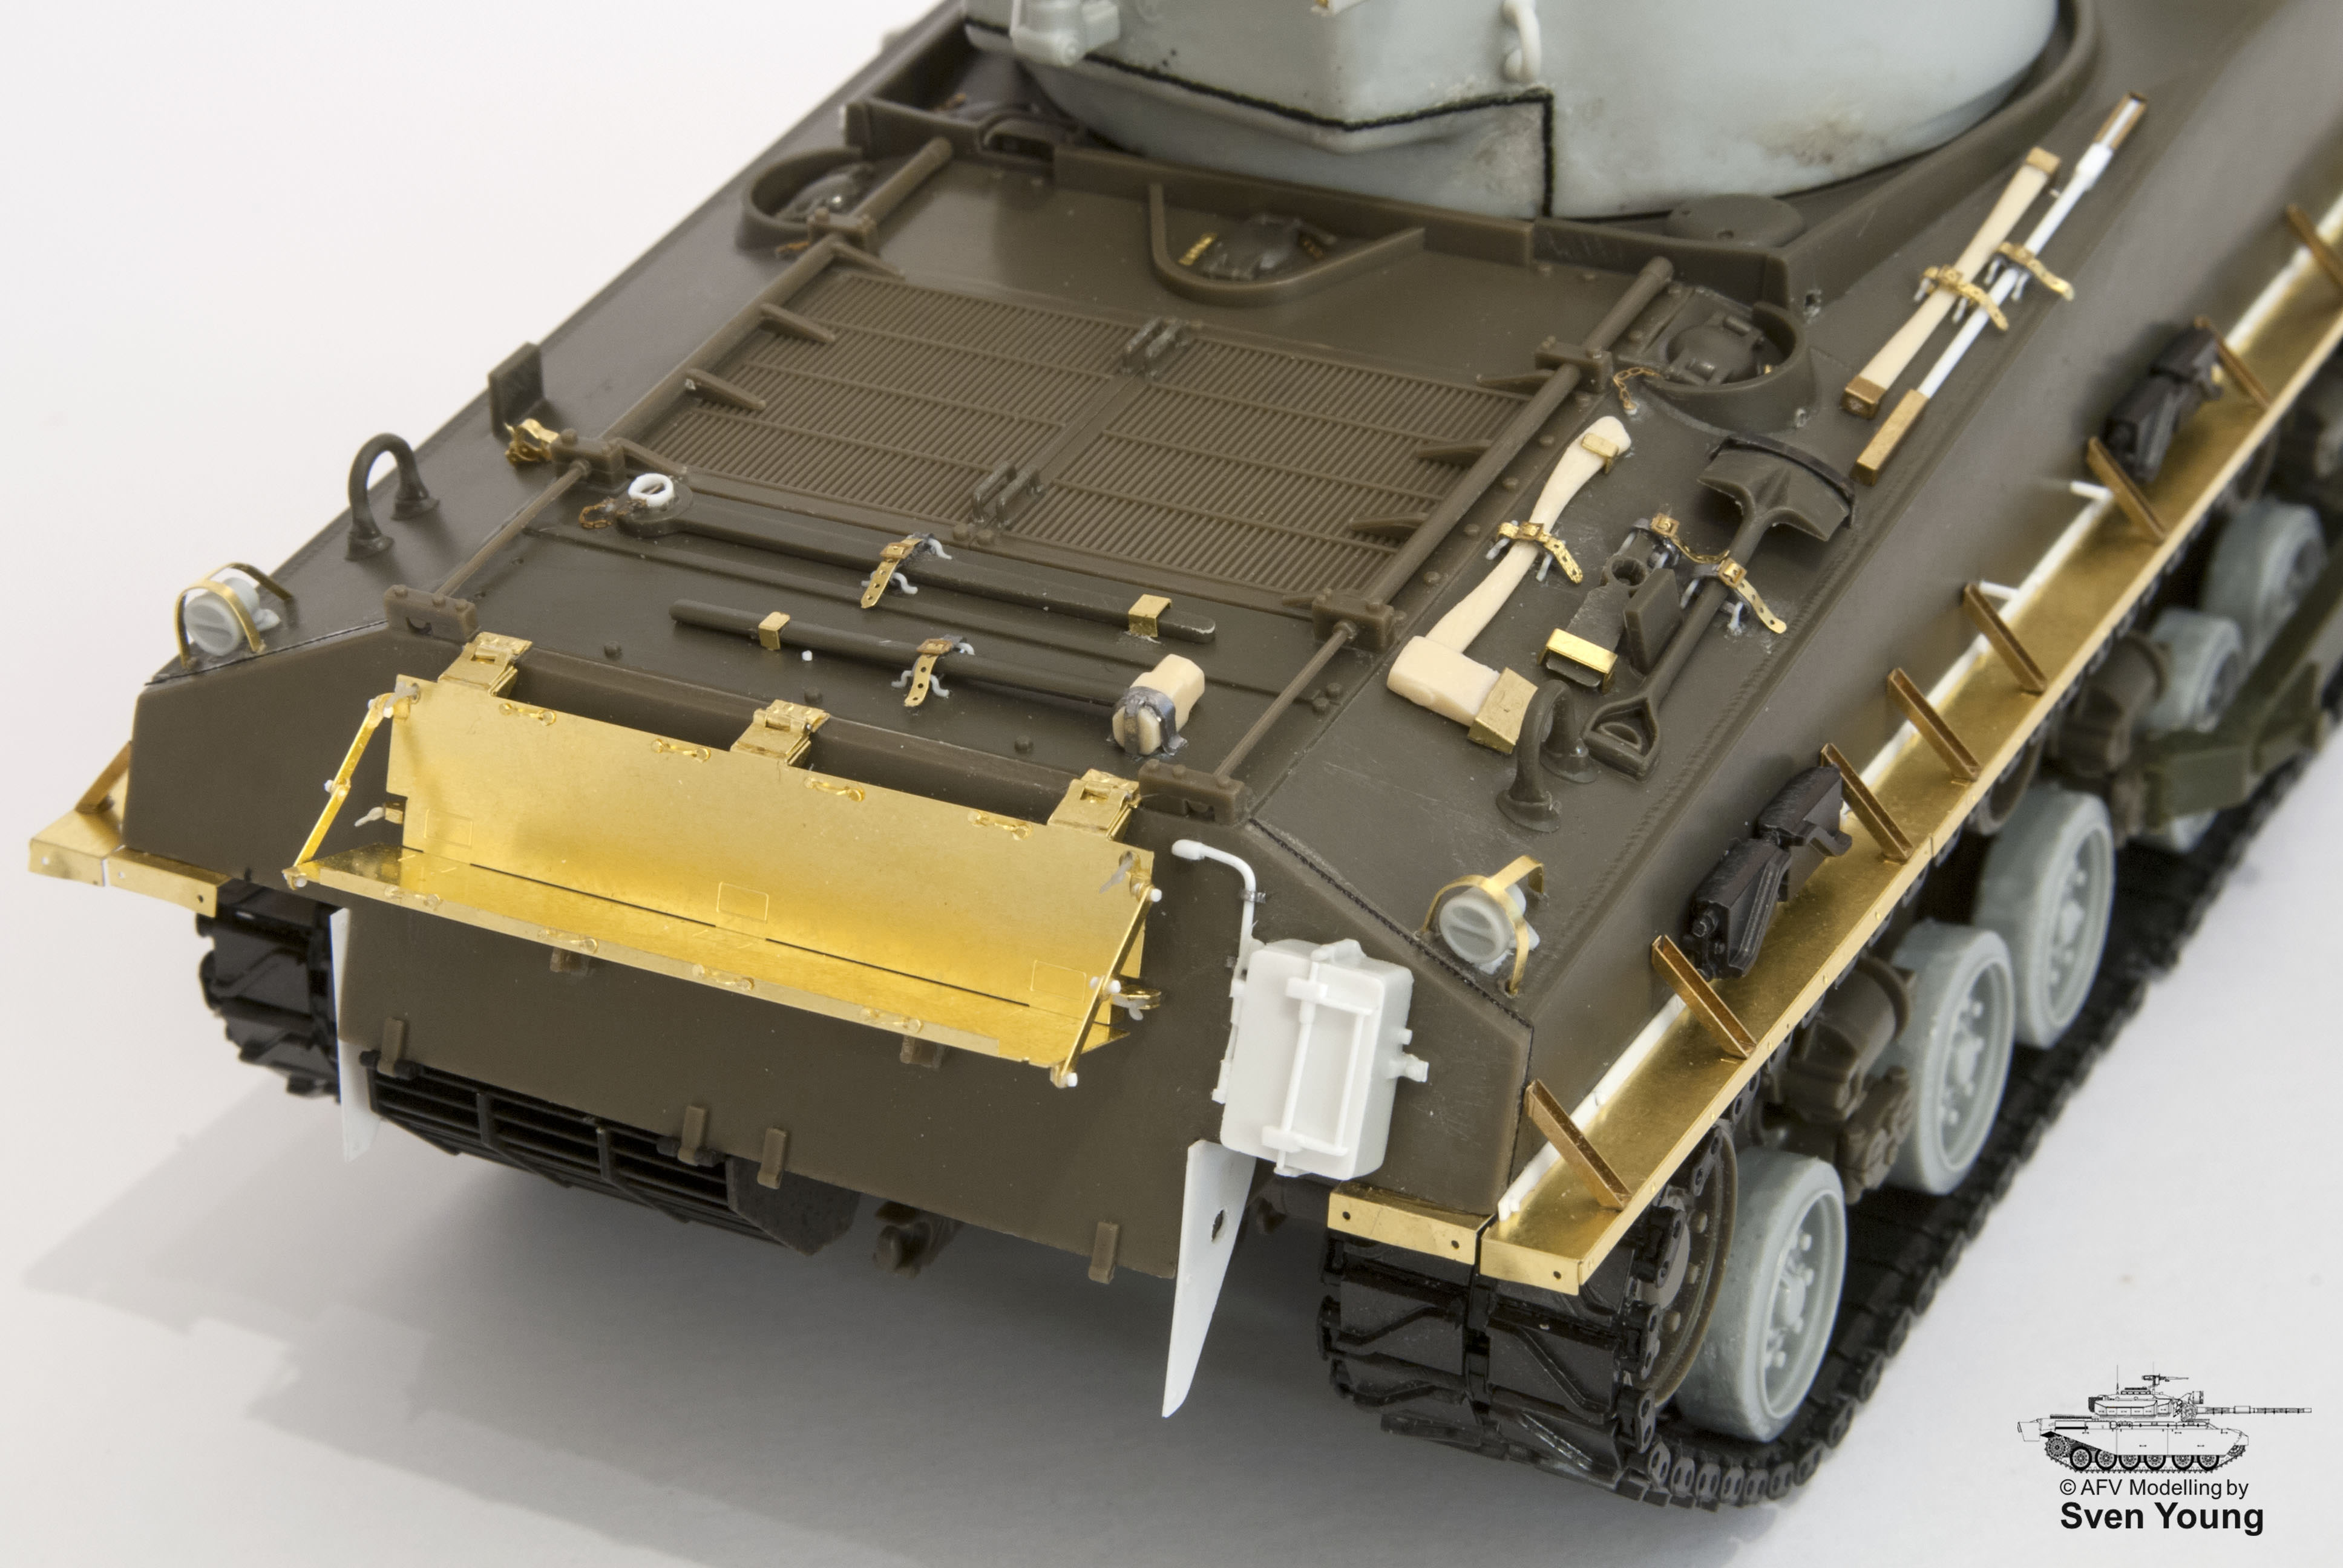
* TMD part as follows:
- Road wheels (only for the outside wheels, that allows the other half of the set to be used on another vehicle :-) )
- 105mm turret (with some modifications to make it a later version)
- Hull hatch set
- Various other detail sets for hull and turret

* Tools from Formations

* ET Models etch set (absolutely fabulous, the best etch I have worked with to be honest).

* RB Model barrels for the Cal .50 and .30

* Dozer parts from Verlinden and Academy

* Archer weld decals

* Yes, a tiny bit of scratch well, amongst other things the periscope brush guards from 0.3mm plastic rod as etch just doesn't work for these items IMHO :-)

Well, enough about that, on to the pics!

Should get around to painting this beast very, very soon.

Thanks for looking!.


Hederstierna
#247
Visit this Community
Nordjylland, Denmark
Joined: January 03, 2008
KitMaker: 1,102 posts
Armorama: 1,018 posts
Posted: Saturday, November 11, 2017 - 08:40 PM UTC
Hi there
Looking forward to seeing some paint on this. Maybe it'll be finished by the time I go to Malmø again... In about two years time
Keep up the good work my friend
Jacob
young_sven
Visit this Community
Skåne, Sweden
Joined: May 14, 2010
KitMaker: 749 posts
Armorama: 743 posts
Posted: Saturday, November 11, 2017 - 09:13 PM UTC
Thank you my friend.

I also look forward to getting some paint on this, it'll be the first time I paint a model in almost 4 years.. haha! :-)

It was really great seeing you (and your fabulous models) in Malmö a couple of weeks ago, congrats again to the well deserved prizes!

Scarred
Visit this Community
Washington, United States
Joined: March 11, 2016
KitMaker: 1,792 posts
Armorama: 1,186 posts
Posted: Saturday, November 11, 2017 - 09:40 PM UTC
Very clean build, looks great and it's almost a shame to cover it with paint.
tankglasgow
Visit this Community
Scotland, United Kingdom
Joined: October 04, 2010
KitMaker: 275 posts
Armorama: 260 posts
Posted: Saturday, November 11, 2017 - 10:47 PM UTC
Lovely clean work, this will look splendid when painted.

Not so young Paul
young_sven
Visit this Community
Skåne, Sweden
Joined: May 14, 2010
KitMaker: 749 posts
Armorama: 743 posts
Posted: Saturday, November 11, 2017 - 11:03 PM UTC
Hey Patrick and Paul,

Thanks for your kind comments guys, I really appreciate it.

Hoping to get to the paint stage soon :-)

Cheers,
Sven
sgtreef
Visit this Community
Oklahoma, United States
Joined: March 01, 2002
KitMaker: 6,043 posts
Armorama: 4,347 posts
Posted: Sunday, November 12, 2017 - 05:22 AM UTC
Nice work on this Sherman.
I know will be killer once it gets paint.
So going to be a Dio,or just single?
ColinEdm
Staff MemberAssociate Editor
ARMORAMA
Visit this Community
Alberta, Canada
Joined: October 15, 2013
KitMaker: 1,355 posts
Armorama: 1,229 posts
Posted: Sunday, November 12, 2017 - 05:44 AM UTC
Wow....amazing work Sven!
alchemymike
Visit this Community
Texas, United States
Joined: December 14, 2011
KitMaker: 208 posts
Armorama: 192 posts
Posted: Sunday, November 12, 2017 - 07:39 AM UTC
WOW!!
jasegreene
Visit this Community
Florida, United States
Joined: October 21, 2013
KitMaker: 751 posts
Armorama: 751 posts
Posted: Sunday, November 12, 2017 - 08:46 AM UTC
Looking great!!!Already know how great TMD products are I will be looking forward to see how this looks when it is finished.
young_sven
Visit this Community
Skåne, Sweden
Joined: May 14, 2010
KitMaker: 749 posts
Armorama: 743 posts
Posted: Sunday, November 12, 2017 - 01:31 PM UTC
Jeff, Colin, Mike and Jason: many thanks for those kind words of encouragement, much appreciated!

Jeff, I will most likely put this one on a scenic base like I usually do with my models, but no diorama. Since I have gone the route with open hatches and (for once) no interior, I will need to conjure up som figures as well.

Jason, I agree, the TMD items are superb and in many cases even the small parts are as good as any etched alternative. I only had a little trouble at the join between the upper and lower turret halves where shrinkage caused a slight misalignment under the bustle, but easy to fix with a little Magic Sculpt :-)
JSSVIII
Visit this Community
Massachusetts, United States
Joined: March 28, 2007
KitMaker: 1,169 posts
Armorama: 1,067 posts
Posted: Sunday, November 12, 2017 - 04:22 PM UTC
Very nice work Sven, I like your version of "out of the box" LOL! did you make your own springs on the loaders hatch? You said you didn't scratchbuild anything, I was just wondering where you got them.
young_sven
Visit this Community
Skåne, Sweden
Joined: May 14, 2010
KitMaker: 749 posts
Armorama: 743 posts
Posted: Sunday, November 12, 2017 - 05:18 PM UTC
Hi John,

Thanks for your kind words.

Haha, yes it didn't quite turn out so OOB after all.. :-)

Regarding the springs:
I used to work in the electronics manufacturing and test industry, and the systems which test the functionality of the circuit boards include fixtures with test pins which make contact with the boards. These tiny test pins are spring loaded. If you break them apart, perfect little springs pop out which are perfect for models. Needless to say, I collected a large number of these test pins once the tips were worn out and could no longer be used in the production fixtures.

Not sure where to buy these things, though. The factories buy them in the thousands, so not really an over-the-shelf item you can pick up at Radio Shack (as far as I know).

young_sven
Visit this Community
Skåne, Sweden
Joined: May 14, 2010
KitMaker: 749 posts
Armorama: 743 posts
Posted: Saturday, November 25, 2017 - 04:13 PM UTC
Hello again,

Life got in the way of this project for a couple of weeks, but now it is ready to be painted.

I will need to remove the bogies (currently only tack-glued) to make the painting process easier. The front and rear bogies are showing a slight tendency to "smile" due to track tension, so I will add some glue to lock them in place later.

The tracks do not have the center guides mounted as yet (easier to dry fit them without the guides). The fit is rather tight, and because of this they showed the typical inward bending at the sprockets. This was solved by gluing on some strengthening rods on the inside (hidden inside the sprockets). I could have gone with the AFV Club link tracks, but honestly did not have the patience for it, and the Tasca/Asuka rubber tracks look good IMHO.

I will also be adding some stowage on the rear rack (that's why I didn't bother adding the inner hinges) and figures when the time comes.

Those of you with sharp eyes will notice that I left one of the armoured exhaust deflectors off. I have seen this on a couple of Korean War pics and am considering just having the one mounted to add some interest.

Now, this may seem like a really stupid idea, but I have decided to leave this build for a little while and get another "quick build" under my belt before painting commences. The reason is that since the build process normally takes me such a long time, I would like to get at least one more "out of box" model finished, and then I can paint a couple of them at the same time.

I'll probably regret the decision, but that's my (current) plan anyway :-)

Thanks for looking!


RobinNilsson
Staff MemberTOS Moderator
KITMAKER NETWORK
Visit this Community
Stockholm, Sweden
Joined: November 29, 2006
KitMaker: 6,693 posts
Armorama: 5,562 posts
Posted: Saturday, November 25, 2017 - 05:01 PM UTC
Well done!

Collecting a few paint jobs which all require more or less the same colours can save changeover time.

Sven, den där hydraulcylindern ser nästan lite obscen ut

/ Robin
young_sven
Visit this Community
Skåne, Sweden
Joined: May 14, 2010
KitMaker: 749 posts
Armorama: 743 posts
Posted: Saturday, November 25, 2017 - 06:02 PM UTC
Thanks Robin!

Yes, having a couple of models ready for paint at the same time would be nice.

Haha, min fru sade samma sak om hydraulcylindern..!
tanknick22
Visit this Community
United States
Joined: February 19, 2009
KitMaker: 1,139 posts
Armorama: 1,100 posts
Posted: Saturday, November 25, 2017 - 06:38 PM UTC

Quoted Text

Thanks Robin!

Yes, having a couple of models ready for paint at the same time would be nice.

Haha, min fru sade samma sak om hydraulcylindern..!


its a nice piece swen is working on but would it have been easier and cheaper to build the Academy kit of the same tank
and the Academy kit even comes with a dozer blade
young_sven
Visit this Community
Skåne, Sweden
Joined: May 14, 2010
KitMaker: 749 posts
Armorama: 743 posts
Posted: Saturday, November 25, 2017 - 06:45 PM UTC
Many thanks Nick!

I have the Academy kit in my stash, and stole some of the dozer parts for this build.

The Academy kit is not bad, but the Tasca kit is generally more accurate (and I had a ton of beautiful TMD items that needed to be used), so went this route instead, even if it was a little more work :-)
27-1025
Visit this Community
North Carolina, United States
Joined: September 16, 2004
KitMaker: 1,281 posts
Armorama: 1,222 posts
Posted: Saturday, November 25, 2017 - 07:58 PM UTC
Superb work. Always nice to see another Sherman.
young_sven
Visit this Community
Skåne, Sweden
Joined: May 14, 2010
KitMaker: 749 posts
Armorama: 743 posts
Posted: Saturday, November 25, 2017 - 10:56 PM UTC
Hi Chris,

Thanks for the kind comments, really glad you like it!

ModelerWynn
Visit this Community
United States
Joined: August 05, 2016
KitMaker: 8 posts
Armorama: 7 posts
Posted: Sunday, December 17, 2017 - 11:34 PM UTC
Wow, It makes me feel like such an amateur. Great work
JSSVIII
Visit this Community
Massachusetts, United States
Joined: March 28, 2007
KitMaker: 1,169 posts
Armorama: 1,067 posts
Posted: Monday, December 18, 2017 - 04:56 AM UTC
[quote]
Now, this may seem like a really stupid idea, but I have decided to leave this build for a little while and get another "quick build" under my belt before painting commences.
[quote]

Wasn't this build supposed to be a quick OOB build LOL! Nice work Sven, what will the next build be?
sgtreef
Visit this Community
Oklahoma, United States
Joined: March 01, 2002
KitMaker: 6,043 posts
Armorama: 4,347 posts
Posted: Monday, December 18, 2017 - 06:20 AM UTC
Well Sven , when I added PE and stuff on my Sherman's don't remember no white looking parts in those PE kits, I must of missed them.LOL

Cheers
chefchris
Visit this Community
North Carolina, United States
Joined: February 06, 2006
KitMaker: 1,544 posts
Armorama: 1,464 posts
Posted: Monday, December 18, 2017 - 08:11 AM UTC
I love checking out your builds. They are so clean and the pictures are always great. Keep the hits coming.
young_sven
Visit this Community
Skåne, Sweden
Joined: May 14, 2010
KitMaker: 749 posts
Armorama: 743 posts
Posted: Tuesday, January 23, 2018 - 12:50 PM UTC
Hi Chris and Jeff,

I am so sorry I missed your posts and did not respond until now.

Jeff, haha yes those white bits don't normally come in the average etched set :-) :-)

Chris: Thank you very much for your kind comments, very happy you like the model and the pictures.

Cheers,
Sven
 _GOTOTOP