

Hey fellas,
I've had his kit built awhile now. It's Tamiya's ODS Bradley.
I haven't sprayed it because I was so nervous to try this camo scheme. I'm not really sure why.
Anyhow, I decided to give it a start just to see how it would look. Doesn't seem to shabby to me. I think I'll finish it up tomorrow.
https://imgur.com/gallery/n7glS
Thoughts? Mind you, it's far from finished.
Constructive Feedback
For in-progress or completed build photos. Give and get contructive feedback!
For in-progress or completed build photos. Give and get contructive feedback!
Hosted by Darren Baker, Dave O'Meara
Bradley NATO three tone camo

Thirian24

Joined: September 30, 2015
KitMaker: 2,493 posts
Armorama: 2,344 posts
Posted: Thursday, November 30, 2017 - 05:51 AM UTC
Epi
Joined: December 22, 2001
KitMaker: 3,586 posts
Armorama: 2,556 posts

Posted: Thursday, November 30, 2017 - 12:12 PM UTC
So far so good!
Here is a tip, if you want a faded, lightly worn look to the paint job, add some Buff or white to each color and do a cloud pattern in the center of the camo patches.
Here is a tip, if you want a faded, lightly worn look to the paint job, add some Buff or white to each color and do a cloud pattern in the center of the camo patches.

Thirian24
Joined: September 30, 2015
KitMaker: 2,493 posts
Armorama: 2,344 posts
Posted: Thursday, November 30, 2017 - 08:00 PM UTC
Thank you, Pete. I'll keep that in mind.
Thirian24
Joined: September 30, 2015
KitMaker: 2,493 posts
Armorama: 2,344 posts
Posted: Thursday, April 05, 2018 - 03:35 AM UTC
It's been a while since I've had some bench time.
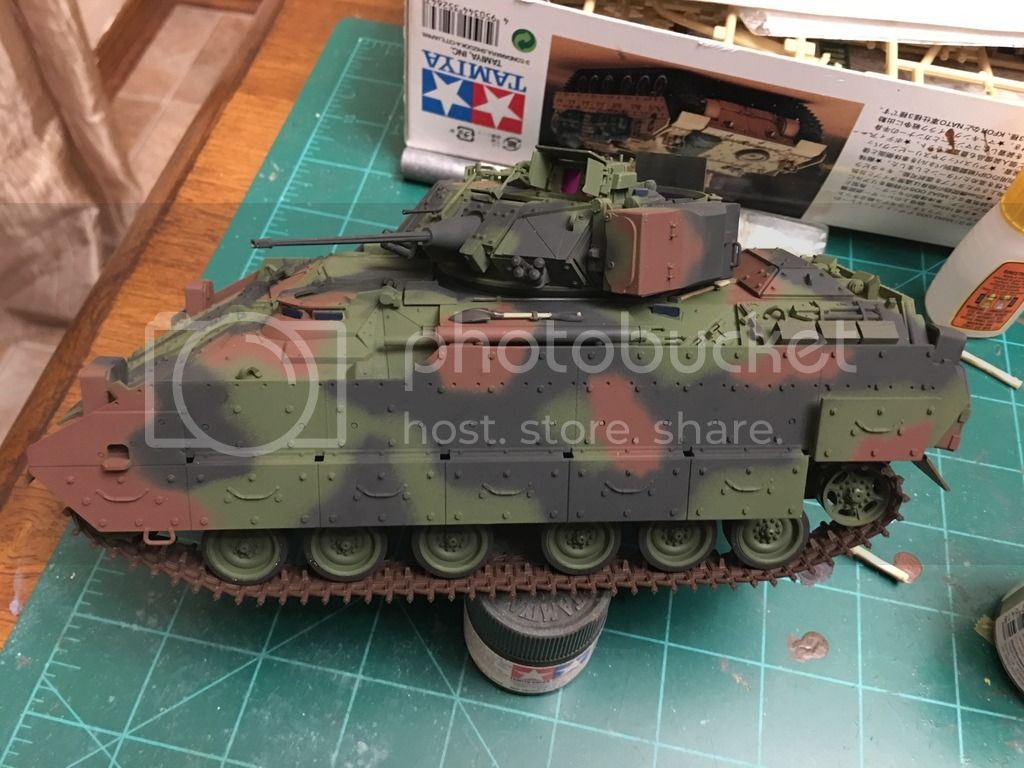
The upper hull and turret are basically done minus detail painting. Still have the lower hull to work on. I'm fairly happy with the camo.
https://i.imgur.com/ydnvwIw.jpg
The upper hull and turret are basically done minus detail painting. Still have the lower hull to work on. I'm fairly happy with the camo.
https://i.imgur.com/ydnvwIw.jpg

Armorsmith
Joined: April 09, 2015
KitMaker: 1,063 posts
Armorama: 1,000 posts
Posted: Thursday, April 05, 2018 - 04:40 AM UTC
Lighting on the picture not the best but I really like the cammo scheme.
Thirian24
Joined: September 30, 2015
KitMaker: 2,493 posts
Armorama: 2,344 posts
Posted: Thursday, April 05, 2018 - 05:56 PM UTC
Thank you Armorsmith.

HeavyArty

Joined: May 16, 2002
KitMaker: 17,694 posts
Armorama: 13,742 posts
Posted: Tuesday, April 10, 2018 - 07:23 PM UTC
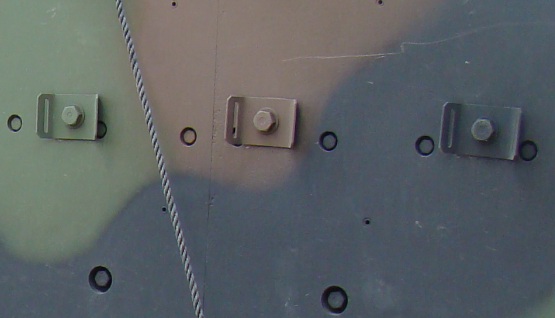
Looking pretty good. One note though, the .30 cal ammo cans on the left rear should not be camo. They are not part of the vehicle, but strapped to the hull. They should be standard ammo can dark green. They should also have straps holding them in place.
You can see the empty ammo can locations and straps for them in the below pics.

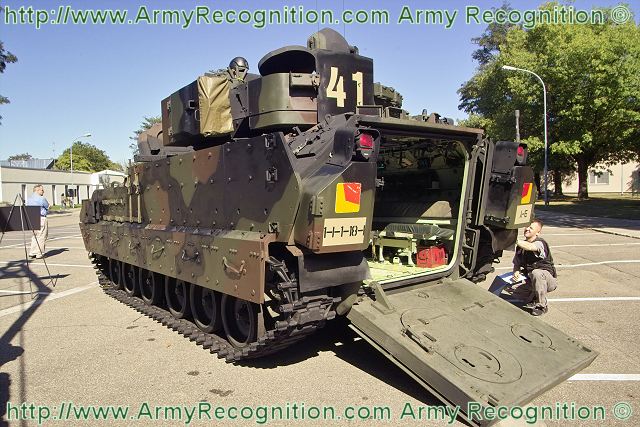
The ammo cans on the rear of the turret bustle rack are similar as well. Only the lower half are the holder which is attached to the hull and should be hull color (camo or send). The upper half is the ammo can and should be dark green.
You can see the bustle rack ammo cans well in the below pic.
You can see the empty ammo can locations and straps for them in the below pics.
The ammo cans on the rear of the turret bustle rack are similar as well. Only the lower half are the holder which is attached to the hull and should be hull color (camo or send). The upper half is the ammo can and should be dark green.
You can see the bustle rack ammo cans well in the below pic.
Thirian24
Joined: September 30, 2015
KitMaker: 2,493 posts
Armorama: 2,344 posts
Posted: Friday, April 20, 2018 - 09:22 PM UTC
Thank you for that info Gino. I just haven't done any detail painting or anything yet to the upper hull. The tool and ammo cans still need painted along with adding straps for the cans.
One question though, shouldn't I add the front water fording canvas this to this? Sorry I don't know what it's called. But this will be a KFOR Bradley. I looked up pictures from Bosnia and some of the Pictures showed this on them.
One question though, shouldn't I add the front water fording canvas this to this? Sorry I don't know what it's called. But this will be a KFOR Bradley. I looked up pictures from Bosnia and some of the Pictures showed this on them.
HeavyArty
Joined: May 16, 2002
KitMaker: 17,694 posts
Armorama: 13,742 posts
Posted: Saturday, April 21, 2018 - 07:40 AM UTC
It depends on the fording canvas. During KFOR was when these vehicles were being updated to ODS standard, which is when the fording canvas was removed. Some were already gone, others were not. Your best bet is to find a pic of one you like and model it.
Thirian24
Joined: September 30, 2015
KitMaker: 2,493 posts
Armorama: 2,344 posts
Posted: Friday, August 03, 2018 - 07:43 AM UTC
Hey fellas,
It's been a long time since I've done anything to this Bradley, but I've stared back on it today.
Quick question, what would be a good wash for NATO three tone? I don't wanna darken it up with a wash that's too dark.
It's been a long time since I've done anything to this Bradley, but I've stared back on it today.
Quick question, what would be a good wash for NATO three tone? I don't wanna darken it up with a wash that's too dark.

18Bravo
Joined: January 20, 2005
KitMaker: 7,219 posts
Armorama: 6,097 posts
Posted: Friday, August 03, 2018 - 08:06 AM UTC
The cammo looks great. Looks like you nailed the pattern. You can make your own wash using a variety of methods found on this site. But why? The cammo looks fine the way it is. You can go for realism, or you can go for art, like with the heavy chipping, the worn paint, all of which IMHO are way overdone.
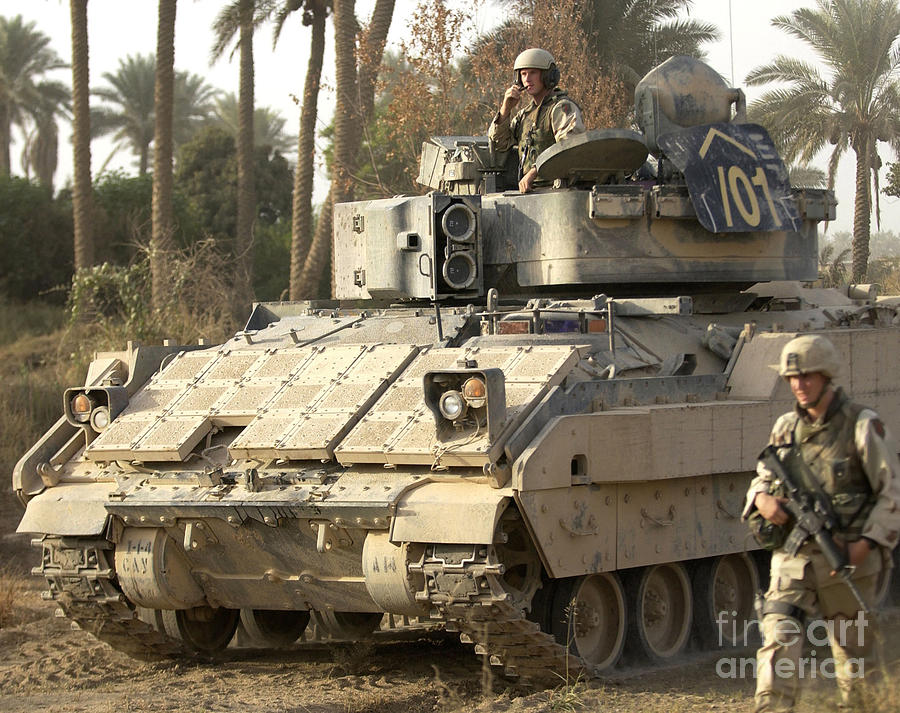
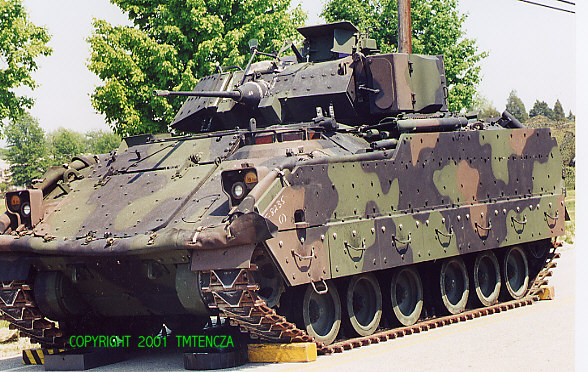
Take this Bradley I photographed in Korea:

A lot of folks will use wash to accentuate all of those bolts heads. Again, why? The most I would do with a wash is drop some into those tiny recesses to darken them. And if any got on the edges I'd wipe it off. If you want the bolts to "pop" slightly, as each of the three colored bolts do in this photo, you can carefully dry brush an ever so slightly lighter shade onto them. Like everything else, it's easy to overdo, but at least the photos shows there APPEARS to be a slight difference ein the color value.
Again, it's a matter of preference. Realism or art?
As for the ammo cans, I pretty much figured you weren't leaving them that way as the tools and other detail pieces hadn't been painted either. A lot of us shoot the whole model at one time like that. But speaking of the cans, you may want to go back and remove the mold seams. Check the whole model. This step will add far more realism than a wash, should you choose to use it.

Take this Bradley I photographed in Korea:
A lot of folks will use wash to accentuate all of those bolts heads. Again, why? The most I would do with a wash is drop some into those tiny recesses to darken them. And if any got on the edges I'd wipe it off. If you want the bolts to "pop" slightly, as each of the three colored bolts do in this photo, you can carefully dry brush an ever so slightly lighter shade onto them. Like everything else, it's easy to overdo, but at least the photos shows there APPEARS to be a slight difference ein the color value.
Again, it's a matter of preference. Realism or art?
As for the ammo cans, I pretty much figured you weren't leaving them that way as the tools and other detail pieces hadn't been painted either. A lot of us shoot the whole model at one time like that. But speaking of the cans, you may want to go back and remove the mold seams. Check the whole model. This step will add far more realism than a wash, should you choose to use it.

Thirian24
Joined: September 30, 2015
KitMaker: 2,493 posts
Armorama: 2,344 posts
Posted: Friday, August 03, 2018 - 08:32 AM UTC
Thank you for the kind words about the camo. I was nervous to try it, since this was first time at a NATO scheme.
You're right, I need to clean those lines up. I was being lazy when I first started this kit.
I do like the more realistic look of the NATO camo, I'll just do a pin wash.
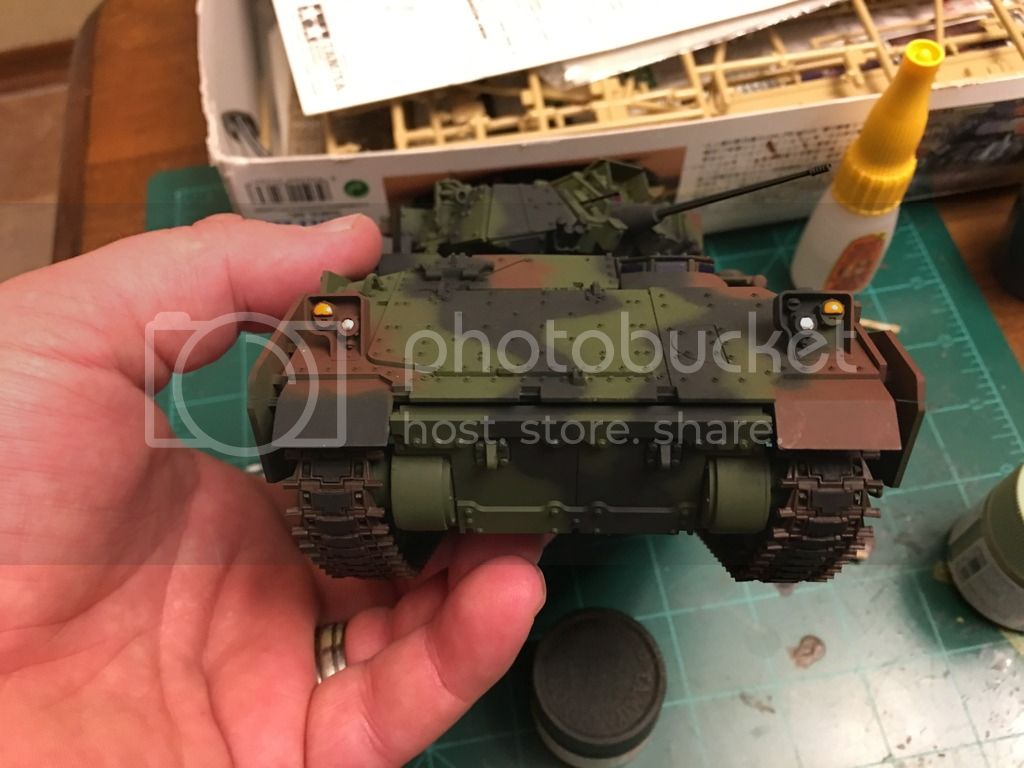
Here is a couple of update shots. Details painted. I'll be redoing the cans once the mold lines are cleaned up.
I'm filling all the holes in the lower hole, once the putty is dry and cleaned up, I'll finish up the lower hull.

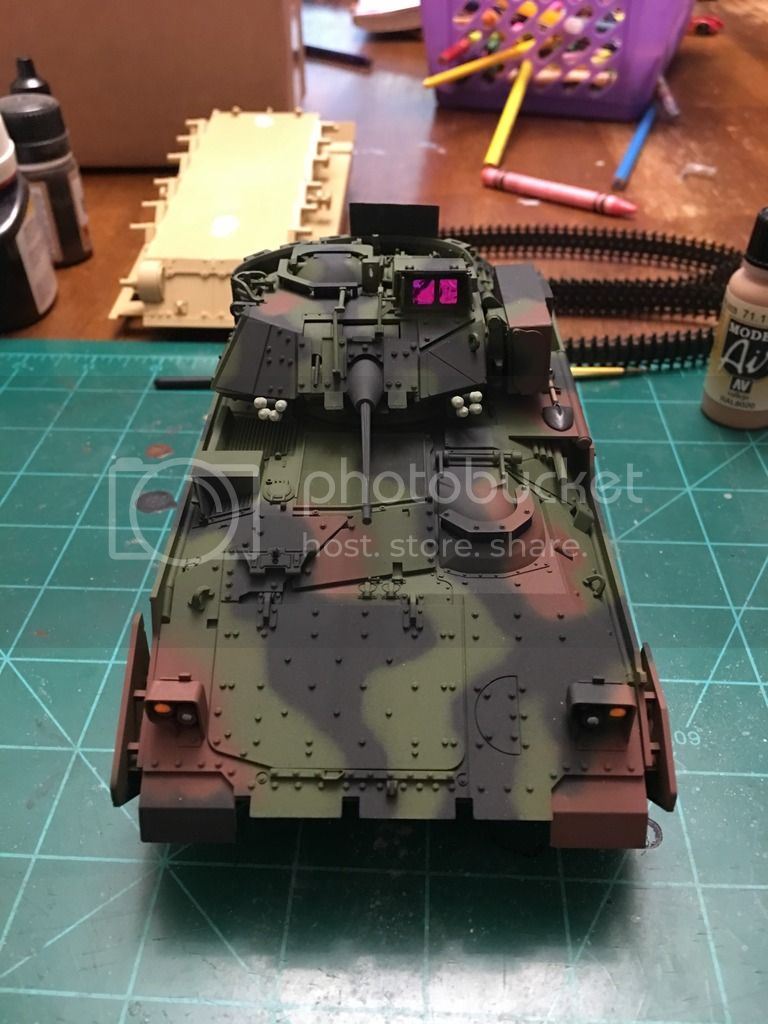
You're right, I need to clean those lines up. I was being lazy when I first started this kit.
I do like the more realistic look of the NATO camo, I'll just do a pin wash.
Here is a couple of update shots. Details painted. I'll be redoing the cans once the mold lines are cleaned up.
I'm filling all the holes in the lower hole, once the putty is dry and cleaned up, I'll finish up the lower hull.


GulfWarrior
Joined: January 05, 2010
KitMaker: 1,051 posts
Armorama: 1,029 posts

Posted: Friday, August 03, 2018 - 09:07 AM UTC
Looks good, Dustin!


Thirian24
Joined: September 30, 2015
KitMaker: 2,493 posts
Armorama: 2,344 posts
Posted: Friday, August 03, 2018 - 09:45 AM UTC
Thank you Richard!

2CAVTrooper
Joined: October 21, 2005
KitMaker: 310 posts
Armorama: 302 posts

Posted: Friday, August 03, 2018 - 03:43 PM UTC
Looks good.
On the last pic, the smoke grenade launchers the ends should be painted black because the kit depicts them as having the rubber dust caps on them.
To show them with the actual grenades, you would have to rework them with some thin wall brass, copper, or aluminum tubing and some solid styrene rod.
On the last pic, the smoke grenade launchers the ends should be painted black because the kit depicts them as having the rubber dust caps on them.
To show them with the actual grenades, you would have to rework them with some thin wall brass, copper, or aluminum tubing and some solid styrene rod.
Thirian24
Joined: September 30, 2015
KitMaker: 2,493 posts
Armorama: 2,344 posts
Posted: Saturday, August 04, 2018 - 02:42 PM UTC
Robert, do you have anymore pictures you can post of the Bradleys sporting the NATO scheme?
Thirian24
Joined: September 30, 2015
KitMaker: 2,493 posts
Armorama: 2,344 posts
Posted: Saturday, August 04, 2018 - 02:42 PM UTC
Jeff, thank you sir. I corrected that issue today.
Cheers
Cheers
18Bravo
Joined: January 20, 2005
KitMaker: 7,219 posts
Armorama: 6,097 posts
Posted: Saturday, August 04, 2018 - 03:03 PM UTC
PM me your email address.
Thirian24
Joined: September 30, 2015
KitMaker: 2,493 posts
Armorama: 2,344 posts
Posted: Saturday, August 04, 2018 - 03:51 PM UTC
Sent, thank you!
HeavyArty
Joined: May 16, 2002
KitMaker: 17,694 posts
Armorama: 13,742 posts
Posted: Sunday, August 05, 2018 - 12:49 AM UTC
The camo looks good. I usually lightly weather mine as well and will do a pin wash and maybe a light wash of a sandy brown color to make it pop. What did you decide on the swim barrier? If you are leaving it off, the poles under the work platform on the left side should be gone as well.
Thirian24
Joined: September 30, 2015
KitMaker: 2,493 posts
Armorama: 2,344 posts
Posted: Sunday, August 05, 2018 - 12:54 AM UTC
Thank you Gino, I'm going to add the swim barrier that's supplied in the kit.

LikesTanks

Joined: May 07, 2013
KitMaker: 242 posts
Armorama: 234 posts
Posted: Sunday, August 05, 2018 - 07:12 AM UTC
Nice clean paint job Dustin. I particularly like the lens effect, how did you get it?
Thirian24
Joined: September 30, 2015
KitMaker: 2,493 posts
Armorama: 2,344 posts
Posted: Sunday, August 05, 2018 - 01:05 PM UTC
Richard, thank you sir!
I used the party whistles from dollar general. Whatever they are called. They come in multiple colors.
Gino - Don you make you're own sandy brown color for a wash?
Also, does anybody have any tips or ideas on how to make the swim barrier look more realistic or better looking? The kit part looks like crap. I'm by no means trying to make this kit look ultra realistic nor have I done any kit corrections. But perhaps I can improve the swim barrier.
Thanks!
Thirian24
Joined: September 30, 2015
KitMaker: 2,493 posts
Armorama: 2,344 posts
Posted: Sunday, August 05, 2018 - 02:07 PM UTC
Lower hull, wheels and tracks painted.
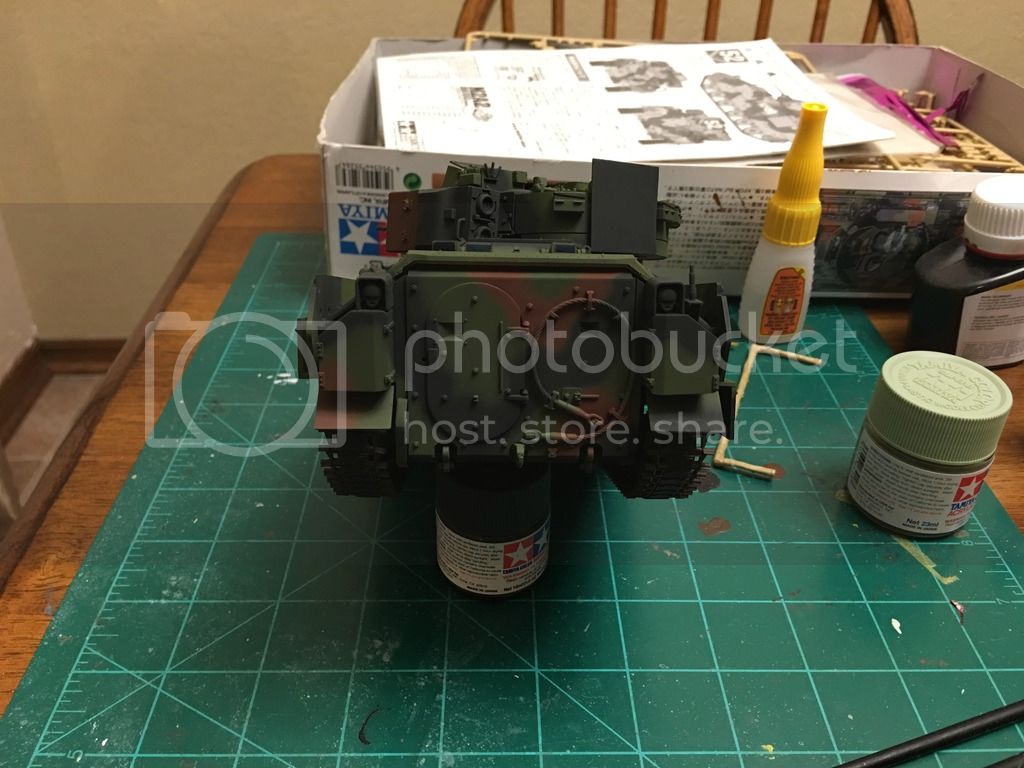
Lighting is terrible in this last pic. I guess I need to find a way to take better pictures.


Lighting is terrible in this last pic. I guess I need to find a way to take better pictures.
HeavyArty
Joined: May 16, 2002
KitMaker: 17,694 posts
Armorama: 13,742 posts
Posted: Sunday, August 05, 2018 - 11:39 PM UTC
Quoted Text
Gino - Don you make you're own sandy brown color for a wash?
I do. I use acrylic craft paints for washes; like what you can get at Michael's or Hobby Lobby, etc. I just go with what looks right to me, a sandy color.
Quoted Text
Also, does anybody have any tips or ideas on how to make the swim barrier look more realistic or better looking?
You could make it yourself as opposed to using the crappy kit part. It is basically just a rubber tube that is split along the top edge. Inside is the actual canvas swim barrier. The tube is held together with straps to secure it. You could build the tube out of lead-foil and make individual straps. It would definitely look better than the kit part.
You can see it pretty well here.

 |

WEB HOSTING BY


Copyright ©2021 Armorama and Kitmaker Network, a subsidiary of Silver Star Enterprises
All Rights Reserved. Please read our Conditions of Use and Privacy Policy.
All Rights Reserved. Please read our Conditions of Use and Privacy Policy.