_GOTOBOTTOM
Constructive Feedback
For in-progress or completed build photos. Give and get contructive feedback!
Scratchbuilt Swedish m37 - interior done
young_sven
Visit this Community
Skåne, Sweden
Joined: May 14, 2010
KitMaker: 749 posts
Armorama: 743 posts
Posted: Tuesday, January 23, 2018 - 12:58 PM UTC
Whilst gathering the inspiration to continue on some of my other builds, I started looking through my WIP pile and found a little project that I started 6 years ago in 2012. At that time I had basically completed the fabrication of all interior details and the outer hull and turret shells.

For some reason (as always in my case) the build stalled and it has been waiting for some love for a very long time. I noticed that the years had started to affect the thin plastic walls of the tank, and they were starting to bow, so I decided it was time to get back into it and (hopefully!) get this one done. 


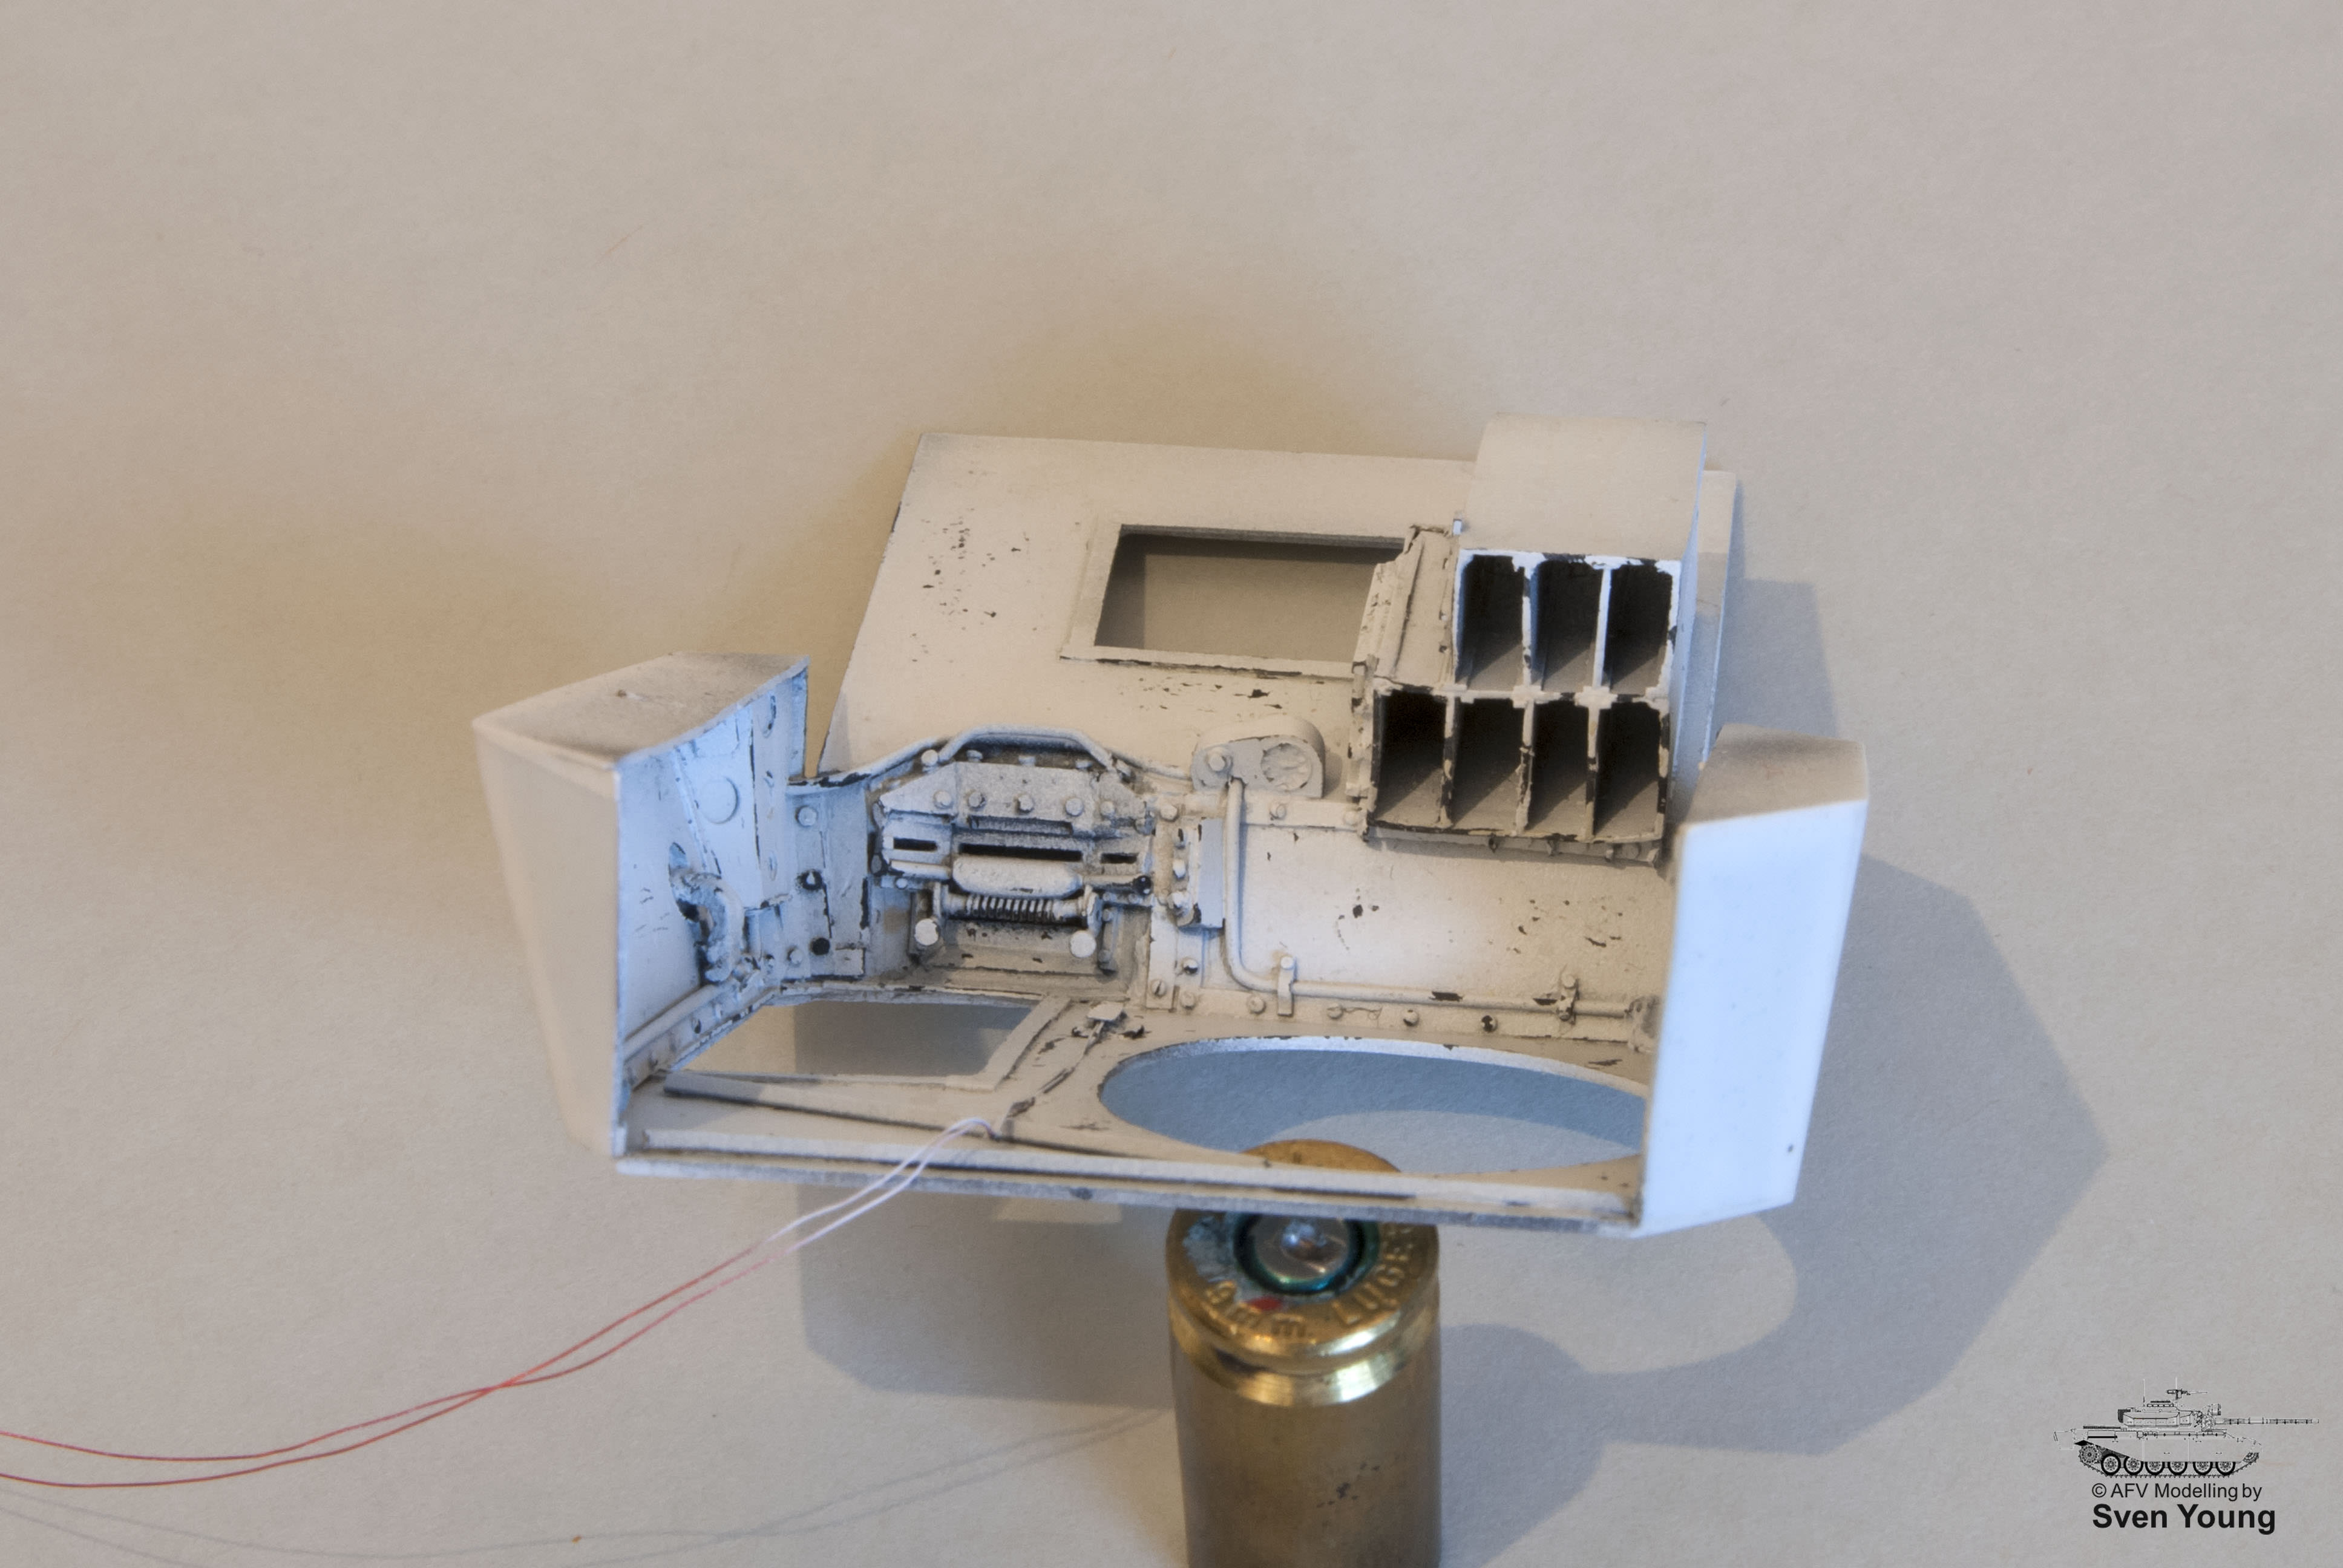
The progress to date has been completion of the interior from unpainted to weathered condition. I have also added the last parts to the upper hull interior (various levers, the radio etc). I have also added some brass V-profile on the inside of the roof to keep it from bowing inwards - nothing that is visible from the outside.


I will admit that I cheated with the radio, the actual set-up was the Swedish radio sv/3 m/39 in this little tank, but since the the radio is barely visible through the hatches I used a German WW2 unit instead. 


The pictures below are divided into lower hull, upper hull and turret. The unpainted pictures are as the model was in 2012.

All the painting and weathering has been done in January 2018. 

In regards to the weathering, this is very small model so I was careful when applying dirt, mud and oil spills so not to overpower the tiny interior. 


Anyway, on to the pictures (descriptive text below).


Thanks for looking! 


Lower hull interior step-by-step: 


Base painted, chipped and a little bit of "OPR": for colour varation 


Weathering with MIG (Ammo) fluids and pigments 


Upper hull step by step: 


Base painted and chipped: 


Weathering with MIG (Ammo) fluids and pigments (I have flipped one of the pics in Photoshop so you can see it the right way up. 


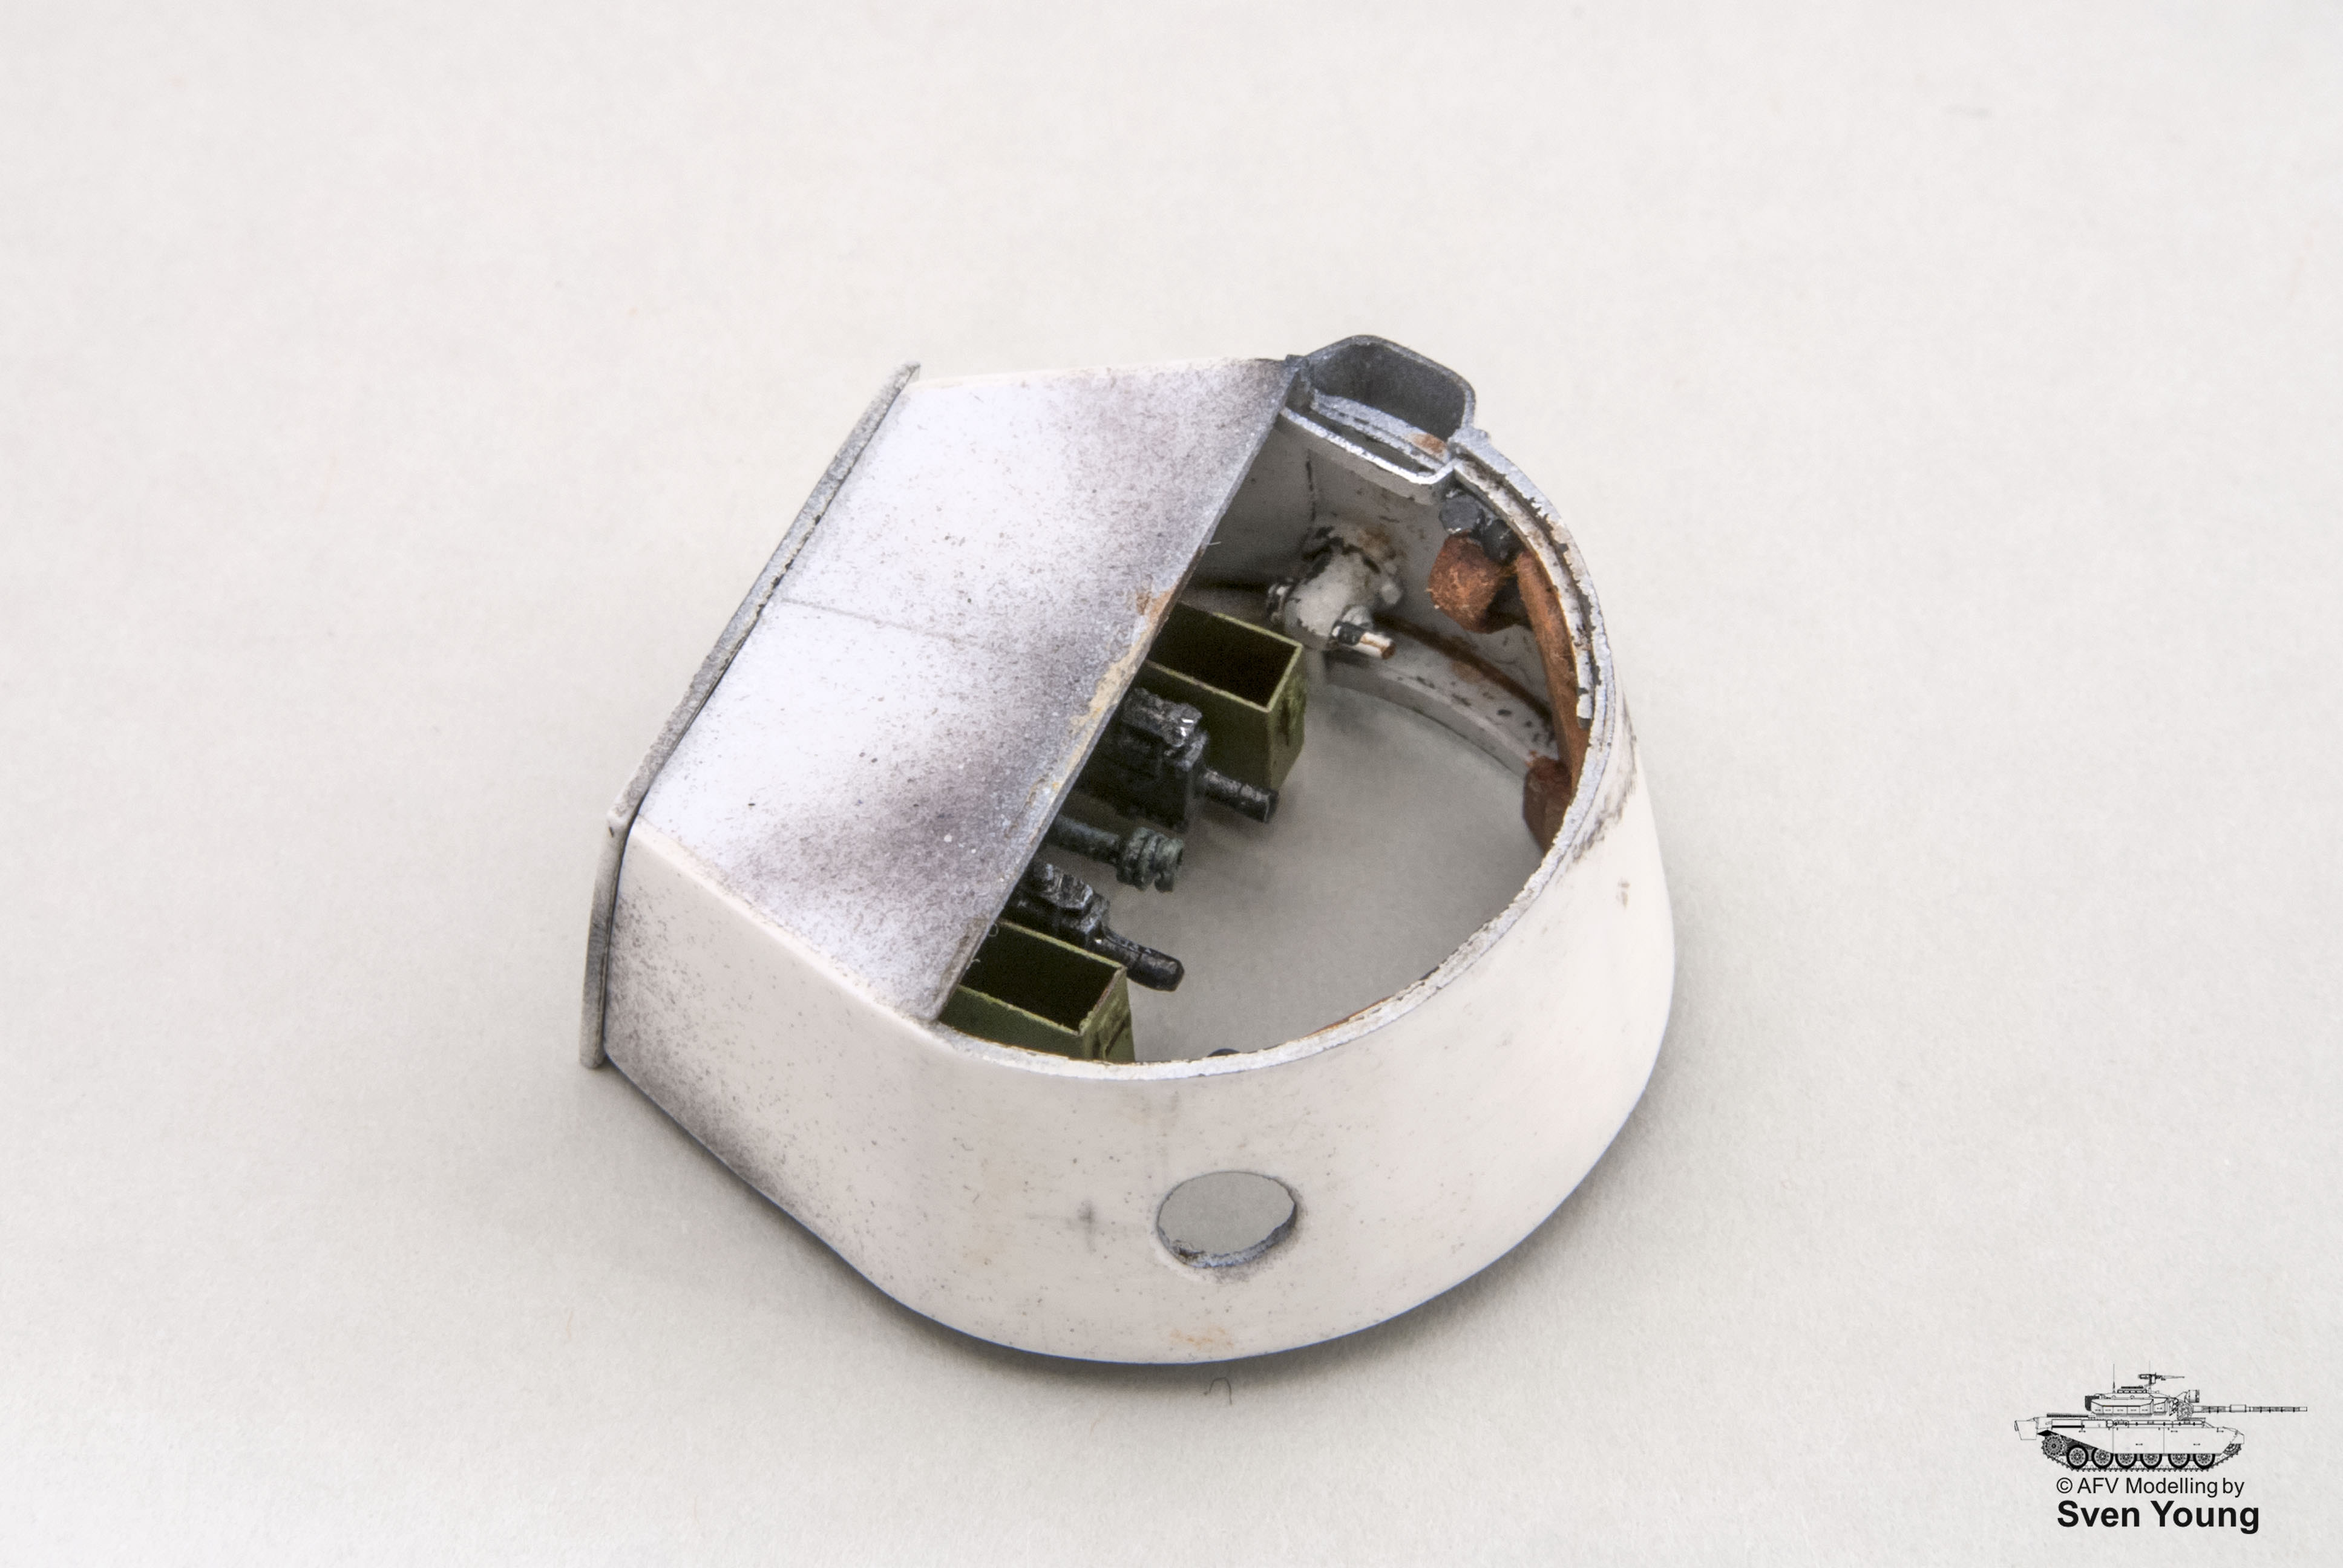
Turret step by step: 


Painted and weathered 


[imghttps://i.imgur.com/SZShyUv.jpg[/img] 


Final details added to upper hull (radio etc) - unfortunately, these pictures looks slightly more washed out. used a slightly different lighting set-up to kill the dark shadows but in the process managed to somewhat wash out the colour vividness as well. 


I'm be more conservative with the lighting next time.


I also decided to add interior lighting (more or less a necessity to be able to see anything inside), here it is tested in different lighting conditions (from a fairly well lit room so a pitch dark one). 


Finally, a dry fit of the hull and turret sections, and a size reference: 


Now on to the exterior! :-)

RobinNilsson
Staff MemberTOS Moderator
KITMAKER NETWORK
Visit this Community
Stockholm, Sweden
Joined: November 29, 2006
KitMaker: 6,693 posts
Armorama: 5,562 posts
Posted: Tuesday, January 23, 2018 - 01:10 PM UTC
This post used to be a copy of Svens post above where I tested some changes to see if I could get the images to display properly. Since Sven has edited his post above to show the images I have decided to clear this post of image links.
Less tedious to scroll past ....
/ Robin
young_sven
Visit this Community
Skåne, Sweden
Joined: May 14, 2010
KitMaker: 749 posts
Armorama: 743 posts
Posted: Tuesday, January 23, 2018 - 01:22 PM UTC
Thanks Robin,

This is very strange. All the images display just fine on my original post when I check them. I must be having some problems with imgur, not sure what is going on.

What did you change to make it work for you?

Edit: thanks also for removing the image links from your post above - yours and mine together made for a heck of a lot of images to scroll past :-)
retiredyank
Visit this Community
Arkansas, United States
Joined: June 29, 2009
KitMaker: 11,610 posts
Armorama: 7,843 posts
Posted: Tuesday, January 23, 2018 - 01:34 PM UTC
I refreshed the page and they work fine.
Maki
Staff MemberSenior Editor
ARMORAMA
Visit this Community
Croatia Hrvatska
Joined: February 13, 2002
KitMaker: 5,579 posts
Armorama: 2,988 posts
Posted: Tuesday, January 23, 2018 - 01:39 PM UTC
The images work well for me...

Sven, you are a crazy, crazy man. This level of detail is unbelievable, and I love that you add light to your interiors. Absolutely amazing work, my friend. Keep it up.

Mario
young_sven
Visit this Community
Skåne, Sweden
Joined: May 14, 2010
KitMaker: 749 posts
Armorama: 743 posts
Posted: Tuesday, January 23, 2018 - 01:47 PM UTC
Matthew and Mario, thanks for the confirmation that the images are working in my original post.

I had to edit the links a little after first submitting them (since they were broken on my first attempt), so perhaps Robin jumped in at the same time as I was making the changes myself. Thanks anyway for the help, Robin! :-)

Mario, thanks a million for your kind comments, I really appreciate that. Glad you like the lighting, this is something I will most likely continue to install on future builds with interiors. :-)
RobinNilsson
Staff MemberTOS Moderator
KITMAKER NETWORK
Visit this Community
Stockholm, Sweden
Joined: November 29, 2006
KitMaker: 6,693 posts
Armorama: 5,562 posts
Posted: Tuesday, January 23, 2018 - 02:02 PM UTC

Quoted Text

Matthew and Mario, thanks for the confirmation that the images are working in my original post.

I had to edit the links a little after first submitting them (since they were broken on my first attempt), so perhaps Robin jumped in at the same time as I was making the changes myself. Thanks anyway for the help, Robin! :-)

Mario, thanks a million for your kind comments, I really appreciate that. Glad you like the lighting, this is something I will most likely continue to install on future builds with interiors. :-)


I checked one link, copy into a new tab on the browser to check that it wasn't faulty and that imgur wasn't creating problems.
Since checking a link this way can make the browser display the image despite something being wrong I did not check the other images.
The next step was to spread the links with line breaks (carriage return) so they were all on separate lines in the post editing window. Then I added some characters in front of each image-bracket (the img enclosed in []) to make sure that the brackets would get read correctly.
The smileys/emoticons sometimes fail to work if they are first on the line and not preceded by a blank space.


/ Robin
RobinNilsson
Staff MemberTOS Moderator
KITMAKER NETWORK
Visit this Community
Stockholm, Sweden
Joined: November 29, 2006
KitMaker: 6,693 posts
Armorama: 5,562 posts
Posted: Tuesday, January 23, 2018 - 02:06 PM UTC

Quoted Text

Thanks Robin,

This is very strange. All the images display just fine on my original post when I check them. I must be having some problems with imgur, not sure what is going on.

What did you change to make it work for you?


I don't think it is caused by imgur.
Do Reply&Quote on my post, this lets you view (and edit) a copy of it and see how the image links/brackets are positioned and what I added, basically: CR + "space" + " " some of them have "hum" instead of "space". Maybe just the CR would have been sufficient ...
/ Robin
young_sven
Visit this Community
Skåne, Sweden
Joined: May 14, 2010
KitMaker: 749 posts
Armorama: 743 posts
Posted: Tuesday, January 23, 2018 - 02:08 PM UTC
Hi Robin,

Thanks for your inputs. I discovered the problem after submitting this post the first time: I had managed to accidentally insert a space between (img) and the following link information.

That caused the pics to be broken for me as well. I immediately fixed this, but you beat me to it :-)
RobinNilsson
Staff MemberTOS Moderator
KITMAKER NETWORK
Visit this Community
Stockholm, Sweden
Joined: November 29, 2006
KitMaker: 6,693 posts
Armorama: 5,562 posts
Posted: Tuesday, January 23, 2018 - 02:10 PM UTC

Quoted Text

Hi Robin,

Thanks for your inputs. I discovered the problem after submitting this post the first time: I had managed to accidentally insert a space between (img) and the following link information.

That caused the pics to be broken for me as well. I immediately fixed this, but you beat me to it :-)


and one of the leading img brackets was missing the ]
young_sven
Visit this Community
Skåne, Sweden
Joined: May 14, 2010
KitMaker: 749 posts
Armorama: 743 posts
Posted: Tuesday, January 23, 2018 - 02:37 PM UTC
Seems so. Its very weird, have never had any issues posting pics before, even when I switched to imgur. Today the links seem to be living their own lives and I have to go in and edit them by hand.

Might have to revert back to Photobucket (oh the horror!)
RobinNilsson
Staff MemberTOS Moderator
KITMAKER NETWORK
Visit this Community
Stockholm, Sweden
Joined: November 29, 2006
KitMaker: 6,693 posts
Armorama: 5,562 posts
Posted: Tuesday, January 23, 2018 - 02:49 PM UTC

Quoted Text

Seems so. Its very weird, have never had any issues posting pics before, even when I switched to imgur. Today the links seem to be living their own lives and I have to go in and edit them by hand.

Might have to revert back to Photobucket (oh the horror!)


I think that the same problems can happen with PB-links.
It is all about how the browser reads and executes the brackets around the link.
retiredyank
Visit this Community
Arkansas, United States
Joined: June 29, 2009
KitMaker: 11,610 posts
Armorama: 7,843 posts
Posted: Tuesday, January 23, 2018 - 03:53 PM UTC
I don't understand this level of insanity. Of course, this is coming from someone who can barely build a box. The upper hull is brilliant! Builds like yours' inspire me to keep practicing.
young_sven
Visit this Community
Skåne, Sweden
Joined: May 14, 2010
KitMaker: 749 posts
Armorama: 743 posts
Posted: Tuesday, January 23, 2018 - 04:08 PM UTC
Matthew, thank you very much for those kind words. I am really glad I can inspire you. You should try it, it's great fun! :-)

Detailing is not as hard as it looks at first. Every complicated structure can be broken down to basic shapes (circles, squares, triangles etc). Its a matter of building up the layers to create a whole (just like painting and weathering in a sense) :-)
ivanhoe6
Visit this Community
Wisconsin, United States
Joined: April 05, 2007
KitMaker: 2,023 posts
Armorama: 1,234 posts
Posted: Tuesday, January 23, 2018 - 05:01 PM UTC
Holy Smokes !! GREAT interior work, both scratching, paint & weathering. Then you add a paint bottle for scale, damn ! This is some fine scratch building ! PLEASE keep showing us more images as you go !
Thank you for sharing with us and keep up the good work !
BTW: The first set of images showed up for me.
goofmuilwijk
Visit this Community
Zuid-Holland, Netherlands
Joined: April 19, 2013
KitMaker: 179 posts
Armorama: 117 posts
Posted: Tuesday, January 23, 2018 - 05:59 PM UTC
I never fail to be amazed by your builds Excellent work!
young_sven
Visit this Community
Skåne, Sweden
Joined: May 14, 2010
KitMaker: 749 posts
Armorama: 743 posts
Posted: Tuesday, January 23, 2018 - 06:56 PM UTC
Many thanks to you both, Ivanhoe6 and Goof, your generous comments really mean a lot.

Thanks also for the confirmation that the first set of images posted by me are working.

Ivanhoe6, yes its a rather tiny model - and yet 1/35 scale, the real thing is amazingly small as well.

Someone joked about this little vehicle once and said that you don't climb into a Strv m/37, you put it on like a suit of armour.. haha :-)


ColinEdm
Staff MemberAssociate Editor
ARMORAMA
Visit this Community
Alberta, Canada
Joined: October 15, 2013
KitMaker: 1,355 posts
Armorama: 1,229 posts
Posted: Thursday, January 25, 2018 - 12:25 AM UTC
Sven, amazing work! I salute you and your incipient eye strain. please consider submitting this for a photo feature when complete.
young_sven
Visit this Community
Skåne, Sweden
Joined: May 14, 2010
KitMaker: 749 posts
Armorama: 743 posts
Posted: Thursday, January 25, 2018 - 01:25 AM UTC
Hi Colin,

Thanks for your very kind feedback, truly appreciated.

Sure, I'll be happy to do so, hopefully I will get this one finished in a reasonable timeframe :-)

(I feel rather guilty, I remember giving Mario a similar promise to do a feature on one of my previous builds and haven't got it done)
 _GOTOTOP