I am fortunate to have a US 8 inch gun (same carriage) on display in front of a local county court house.
Note the casting seam in the travel lock. I sometimes debate if I leave some mold seams on a model will the judges mark me down thinking I was too foolish to remove them? Some seams are SUPPOSED to be there!
Armor/AFV
For discussions on tanks, artillery, jeeps, etc.
Hosted by Darren Baker, Mario Matijasic
M-59 155 mm LONG TOM - something went wrong
Posted: Tuesday, November 27, 2018 - 11:26 AM UTC
RobinNilsson
TOS Moderator
Stockholm, Sweden
Joined: November 29, 2006
KitMaker: 6,693 posts
Armorama: 5,562 posts
Joined: November 29, 2006
KitMaker: 6,693 posts
Armorama: 5,562 posts
Posted: Tuesday, November 27, 2018 - 11:30 AM UTC
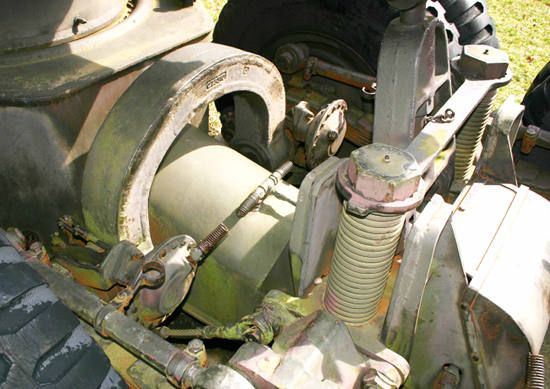
Correct me if I am wrong but I get the impression that those cables can not both be tight at the same time.
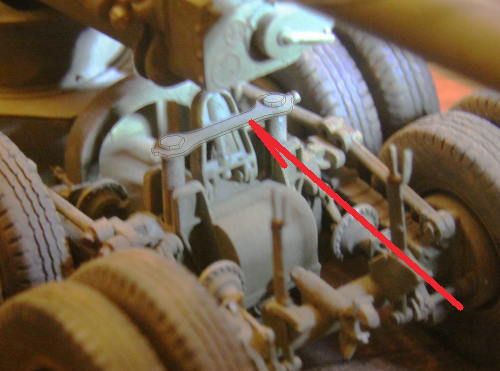
In this image the cables are slack and can be attached to the "bolt" head
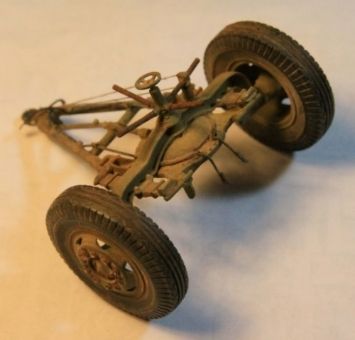
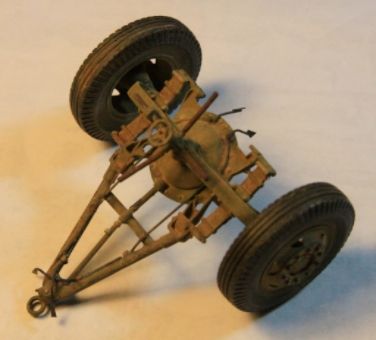
The attachment point is on a part of the bogie assembly that lifts up (turning those great big screws).
If the other end of the cable is also attached to a part of the bogie which lifts up then it should not be possible to tighten the cables with any amount of lifting/lowering the bogie since both ends move up and down together.
The cables will prevent excessive swinging of the bogie but they will not keep the bogie completely still.
What have I misunderstood?
/ Robin
KurtLaughlin
Pennsylvania, United States
Joined: January 18, 2003
KitMaker: 2,402 posts
Armorama: 2,377 posts
Joined: January 18, 2003
KitMaker: 2,402 posts
Armorama: 2,377 posts
Posted: Tuesday, November 27, 2018 - 03:17 PM UTC
1. The bogie was free floating in a groove in the carriage. Turning the screws lowered the carriage until it bottomed, then the same motion lifted the wheels off the ground.
2. The cables kept the bogie from moving too much. The suspension was like a see-saw, putting one end high took the other end low. The cables were attached while the carriage rested on the wheels (so both slack) and went taut when the wheels were lifted. If they weren't installed one axle or the other would/could rest on the ground and that could change how the gun was seated after each shot, or damage the bogie from excessive motion.
3. Running the screws did not take long. The screws were actually a compound or differential screw with two different concentric elements of different pitches so they moved faster than is apparent by looking at the visible thread pitch. Also, the wrenches were ratcheted and usually two guys were on each wrench allowing a quick push-pull motion.
4. The elevating screw lock was only used when travelling.
"Remove the bogie lifting screw lock (fig. 39). Remove bogie lifting screw covers (fig. 40). Remove the ends of the four wheel supporting cables from their brackets on the torque arms and attach them to the wheel supporting bolts on the bogie cross beam (fig. 41). Release the cradle lock from the cradle. Dig pits for front spades, then attach spades. Lower the carriage by operation of the bogie lifting screws with the bogie lifting screw wrenches (fig. 42), and continue operating the bogie lifting mechanism until the bogie wheels are raised completely off the ground. Operate both screws in unison to prevent cramping of the mechanism. Cables are attached to the brackets and axles to provide a support for the wheels when they are raised from the ground in firing position."
KL
RobinNilsson
TOS Moderator
Stockholm, Sweden
Joined: November 29, 2006
KitMaker: 6,693 posts
Armorama: 5,562 posts
Joined: November 29, 2006
KitMaker: 6,693 posts
Armorama: 5,562 posts
Posted: Tuesday, November 27, 2018 - 06:14 PM UTC
Thanks Kurt!
I forgot about the springs.
Wheels down = springs compressed & cables slack
Wheels up = springs relaxed until cables are tight
I wonder if the springs in the AFV-Club kit are compressed
or relaxed?
/ Robin
I forgot about the springs.
Wheels down = springs compressed & cables slack
Wheels up = springs relaxed until cables are tight
I wonder if the springs in the AFV-Club kit are compressed
or relaxed?
/ Robin
berwickj
Fyn, Denmark
Joined: April 16, 2007
KitMaker: 352 posts
Armorama: 342 posts
Joined: April 16, 2007
KitMaker: 352 posts
Armorama: 342 posts
Posted: Tuesday, November 27, 2018 - 07:02 PM UTC
Quoted Text
I am fortunate to have a US 8 inch gun (same carriage) on display in front of a local county court house.
Now that's quite a subliminal message!!
John
Posted: Wednesday, November 28, 2018 - 05:28 AM UTC
Kevlar06
Washington, United States
Joined: March 15, 2009
KitMaker: 3,670 posts
Armorama: 2,052 posts
Joined: March 15, 2009
KitMaker: 3,670 posts
Armorama: 2,052 posts
Posted: Wednesday, November 28, 2018 - 07:11 AM UTC
Christmas will be a “Blast” and the New Year will come in with a “Bang”!
VR, Russ
VR, Russ
Posted: Wednesday, November 28, 2018 - 09:44 AM UTC
Quoted Text
Ready for Christmas - fresh paint and new tires
Where would/did get new tires?
Posted: Thursday, November 29, 2018 - 01:35 AM UTC
The Mayor contacted a military base somewhere???? Found tires, most already mounted on newer rims. (You will notice the paint color of some rims does not exactly match the rest of the gun.)
I shared with him that there is a need to get the axles up on welded jack stands, otherwise the new tires will soon look as deflated as the old ones but that did not happen.
p.s. The photo was taken 3+ years ago.
I shared with him that there is a need to get the axles up on welded jack stands, otherwise the new tires will soon look as deflated as the old ones but that did not happen.
p.s. The photo was taken 3+ years ago.
RobinNilsson
TOS Moderator
Stockholm, Sweden
Joined: November 29, 2006
KitMaker: 6,693 posts
Armorama: 5,562 posts
Joined: November 29, 2006
KitMaker: 6,693 posts
Armorama: 5,562 posts
Posted: Thursday, November 29, 2018 - 03:32 AM UTC
Quoted Text
Mayor contacted a military base somewhere???? Found tires, most already mounted on newer rims. (You will notice the paint color of some rims does not exactly match the rest of the gun.)
I shared with him that there is a need to get the axles up on welded jack stands, otherwise the new tires will soon look as deflated as the old but that did not happen.
p.s. The photo was taken 3+ years ago.
Another option is to insert some kind of support, for instance two short steel H-beams 10 inches high/wide under the carriage part, bring out those oversized wrenches and lift up the wheels until the support under the carriage is locked firmly in place.
Just to take most of the weight off the wheels while still keeping the wheels sligthly under pressure so that it doesn't look as if they had been lifted.
/ Robin
Posted: Thursday, November 29, 2018 - 04:15 AM UTC
Ratchets, spades and limber long gone from the gun!
Four fixed jack stands would have been easy for the local county highway garage to fabricate. I offered to draw up the design for them but the suggestion fell on deaf ears.
HeavyArty
Florida, United States
Joined: May 16, 2002
KitMaker: 17,694 posts
Armorama: 13,742 posts
Joined: May 16, 2002
KitMaker: 17,694 posts
Armorama: 13,742 posts
Posted: Thursday, November 29, 2018 - 04:22 AM UTC
Unfortunately, the average person, unlike most of us, could care less about old, rusty pieces of military equipment being preserved. It is especially true with the current PC, anti-anything that looks like a gun or that it was at one time threatening climate. That machine of destruction must go!! Idiots!!
Posted: Thursday, November 29, 2018 - 05:19 AM UTC
I can personally think of at least four cities in the central part of the state that have tanks on display honoring our WWII heros as well as this very well kept field piece. Of course we also have Ft. Knox and Ft. Campbell within our borders plus three military museums and an aviation museum.
The city of Vine Grove, KY has the highest per capita percentage of fallen WWII soldiers in the entire US, many of whom were party to the Bataan death march!
Posted: Thursday, November 29, 2018 - 05:23 AM UTC
Just a further note on the jack screw travel lock: as said earlier the Masters Productions back-date set includes this part molded in very delicate resin.
If you can find them, Masters actually offered two back-dating sets for the AFV kit: one was the tires only and the other included the extra parts plus the very nicely done M1 limber.
.
Early M1 limber from Masters Productions
If you can find them, Masters actually offered two back-dating sets for the AFV kit: one was the tires only and the other included the extra parts plus the very nicely done M1 limber.
.
Early M1 limber from Masters Productions
Posted: Thursday, November 29, 2018 - 05:47 AM UTC
Sidebar:
When/If the new model Mack NO becomes a reality - I would want to remind everyone that Mack had designed a specialized hitch for the 155mm and 8 inch guns that allowed the guns trails to be attached directly to the prime mover without the use of a limber.
While towing with either limber was acceptable over hard ground, attaching the gun directly to the vehicle was preferred. This allowed part of the weight of the gun to be transferred to the towing vehicle avoiding the need for the use of what is known as a "ballast tractor" (such as the M19 Diamond T) for towing. For the Mack no additional weight other than crew and ready rounds need be carried by the vehicle to produce adequate tractive effort.
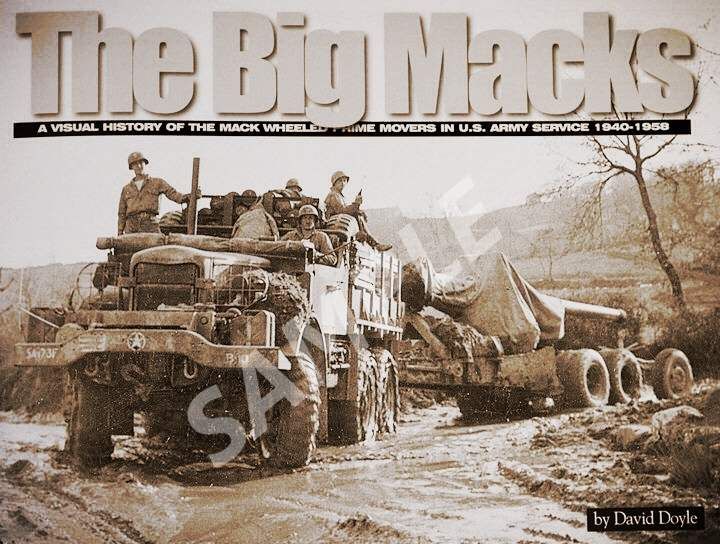
You may often see photos of the Mack NO towing the gun followed by the limber as on the cover of this David Doyle tome. This is because the next tow vehicle assigned to the gun MIGHT be the HST, a Caterpillar tractor or the M19; all of which would absolutely require the use of a limber.**
** p.s. Either the M1 or the later M5 limber would be correct for the WWII gun. The M5 limber was an improvement and considered quicker and easier to use.
Posted: Thursday, November 29, 2018 - 06:02 AM UTC
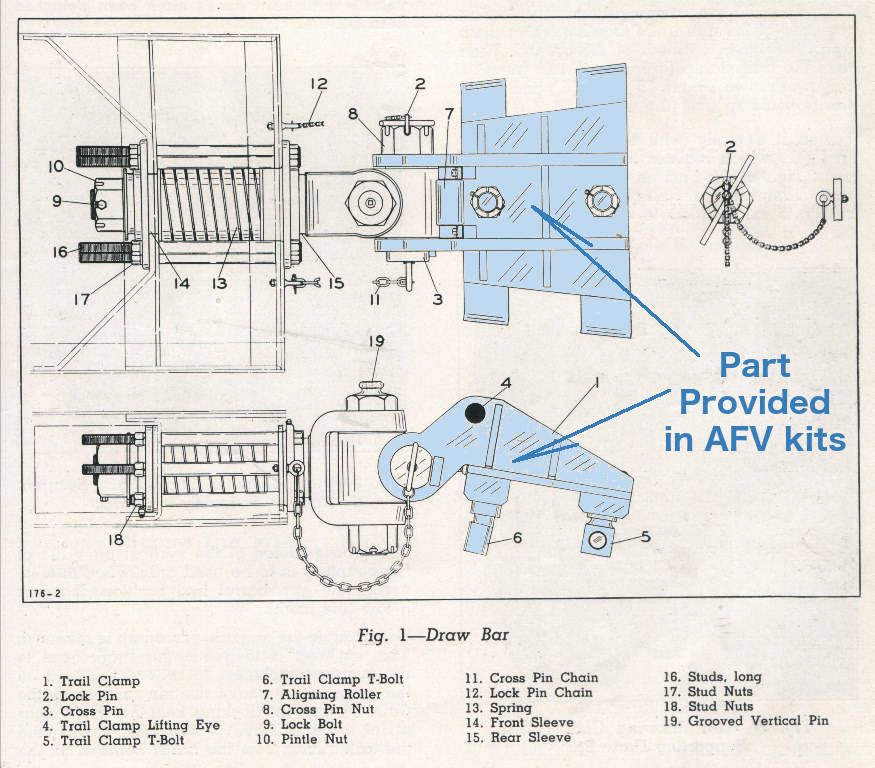
Here is shown the standard "corset" which attached to and gripped the gun trails. The corset shown here has been attached to the specialized Mack hitch (a large universal joint actually) which could replace the standard military towing pintle on the back of the vehicle.
This standard corset, or trail clamp, would mate with either the M1 or M5 limbers.*
Both the AFV gun kits include this trail clamp/corset.
* Also functioned with the M23 8-ton ammo trailer either with of without the M5 limber.
This standard corset, or trail clamp, would mate with either the M1 or M5 limbers.*
Both the AFV gun kits include this trail clamp/corset.
* Also functioned with the M23 8-ton ammo trailer either with of without the M5 limber.
Posted: Friday, November 30, 2018 - 04:30 AM UTC
Frenchy
Rhone, France
Joined: December 02, 2002
KitMaker: 12,719 posts
Armorama: 12,507 posts
Joined: December 02, 2002
KitMaker: 12,719 posts
Armorama: 12,507 posts
Posted: Friday, December 07, 2018 - 09:01 AM UTC
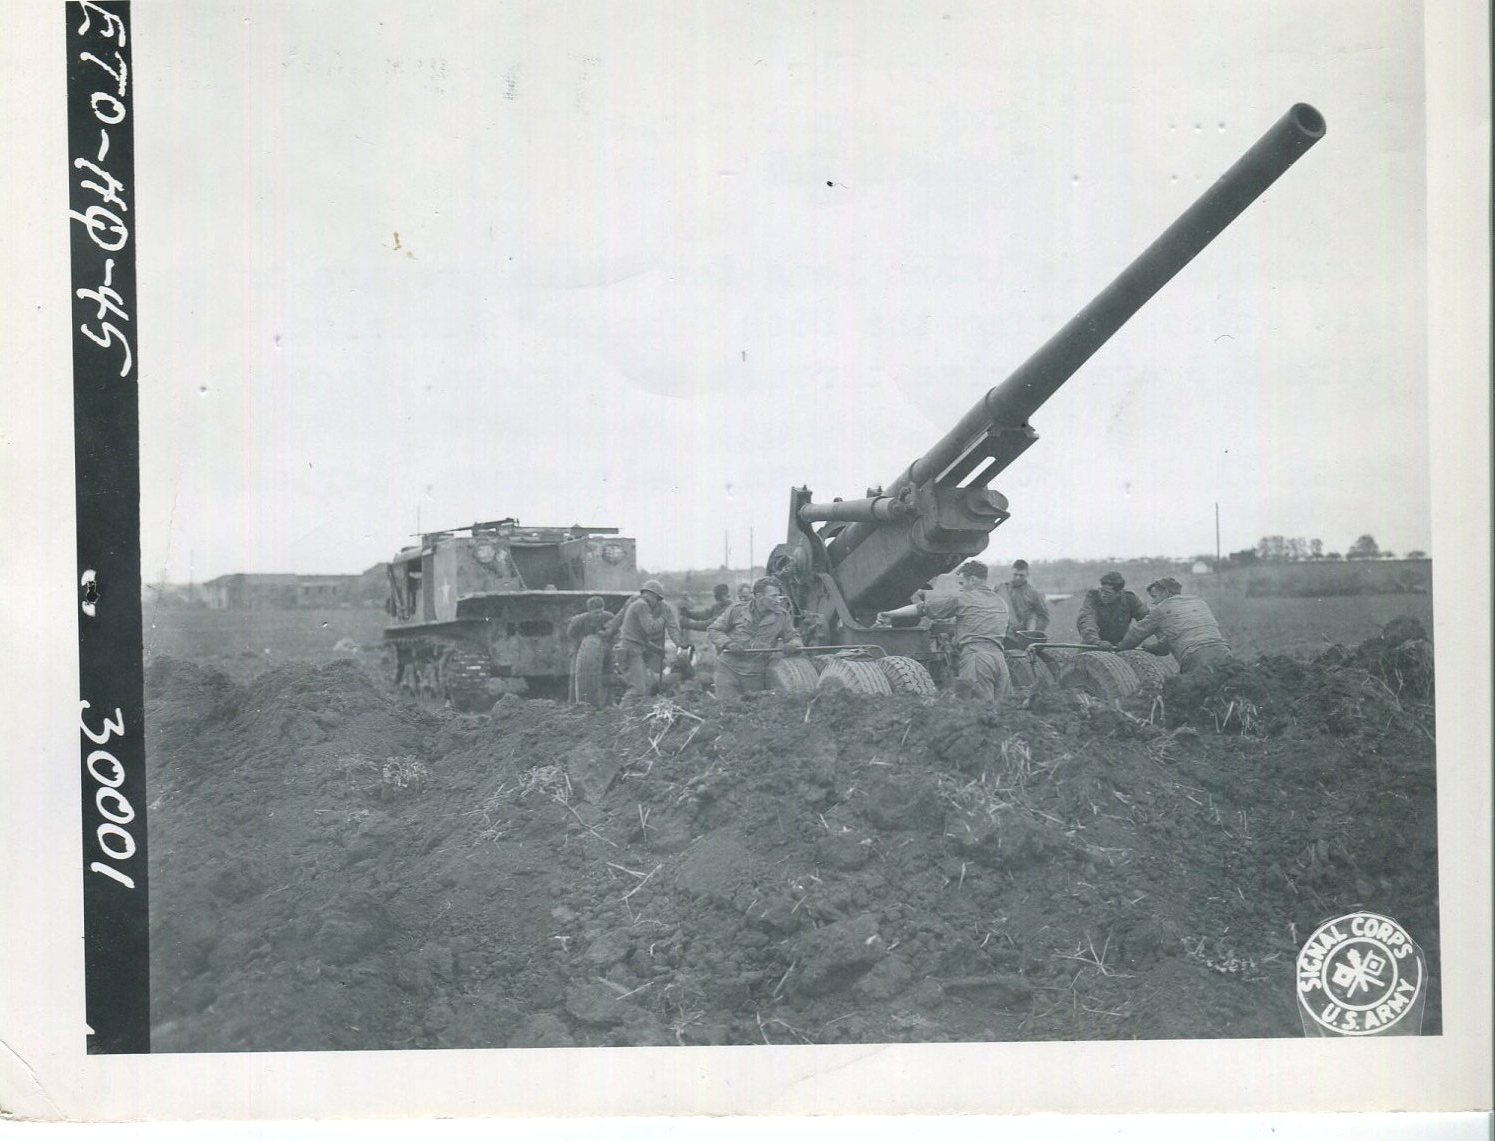
Just came across this period picture showing gunners from the 244th Field Artillery Battalion preparing to fire their M1A1 155mm gun in support of the 26th Infantry Division near Gelnhausen, Germany, 30 March 1945.
Full size
H.P.
Full size
H.P.