Hi all,
I have recently just finished my first kit build in 40 years, the build log was posted on this site and entitled 'My first build in 40 years...so here goes!...'. You can find this under the following - Armor/AFV: British Armor Discuss all types of British Armor of all eras - if anyone is interested.
My biggest disappointment, of which there were many, was the quality, or lack thereof, of my figure painting, . Having followed a good number of builds on this site it is, imho, the figures that can make or break a finished vehicle and/or diorama...they bring humour, life and scale to a finished article.
In my teens I could paint eyes, however, this time around I struggled to get even the basic painting right, , so at the end of my first build I set myself the following challenge...
...I purchased these at the weekend (see image below), I need to find a relatively small vehicle as I intend to display them on an A4 size base.
Proposed Figures:
I'm thinking that these 10 figures, plus maybe a couple of crew depending on the vehicle I choose will give me 12-to-13 figures to practice on, ...
I’m thinking the troops can be moving along a Normandy bocage hedgerow or maybe a farmyard, A4 isn’t large so the groundwork will be simple. As for the vehicle I’m thinking of purchasing the Tamiya Universal Carrier, I appreciate it’s not as accurate or detailed as the Riich version(s), but I’m certain it’s darned sight easier to build, .
Any thoughts or suggestions would be greatly appreciated.
Cheers, .
G
p.s. although there will be a vehicle and a diorama, I’m hoping that I have entered this build log in to the right category as it is primarily about the figures? If I’m mistaken please let me know and I will move it accordingly.
Figures
Military figures of all shapes and sizes.
Hosted by Darren Baker, Mario Matijasic
Figure Challenge to Oneself
G-man69
England - South West, United Kingdom
Joined: October 17, 2017
KitMaker: 944 posts
Armorama: 928 posts
Joined: October 17, 2017
KitMaker: 944 posts
Armorama: 928 posts
Posted: Tuesday, March 19, 2019 - 01:40 AM UTC
G-man69
England - South West, United Kingdom
Joined: October 17, 2017
KitMaker: 944 posts
Armorama: 928 posts
Joined: October 17, 2017
KitMaker: 944 posts
Armorama: 928 posts
Posted: Tuesday, March 19, 2019 - 03:00 AM UTC
Hi all,
Whilst I am used to the ‘Tamiya’ way of boxing figures...it hasn't changed that much since my teens, ...I am new to the ‘Gecko’ way, and I have to say that my initial impressions of the ‘Gecko’ product is very good, .
Below are some initial images of the Gecko boxing followed by that of the Tamiya product.
The outer packaging has some nice artwork on the front.
On the rear is a parts list.
Inside the end opening outer package is a second flip-lid box, no artwork, but very sturdy, thus giving good protection to any contents contained therein.
There is an instruction booklet with renditions of the figures and equipment printed in colour on thick gloss ‘card’. This gives part assembly/locations and basic painting colours.
As well as the instruction booklet the box contains one large cellophane packet which protects the 1xlarge and 4xsmaller sprues containing figures and their helmets and pouches etc. A smaller packet containing 1xsmall and 4xsmaller sprues holding weapons and associated equipment, and a small resealable bag containing photoetch fret for straps and buckles, plus a sheet of rank/regiment decals.
By comparison the Tamiya end opening boxing seems flimsy, though the artwork on the front is the usual excellent colour portrait style.
On the rear are images of the actual figures built and painted with colours/parts referenced.
Inside the box is one large polythene bag containing 1xlarge sprue holding the figures and a smaller bag containing 2xmedium sprues holding the helmets, pouches, weapons and other small items of equipment.
Both companies have some artwork on the long sides of the box, but Tamiya’s is more colourful and useful.
Any comments made herein have to be tempered by the simple fact that the Tamiya set...both sets contain 5 troopers...is, in the UK, approximately half the price of the Gecko set.
The Gecko set, imho, is better packaged, it has better instructions/painting guide, you get a fret of straps and buckles plus the rank/regiment/decals…does all of this justify a doubling of the cost? Only the individual modeller can make that call, .
Hopefully later, or possibly tomorrow, I will post some images of the parts on their respective sprue.
Cheers, .
G
G-man69
England - South West, United Kingdom
Joined: October 17, 2017
KitMaker: 944 posts
Armorama: 928 posts
Joined: October 17, 2017
KitMaker: 944 posts
Armorama: 928 posts
Posted: Tuesday, March 19, 2019 - 06:01 AM UTC
Hi all,
Find below images of both the Tamiya and Gecko contents, I have taken shots of both sides of each sprue.
Tamiya Sprue ‘Z’:
Tamiya Sprue ‘Y’ (there are 2 off of this item):
The duplication of this sprue means you will have some bits for the spares box, .
Gecko Sprues ‘A, B, D and E’:
Gecko Sprue ‘C’:
Gecko Sprue ‘F’:
Gecko Sprue ‘G’:
Gecko Sprue ‘He’:
Gecko Sprue ‘Hf’:
Gecko Sprue ‘Hg’:
Gecko Sprue ‘Hi’:
Gecko Sprue ‘Hj’:
Gecko Sprue ‘T’:
Gecko Photo Etched Fret:
Gecko Decals:
My first impression is that both sets are generally well detailed, so placing both sets of figures side-by-side shouldn’t cause issues. Also, it might be possible to interchange some parts with little, or no modification, though I shall have to double check this if the need arises, .
Tomorrow I might remove a few parts for side-by-side comparison purposes, e.g. weapons, packs, etc.
Cheers, .
G
Biggles2
Quebec, Canada
Joined: January 01, 2004
KitMaker: 7,600 posts
Armorama: 6,110 posts
Joined: January 01, 2004
KitMaker: 7,600 posts
Armorama: 6,110 posts
Posted: Tuesday, March 19, 2019 - 07:19 AM UTC
I might suggest a virtual tour of Normandie in the vicinity of Villars Bocage. Take a road trip down the smallest tracks Google will allow. Lots of interesting bocage country - sunken roads - farms - ect. mostly unchanged since WWll.
BootsDMS
England - South West, United Kingdom
Joined: February 08, 2012
KitMaker: 978 posts
Armorama: 965 posts
Joined: February 08, 2012
KitMaker: 978 posts
Armorama: 965 posts
Posted: Tuesday, March 19, 2019 - 08:22 AM UTC
Gareth,
How did I know just from the title that this would be your post?!
Very worthy stuff and I appreciate your intent; figures can be daunting but to my mind are essential to set any vehicle in context let alone explain, or indicate, a "story". (Jerry Rutman of course is the Ninja to my mind in 1:35)
In my experience - normally not worth vey much at all (!) - figures take an inordinate amount of time compared to a vehicle build; in choosing British WW2 figures you have asset yourself a real challenge in that the vagaries of uniform, personal equipment (webbing) and weapons of the period will all demand serious research.
To start with I don't think that the leather (flannel-lined jerkins) were issued until winter 1944, so that cancels out any Normandy focus. If you opt for something like the Reichswald campaign later that year then you're probably on the right track. Again, if you're planning on an A4 sized base, then with that amount of figures, you're limiting yourself to a very small vehicle indeed. However, there is nothing to stop you, for example, portraying this number of figures, (almost half a Platoon) trekking past a German piece of equipment - just to ring the changes.
Certainly the base size will focus on how you devise what you will, but a size up - viz A3 - may give you greater scope to incorporate a larger vehicle (and arguably, a more coherent "story").
Over to you and forgive what may be seen as any hijacking/micro management of what is, after all, your project.
Brian
G-man69
England - South West, United Kingdom
Joined: October 17, 2017
KitMaker: 944 posts
Armorama: 928 posts
Joined: October 17, 2017
KitMaker: 944 posts
Armorama: 928 posts
Posted: Tuesday, March 19, 2019 - 10:27 PM UTC
Hi Biggles,
Thank you for the suggestion, i will have a look, though, if Brian is correct i might have to revise my location, .
Cheers, .
G
Thank you for the suggestion, i will have a look, though, if Brian is correct i might have to revise my location, .
Cheers, .
G
G-man69
England - South West, United Kingdom
Joined: October 17, 2017
KitMaker: 944 posts
Armorama: 928 posts
Joined: October 17, 2017
KitMaker: 944 posts
Armorama: 928 posts
Posted: Tuesday, March 19, 2019 - 10:35 PM UTC
Hi Brian,
You know me too well, .
You might be right about a bigger base, but I will explore the challenge of the A4 option, it might focus the mind and allow me to come up with a nice solution, .
As to the jerkin, I need to look into this further, I'd always thought that variations of such a garment had been in use since WW1, though I could well be wrong...it has often been known, .
If anyone else has information relating to the use and period of such an item please feel free to chip in.
Also, how common was the use of netting on the helmets, both with and without additional scrim, any advice would be greatly appreciated.
Cheers, .
G
BootsDMS
England - South West, United Kingdom
Joined: February 08, 2012
KitMaker: 978 posts
Armorama: 965 posts
Joined: February 08, 2012
KitMaker: 978 posts
Armorama: 965 posts
Posted: Tuesday, March 19, 2019 - 11:00 PM UTC
Quoted Text
Hi Brian,
You know me too well, .
You might be right about a bigger base, but I will explore the challenge of the A4 option, it might focus the mind and allow me to come up with a nice solution, .
As to the jerkin, I need to look into this further, I'd always thought that variations of such a garment had been in use since WW1, though I could well be wrong...it has often been known, .
If anyone else has information relating to the use and period of such an item please feel free to chip in.
Also, how common was the use of netting on the helmets, both with and without additional scrim, any advice would be greatly appreciated.
Cheers, .
G
Gareth,
Whilst the Jerkin was indeed available during and since WW1, I'm just basing my opinion on the lack of visual evidence of images of the Normandy campaign; I just know now that someone will come up with pictures proving me totally wrong!)
Re scrim on helmets: if I were a professional Infantryman, my personal camouflage and concealment would be paramount, in other words I would do whatever it took to prevent me being identified by the enemy and killed, however, period photographs do show a variety of camouflaged and naked helmets, so up to you I reckon. I suspect it came down to individual units and how efficient the Platoon Sergeant was in enforcing Battle Prep.
I think if I were undertaking this project I'd go for camouflaged helmets - it just makes the figures look that little bit more warlike.
Brian
M4A1Sherman
New York, United States
Joined: May 02, 2013
KitMaker: 4,403 posts
Armorama: 4,078 posts
Joined: May 02, 2013
KitMaker: 4,403 posts
Armorama: 4,078 posts
Posted: Tuesday, March 19, 2019 - 11:12 PM UTC
Quoted Text
Hi Brian,
You know me too well, .
You might be right about a bigger base, but I will explore the challenge of the A4 option, it might focus the mind and allow me to come up with a nice solution, .
As to the jerkin, I need to look into this further, I'd always thought that variations of such a garment had been in use since WW1, though I could well be wrong...it has often been known, .
If anyone else has information relating to the use and period of such an item please feel free to chip in.
Also, how common was the use of netting on the helmets, both with and without additional scrim, any advice would be greatly appreciated.
Cheers, .
G
Hi, Gareth!
You opened this thread with the statement that you want to improve your figure-painting skills, especially their eyes. Didn't you read my suggestions which I posted for you in your "Conqueror" dio/build..? OK, having mentioned that, I would very much like to suggest an EXCELLENT book for you, which will definitely help you to improve your figure-building efforts:
"Bill Horan's MILITARY MODELLING MASTERCLASS", which is published by Windrow & Greene Publishing.
(This book is published in the U.K., which will probably be easier for you to obtain than it is here in the 'States...)
This book is not only highly instructive and LOADED with color "how-to" photography, but it makes for some pleasurable reading, as well. It is a work that one should read from front to back, in its entirety. It is a GREAT book which you can keep on your workbench, as you can refer back to it during any stage in your figure's completion from start-to-finish. This book will even show you how to MAKE YOUR OWN figures!
Some advice: You've taken on a HUGE project with all of those figures, and my advice is this:
DON'T try to do everything at once!!! That's THE QUICKEST way to get sick of IT and YOURSELF for having taken on such an ambitious endeavor. Take your time and practice your techniques on a "dummy-figure" first. Develop your highlighting, shading and blending skills BEFORE you apply them to the actual figures in your work- Doing this will pay dividends for you in the end...
I applaud your pluck in deciding to take on such a great "Tommy-project"!!! I wish you GOOD LUCK in your figure-construction and painting- You may even find that you've grown to enjoy modeling figures more than building the actual vehicle kits that you bought in the first place! That's what happened with me!!!
As to the Helmet-netting: I wouldn't go nuts with it- Just as many Tommies (and GIs) had netting as not, so "bare" Helmets are just as realistic in a WWII dio as the "netted" ones. Might I suggest some HORNET heads for you as well? The British and Commonwealth Heads are very finely represented with wonderful facial expressions an a multitude of British-style Head-gear to choose from. The HORNET Heads are much better than any plastic heads from any model manufacturer- Their facial features are much better in definition and detail, which WILL ALSO AID YOU IN PAINTING your figures' eyes, nostrils, lips and mouths. You will also be more able to define your figures' cheekbones, chins, etc. Quite simply, just adding a HORNET head to your figure will improve it by 100%!! The Heads come 5 to a package, so it's a very good investment for you... I might also suggest getting a few sets of the British Heads with the Mk.III Helmets- I've seen MANY of these Helmets in photos of British Troops during and after the D-Day Invasion, and right up to VE-Day in May of 1945...
PS- I wouldn't sweat over the TAMIYA U/C kit as being inferior; a nice PE set, some resin "stowage", ass some camo netting, AND DEFINITELY purchase a nice set of after-market tracks. All of these things can make the little TAMIYA Carrier sing a happy song all of its own!!!
"Scrim" can also be duplicated by cutting tiny, narrow strips of thin PAPER. Moisten it with a very thin solution of water, white water-soluble glue, and a tiny drop of dish-washing liquid mixed to the solution. Doing this will chemically make your solution "wetter", and will make your "Scrim" more pliable. This solution should have the consistency of SKIM MILK. Using a pair of tweezers, dip a piece of the "Scrim" in your solution for a few seconds to allow it "soak up the juices". I like to apply a tiny bit of "straight" white-glue to the tip of a wooden toothpick, and then deposit a bit of this glue to strategic points of my subject, so as to be able to "anchor" the "Scrim" to the netting. You can then begin shaping it to the contours and shapes of your figure's Helmet-and-netting, OR your vehicle's camo-netting...
T think that you did just fine with the camo-netting on your Conqueror. If I were in your place though, what I WOULD do is stay away from all of hose "varnishes"- That's what seemed to be slowing you up because of those lengthened "drying-times" and giving you those "glossy finishes", etc on your camo-netting...
Let me know what you think of my suggestions...
G-man69
England - South West, United Kingdom
Joined: October 17, 2017
KitMaker: 944 posts
Armorama: 928 posts
Joined: October 17, 2017
KitMaker: 944 posts
Armorama: 928 posts
Posted: Wednesday, March 20, 2019 - 02:13 AM UTC
Hi Brian,
Thanks for clarifying your earlier comments regarding the jerkin, I now understand where you were coming from.
Also, thanks for the information regarding camouflage, taking onboard both the feedback from you and Dennis I think I will mix it up a bit to give more interest.
Thanks again, your support and advice has been, and will always be, much appreciated.
Regards,
G
p.s. I am adding another figure to my Conqueror build…all thanks to an image I found whilst reviewing your comment on antenna/antennae, .
G-man69
England - South West, United Kingdom
Joined: October 17, 2017
KitMaker: 944 posts
Armorama: 928 posts
Joined: October 17, 2017
KitMaker: 944 posts
Armorama: 928 posts
Posted: Wednesday, March 20, 2019 - 02:46 AM UTC
Hi Dennis,
Your suggestions that you kindly posted on the “Conqueror” build, along with some from Brian, were much appreciated and I did respond in that same post, thanking you both.
And, again, you have both been kind enough to take the time in this new post to offer suggestions, thank you.
Of interest is your recommendation of the Bill Horan book, I already have the Building, Panzer and Terrain Masterclass publications but have always fought shy of the Bill Horan book as a number of reviews on a well known online Market seemed to suggest hat it was a tad light on the painting side, being that it was more about figure construction...I shall definitely revisit reviews on the publication.
I am actually in the process of adding one additional figure to my Conqueror build, the missing 4th crewman (I have posted some preliminary images in the Conqueror log), so he can be my, or at least one of my “dummies”, .
A number of good folks on this site have mentioned the Hornet heads, with similar comments about them almost painting themselves so I think I might give them a checkout.
To be honest I’m a little wary of photo-etch (PE) and resin, hence thinking Tamiya Universal Carrier over the Riich product. I also imagine, that with the addition of PE, resin and replacement tracks the cost of Tamiya kit would probably end up not being dissimilar to that of the Riich...you’ve given me food for thought, .
Your method of making scrim is not too different to the one I tried, I used an old envelope and white glue, though I didn’t use such a thin solution, so that might have added to my problem, and yes, you’re right about me going over the top with the varnish...one of my many learnt lessons, .
Thanks for all your help thus far, your advice is always appreciated and welcomed.
Cheers, .
G
G-man69
England - South West, United Kingdom
Joined: October 17, 2017
KitMaker: 944 posts
Armorama: 928 posts
Joined: October 17, 2017
KitMaker: 944 posts
Armorama: 928 posts
Posted: Wednesday, March 20, 2019 - 03:55 AM UTC
Hi all,
Below are a few comparison images between similar Tamiya and Gecko items.
Bren Gun Left-Hand View:
Bren Gun Right-Hand View:
Having looked at various images of Bren Guns my gut tells me that the Gecko weapon looks more accurate, especially the ‘butt/stock’?
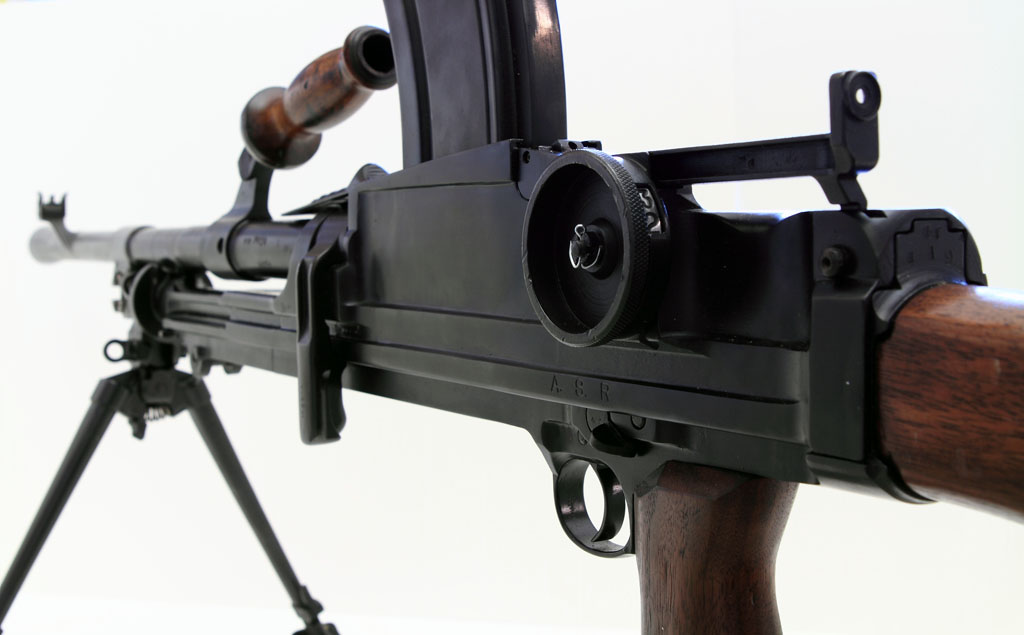
I’m not sure what the round item is on the left-hand side of the Gecko weapon, it is seen on some images of the Bren Gun but, equally, many images don’t show it, so more like the Tamiya version…could it be different MKs of the same weapon?
Canteens, Helmets and Rucksacks:
Not much to choose from when it comes to rucksacks, though I think I prefer the Tamiya items. I definitely favour the Tamiya Brodie helmet, the brim looks slightly odd on the Gecko version, though I do prefer the Gecko canteen...what say others?
Obviously, I have to qualify my remarks by saying I’m no expert on any of the above items, especially ‘hard’ items, e.g. weapons and helmets.
Cheers, .
G
BootsDMS
England - South West, United Kingdom
Joined: February 08, 2012
KitMaker: 978 posts
Armorama: 965 posts
Joined: February 08, 2012
KitMaker: 978 posts
Armorama: 965 posts
Posted: Wednesday, March 20, 2019 - 06:47 AM UTC
Gareth,
You are indeed setting yourself a fair old challenge here - Dennis' comments are more than apposite(!)
First off - the setting: whilst Gecko's figures are certainly useful, and to be welcomed, it is unlikely that a Platoon or so of British Infantry would include the Vickers MMG; whilst this was integral to a British Infantry Battalion, it's rightful place would be within the Support Weapons Company. I'm not saying never, but it is unlikely to be seen as depicted in Gecko's box art ie amongst a Section/Platoon.
The Bren; weighs a ton. Whilst there may be the odd Goliath who can master it as a rifle, if it was carried as per Gecko's picture, the user would have it slung - ie with the sling resting on the shoulder. The round item is part of the sight and all versions should have it.
The extra metalwork on the butt is to take an additional handle for when the gun is mounted on a tripod for anti aircraft use.
All weapons - whether or not Tamiya or Gecko - will require slings.
The long bayonet shown underneath the Entrenching Tool carrier is wrong for 1944 - the then bayonet was the shorter "Pig sticker" version. Easy enough to modify but would be on the left hip affixed to the web belt.
Brodie helmet is the wrong terminology, referring to WW1 helmets; the version shown was known as the Mk II helmet. Mk IIIs were in widespread use from D Day onwards but Mk IIs were in use up to the end of the war so you can use them. Netting and camouflage scrim would represent a more professional unit perhaps.
From the images you have posted it looks like neither manufacturer have the Small Pack correct. There are buckles at the top of each side, and 2 more underneath. Gecko's illustration as to how it is connected to other straps is totally wrong. I think a firm such as Eduard do a buckles and straps sheet (in etched brass) which might help here.
When packing the Small Pack it was common procedure to have the groundsheet folded in such a way that part of it protruded - forming a bit of a waterproof "lid" as it were - but this is shown only on some.
The Water bottle is stoppered with a cork and this is attached by a small length of string; in 1:35 you might try a small section of fuse wire to replicate this.
Good reference pictures will help you re the webbing, and I'm sure there's some good sites somewhere on the www. The Histoire & Collections series of books are also very useful.
Good luck on this project - which might just test your sanity(!)
Brian
trooper82
Scotland, United Kingdom
Joined: September 11, 2005
KitMaker: 109 posts
Armorama: 98 posts
Joined: September 11, 2005
KitMaker: 109 posts
Armorama: 98 posts
Posted: Wednesday, March 20, 2019 - 01:05 PM UTC
This is starting to look like an interesting topic to follow. I had a quick look around some sites and found this for you - https://www.militaryfactory.com/smallarms/detail.asp?smallarms_id=61 It has all the details you should need on the Bren. There are thousands of quality images online that should help with any questions you may have on British equipment during your chosen period. Good Luck with this.
Paul
Paul
G-man69
England - South West, United Kingdom
Joined: October 17, 2017
KitMaker: 944 posts
Armorama: 928 posts
Joined: October 17, 2017
KitMaker: 944 posts
Armorama: 928 posts
Posted: Thursday, March 21, 2019 - 05:41 AM UTC
Hi Brian,
Firstly, thank you as always for your helpful advice, as always, it’s much appreciated, .
As to this build being a challenge, well, as they say, no pain...no frustration, .
With regards the bren, funnily enough both Gecko and Tamiya figures must be superhuman as they appear to be toting the weapon with relative ease, . I have seen a photo of a chap carrying it in a manner similar to how the Vickers is shown on the Gecko box art, so may modify accordingly. With regards weight, I held a Thompson once and was surprised at how heavy that was, so totally understand where you’re coming from, the bren being that much bigger.
Interesting about the round bit though, as I said, found images both with and without it, and a big omission for the Tamiya item.
Gecko provide all the slings on a PE fret, so no problem, as for the Tamiya figures I will have to see, maybe some thin plasticard or scrap PE carrier frame offcuts, .
The long bayonet should be an easy fix…I hope.
Apologies about the incorrect name used for the helmet…but, in my defence, I did make it clear I was no expert, .
Thanks for all the hints and tips regarding packs and canteen, all useful advice, and all taken onboard.
Cheers, .
G
G-man69
England - South West, United Kingdom
Joined: October 17, 2017
KitMaker: 944 posts
Armorama: 928 posts
Joined: October 17, 2017
KitMaker: 944 posts
Armorama: 928 posts
Posted: Thursday, March 21, 2019 - 05:48 AM UTC
Hi Paul,
Thanks for the good luck wishes, I hope I manage to keep this an interesting topic and that you continue to follow, and please, always feel free to pass comment, be it negative, positive or supportive as you have with your link.
Thanks for taking the time to find the site and post the link, I have saved it to my favourites.
Thanks again and cheers, .
G
G-man69
England - South West, United Kingdom
Joined: October 17, 2017
KitMaker: 944 posts
Armorama: 928 posts
Joined: October 17, 2017
KitMaker: 944 posts
Armorama: 928 posts
Posted: Thursday, March 21, 2019 - 06:14 AM UTC
Hi all,
Starting to rough-out the figures, I’ve decided to do them in pairs, i.e. one Gecko and one Tamiya at a time so that I can show comparisons, etc.
Some of the figures will be built straight out of the box, others may be modified slightly, but nothing too challenging as this is primarily intended to be more of an exercise in painting than anything else.
I have started to clean the parts up, but studying the photographs taken allows me to see bits I might have missed, .
Also, I will need to do some filling, as there are slight gaps (see images below of the first pair), though these might be down to my hamfisted and inexperienced capabilities as opposed to a parts-fit issue, .
The Gecko figure is on the right, and I will try to remember to position all paired images thus in future posts within this topic.
A couple of questions if I may?
• Is it generally better to clean seams by scraping with a sharp blade or by filing away?
• Is it better to completely build a figure before painting, i.e. add heads, packs and pouches, and other elements...with the exception of weapons, boxes, etc...or is it best to paint subassemblies. e.g. legs, torso and arms?
• One obvious omission from both manufacturers is any detail on the bottom of boots, and this will be very noticeable for figures in motion…does anyone have a easy fix/solution to this problem?
• Any other useful advice regarding assembly and painting?
cheers, .
G
Paulinsibculo
Overijssel, Netherlands
Joined: July 01, 2010
KitMaker: 1,322 posts
Armorama: 1,239 posts
Joined: July 01, 2010
KitMaker: 1,322 posts
Armorama: 1,239 posts
Posted: Thursday, March 21, 2019 - 06:48 AM UTC
Dear Garreth,
Thanks for posting this comparison.
Have you considered these men returning to a (IBG) Bedford QLT Troop Carrier?
With an additional etch set this builds a nice base for your troop.
Just a hint.
Looking forward to read more.
P.
Thanks for posting this comparison.
Have you considered these men returning to a (IBG) Bedford QLT Troop Carrier?
With an additional etch set this builds a nice base for your troop.
Just a hint.
Looking forward to read more.
P.
iamheaminot
Invercargill, New Zealand
Joined: January 03, 2004
KitMaker: 265 posts
Armorama: 185 posts
Joined: January 03, 2004
KitMaker: 265 posts
Armorama: 185 posts
Posted: Thursday, March 21, 2019 - 08:37 AM UTC
Gareth, I hope this post is of use to you. Love what you want to achieve.
"The round item is part of the sight and all versions should have it."
Re the bren. This is the drum sight per MkI.
Later model bren MkII had this
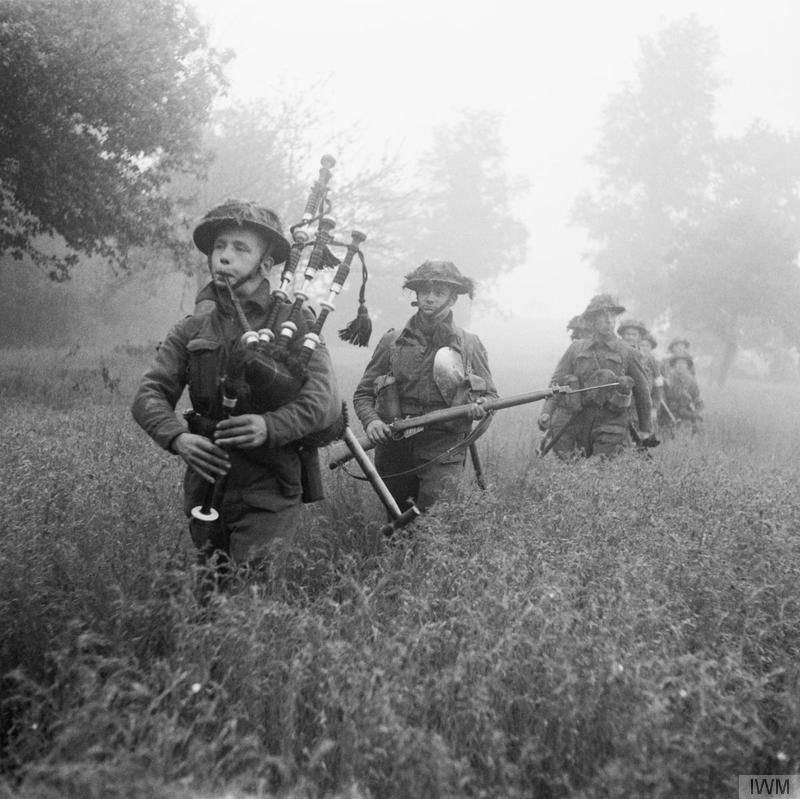
Cameron Highlanders of Ottawa in action at Carpiquet, Normandy, 4 July 1944. This was the machine gun battalion of 3rd Inf Div.
Chap on left may be wearing a jerkin. Not sure.
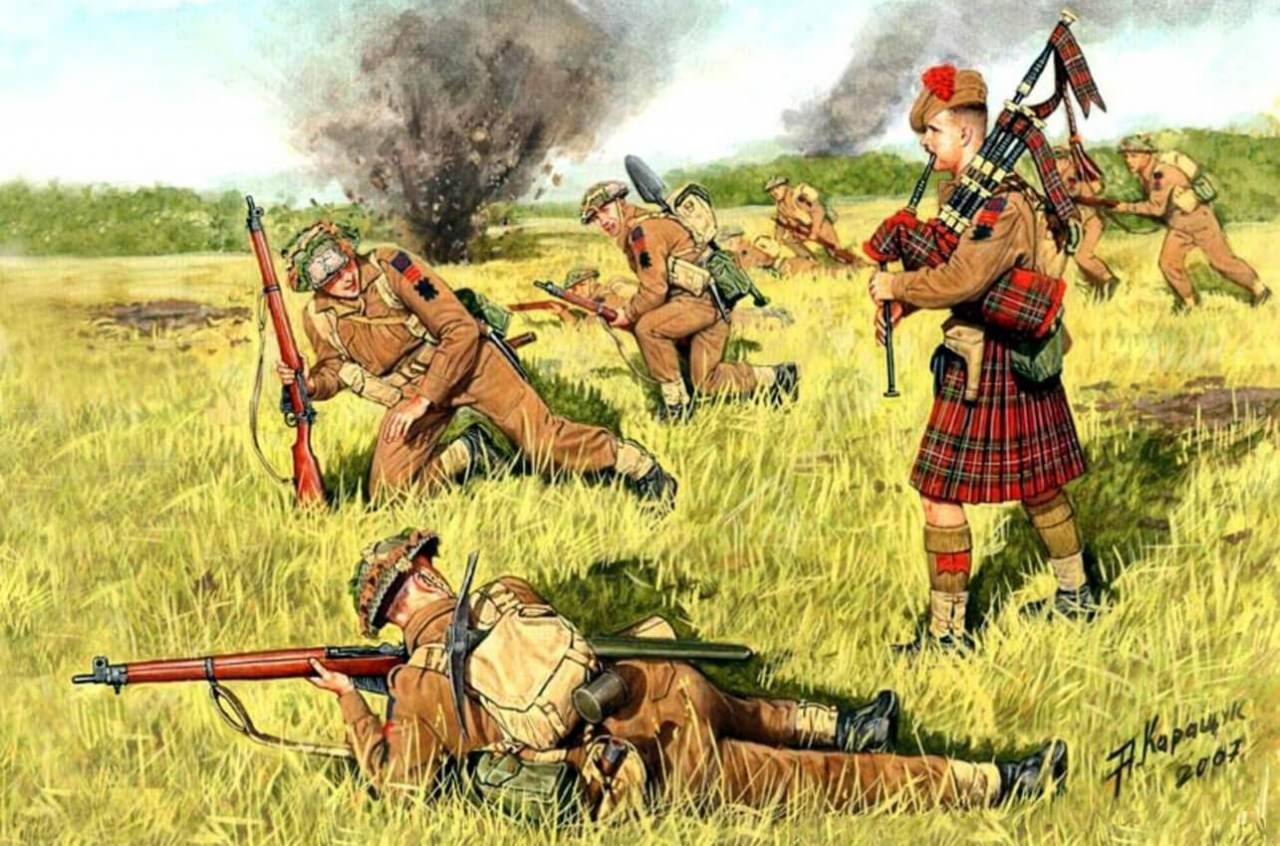
Or how about this one for atmosphere. No jerkin tho. Master Box has a set with a piper in a kilt
Quite a number of photos of troops wearing a battle juerkin in Normandy but that is another animal so to speak
I have modelled that on a commando as part of a vignette with a RM Centaur. Plus a guy carrying a bike etc. Not finished yet. Must hunt them out and take some in progress pics one day. LOL
BootsDMS
England - South West, United Kingdom
Joined: February 08, 2012
KitMaker: 978 posts
Armorama: 965 posts
Joined: February 08, 2012
KitMaker: 978 posts
Armorama: 965 posts
Posted: Thursday, March 21, 2019 - 08:54 AM UTC
Quoted Text
Gareth, I hope this post is of use to you. Love what you want to achieve.
"The round item is part of the sight and all versions should have it."
Re the bren. This is the drum sight per MkI.
Later model bren MkII had this
Cameron Highlanders of Ottawa in action at Carpiquet, Normandy, 4 July 1944. This was the machine gun battalion of 3rd Inf Div.
Chap on left may be wearing a jerkin. Not sure.
Or how about this one for atmosphere. No jerkin tho. Master Box has a set with a piper in a kilt
Quite a number of photos of troops wearing a battle juerkin in Normandy but that is another animal so to speak
I have modelled that on a commando as part of a vignette with a RM Centaur. Plus a guy carrying a bike etc. Not finished yet. Must hunt them out and take some in progress pics one day. LOL
Rod,
Well done on the Bren sight comparisons; I'd forgotten about the leaf sight. We had a couple in our old Army Cadet Force hut (together with No 4 Rifles). Both seemed heavier than I was as a 13 year old!
Brian
iamheaminot
Invercargill, New Zealand
Joined: January 03, 2004
KitMaker: 265 posts
Armorama: 185 posts
Joined: January 03, 2004
KitMaker: 265 posts
Armorama: 185 posts
Posted: Thursday, March 21, 2019 - 11:11 AM UTC
Too funny Brian.
Same here at school Cadets agev13. When I joined the army in 1966 as a 17 year old I can remember lugging the beeping thing. Always had a sling. Same year introduced to the GPMG.
Now that was lots of fun.
I remember being told what the holes were for in the bipod legs. When firing in bursts how the bren would creep forward. Firing the thing and bracing oneself for the creep forward. Digging elbows and toes in. For me anyway ended up a load of rubbish. Probably the way that I held my tongue.
Oh the memories. Good days.
M4A1Sherman
New York, United States
Joined: May 02, 2013
KitMaker: 4,403 posts
Armorama: 4,078 posts
Joined: May 02, 2013
KitMaker: 4,403 posts
Armorama: 4,078 posts
Posted: Thursday, March 21, 2019 - 11:41 AM UTC
Quoted Text
Too funny Brian.
Same here at school Cadets agev13. When I joined the army in 1966 as a 17 year old I can remember lugging the beeping thing. Always had a sling. Same year introduced to the GPMG.
Now that was lots of fun.
I remember being told what the holes were for in the bipod legs. When firing in bursts how the bren would creep forward. Firing the thing and bracing oneself for the creep forward. Digging elbows and toes in. For me anyway ended up a load of rubbish. Probably the way that I held my tongue.
Oh the memories. Good days.
Wow, Fellas! I'm learning A LOT of GREAT STUFF about the WWII Tommies and their equipments here, too!
Gareth- If I may suggest another book for you; I have the book in another location at the moment, so I don't remember the EXACT title:
"The WORLD WAR II TOMMY British army Uniforms In Color Photographs" This book, I believe was co-authored by Richard Windrow & Tim Hawkins, and published by The Crowood Press Ltd. Ramsbury, Marlborough, Wiltshire, SN8 2HR, Great Britain- EXCELLENT Reference Book with STUNNING photos!!!
PS- The Bill Horan book is not only about figure conversion- MOST of the text entails PAINTING the figures, horses, equipments, etc, and INCLUDING painting the men's faces in the first chapter. I'm sure you'll find it very useful...
All of you fellas: CHEERS, from the 'States!
G-man69
England - South West, United Kingdom
Joined: October 17, 2017
KitMaker: 944 posts
Armorama: 928 posts
Joined: October 17, 2017
KitMaker: 944 posts
Armorama: 928 posts
Posted: Thursday, March 21, 2019 - 09:43 PM UTC
Hi Paul,
Thank you for the kind words and for sharing ideas, all comments and suggestions are more than welcome as this is an evolving topic with nothing fixed, other than it being an experiment in figure painting.
I hope you continue to enjoy following the log, .
Cheers, .
G
Thank you for the kind words and for sharing ideas, all comments and suggestions are more than welcome as this is an evolving topic with nothing fixed, other than it being an experiment in figure painting.
I hope you continue to enjoy following the log, .
Cheers, .
G
G-man69
England - South West, United Kingdom
Joined: October 17, 2017
KitMaker: 944 posts
Armorama: 928 posts
Joined: October 17, 2017
KitMaker: 944 posts
Armorama: 928 posts
Posted: Thursday, March 21, 2019 - 09:59 PM UTC
Hi Rod,
Thanks for taking the time to contribute to this build and for sending all useful images, I think from what both you and Brian have said I’ll go with my gut feeling and use the Gecko Bren as it appears to be more accurate.
You’ve also managed to provide an image that answered one of own thoughts...that being whether troops carried field dressings attached to their helmets, much like you sometimes see on American airborne troops. Your third image appears to show two figures with a dressing on the rear of the helmet, it might just be the quality of the original image but it might be held beneath the helmet netting, though I would have thought this made it more difficult to access…so thank you for that.
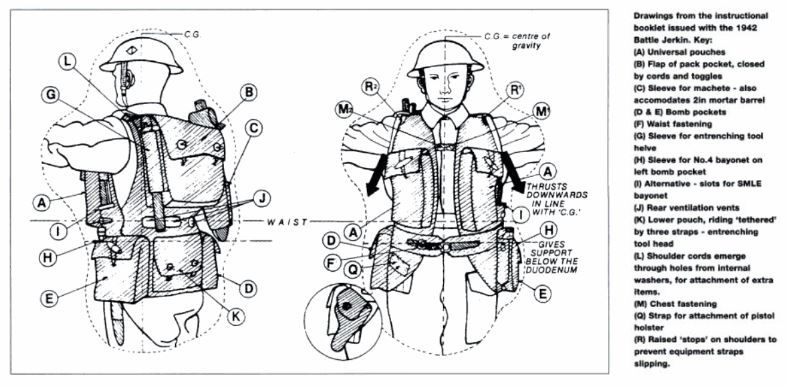
The battle jerkin diagram is interesting, I was reading about this item but didn’t know what it looked like. I gather it wasn’t too popular as the wearer tended to overheat, but interesting to see what was possibly the forerunner of the modern mole tactical vests.
I’d like to see some images of the one you modelled, and some of your work in general.
Thanks again, much appreciated, cheers, .
G
G-man69
England - South West, United Kingdom
Joined: October 17, 2017
KitMaker: 944 posts
Armorama: 928 posts
Joined: October 17, 2017
KitMaker: 944 posts
Armorama: 928 posts
Posted: Thursday, March 21, 2019 - 10:18 PM UTC
Hi Dennis, and a big cheers back to the States,
Thanks for continuing to take the time to offer support and advice, and I'm pleased that you’re finding some interesting information from those people that have been kind enough to contribute, .
Your update on the content of the Bill Horan book has convinced me to invest in a copy but, before I do, I have looked for the other book you referenced and have found this...
'The World War II Tommy: British Army Uniforms, European Theatre, 1939-45, in Colour Photographs'
It's by Crowood Press, but not the authors you referenced, it's listed as - Martin J. Brayley & Richard Ingram - could it be the book you were referring to?
Thanks again, and cheers, .
G