

I have a resin & photo etch 1:35 CMK VW engine which is meant to be used with their VW beetle. I am going to use it in a Revell VW.
Q: anyone have experience with this engine? tips with the conversion?
thanks
Hosted by Darren Baker
CMK Volkswagen Engine

southpier

Joined: December 11, 2009
KitMaker: 546 posts
Armorama: 316 posts
Posted: Wednesday, June 26, 2019 - 12:09 PM UTC
brekinapez

Joined: July 26, 2013
KitMaker: 2,272 posts
Armorama: 1,860 posts
Posted: Wednesday, June 26, 2019 - 01:42 PM UTC
Quoted Text
I have a resin & photo etch 1:35 CMK VW engine which is meant to be used with their VW beetle. I am going to use it in a Revell VW.
Q: anyone have experience with this engine? tips with the conversion?
thanks
You are aware the Revell is a rebox of the CMK, right? There should be no issues beyond those presented by the installation itself.
The problem to me is that I can't tell if there is a stand for the generator. The illustration in the instructions seem to show it simply hanging off the fan housing, when there is supposed to be an extension cast as part of the engine block to rest the generator body on so it doesn't cause a downward pull on the on the fan, seeing as how the fan is turned by a belt connected to a pulley on the crankshaft. There is not a lot of wiggle room inside that housing and it doesn't take much to get a blade to hit the inside of the housing.
southpier
Joined: December 11, 2009
KitMaker: 546 posts
Armorama: 316 posts
Posted: Wednesday, June 26, 2019 - 02:13 PM UTC
I knew the revell kit was a copy of something, but didn't know what. I think my biggest (two) hurdles will be setting the engine on it's body member or whatever supports it, and then figuring out how the axles/ wheels attach.
thanks for the generator warning; i'll be mindful when I get to that stage!
thanks for the generator warning; i'll be mindful when I get to that stage!

panzerbob01
Joined: March 06, 2010
KitMaker: 3,128 posts
Armorama: 2,959 posts
Posted: Wednesday, June 26, 2019 - 06:44 PM UTC
JSmith:
Hi. I know nada about the kit... But the real engine actually has no engine mounts - it hung, as do all VW beetle (real beetles with the rear 4cyl air-cooled engine, not the newer "new beetle") engines, off the clutch housing of the transaxle. So... IF the kit or AM engine is reasonably correct (and I guess we already know about that missing generator-mount... ), it should attach to that transaxle, and have a roughly oval-shaped horizontal pan / shroud and a half-circle vertical fan shroud that together serve as air-dams and air-handler for cooling the engine while keeping water from splashing up into the engine compartment. The 4 cylinders lie below that horizontal pan, and should have some box-like shroud covering each cylinder (part of the ducted air-flow for cooling the cylinders, and serve as the heater-boxes for heating cabin air.) It's entirely possible that the kit / AM engine fits into some hole or such in the floor of the engine compartment... I know nada of how the kit parts are actually arranged or shaped, but if the parts are reasonably like the real geometry, that is what should happen.
IF you are not familiar with the old V-dub engine, it would help you greatly to take a look at the real thing - both outside the car and in. I highly recommend Googling "VW air-cooled engine" and look at the many images. Pre-war and post-war beetle engines were the same up thru the early 1960's in every important way (generator and mounts, pulleys, carb set-up, above-deck / shroud plumbing and piping, distributor set-up, etc.) - and seeing these pics will enable you to fashion a good generator mount and do any amount of wiring and fuel-line additions as you may wish.
You WILL want to look at the pics for that gen mount, as that's important - it includes the large filler neck and cap for adding engine oil... crucial in that air-cooled thing!
Cheers! Bob
Hi. I know nada about the kit... But the real engine actually has no engine mounts - it hung, as do all VW beetle (real beetles with the rear 4cyl air-cooled engine, not the newer "new beetle") engines, off the clutch housing of the transaxle. So... IF the kit or AM engine is reasonably correct (and I guess we already know about that missing generator-mount...
), it should attach to that transaxle, and have a roughly oval-shaped horizontal pan / shroud and a half-circle vertical fan shroud that together serve as air-dams and air-handler for cooling the engine while keeping water from splashing up into the engine compartment. The 4 cylinders lie below that horizontal pan, and should have some box-like shroud covering each cylinder (part of the ducted air-flow for cooling the cylinders, and serve as the heater-boxes for heating cabin air.) It's entirely possible that the kit / AM engine fits into some hole or such in the floor of the engine compartment... I know nada of how the kit parts are actually arranged or shaped, but if the parts are reasonably like the real geometry, that is what should happen.IF you are not familiar with the old V-dub engine, it would help you greatly to take a look at the real thing - both outside the car and in. I highly recommend Googling "VW air-cooled engine" and look at the many images. Pre-war and post-war beetle engines were the same up thru the early 1960's in every important way (generator and mounts, pulleys, carb set-up, above-deck / shroud plumbing and piping, distributor set-up, etc.) - and seeing these pics will enable you to fashion a good generator mount and do any amount of wiring and fuel-line additions as you may wish.
You WILL want to look at the pics for that gen mount, as that's important - it includes the large filler neck and cap for adding engine oil... crucial in that air-cooled thing!
Cheers! Bob
southpier
Joined: December 11, 2009
KitMaker: 546 posts
Armorama: 316 posts
Posted: Wednesday, June 26, 2019 - 08:00 PM UTC
thanks for the direction. I have (had) been trapped by my own thinking and didn't realize there was no conventional engine to frame (floor pan) mounting brackets.
it makes perfect sense the way you explained.
and that pesky generator . . . .
now off to SAMBA for some reference photos!
edit: https://www.thesamba.com/vw/forum/
it makes perfect sense the way you explained.
and that pesky generator . . . .
now off to SAMBA for some reference photos!
edit: https://www.thesamba.com/vw/forum/

panamadan
Joined: July 20, 2004
KitMaker: 1,513 posts
Armorama: 1,449 posts
Posted: Wednesday, June 26, 2019 - 11:17 PM UTC
Have you seen the new RFM kit of the Beetle?
Dan
Dan
southpier
Joined: December 11, 2009
KitMaker: 546 posts
Armorama: 316 posts
Posted: Wednesday, June 26, 2019 - 11:47 PM UTC
I had seen it ( https://armorama.kitmaker.net/news/30081 ) but I am valiantly trying to get through my 30+ year stash of unbuilt kits!
I bought when I was working, but had no time to develop building & painting skills. now retired, I am slowly digging my way through the inventory. "it's a process".
I think I can get a grip on things if I live to be 107!
I bought when I was working, but had no time to develop building & painting skills. now retired, I am slowly digging my way through the inventory. "it's a process".
I think I can get a grip on things if I live to be 107!
panamadan
Joined: July 20, 2004
KitMaker: 1,513 posts
Armorama: 1,449 posts
Posted: Thursday, June 27, 2019 - 12:29 AM UTC
Haha!
I hear you!
I just got the RFM kit and will start it today.
Good luck on your kit.
Dan
I hear you!
I just got the RFM kit and will start it today.
Good luck on your kit.
Dan
brekinapez
Joined: July 26, 2013
KitMaker: 2,272 posts
Armorama: 1,860 posts
Posted: Thursday, June 27, 2019 - 10:17 AM UTC
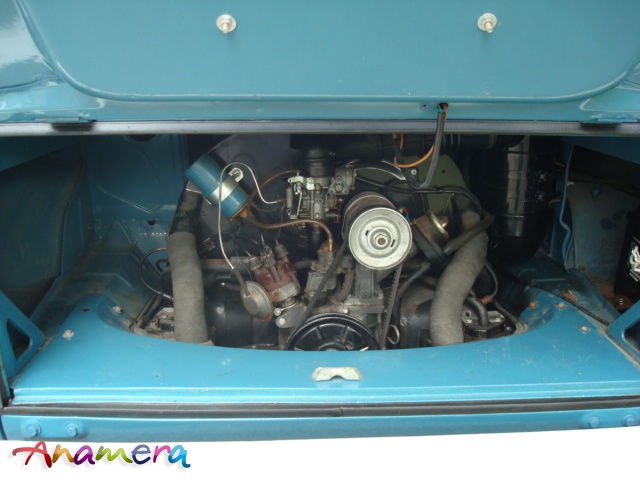
From the pics of the instructions I was looking at, it seems several parts are molded together to form the lower part containing everything below the fan housing, the housing itself with generator attached already, the oil bath air filter, and the transmission bell housing. There are a few other pieces for the exhaust and attaching tubes. Although I can only go by the drawings, it seems the transmission is longer than it should be, and I can see no provision for the distributor, fuel filter, or solenoid.
Having spent many years looking up at the bottom of a VW engine, I have concerns about the exhaust setup, the transmission, and a few other things.
This is a 1600cc from a 1969 bus, which is very similar to the other engine externally. The oil bath air filter is larger and on the other side on the bus, and you can see the solenoid (blue cylinder), carburetor, distributor with vacuum advance, fuel filter, generator stand with built-in filler neck for the oil, and the cooling hoses from the fan housing to the heater boxes under the cooling shroud (this wasn't always installed, especially for hot climates).
southpier
Joined: December 11, 2009
KitMaker: 546 posts
Armorama: 316 posts
Posted: Thursday, June 27, 2019 - 11:01 AM UTC
thank you. that's a great reference picture especially combined with your comments.
a conundrum I have in general with "reference pictures" is that I have no idea what i'm looking at while i'm looking at them!
a conundrum I have in general with "reference pictures" is that I have no idea what i'm looking at while i'm looking at them!
panzerbob01
Joined: March 06, 2010
KitMaker: 3,128 posts
Armorama: 2,959 posts
Posted: Thursday, June 27, 2019 - 12:23 PM UTC
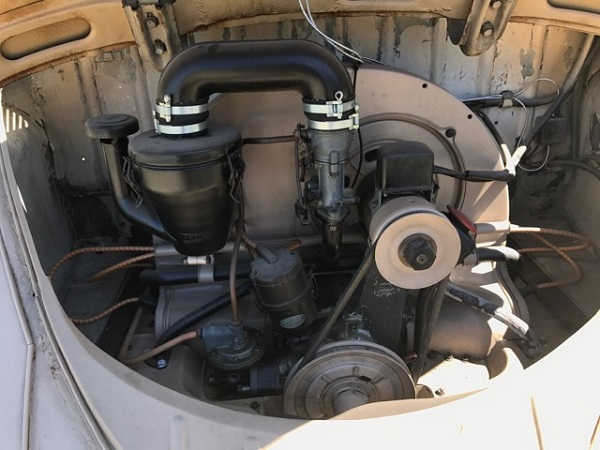
You are probably "saved" by the fact that we can really simply model what we see, without knowing what that bit really was! 
As you are, I presume, modeling the wartime "Kafer", you are modeling the wartime and early post-war "1131 cc" engine. For best idea as to what that early (pre "bus") engine, accessories, exhaust and shrouding looked like, Google "pre-war VW beetle" and "early VW beetle engine".
The bus engine Shell posted is fundamentally the same engine, but encompasses mods to the shrouding and other details that came about with upgrading and enlarging the displacement of that earlier engine, and rearrangements for use in the "bus" body.
Notable in the two linked photos below are the early style air-cleaner and carb and the early gen mounts, and the early style wiring and carb linkages. The deck shrouding (pan) was indeed composed of multiple sheet-metal pieces that one pulls out so that one can drop the engine for servicing.
https://rmsothebys.com/en/auctions/PA17/Paris/lots/r137-1952-volkswagen-type-1-beetle/411518
https://www.thesamba.com/vw/forum/viewtopic.php?t=645197 (1950, I believe)
@Shell: Hey! Another VW fan! It was my distinct pleasure to own a 1956 beetle and a 1957 beetle w/ sunroof! All orig both! Oh, and I learned by experience one afternoon how to drop that old 27 horse engine with a car jack, a spare tire, a 2x4 and a couple box-end wrenches and a pair of pliars and a screwdriver. 45 sweaty minutes later, I was off to replace the clutch and put it back in so's I could drive off to visit the g'friend that evening! Try that with your modern engines!
Cheers! Bob
brekinapez
Joined: July 26, 2013
KitMaker: 2,272 posts
Armorama: 1,860 posts
Posted: Thursday, June 27, 2019 - 02:32 PM UTC
I had my bus while in college, where I lived in the dorms. I decided to replace the clutch plate and throw-out bearing one day, so I bought a cheap 1 1/2 ton jack at Walmart and found a spot in the temporary gravel lot near my dorm where they were prepping a new multi-level garage. I dug a shallow trench under the engine, and after removing all the sheet metal and connections, rolled a skateboard with the jack on top down the trench and under the engine. Worked it off the tranny mounts and with some careful balancing rolled it up and out.
While I appreciate how easy the cars are to work on, it certainly made me appreciate when someone else does that dirty, knuckle-busting work. My fingernails are still ruined from all the Castrol purple cleanser I've had on my hands. When I did a partial resto in 1993, my wife called it the 'other woman'.
And yes, the early engines had some differences but the basic parts were there, and should be on the CMK engine as well. Unfortunately, I couldn't afford a Type 82e back in 1986, let alone now. I had to use my (now sadly deceased thanks to my brother) bus.

Frenchy

Joined: December 02, 2002
KitMaker: 12,719 posts
Armorama: 12,507 posts
Posted: Thursday, June 27, 2019 - 11:51 PM UTC
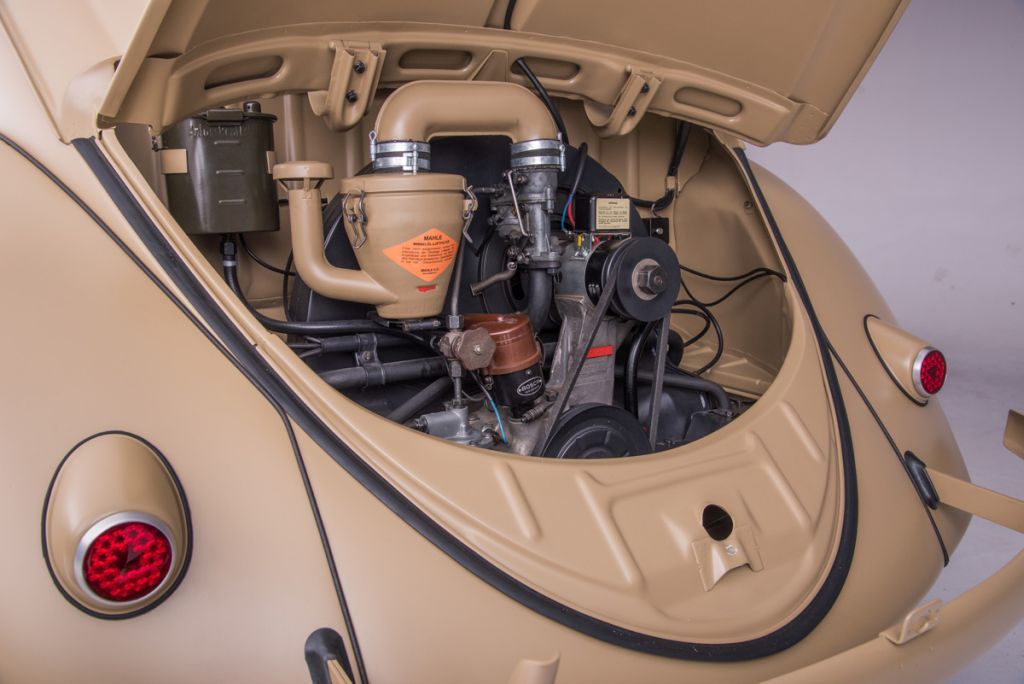
Here's a view of the engine bay of a 1944 Typ 82e :
Don't know if it's accurate or not though...
More pics here
Another example :

You can dowload the user's manual for the 1939 model here :
https://www.thesamba.com/vw/archives/manuals/39_kdfwagen/1939_kdfwagen.pdf
H.P.
Don't know if it's accurate or not though...
More pics here
Another example :
You can dowload the user's manual for the 1939 model here :
https://www.thesamba.com/vw/archives/manuals/39_kdfwagen/1939_kdfwagen.pdf
H.P.
panzerbob01
Joined: March 06, 2010
KitMaker: 3,128 posts
Armorama: 2,959 posts
Posted: Friday, June 28, 2019 - 03:31 AM UTC
That's a great pic of that 82e, Frenchy! Looks like the restoration utilized both the enlarged and enhanced "Feifel-like" oil-bath air-filter AND the additional oil reservoir (dark square can mounted to the left on the fire-wall) that were, I believe, originally developed for the VW for use in north Africa! These additions would of course also be of use and be seen on cars in southern Russia, if these cars made it out there... The oil-bath obviously copes with the dustier NA and Russia environments, and the added oil-reservoir was key to VW engine survival in hotter environs... As oil volume was the key heat-transfer for this air-cooled, oil-bath engine.
The manual shows the original pre-war "mushroom" air-filter. VERY COOL! That could be applicable on early-war in-service beetles. Many Kubels and later wartime cars used the cross-draft box-and-tube item seen in the pics I posted above, or they had that enhanced oil-bath with the goose-neck duct-work.
So, perhaps from the modeler perspective, one might use any of the 3 air-filter set-ups, depending in part on when and where one wants his/her V-dub to be modeled in. DAK VW probably all had the oil-reservoir and oil-bath filter added. Early 'dubs no reservoir and no oil-bath filter. Later war Russia / Europe may have had any combo of filter and reservoir.
The 82e photos may be the best guide for both painting and wiring - (save for the options on the reservoir and filter type - which shouldn't affect the rest of the plumbing and wiring beyond comparing what one sees in the 1939 manual and the 82e photos).
COOL STUFF! I'm starting to think more about how to dress up a kubel kit I have...
Cheers! Bob
southpier
Joined: December 11, 2009
KitMaker: 546 posts
Armorama: 316 posts
Posted: Friday, June 28, 2019 - 08:06 AM UTC
Quoted Text
Here's a view of the engine bay of a 1944 Typ 82e...
perfect; thanks so much. and for the links, too.
nice to see a "stock" engine in its natural habitat!
 |

WEB HOSTING BY


Copyright ©2021 Armorama and Kitmaker Network, a subsidiary of Silver Star Enterprises
All Rights Reserved. Please read our Conditions of Use and Privacy Policy.
All Rights Reserved. Please read our Conditions of Use and Privacy Policy.