Dioramas: Before Building
Ideas, concepts, and researching your next diorama.
Hosted by Darren Baker
Which comes first,...
G-man69
Visit this Community
England - South West, United Kingdom
Joined: October 17, 2017
KitMaker: 944 posts
Armorama: 928 posts
Posted: Friday, February 07, 2020 - 05:16 AM UTC
Hi Cheyenne,

Thank you for the kind words, they're much appreciated. You're right, plenty of debris should help the 'aged' look.

Cheers, ,

G
G-man69
Visit this Community
England - South West, United Kingdom
Joined: October 17, 2017
KitMaker: 944 posts
Armorama: 928 posts
Posted: Friday, February 07, 2020 - 05:36 AM UTC
Hi all,

Not managed to get much done these last few days as we've actually had some half decent weather...for a change, ...so managed to get out and about.

But, no big surprise, the bad weather is back, , so today I have been playing about with bits of cork, . I'm attempting to build one of the wall elements (see image below).


I'm not entirely happy with it, but it's my first attempt...hopefully I'll improve as I go along, . The bits I'm not happy with I can always cover over with 'ivy', and lean some 'farm' implements against as camouflage, .

The gaps between the 'stones' look quite large in places on the image, but once I've grouted I'm hoping it'll not be so obvious, .

As an aside, does anyone have a preferred matt varnish they can recommend that is suitable for use on acrylics, enamels and oils, but is then resistant to washes using spirit based thinners? I had thought of using 'Future' floor coatings, but am a bit concerned by the mixed comments I've read. Any suggestions would be much appreciated.

Cheers, ,

G
G-man69
Visit this Community
England - South West, United Kingdom
Joined: October 17, 2017
KitMaker: 944 posts
Armorama: 928 posts
Posted: Tuesday, February 11, 2020 - 01:31 AM UTC
Hi all,

Below is an image of my initial attempt at 'grouting' between the cork 'stones'. It needs a bit more work methinks, and possibly a different method.


I think I might try a dry mix of sand and plaster brushed between the 'stones', after which I'll add some moisture. Not sure if it'll work, but it's worth a try, .

Also, below is an image of my second attempt at painting the 'cobbles'. It's better than my first attempt, and it still needs quite a bit of work, but luckily most of it will be hidden, .


Cheers, ,

G
Tank1812
Visit this Community
North Carolina, United States
Joined: April 29, 2014
KitMaker: 1,112 posts
Armorama: 886 posts
Posted: Tuesday, February 11, 2020 - 01:51 AM UTC
Not a bad 1st attempt. I am going to try your cobblestone method for this French cobblestone road to put my Shep Paine jeep build on. If I don't like it then I will try cork.

These might help if you haven't already seen them for cork roads and walls.

https://www.youtube.com/watch?v=rAyxveNfnsE

http://falconsbench.blogspot.com/2014/12/making-stone-with-cork.html

HTH

G-man69
Visit this Community
England - South West, United Kingdom
Joined: October 17, 2017
KitMaker: 944 posts
Armorama: 928 posts
Posted: Tuesday, February 11, 2020 - 03:20 AM UTC
Hi Ryan,

Thanks for the positive feedback, .

The two links you gave me relating to using cork are excellent, not seen them before, so thank you, . The downside of seeing the links is I might have to spend some more money, . The balsa strip cutter and wire brush pen aren't too expensive, but the chopper is very costly here in the UK, . I have seen some less expensive plastic ones, but the reviews are middling.

Good luck with your 'cobbles', it would be good to see some images.

Cheers, ,

G
Tank1812
Visit this Community
North Carolina, United States
Joined: April 29, 2014
KitMaker: 1,112 posts
Armorama: 886 posts
Posted: Tuesday, February 11, 2020 - 04:03 AM UTC
Glad they helped or might help.


Quoted Text

The balsa strip cutter and wire brush pen aren't too expensive, but the chopper is very costly here in the UK, . I have seen some less expensive plastic ones, but the reviews are middling.


I understand, I have had mine for a decade or so now. So it is worth the cost in my book. I used it cut the evergreen precut strips for road. I will try to take photos tonight.
G-man69
Visit this Community
England - South West, United Kingdom
Joined: October 17, 2017
KitMaker: 944 posts
Armorama: 928 posts
Posted: Tuesday, February 11, 2020 - 04:20 AM UTC
Hi all,

Have added some fine grass scatter to the areas between some of the 'cobbles' (before and after images below).


Below are some images of the Cromwell in-situ, demonstrating that, luckily, only a small area of the 'cobbles' will be seen, .


I may also add further debris to further reduce the area of 'cobbles' exposed, .

Cheers, ,

G
G-man69
Visit this Community
England - South West, United Kingdom
Joined: October 17, 2017
KitMaker: 944 posts
Armorama: 928 posts
Posted: Tuesday, February 11, 2020 - 04:30 AM UTC
Hi Ryan,

They will help, they've already given me ideas on how to fine-tune my stonework and 'grout' between, so thanks again, .

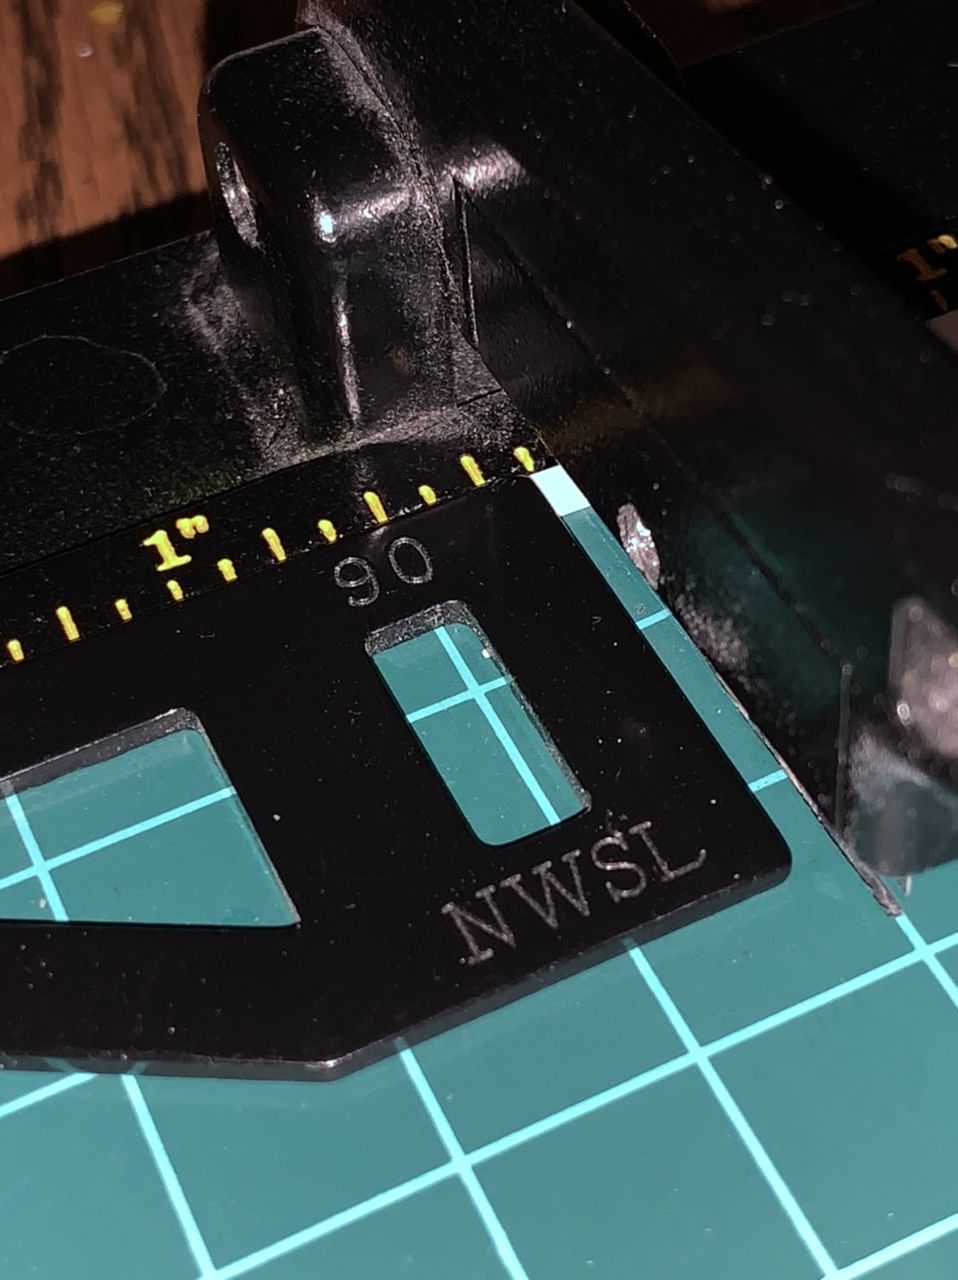
I look forward to seeing some images, is your cutter the same as used on the YouTube clip, the Northwest Short Line Chopper II (see image below).


Cheers, ,

G
Tank1812
Visit this Community
North Carolina, United States
Joined: April 29, 2014
KitMaker: 1,112 posts
Armorama: 886 posts
Posted: Tuesday, February 11, 2020 - 05:20 AM UTC
The cobblestone looks great with the grass.


Quoted Text

Hi Ryan,

They will help, they've already given me ideas on how to fine-tune my stonework and 'grout' between, so thanks again, .

I look forward to seeing some images, is your cutter the same as used on the YouTube clip, the Northwest Short Line Chopper II (see image below).


Cheers, ,

G


Yes, it is the same one in the photos.
Tank1812
Visit this Community
North Carolina, United States
Joined: April 29, 2014
KitMaker: 1,112 posts
Armorama: 886 posts
Posted: Tuesday, February 11, 2020 - 02:16 PM UTC
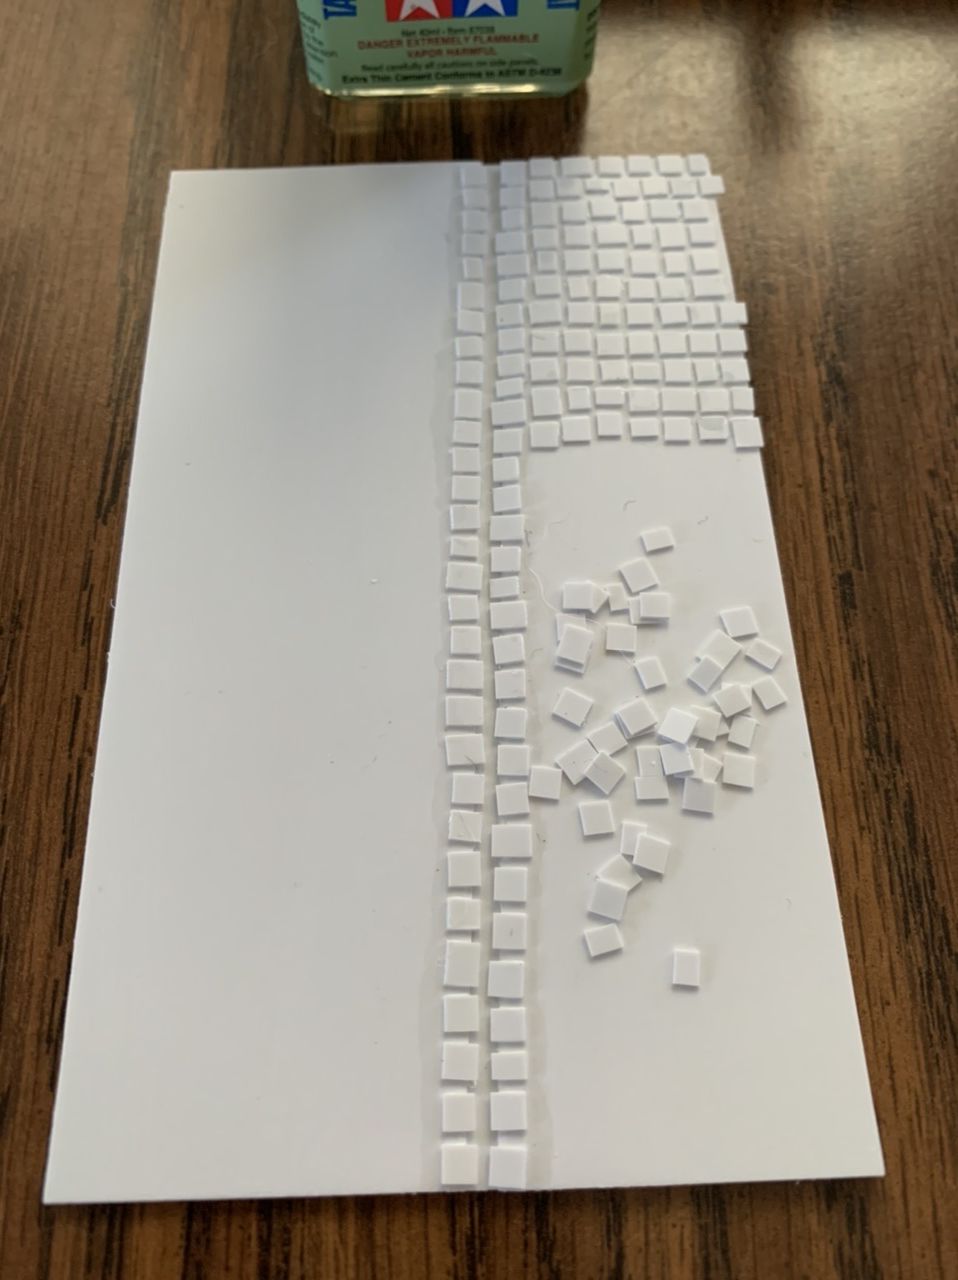
Using the chopper with evergreen (116) .015 x .125 strip


Basically a 3” x 5” .30 sheet styrene. I drew a line for a gutter.


A small pile of assorted “cobblestones” to layout.
G-man69
Visit this Community
England - South West, United Kingdom
Joined: October 17, 2017
KitMaker: 944 posts
Armorama: 928 posts
Posted: Thursday, February 13, 2020 - 01:03 AM UTC
Hi Ryan,

Thanks for the images, it looks a great bit of kit.

Does it have a 'stop', or similar device, that allows you to cut the strips down to smaller tiles of a consistent length? It's one of the main criticisms I'm finding of the cheaper versions, you have to cut the lengths by eye.

The cheapest I've found it so far is just over £72, incl. post, in the UK. From the States, it's much cheaper until you add post, then it comes out at about £77, but then I could also be hit with import tax, ...either way, it's a big outlay, .

Thanks again, cheers, ,

G
Tank1812
Visit this Community
North Carolina, United States
Joined: April 29, 2014
KitMaker: 1,112 posts
Armorama: 886 posts
Posted: Thursday, February 13, 2020 - 01:11 AM UTC

Quoted Text

Hi Ryan,

Thanks for the images, it looks a great bit of kit.

Does it have a 'stop', or similar device, that allows you to cut the strips down to smaller tiles of a consistent length? It's one of the main criticisms I'm finding of the cheaper versions, you have to cut the lengths by eye.

The cheapest I've found it so far is just over £72, incl. post, in the UK. From the States, it's much cheaper until you add post, then it comes out at about £77, but then I could also be hit with import tax, ...either way, it's a big outlay, .

Thanks again, cheers, ,

G


Yes, it has two stops depending on what angle you want. 0, 30, 45, or 60d. The two clamp posts, one on each side allow to you pick which side you want the material. It does have large tick marks you can use or eyeball the length you need and then clamp down the stop you need.


I like the paper cutter type action, however it made me think of another tool that can do the same thing but cheaper with a little more elbow grease. I think I have this as well. I use that blade to remove all my plastic from the sprue. There is probably a similar product across the pond.

http://umm-usa.com/onlinestore/product_info.php?cPath=21_28&products_id=5626

http://umm-usa.com/onlinestore/product_info.php?cPath=21_28&products_id=8706

http://umm-usa.com/onlinestore/product_info.php?cPath=21_28&products_id=8705

HTH
sinsling
Visit this Community
Singapore / 新加坡
Joined: January 16, 2007
KitMaker: 86 posts
Armorama: 85 posts
Posted: Thursday, February 13, 2020 - 04:38 AM UTC
https://imgur.com/a/qHMiuZv
G-man69
Visit this Community
England - South West, United Kingdom
Joined: October 17, 2017
KitMaker: 944 posts
Armorama: 928 posts
Posted: Thursday, February 13, 2020 - 06:08 AM UTC
Hi Ryan,

Thanks for the feedback on the chopper 'stops', and the additional links, they're much appreciated.

I think I'm going to invest in the 'northwest short line chopper', it might be costly, but I think in the long run it'll be worth it as I have been really inspired by the previous links you sent me.

I won't have it in time for my current project, but I think my next attempt at a diorama might involve a street scene.

Cheers, ,

G
G-man69
Visit this Community
England - South West, United Kingdom
Joined: October 17, 2017
KitMaker: 944 posts
Armorama: 928 posts
Posted: Thursday, February 13, 2020 - 06:11 AM UTC
Thanks for the link sinsling, cheers, ,

G
Removed by original poster on 02/13/20 - 18:29:16 (GMT).
G-man69
Visit this Community
England - South West, United Kingdom
Joined: October 17, 2017
KitMaker: 944 posts
Armorama: 928 posts
Posted: Thursday, February 13, 2020 - 10:48 PM UTC
Hi all,

A tad more progress on the first half of the wall (see images below). One side is now clad with 'stones', and one half of the back face is clad likewise.


It's slow progress, but I'm getting there, . I have today, parted with my hard earned cash and ordered the Northwest Short Line Chopper II, eeek, !

Cheers, ,

G
Tank1812
Visit this Community
North Carolina, United States
Joined: April 29, 2014
KitMaker: 1,112 posts
Armorama: 886 posts
Posted: Friday, February 14, 2020 - 12:01 AM UTC
I am like the wall.

I think you will like the Chopper and more scratch building you do the better ROI you will have and you might like scratch building more as production looks cleaner, ymmv. Since you talked about doing a street dio and look forward to seeing that. I would also recommend the Slicer or Slicer HD
https://masterpiecemodels.com/product/the-slicer-hd/
https://masterpiecemodels.com/product/the-slicer-cork-cutting-tool/

or something similar. This allows your strips of cork from a sheet or roll to be more uniform and then the Chopper allows the blocks to be more uniform for the sizes you want. You can easily cut piles of different size cork blocks for cobblestone, sidewalk, curbs, etc. in a very short time.
Dioramartin
Visit this Community
New South Wales, Australia
Joined: May 04, 2016
KitMaker: 1,476 posts
Armorama: 1,463 posts
Posted: Friday, February 14, 2020 - 01:00 AM UTC
Looking really good & I’ve made notes re the weeds, I’ll need a small sack. Good luck with your Chopper…ah so many innuendos, so little time
G-man69
Visit this Community
England - South West, United Kingdom
Joined: October 17, 2017
KitMaker: 944 posts
Armorama: 928 posts
Posted: Friday, February 14, 2020 - 01:38 AM UTC
Hi Ryan,

Thanks for the positive feedback, the proof of the pudding will be the finished article, but it won't be a patch on the guy who did the links you referred me to, .

I think you're trying to bankrupt me with all the goodies you're showing me, . The Masterpiece Models bits and bobs aren't generally silly prices, imho, but the postage from stateside sellers seem to double, if not triple the cost, ...I'd been looking at their 'corr-u-gator', but did a double take at the postage cost, .

Cheers again, ,

G
G-man69
Visit this Community
England - South West, United Kingdom
Joined: October 17, 2017
KitMaker: 944 posts
Armorama: 928 posts
Posted: Friday, February 14, 2020 - 01:50 AM UTC
Hi Tim,

Thanks for the support, much appreciated. I think the weeds are the least of your problem, I imagine a street in use would be relatively 'clean'. Though i suspect you'll need a lashings of paint and shed-loads of patience when you start adding colour.

I had been deliberately trying to avoid any innuendo regarding the 'chopper', carefully choosing my words to avoid the post sounding like an extract from a 'carry on' script, ...but I knew that sooner or later it would happen... (done in the style of Sid James).

Cheers, ,

G
Tank1812
Visit this Community
North Carolina, United States
Joined: April 29, 2014
KitMaker: 1,112 posts
Armorama: 886 posts
Posted: Friday, February 14, 2020 - 07:45 AM UTC

Quoted Text


I think you're trying to bankrupt me with all the goodies you're showing me, . The Masterpiece Models bits and bobs aren't generally silly prices, imho, but the postage from stateside sellers seem to double, if not triple the cost, ...I'd been looking at their 'corr-u-gator', but did a double take at the postage cost, .

Cheers again, ,

G


Not trying to break you, just providing options. You can make the strips with a straight edge and razor, just easier with the tool. I also proved links just in case you can find something similar across the pond or have other options, like a friend on a business trip.
G-man69
Visit this Community
England - South West, United Kingdom
Joined: October 17, 2017
KitMaker: 944 posts
Armorama: 928 posts
Posted: Saturday, February 15, 2020 - 05:15 AM UTC
Hi Ryan,

Your links have been invaluable, so ignore my joking about 'bankruptcy', .

I will certainly need to source something apart from the 'chopper' if I'm going to attempt a street scene for my next build...cutting everything by hand is slow going, .

So keep the links coming if you find anything pertinent.

Cheers, ,

G
G-man69
Visit this Community
England - South West, United Kingdom
Joined: October 17, 2017
KitMaker: 944 posts
Armorama: 928 posts
Posted: Saturday, February 15, 2020 - 05:26 AM UTC
Hi all,

I have finished the 'stone' facing on both sides of the 'gate' wall (see images below).


I still have to 'grout' between the 'stones', add some type of coping to the top of the wall, then it'll be build the gate and paint.

I have also started to face the 'damaged' wall with 'stones' (see images below)...I'll be glad when this one is finished, .


Cheers, ,

G
Tank1812
Visit this Community
North Carolina, United States
Joined: April 29, 2014
KitMaker: 1,112 posts
Armorama: 886 posts
Posted: Saturday, February 15, 2020 - 05:28 AM UTC
It’s all good. I am sure if I ever make it back to southern UK we could talk it over at a pub and I would let you test drive the tools.
Where I am this morning after about an hour.