_GOTOBOTTOM
Constructive Feedback
For in-progress or completed build photos. Give and get contructive feedback!
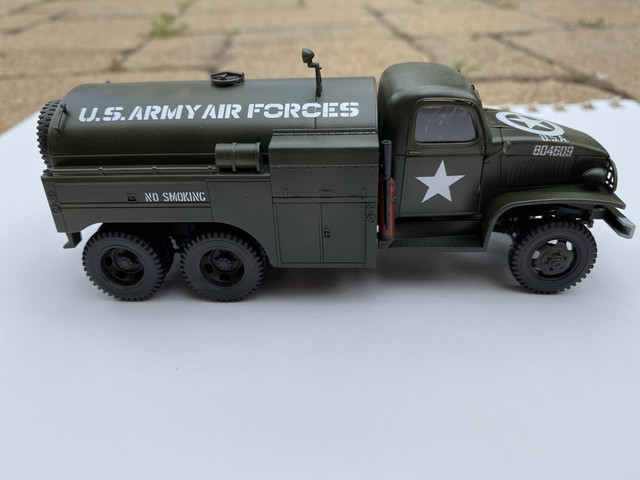
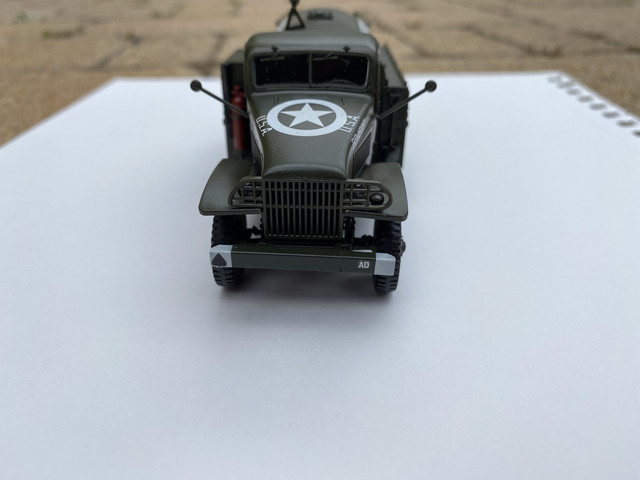
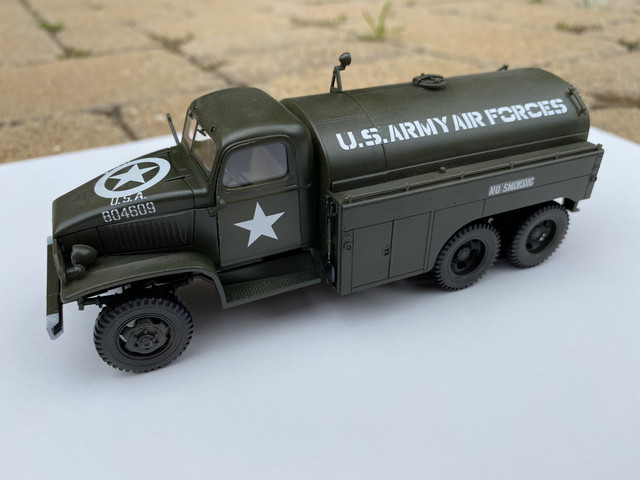
Tamiya 1/48 U.S. Fuel Truck
Rampenfest
Visit this Community
California, United States
Joined: April 28, 2011
KitMaker: 193 posts
Armorama: 188 posts
Posted: Tuesday, April 21, 2020 - 08:11 AM UTC
Hey all!

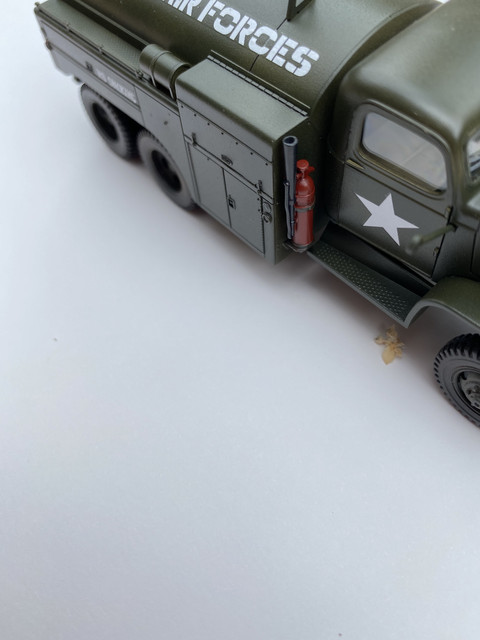
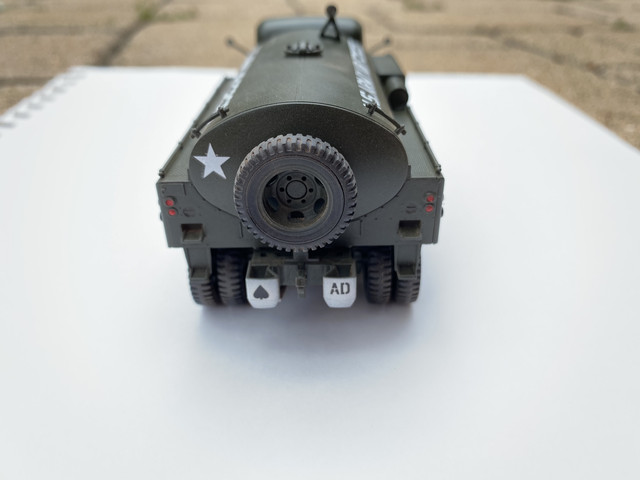
Here is my finished Tamiya US Army Fuel Truck in 1/48 scale! It was a fantastic kit, however the doors do not fit well. I had to do a lot of trimming and sanding to get them to fit okayish. I kept the weathering light, and hollowed out the fire extinguisher nozzle with a #2 blade to add a little more realism. Let me know what you guys think! Thanks!

-Joe

PLEASE LET ME KNOW IF THE IMAGES ARE NOT SHOWING. I had some issues in the past. Thanks!


panamadan
Visit this Community
Minnesota, United States
Joined: July 20, 2004
KitMaker: 1,513 posts
Armorama: 1,449 posts
Posted: Tuesday, April 21, 2020 - 11:50 AM UTC
Nice! Wish it was also in 35th.
D
JPTRR
Staff MemberManaging Editor
RAILROAD MODELING
#051
Visit this Community
Tennessee, United States
Joined: December 21, 2002
KitMaker: 7,772 posts
Armorama: 2,447 posts
Posted: Tuesday, April 21, 2020 - 12:01 PM UTC
Joe,

Great looking gas truck.

I am a heavy weathered but I appreciate lightly weathered models, too. This model inspires me to return to lightly weathered - I spend so much time trying to get colors correct and then hide them under smut and muck. This model is wonderful.
Rampenfest
Visit this Community
California, United States
Joined: April 28, 2011
KitMaker: 193 posts
Armorama: 188 posts
Posted: Tuesday, April 21, 2020 - 01:19 PM UTC
Thanks guys!I am actually thinking of adding a little more dust on the wheels after looking at it on the shelf for a little bit haha

Any tips for getting these dang Tamiya decals to not show their edges? I used Micro Sol a lot and more than several coats of Tamiya flat clear on top, but one can still see some of the edges of the decals.
Lakota
#123
Visit this Community
New Mexico, United States
Joined: November 17, 2008
KitMaker: 1,202 posts
Armorama: 635 posts
Posted: Tuesday, April 21, 2020 - 01:46 PM UTC
Sweet model. I would have weathered it a little more but that's my personal preference. I don't notice door problems on the passenger side.
Your plan to add a little more dust on the wheels should bring out the details a little more. I love what you did with the fire extinguisher.
Great job, I've got one in the stash so I enjoyed your model.
Take care and stay safe,
Don "Lakota"
AussieReg
Staff MemberAssociate Editor
AUTOMODELER
#007
Visit this Community
Victoria, Australia
Joined: June 09, 2009
KitMaker: 8,156 posts
Armorama: 194 posts
Posted: Tuesday, April 21, 2020 - 01:50 PM UTC
Very nice build, well done. I built this kit a couple of years back and it really is a joy to put together.

Cheers, D
18Bravo
Visit this Community
Colorado, United States
Joined: January 20, 2005
KitMaker: 7,219 posts
Armorama: 6,097 posts
Posted: Wednesday, April 22, 2020 - 02:43 PM UTC
Very nicely done. These little kits actually rekindled my interest in 1/48. You can cross kit it with the deuce for the soft top version. My only complaint about the kit was the missing rear window.

For your decal problem there are a couple of solutions. If the edges are showing it may be because you trimmed as close to the image as possible, like most instructions tell us to. That leaves a very sharp edge on the decal which really needs a lot of clear coat to completely get rid of.
I like to hold the decal sheet up to the light and turn it so I can see the entire little "island" of clear film around the image, and trim so that I'm not cutting into it. The reason is simple: The film tapers down to nothing at the edge. It you don't cut into it there's no sharp edge that's brought out by weathering.
Of course some decals don't come individually and are all connected by one film On those you have no choice. But if you're familiar with how certain brands perform and can anticipate which one are going to to e thick (and hence give you a "taller" edge) you can sand down the thickness prior to using them with 400 wet/dry sandpaper. Obviously you don't want to be too aggressive with this. Practice on some old ones first.
Rampenfest
Visit this Community
California, United States
Joined: April 28, 2011
KitMaker: 193 posts
Armorama: 188 posts
Posted: Wednesday, April 22, 2020 - 05:50 PM UTC

Quoted Text

Very nicely done. These little kits actually rekindled my interest in 1/48. You can cross kit it with the deuce for the soft top version. My only complaint about the kit was the missing rear window.

For your decal problem there are a couple of solutions. If the edges are showing it may be because you trimmed as close to the image as possible, like most instructions tell us too. That leave a very sharp edge on the decal which really needs a lot of clear coat to completely get rid of.

I like to hold the decal sheet up to the light and turn it so can see the entire little "island" of clear film around the image, and trim so that I not cutting into it. The reason is simple: The film tapers down to nothing at the edge. It you don't cut into it there's no sharp edge that's brought out by weathering.
Of course some decals don't come individually and are all connected by one film On those you have no choice. But if you're familiar with how certain brands perform and can anticipate which one are going to to e thick (and hence give you a "taller" edge) you can sand down the thickness prior to using them with 400 wet/dry sandpaper. Obviously you don't want to be too aggressive with this. Practice on some old ones first.


Thank you for that info! I will be keeping that in mind for my next one. Never knew they actually tapered down at the edge! Thanks!

-Joe
 _GOTOTOP