

Hello fellow scale modelers,
Today I present to you my latest project that I'm working on.
The B1 Bis French Heavy Tank from Tamiya.
Yesterday and the day before Yesterday, if I'm saying this correctly of course.
I did do the paint job of the project, because other days it would be to hot for me to do so.
So I wanted it to be done before it became to hot again with the weather conditions.
This was also my first time that I was working with camouflage putty from AK.
The first color I was relatively satisfied with, two layers of dark green paint from Tamiya.
With the second color, I was relatively satisfied.
But I thought it could be a bit better, especially the top of the tank and maybe the front and rear of the vehicle.
It seamed that I came to the strange conclusion that with Revell paints you have to pull back on the trigger and push it to add airflow.
And for Tamiya it was the exact opposite.
So that was a bit strange for me to experience, that could be the explainer why in the first stages and especially on the top of the tank.
It didn't go as much as I wanted it to and/or expected to do so.
In general I'm somewhat satisfied with the result, especially for a first time working with this new technique.
But, I still thought that it could be a bit better still.
If you notice some scratches and damage, that is because my model fell hard on the ground.
And the floor I worked was not exactly soft, I was just happy that there was nothing broken.
I may post more on this project as I'm progressing.
Because the project isn't finished yet.
And I hope you will enjoy the photo's.
Don't be to harsh or critical with your comments, because it was my first time working with a new technique, so keep that in mind.
https://imgur.com/a/hLfbXCU
Hosted by Darren Baker
Work in progress B1 Bis Tamiya

Lada_Niva

Joined: October 06, 2019
KitMaker: 177 posts
Armorama: 97 posts
Posted: Monday, June 29, 2020 - 09:47 PM UTC

TopSmith

Joined: August 09, 2002
KitMaker: 1,742 posts
Armorama: 1,658 posts

Posted: Tuesday, June 30, 2020 - 02:03 AM UTC
I haven't tried the putty yet but I have ordered some. Did you have any problems with the putty? What worked like you thought it would? What problems did you have that you didn't plan for? What would you do differently the next time you use the putty?

SSGToms
Joined: April 02, 2005
KitMaker: 3,608 posts
Armorama: 3,092 posts

Posted: Tuesday, June 30, 2020 - 12:55 PM UTC
Greg,
If you look closely at the photos, you will see that he had a problem with the AK camo putty - it left dark, greasy stains on the dark green paint wherever it was applied. I wouldn't buy AK camo putty, and I sure wouldn't put it on my model.
If you look closely at the photos, you will see that he had a problem with the AK camo putty - it left dark, greasy stains on the dark green paint wherever it was applied. I wouldn't buy AK camo putty, and I sure wouldn't put it on my model.

SSGToms
Joined: April 02, 2005
KitMaker: 3,608 posts
Armorama: 3,092 posts
Posted: Tuesday, June 30, 2020 - 12:58 PM UTC
Lada,
I wouldn't say nothing was broken in the fall; half the 75mm gun barrel is snapped off.
I wouldn't say nothing was broken in the fall; half the 75mm gun barrel is snapped off.

TheGreatPumpkin
Vendor

Joined: April 20, 2009
KitMaker: 690 posts
Armorama: 672 posts
Posted: Tuesday, June 30, 2020 - 01:49 PM UTC
Matt,
That dark green you're talking about isn't a residue. It's the original color of the paint! The rest of model has some red-brown overspray that's making it look lighter. I could be wrong on this, but that's what it looks like from the photos I'm looking at.
Regards,
Georg
That dark green you're talking about isn't a residue. It's the original color of the paint! The rest of model has some red-brown overspray that's making it look lighter. I could be wrong on this, but that's what it looks like from the photos I'm looking at.
Regards,
Georg

ericadeane
Joined: October 28, 2002
KitMaker: 4,021 posts
Armorama: 3,947 posts
Posted: Wednesday, July 01, 2020 - 12:37 AM UTC
Georg: I think it's residue. Look at the areas far from the paint demarcation line -- the base green has a frosty look to it throughout. There is some dk red overspray --- but not on the entirety of the base green areas
SSGToms
Joined: April 02, 2005
KitMaker: 3,608 posts
Armorama: 3,092 posts
Posted: Wednesday, July 01, 2020 - 01:25 AM UTC
Georg,
Overspray wouldn't have left a sharp line on the back side of the snakes, and you can see where his overspray stops on the top of each snake. Those dark lines are residue from the AK putty.
Overspray wouldn't have left a sharp line on the back side of the snakes, and you can see where his overspray stops on the top of each snake. Those dark lines are residue from the AK putty.

Biggles2

Joined: January 01, 2004
KitMaker: 7,600 posts
Armorama: 6,110 posts

Posted: Wednesday, July 01, 2020 - 03:24 AM UTC
I think what happened was that the putty was not pressed down flat enough to the surface and allowed some exposed space, which was the lighter color green, to remain showing between the patterns.


RobinNilsson

Joined: November 29, 2006
KitMaker: 6,693 posts
Armorama: 5,562 posts
Posted: Wednesday, July 01, 2020 - 03:25 AM UTC
Compare the images and the areas covered by the putty and where the red overspray starts.
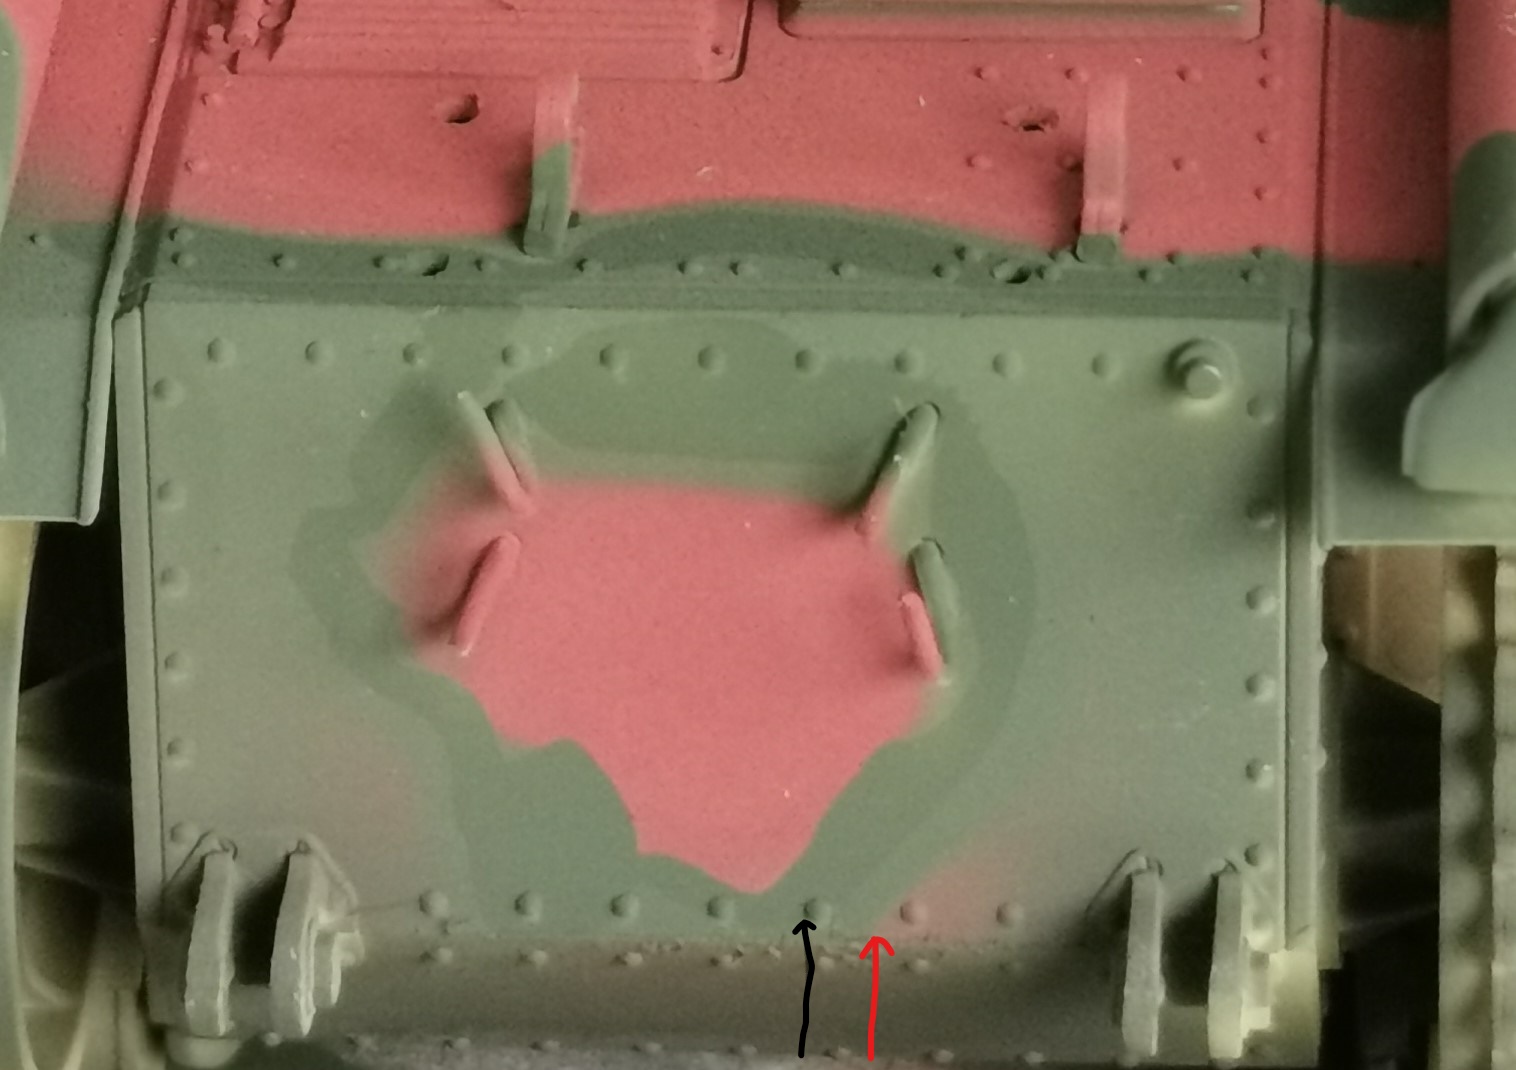
In the image above the red overspray down at the 5 o'clock position starts at the red arrow, the black arrow points at the edge of the residue area,
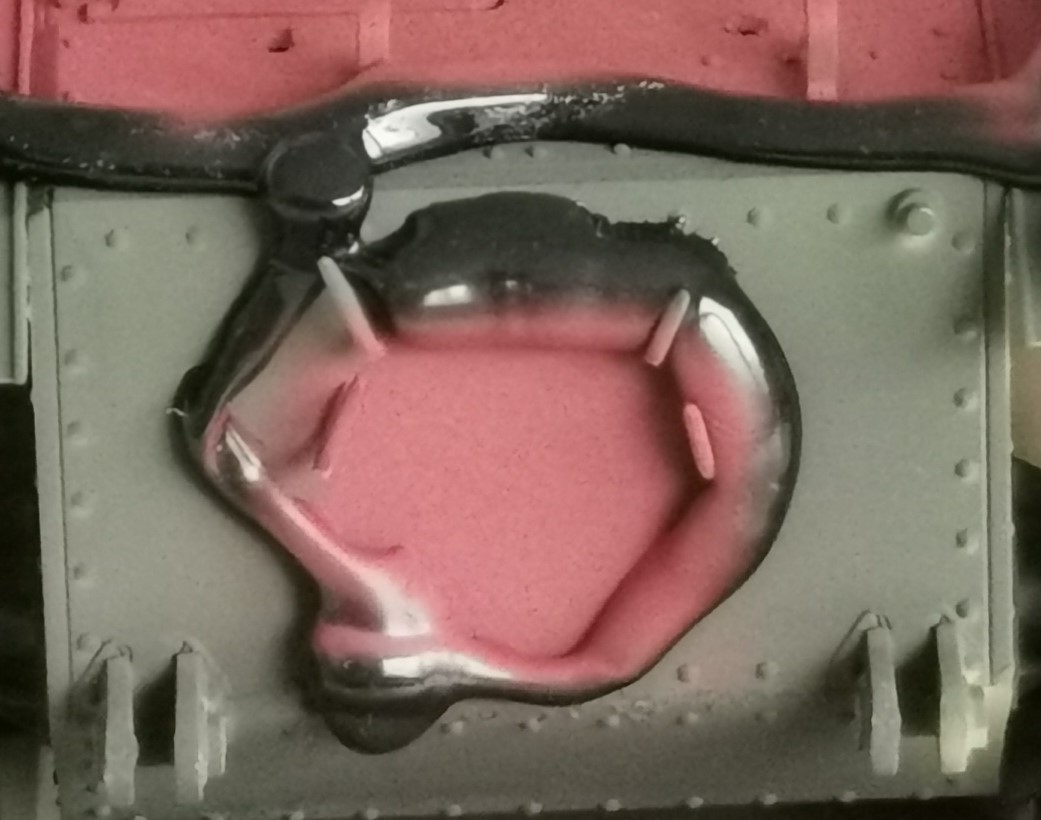
Compare with the image below showing the masking putty for this area.The area between the arrows show the untainted green
In the image above the red overspray down at the 5 o'clock position starts at the red arrow, the black arrow points at the edge of the residue area,
Compare with the image below showing the masking putty for this area.The area between the arrows show the untainted green
Lada_Niva
Joined: October 06, 2019
KitMaker: 177 posts
Armorama: 97 posts
Posted: Wednesday, July 01, 2020 - 04:03 AM UTC
Thank you all for the feedback that you have given.
As I was telling, the technique was very new to me.
I had never ever used this technique of working with masking putty.
The AK Putty was the only thing the store had in stock when I was buying the model that I'm now making.
I wanted to buy masking putty from 'Mr.' but they didn't had that in stock neither did they have the MIG camouflage putty.
So I didn't have any other option left to buy.
Could the 'residue' what you are talking about be due to pressing the putty to much down on the subject?
Because I had seen a video on how to use the camouflage putty.
And if I'm right they said that you had to lay it on the model?
And that it would sit on the model by it's own weight?
As I said, the technique is very new for me and I'm also still working on my airbrushing technique.
I need to practice a lot with that to.
And I ferther don't really know how those 'residues' 'marks' have came there.
If you have any tips on how to improve my workings I would love to hear it, because I want to improve as much as I can.
But, just bring it in a constructive polite fashion.
Because I'm not liking it to get it 'the rough' or the 'rude' way.
I will keep monitoring my topic and add another reply as more reply's get added to this topic.
And I will upload more of the project later on.
RobinNilsson
Joined: November 29, 2006
KitMaker: 6,693 posts
Armorama: 5,562 posts
Posted: Wednesday, July 01, 2020 - 04:37 AM UTC
Place some of that putty on a paper for the same amount of time that you had it on the model and then check if the paper has been tainted.
I suspect that the stuff that makes the putty soft and usable as putty will leak out of the putty.
I used ordinary kids modelling clay on a similar project. I was fully aware that the oil in the mo0delling clay will stain the paint but I planned to hide the stains by getting them everywhere if I can't wash them off with detergent or soap. The modelling clay also leaves and oily residue on my skin when I work with it and that oil washes off with soap.
If washing fails then giving the surface a light cover of matt or satin clear lacquer could hide the stains.
About the overspray: One method is to cover the areas outside the putty with paper. Cut the edge to roughly fit the edge of the putty and slide it in under the outside edge of the putty. The overspray lands a small distance outside of the putty so the mask doesn't need to be 100% tight.
Lowering the pressure, smaller opening on the airbrush or spraying closer to the surface can also help with controlling overspray.
 |

WEB HOSTING BY


Copyright ©2021 Armorama and Kitmaker Network, a subsidiary of Silver Star Enterprises
All Rights Reserved. Please read our Conditions of Use and Privacy Policy.
All Rights Reserved. Please read our Conditions of Use and Privacy Policy.