Given the amount of interest in the new Tamiya KV-1 kit, I thought I'd do a build log with mine and take y'all along for the journey.
The kit represents a KV-1 Model 1941 manufactured at ChTZ/ChKZ in Chelyabinsk in Oct/Nov 1941, so it's not exactly an 'early production' example as Tamiya claims on the box. It has a 75mm armored hull, early production 90mm armored turret and ZIS-5 gun.
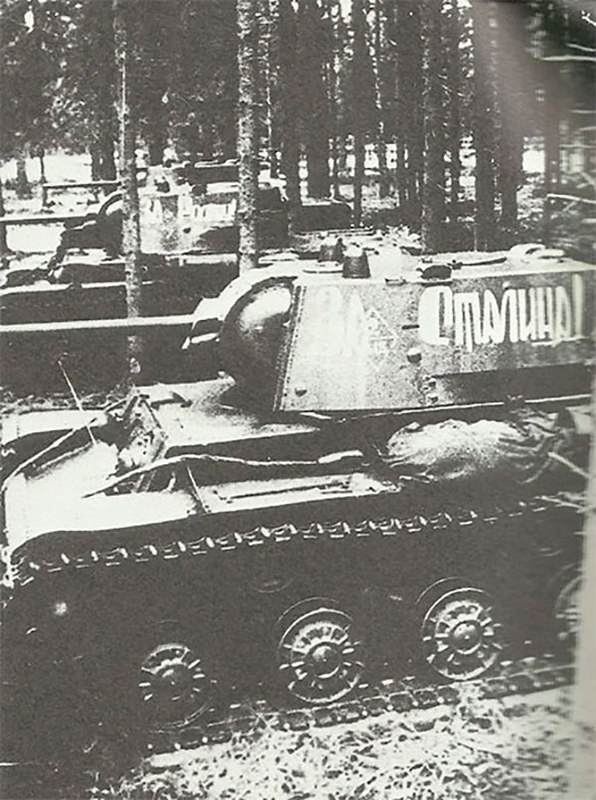
I plan to build the vehicle depicted on the box art, which is from 1 battalion, 116th Tank Regiment in the winter of 1941/42 as shown in the photo below. This unit was formed in February 15, 1942 in the city of Mokshany in the Volga Military District.
The kit is comprised of 300 pieces on 10 sprues molded in dark green styrene, plus a further 2 pieces in clear styrene, a length of black twine for the tow cables and 8 poly caps to secure the gun trunnions, sprockets and idlers. 22 parts are unused.
Construction begins with the hull which, like most recent Tamiya kits, is comprised of multiple parts rather than the traditional one-piece hull tub.
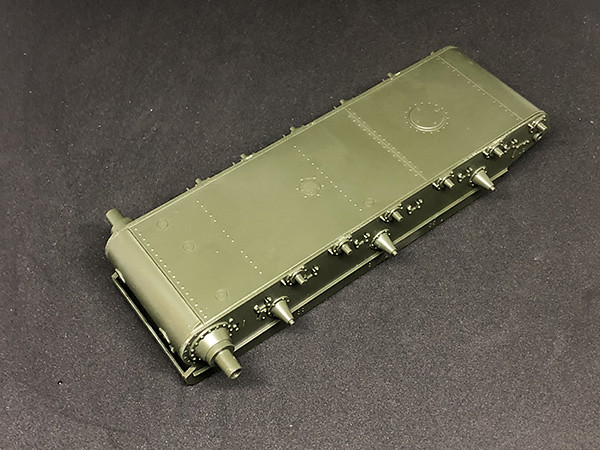
The parts include the weld beads between the hull top, sides and bottom. They do perhaps look a little too neat, but I'm not going to get too pedantic about that.
The instructions direct you to open up holes for the applique armor on the hull top, sides and driver's front plate, and to remove molded on weld marks where the rear towing brackets attach. This may be a hint that Tamiya intends to release earlier variants without the applique armor. Here's hoping.
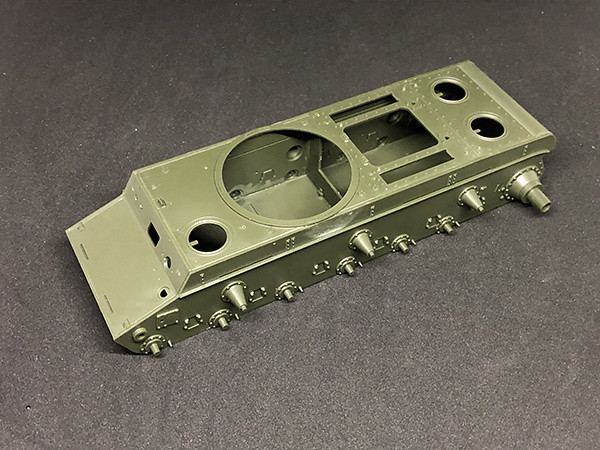
Fit is excellent, as you would expect from a Tamiya kit.
The lifting eyes on the engine compartment and transmission compartment roof plates are molded in situ, and lack holes for the lifting rings. I carefully drilled them out with a #80 drill bit.
Armor/AFV
For discussions on tanks, artillery, jeeps, etc.
Hosted by Darren Baker, Mario Matijasic
Tamiya KV-1 Build Log
MrNeil
New Jersey, United States
Joined: November 01, 2005
KitMaker: 266 posts
Armorama: 262 posts
Joined: November 01, 2005
KitMaker: 266 posts
Armorama: 262 posts
Posted: Monday, July 27, 2020 - 10:21 AM UTC
SSGToms
Connecticut, United States
Joined: April 02, 2005
KitMaker: 3,608 posts
Armorama: 3,092 posts
Joined: April 02, 2005
KitMaker: 3,608 posts
Armorama: 3,092 posts
Posted: Tuesday, July 28, 2020 - 02:46 AM UTC
I don't need to watch your blog. I have the big huge KV book by some guy named Neil Stokes.
Posted: Tuesday, July 28, 2020 - 03:20 AM UTC
Taking a seat here!
kaleu
Indiana, United States
Joined: June 11, 2003
KitMaker: 123 posts
Armorama: 112 posts
Joined: June 11, 2003
KitMaker: 123 posts
Armorama: 112 posts
Posted: Wednesday, July 29, 2020 - 05:01 AM UTC
Watching for sure!
MrNeil
New Jersey, United States
Joined: November 01, 2005
KitMaker: 266 posts
Armorama: 262 posts
Joined: November 01, 2005
KitMaker: 266 posts
Armorama: 262 posts
Posted: Wednesday, July 29, 2020 - 10:36 AM UTC
Continuing with construction, I deviated slightly from the instruction sequence to work on the engine compartment and transmission compartment roof plates.
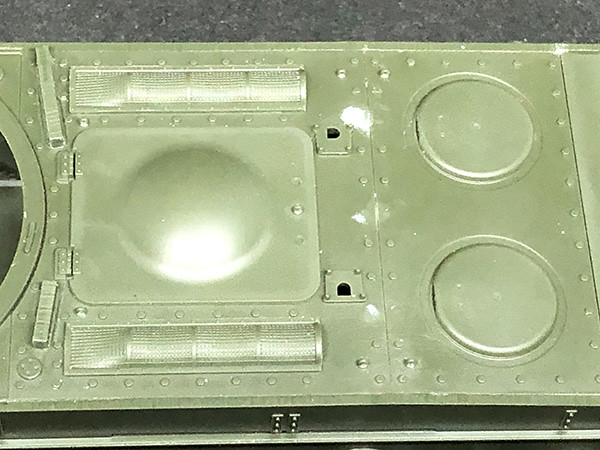
The first thing I did was to remove every third bolt along the joint between the engine compartment and transmission compartment roof plates. Tamiya gives us 11 evenly spaced bolts fore and aft of this joint, which is correct for a hull manufactured up to October 1941. At that time, the configuration switched to 8 bolts arranged in pairs.
The photo below shows the modified kit parts. The spots of putty are the result of me being a little ham-fisted with the hobby knife, and not the fault of the kit.
As I posted this photo, I realized that I neglected to remove the matching bolts along the rear edge of the transmission compartment roof plate. I'll do that before the next post.
The radiator intake grilles are about 1mm shorter and narrower than those in the Trumpeter kit, so aftermarket etched brass grilles intended for the Trumpeter kit won't fit the Tamiya kit. Though the Tamiya grilles are molded solidly, they're very nicely done so I decided to use them.
The kit provides us with a domed engine access hatch of the 'blind' variant, without the water filler cap in the center of the dome. This is appropriate for an Oct/Nov 1941 production example.
The engine access hatch provides a single lifting eye in the center of the rear edge, which again is correct for the time period, but the kit does not include the lifting ring, cable and hook which were typically attached to the lifting eye to secure the open hatch cover to the grab handle on the side of the turret.
The lifting eye is molded solid so I drilled out the hole with a #80 drill bit.
The latches are molded as small circular depressions either side of the lifting eye. They lack the square protrusions that engaged with a key to lock and unlock the hatch.
The kit provides raised transmission access hatches with curved edges. The latches in the center of each hatch lack the square protrusions, like the engine access hatch.
Forward of the radiator intake grilles, the kit includes the two raised bars of armor that protected the rear quarters of the turret ring. These are molded separately with weld beads in situ. They have very faint ejector pin marks on the sides facing the turret ring, but a quick swipe with a sanding stick took care of those.
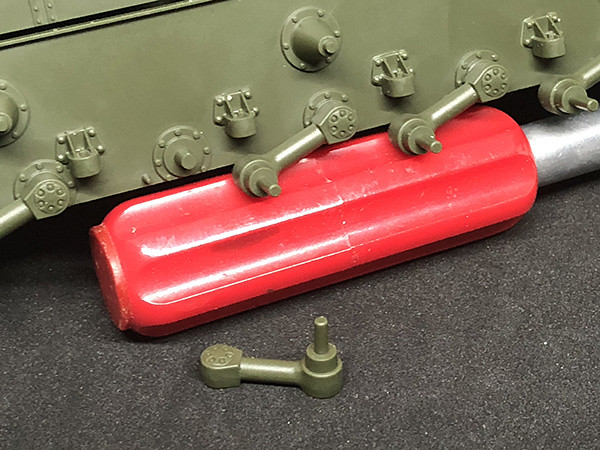
Next I added the bump stops and suspension swing arms to the hull sides.
The bump stops are molded as a single piece each, and locate positively into depressions on the hull sides. The joints are well positioned and the fit is so precise that I found no seams to fill.
The swing arms are of the early machined pattern, with six bolts securing the end caps on the torsion bars. This is appropriate for a vehicle manufactured up to October 1941.
The swing arms locate precisely onto sturdy pegs protruding from the hull sides. There are smaller pins that engage with holes on the back of each swing arm to ensure correct alignment. If you want to depict your model in a diorama setting on uneven ground, you can cut off the pins allowing the swing arms to pivot.
The first thing I did was to remove every third bolt along the joint between the engine compartment and transmission compartment roof plates. Tamiya gives us 11 evenly spaced bolts fore and aft of this joint, which is correct for a hull manufactured up to October 1941. At that time, the configuration switched to 8 bolts arranged in pairs.
The photo below shows the modified kit parts. The spots of putty are the result of me being a little ham-fisted with the hobby knife, and not the fault of the kit.
As I posted this photo, I realized that I neglected to remove the matching bolts along the rear edge of the transmission compartment roof plate. I'll do that before the next post.
The radiator intake grilles are about 1mm shorter and narrower than those in the Trumpeter kit, so aftermarket etched brass grilles intended for the Trumpeter kit won't fit the Tamiya kit. Though the Tamiya grilles are molded solidly, they're very nicely done so I decided to use them.
The kit provides us with a domed engine access hatch of the 'blind' variant, without the water filler cap in the center of the dome. This is appropriate for an Oct/Nov 1941 production example.
The engine access hatch provides a single lifting eye in the center of the rear edge, which again is correct for the time period, but the kit does not include the lifting ring, cable and hook which were typically attached to the lifting eye to secure the open hatch cover to the grab handle on the side of the turret.
The lifting eye is molded solid so I drilled out the hole with a #80 drill bit.
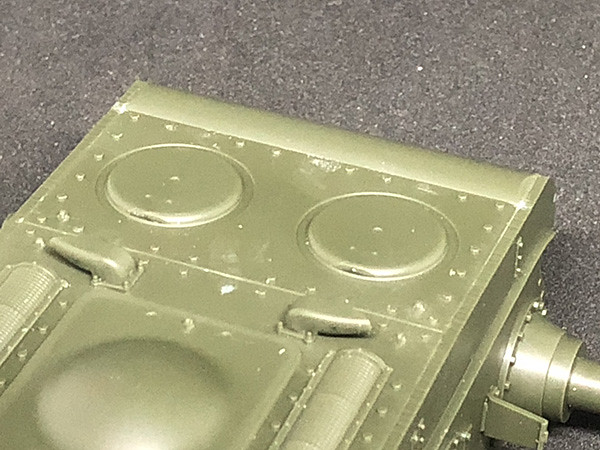
The latches are molded as small circular depressions either side of the lifting eye. They lack the square protrusions that engaged with a key to lock and unlock the hatch.
The kit provides raised transmission access hatches with curved edges. The latches in the center of each hatch lack the square protrusions, like the engine access hatch.
Forward of the radiator intake grilles, the kit includes the two raised bars of armor that protected the rear quarters of the turret ring. These are molded separately with weld beads in situ. They have very faint ejector pin marks on the sides facing the turret ring, but a quick swipe with a sanding stick took care of those.
Next I added the bump stops and suspension swing arms to the hull sides.
The bump stops are molded as a single piece each, and locate positively into depressions on the hull sides. The joints are well positioned and the fit is so precise that I found no seams to fill.
The swing arms are of the early machined pattern, with six bolts securing the end caps on the torsion bars. This is appropriate for a vehicle manufactured up to October 1941.
The swing arms locate precisely onto sturdy pegs protruding from the hull sides. There are smaller pins that engage with holes on the back of each swing arm to ensure correct alignment. If you want to depict your model in a diorama setting on uneven ground, you can cut off the pins allowing the swing arms to pivot.
MrNeil
New Jersey, United States
Joined: November 01, 2005
KitMaker: 266 posts
Armorama: 262 posts
Joined: November 01, 2005
KitMaker: 266 posts
Armorama: 262 posts
Posted: Friday, July 31, 2020 - 10:09 AM UTC
As I noted in my previous post, I neglected to remove every third bolt from the rear edge of the transmission compartment roof plate. I rectified that omission as shown in the photo below.
Let me point out that the Tamiya kit is not necessarily incorrect here. The transition from 11 evenly spaced bolts to 8 paired bolts occurred in October 1941, so either configuration is appropriate for the October/November 1941 production example I'm depicting. I just let my AMS run a little bit rampant
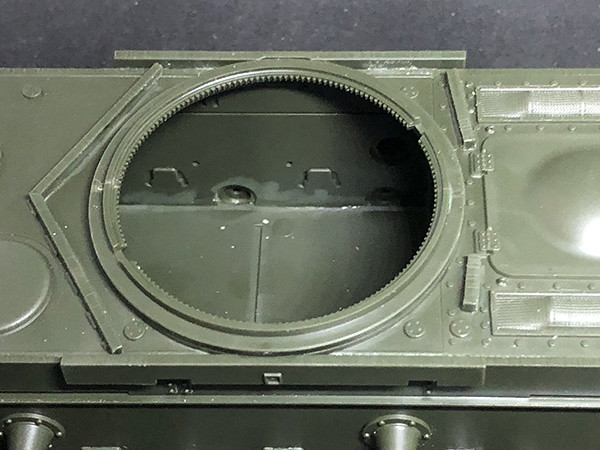
Moving forward, I added the turret ring and the applique armor around the front and sides.
I'm not sure why Tamiya chose to include the turret race, since there is very little other interior detail.
The applique armor parts are nicely detailed and those for the upper hull side include weld beads for the brackets that secure the rear ends of the tow cables.
MrNeil
New Jersey, United States
Joined: November 01, 2005
KitMaker: 266 posts
Armorama: 262 posts
Joined: November 01, 2005
KitMaker: 266 posts
Armorama: 262 posts
Posted: Monday, August 03, 2020 - 09:42 AM UTC
The further I progress with this build, the more I realize that Tamiya has given us a spring/early summer 1941 hull, combined with a fall 1941 turret.
This is borne out by the bolt configuration on the engine compartment and transmission compartment roof plates, the sprockets with 16 bolts on the convex hub covers, and also by the 11 filled bolt holes across the upper and lower faces of the nose, as shown in the photo below.
The nose plate is simply placed in position in the photo to show you what I mean. Note the 11 raised rings across the width of the part. These represent holes for bolts that attached the nose plate to the hull itself. The holes were then filled with weld bead.
The 11 bolt holes are the correct configuration until about August 1941 but from then on, the number of holes was reduced to 8 and around the end of the year, the bolts were omitted altogether and the nose plate was simply welded in place.
Tiger Model Designs makes the correct 8-bolt nose plate as item 35-3008. It's intended for the Trumpeter kits but should fit the Tamiya hull with a little adjustment. I have one on order as I write this.
MrNeil
New Jersey, United States
Joined: November 01, 2005
KitMaker: 266 posts
Armorama: 262 posts
Joined: November 01, 2005
KitMaker: 266 posts
Armorama: 262 posts
Posted: Wednesday, August 05, 2020 - 09:54 AM UTC
While I'm waiting for the new nose plate to arrive, I decided to go ahead and work on the running gear.
The road wheels scale out correctly, as do the all-steel return rollers.
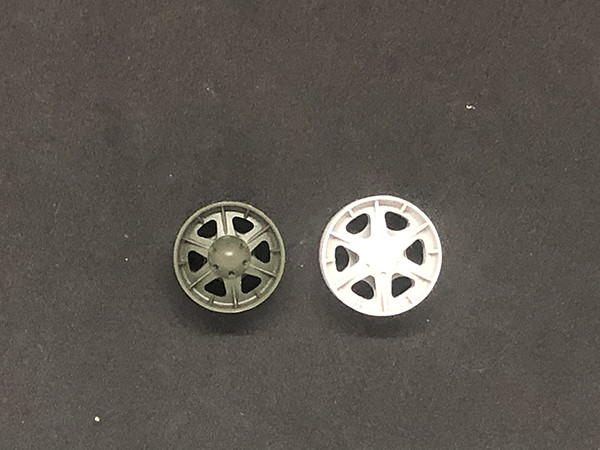
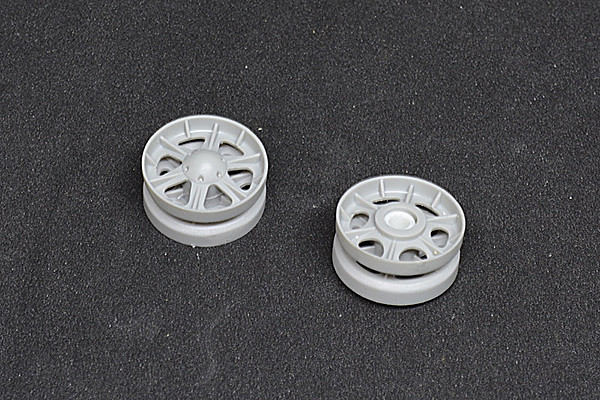
Tamiya has provided the outer central discs of the road wheels as separate sections, keyed to the rims with a slight offset between the splines on the central disc and the reinforcing ribs on the hull. This is perfectly fine, since the central disc and the hub were held together by the rubber shock absorbing disc sandwiched between them, and could theoretically move independently of one another. Photos show the splines and ribs with varying degrees of offset.
I decided I wanted to vary my road wheels a little however, so I widened the slots of the backs of the central discs to allow a little more play, as shown in the photo below.
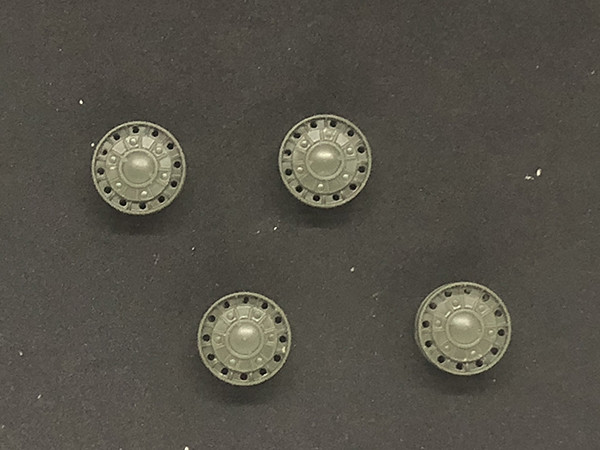
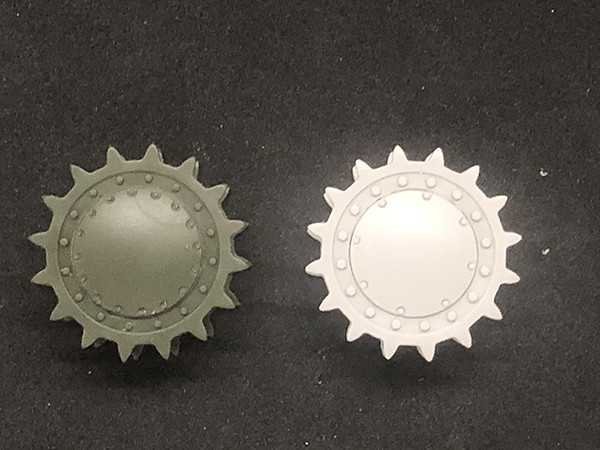
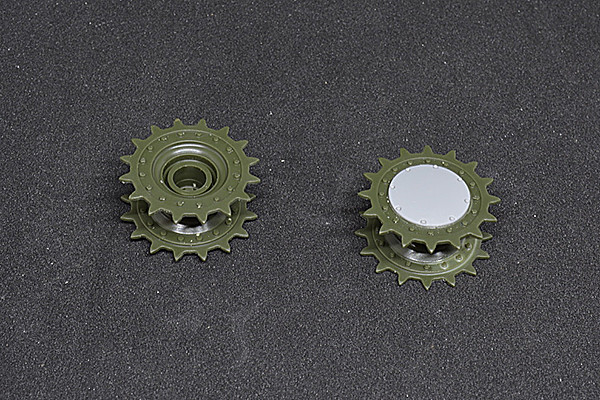
The drive sprockets also scale out correctly in diameter, but they feature 16 bolts securing the central cover. This configuration transitioned to 8 bolts in the mid-summer of 1941 and by the fall, the 8-bolt configuration was much more common. I therefore decided to replace the kit sprockets with spare Trumpeter ones.
The Tamiya and Trumpeter sprockets are identical in terms of diameter and pitch of the teeth, so there should be no problem using the Tamiya kit tracks (fingers crossed).
The Tamiya idlers are undersized. They should be 19.43mm in diameter, and they're only 18mm. The difference is noticeable, as you can see in the photo below, which shows the Tamiya sprocket on the left, next to a Trumpeter sprocket (18.5mm so close to correct) on the right.
Like the sprockets, I chose to replace the Tamiya idlers with spare Trumpeter ones.
marcb
Overijssel, Netherlands
Joined: March 25, 2006
KitMaker: 1,244 posts
Armorama: 1,226 posts
Joined: March 25, 2006
KitMaker: 1,244 posts
Armorama: 1,226 posts
Posted: Wednesday, August 05, 2020 - 11:34 AM UTC
Excellent work Neil,
I'm surprised Tamiya didn't contact your when they were developing the kit.
The modelling world isn't that big.
I'm surprised Tamiya didn't contact your when they were developing the kit.
The modelling world isn't that big.
gharker
British Columbia, Canada
Joined: May 21, 2014
KitMaker: 109 posts
Armorama: 109 posts
Joined: May 21, 2014
KitMaker: 109 posts
Armorama: 109 posts
Posted: Wednesday, August 05, 2020 - 11:51 AM UTC
Was there any issues fitting the Trumpeter sprockets and idlers.
MrNeil
New Jersey, United States
Joined: November 01, 2005
KitMaker: 266 posts
Armorama: 262 posts
Joined: November 01, 2005
KitMaker: 266 posts
Armorama: 262 posts
Posted: Wednesday, August 05, 2020 - 11:51 PM UTC
Marc...no, they didn't contact me. I would have been happy to provide any assistance I could. I think the mid-1941 hull details are not due to simple inattention, so much as a desire to make one hull serve multiple purposes. There have been rumors that Tamiya is planning a KV-1E and KV-2, both of which would use a mid-1941 hull.
Greg, I haven't gotten to fitting the sprockets and idlers yet, but it appears I'll have to cut off the sprocket mounts and replace them with a suitable diameter tube to suit the Trumpeter sprockets. For the idlers, I already checked and 5mm styrne tube will act as a sleeve inside the Trumpeter idler, and fit snugly over the Tamiya idler mount.
bill_c
Campaigns Administrator
New Jersey, United States
Joined: January 09, 2008
KitMaker: 10,553 posts
Armorama: 8,109 posts
Joined: January 09, 2008
KitMaker: 10,553 posts
Armorama: 8,109 posts
Posted: Friday, August 07, 2020 - 07:55 AM UTC
Quoted Text
The photo below shows the modified kit parts. The spots of putty are the result of me being a little ham-fisted with the hobby knife, and not the fault of the kit.
Neil, I have found the Trumpeter chisels to be very helpful with the ham in my fists. They have one that's flat on the bottom and slides along the styrene's surface without digging trenches.
Pongo_Arm
British Columbia, Canada
Joined: January 27, 2017
KitMaker: 147 posts
Armorama: 147 posts
Joined: January 27, 2017
KitMaker: 147 posts
Armorama: 147 posts
Posted: Friday, August 07, 2020 - 08:51 AM UTC
I take this interesting build to mean that the IS series book is complete and off to the printer....
MrNeil
New Jersey, United States
Joined: November 01, 2005
KitMaker: 266 posts
Armorama: 262 posts
Joined: November 01, 2005
KitMaker: 266 posts
Armorama: 262 posts
Posted: Friday, August 07, 2020 - 10:13 AM UTC
Bill, thanks for the pointer. I'll see if I can lay my hands on some Trumpeter chisels.
Greg, you are a wildly optimistic man
Quoted Text
I take this interesting build to mean that the IS series book is complete and off to the printer....
Greg, you are a wildly optimistic man
warmonger
Oklahoma, United States
Joined: November 08, 2006
KitMaker: 217 posts
Armorama: 117 posts
Joined: November 08, 2006
KitMaker: 217 posts
Armorama: 117 posts
Posted: Friday, August 07, 2020 - 11:51 PM UTC
Do you feel that by using the larger idler, that the tracks may have a gap in them?
MrNeil
New Jersey, United States
Joined: November 01, 2005
KitMaker: 266 posts
Armorama: 262 posts
Joined: November 01, 2005
KitMaker: 266 posts
Armorama: 262 posts
Posted: Sunday, August 09, 2020 - 02:31 AM UTC
Quoted Text
Do you feel that by using the larger idler, that the tracks may have a gap in them?
Tamiya gives you two extra individual links per track, so I'm hopeful that will be enough to compensate for the larger idler. If not, I have a set of Masterclub metal tracks in the stash.
MrNeil
New Jersey, United States
Joined: November 01, 2005
KitMaker: 266 posts
Armorama: 262 posts
Joined: November 01, 2005
KitMaker: 266 posts
Armorama: 262 posts
Posted: Tuesday, August 11, 2020 - 04:10 AM UTC
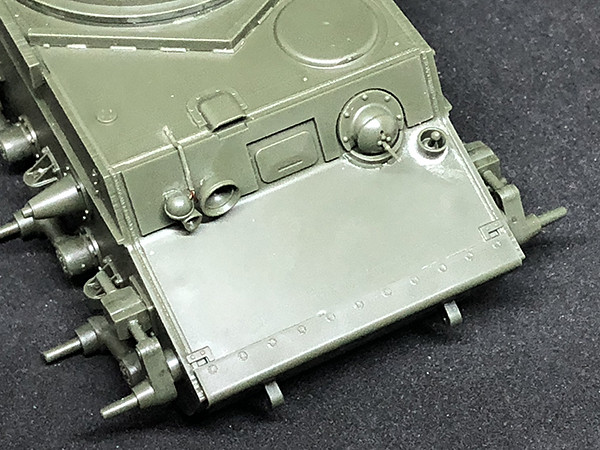
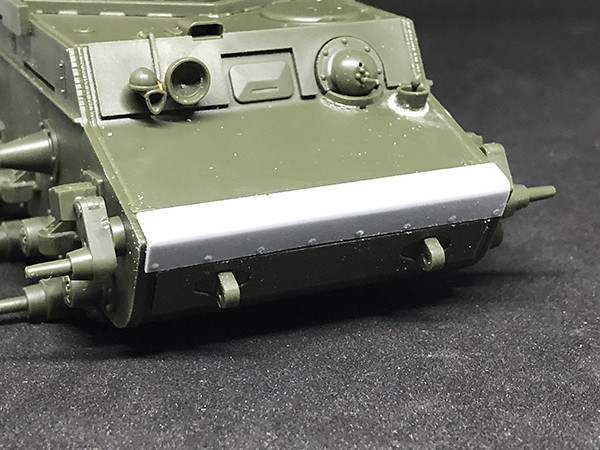
My order from Tiger Model Designs arrived (five days!) so I proceeded to fit the new 8-bolt nose plate to the hull. Apologies for the excessive brightness on the top of the nose plate which hides the bolts but trust me, they're there.
The TMD part required a little modification. It's designed to fit the Trumpeter kits so it has two small locating tabs on the underside of the upper portion. I cut these away since the Tamiya hull has slots going the other way.
I also sanded the upper and lower edges a little, since the resin part butted right up against the applique armor on the lower hull, whereas there should be a gap. That's not a failure with the TMD part or the Tamiya kit - just the result of a very slight difference in dimensions between the Tamiya and Trumpeter kits.
Even with the sanding, I had to put a 5-thou shim under the upper part of the nose plate, to lift it away from the applique armor.
Just visible in the photo are the power cables for the headlamp and horn, which I added from thin copper wire that I took from a smashed electric motor I found by the roadside when walking my dogs.
SSGToms
Connecticut, United States
Joined: April 02, 2005
KitMaker: 3,608 posts
Armorama: 3,092 posts
Joined: April 02, 2005
KitMaker: 3,608 posts
Armorama: 3,092 posts
Posted: Tuesday, August 11, 2020 - 04:38 AM UTC
Excellent work Neil. Is this kit worth getting if I already have the Trumpeter kits?
KurtLaughlin
Pennsylvania, United States
Joined: January 18, 2003
KitMaker: 2,402 posts
Armorama: 2,377 posts
Joined: January 18, 2003
KitMaker: 2,402 posts
Armorama: 2,377 posts
Posted: Tuesday, August 11, 2020 - 04:59 AM UTC
Quoted Text
Excellent work Neil. Is this kit worth getting if I already have the Trumpeter kits?
That's a good question, Matt. Perhaps it's best to wait 'til the end to see the total amount of work involved, but since this kit came out I've been wondering if it was better or just different.
KL
dylans
British Columbia, Canada
Joined: March 05, 2009
KitMaker: 394 posts
Armorama: 380 posts
Joined: March 05, 2009
KitMaker: 394 posts
Armorama: 380 posts
Posted: Tuesday, August 11, 2020 - 08:37 AM UTC
Quoted Text
Excellent work Neil. Is this kit worth getting if I already have the Trumpeter kits?
no, I have built both and the trumpeter kits are fantastic.
MrNeil
New Jersey, United States
Joined: November 01, 2005
KitMaker: 266 posts
Armorama: 262 posts
Joined: November 01, 2005
KitMaker: 266 posts
Armorama: 262 posts
Posted: Tuesday, August 11, 2020 - 12:44 PM UTC
The Tamiya kit is excellent in terms of engineering and fit of parts, as you would expect.
Tamiya also gives us a short-bustle 90mm armored turret with splash bars under the periscopes but without the corresponding cutouts in the top of the turret sides. Trumpeter doesn't do this turret.
There are two issues with the Tamiya kit:
First, the idlers are undersized.
Second, various hull features are appropriate for a mid-summer 1941 hull, whereas the turret is more appropriate for a late fall/early winter 1941 vehicle.
If you put a long bustle 75mm armored turret with F-32 gun, or a KV-2 turret, on the Tamiya hull, you'd have a decent match with respect to period.
If you put the Tamiya turret on a later Model 1941 hull such as that in the Trumpeter KV-1 "Heavy Cast Turret" kit, you'd have another good match. That kit includes the all steel cast road wheels but you could graft the Tamiya wheels onto the Trumpeter hull.
For me, the prize is the turret, which is a variant that nobody else provides. You can also add the armored ring around the rear-facing turret machine gun to this turret for something even more different. The ring is available from Zavod3D Miniatures on Shapeways.
In this build, I'm trying to use as many of the Tamiya parts as I can, but I still need to replace the sprockets, idlers and nose plate, and change the bolt configurations on the engine deck and fender brackets. That will update the hull to match the turret, as an Oct/Nov 1941 vehicle from ChTZ/ChKZ.
lancew
Auckland, New Zealand
Joined: April 15, 2006
KitMaker: 10 posts
Armorama: 9 posts
Joined: April 15, 2006
KitMaker: 10 posts
Armorama: 9 posts
Posted: Sunday, August 16, 2020 - 11:55 AM UTC
A quick question. Is the turret symmetrical or asymmetrical? There was an interesting thread on Missing Lynx a while ago about how Trumpeter's welded turrets are off because of being symmetrical in plan view.
https://www.tapatalk.com/groups/missinglynx/tamiya-s-new-1-35-kv-1-t322339-s30.html
marcb
Overijssel, Netherlands
Joined: March 25, 2006
KitMaker: 1,244 posts
Armorama: 1,226 posts
Joined: March 25, 2006
KitMaker: 1,244 posts
Armorama: 1,226 posts
Posted: Monday, August 17, 2020 - 09:31 AM UTC
MrNeil
New Jersey, United States
Joined: November 01, 2005
KitMaker: 266 posts
Armorama: 262 posts
Joined: November 01, 2005
KitMaker: 266 posts
Armorama: 262 posts
Posted: Thursday, August 20, 2020 - 05:16 AM UTC
Quoted Text
A quick question. Is the turret symmetrical or asymmetrical? There was an interesting thread on Missing Lynx a while ago about how Trumpeter's welded turrets are off because of being symmetrical in plan view.
https://www.tapatalk.com/groups/missinglynx/tamiya-s-new-1-35-kv-1-t322339-s30.html
Assuming we're talking about the trunnion 'cheeks', yes, they're asymmetrical. But you're getting ahead of me in this here build log
MrNeil
New Jersey, United States
Joined: November 01, 2005
KitMaker: 266 posts
Armorama: 262 posts
Joined: November 01, 2005
KitMaker: 266 posts
Armorama: 262 posts
Posted: Thursday, August 20, 2020 - 05:23 AM UTC
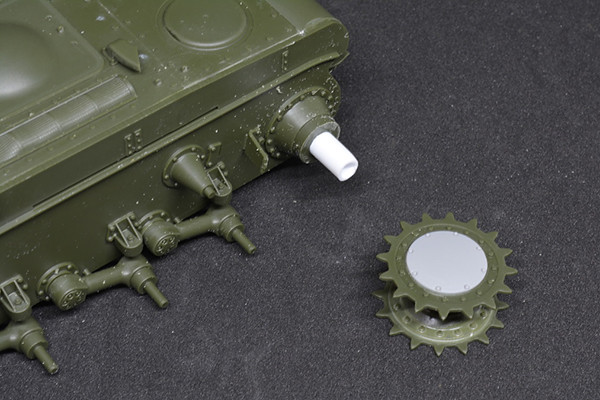
Moving forward a little on the idlers, I added sleeves inside the hubs from 3/16" (4.8mm) styrene tube, to make the Trumpeter idlers conform to the narrow Tamiya axles.
I planned to use the Trumpeter sprockets too, but I realized that the hubs on the inner halves of the Tamiya sprockets are inset, whereas the Trumpeter ones are flush with the inner sprocket rings. This means that the Trumpeter sprockets sit too far outboard.
I therefore decided to use the Trumpeter hubs, with the correct 8 bolts, on the Tamiya sprockets.
Of course, I realized this about five minutes AFTER I sawed off the sprocket mounts from the hull sides. Thankfully it was simple matter to cut some 7/64" (5.5mm) styrene tube to make replacements.
I broke the old rule 'measure twice, cut once' You have the opportunity to learn from my mistakes