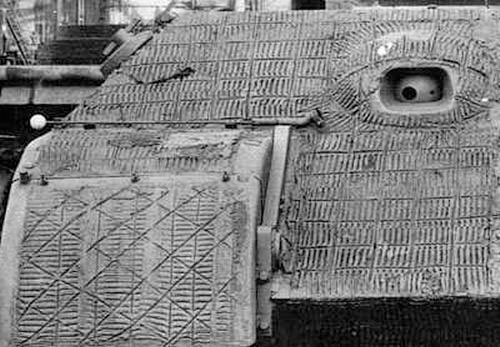
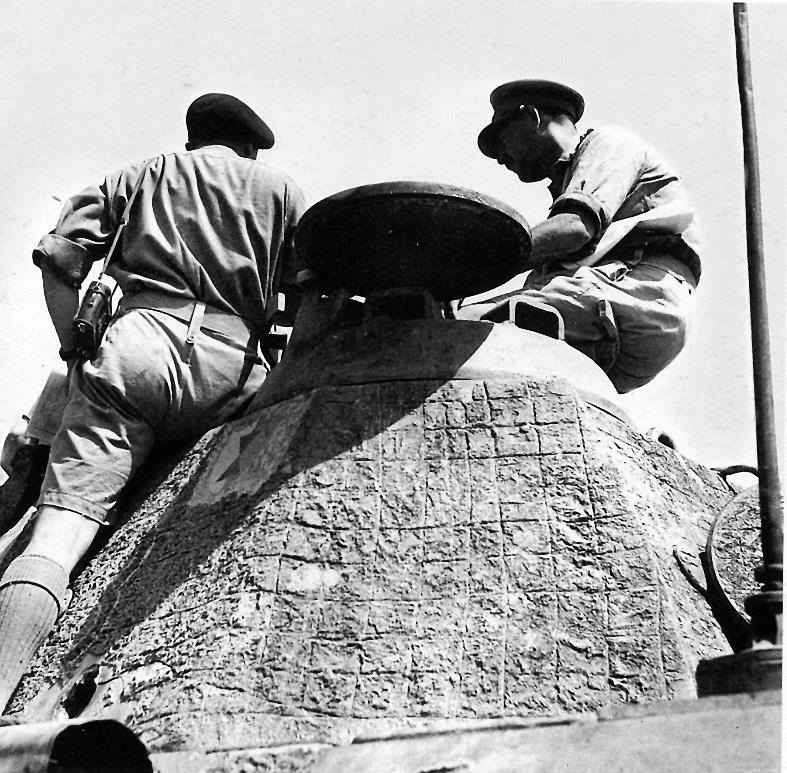
I am close to start the build of a Panther Ausf.A late of Meng.
For what I see, them all were provided with a zimmeritt layer, and I have to provide a fair reproduction of it.
For what I have seen, there seem to be two types: horizontal long lines separing arraus of vertical short ones, and a square cells pattern.
I have some parts from an old Italeri kit representing the layer of zimmeritt of the first tipe that have to be glued on the armour. I am considering to adapt them to the kit of Meng. To cover the parts where these pieces aren't enough, I've made some tests of working pieces of plasticard with a screwdriver after having softened them with Tamiya lemonene glue.
The plates of Italeri are about 0,7 mm thick. Is this thickness adequate for a layer of zimmeritt?
What to do where tools supports have to be added on the armour? I suppose that the zimmeritt has to be interrupted on the supports. Does it have to continue under the tools, or has to be interrupted for its thickness?
All suggestions are welcome.
Armor/AFV
For discussions on tanks, artillery, jeeps, etc.
For discussions on tanks, artillery, jeeps, etc.
Hosted by Darren Baker, Mario Matijasic
Zimmeritt for a Panther
MassimoTessitori

Joined: March 14, 2013
KitMaker: 278 posts
Armorama: 278 posts
Posted: Monday, September 28, 2020 - 06:04 PM UTC
Bozothenutter

Joined: December 06, 2017
KitMaker: 48 posts
Armorama: 48 posts

Posted: Monday, September 28, 2020 - 07:44 PM UTC
not just 2 types,
each factory had they own pattern.....
https://atakmodel.istore.pl/en_US/searchquery/panther/1/phot/5?url=panther
this book is what you need:
https://www.amazon.co.uk/ABTEILUNG-502-ABT601-External-Appearance/dp/B01IA98C66/ref=sr_1_1?dchild=1&keywords=Panther+external+appearance&qid=1601365692&s=books&sr=1-1
Khouli

Joined: March 13, 2020
KitMaker: 68 posts
Armorama: 68 posts

Posted: Monday, September 28, 2020 - 10:04 PM UTC
Following on from this, is there a definitive reference of Panther (G) camo schemes?
Kelley

Joined: November 21, 2002
KitMaker: 1,966 posts
Armorama: 1,635 posts

Posted: Monday, September 28, 2020 - 10:56 PM UTC
Quoted Text
Following on from this, is there a definitive reference of Panther (G) camo schemes?
The same book mentioned above would be the best reference currently in print, IMHO.
Mike
RLlockie

Joined: September 06, 2013
KitMaker: 1,112 posts
Armorama: 938 posts
Posted: Monday, September 28, 2020 - 11:54 PM UTC
Surviving samples of Zimmerit (some museum examples are non-original) are pretty thin, c.5mm at the ridges. In 1/35 that’s around 5 thou. Italeri’s applique stuff is far too thick and I suspect that it may not fit either, given that its kit was an A and you are building a G. While the real turret was the same, no guarantee that Italeri’s ancient kit will be the same size as Meng’s. The hull was completely different too, so the Italeri parts won’t help you there.
There are resin sets available (Atak comes to mind) and paper (Monroe Perdu) but personally I’m a fan of applying it myself with epoxy putty and then texturing it with the Trumpeter 0.5mm roller and/or home-made tools. It was applied after all the metal fittings, so around tool brackets - you can’t weld steel to it, so definitely not underneath. If you look at close-up photos, you can see it ‘flow’ round the fittings.
Roddy’s book is definitely worth having for this and many other reasons.
marcb

Joined: March 25, 2006
KitMaker: 1,244 posts
Armorama: 1,226 posts

Posted: Tuesday, September 29, 2020 - 02:33 AM UTC
Here's my method.
https://armorama.kitmaker.net/forums/278641
https://armorama.kitmaker.net/forums/278641
MassimoTessitori

Joined: March 14, 2013
KitMaker: 278 posts
Armorama: 278 posts
Posted: Tuesday, September 29, 2020 - 05:30 PM UTC
Hi all,
thank you for your suggestions.
Now it's clear that the Italeri parts are not good, not only for thickness that can be reduced, but for the realism of the texture too. The small lines are unevenly spaced, I supposed that they were made by spatula in the original tanks, but now I see that the pattern has evenly spaced lines, although distorted, made with the use of some shaped spatula; the horizontal lines were made after the vertical thin ones. So the screwdriver is not appropriate as a tool for thin lines.
Now I have the choice if to buy the set of Atak or to make it by myself.
Very interesting.
The use of the tool with three pins is clear.
I don't understand the other tool. It is a blade fixed trasversally on a cutter's handle. Is the blade shaped in any way, or is it used as a flat spatula?
Removed by original poster on 09/30/20 - 05:56:33 (GMT).
Khouli

Joined: March 13, 2020
KitMaker: 68 posts
Armorama: 68 posts

Posted: Tuesday, September 29, 2020 - 05:57 PM UTC
Quoted Text
Quoted TextFollowing on from this, is there a definitive reference of Panther (G) camo schemes?
The same book mentioned above would be the best reference currently in print, IMHO.
Mike
You're probably correct, but its also currently bloody expensive
marcb

Joined: March 25, 2006
KitMaker: 1,244 posts
Armorama: 1,226 posts

Posted: Tuesday, September 29, 2020 - 11:37 PM UTC
Massimo,
It's a x-acto chisel blade mounted tranversaly in an x-acto blade, to help spread the putty evenly.
For the MAN pattern (as on my model), the distance between the pins is 3 mm. Use the AFV Club zimmerit doe to make the ridges.
https://www.scalemates.com/kits/afv-club-ac35003-zimmerit-coating-applicator-die--227020
For the DB pattern the tool with 3 pins is a bit smaller, with spacing of 2,5 mm. Use a sponge to add texture to the putty.
MAN

DB

It's a x-acto chisel blade mounted tranversaly in an x-acto blade, to help spread the putty evenly.
For the MAN pattern (as on my model), the distance between the pins is 3 mm. Use the AFV Club zimmerit doe to make the ridges.
https://www.scalemates.com/kits/afv-club-ac35003-zimmerit-coating-applicator-die--227020
For the DB pattern the tool with 3 pins is a bit smaller, with spacing of 2,5 mm. Use a sponge to add texture to the putty.
MAN

DB


ninjrk

Joined: January 26, 2006
KitMaker: 1,381 posts
Armorama: 1,347 posts

Posted: Wednesday, September 30, 2020 - 12:49 AM UTC
Quoted Text
Quoted TextQuoted TextFollowing on from this, is there a definitive reference of Panther (G) camo schemes?
The same book mentioned above would be the best reference currently in print, IMHO.
Mike
You're probably correct, but its also currently bloody expensive
It is as a hardcopy but you can buy the book from Google Play electronically for ~$32 https://books.google.com/books/about/PANTHER_External_Appearance_Design_Chang.html?id=TtSGDwAAQBAJ
steel_tiger1

Joined: May 14, 2008
KitMaker: 35 posts
Armorama: 34 posts

Posted: Wednesday, September 30, 2020 - 12:57 AM UTC
I just bought the book off of Amazon for $67 shipped. The seller had 2 copies left. 

MassimoTessitori

Joined: March 14, 2013
KitMaker: 278 posts
Armorama: 278 posts
Posted: Wednesday, September 30, 2020 - 02:08 AM UTC
Hi,
Is this tool a small roller with texture?
I'm studying some odourless method with some product I have home. The Tamiya lemonene glue could be mixed with something to make a liquid putty workable for long.
Quoted Text
For the MAN pattern (as on my model), the distance between the pins is 3 mm. Use the AFV Club zimmerit doe to make the ridges.
https://www.scalemates.com/kits/afv-club-ac35003-zimmerit-coating-applicator-die--227020
Is this tool a small roller with texture?
I'm studying some odourless method with some product I have home. The Tamiya lemonene glue could be mixed with something to make a liquid putty workable for long.
marcb

Joined: March 25, 2006
KitMaker: 1,244 posts
Armorama: 1,226 posts

Posted: Wednesday, September 30, 2020 - 02:21 AM UTC
Yes, it's a brass ridged roller.
Khouli

Joined: March 13, 2020
KitMaker: 68 posts
Armorama: 68 posts

Posted: Wednesday, September 30, 2020 - 06:12 PM UTC
People, don't be messing around with home made bodges
https://www.perthmilitarymodelling.com/reviews/tools/lionroar/lt0016-17.htm
https://www.amazon.co.uk/Zimmerit-coating-roller-production-MODELKASTEN/dp/B01A9MI6XG
https://www.perthmilitarymodelling.com/reviews/tools/lionroar/lt0016-17.htm
https://www.amazon.co.uk/Zimmerit-coating-roller-production-MODELKASTEN/dp/B01A9MI6XG
RLlockie

Joined: September 06, 2013
KitMaker: 1,112 posts
Armorama: 938 posts
Posted: Thursday, October 01, 2020 - 06:07 AM UTC
If you want to reproduce the MAN pattern, which was rollered, there was a useful thread on Missing Links recently which covered ways of reproducing it and reviewed some of the manufacturers’ efforts. Trumpeter’s 0.5mm one came out well.

ninjrk

Joined: January 26, 2006
KitMaker: 1,381 posts
Armorama: 1,347 posts

Posted: Friday, October 02, 2020 - 03:26 AM UTC
Quoted Text
If you want to reproduce the MAN pattern, which was rollered, there was a useful thread on Missing Links recently which covered ways of reproducing it and reviewed some of the manufacturers’ efforts. Trumpeter’s 0.5mm one came out well.
https://www.tapatalk.com/groups/missinglynx/man-rolled-zimmerit-tool-recommendations-t323253-s80.html
 |


