_GOTOBOTTOM
Constructive Feedback
For in-progress or completed build photos. Give and get contructive feedback!
How's the weather(ing)? Brummer
Spider
Visit this Community
South Africa
Joined: November 11, 2002
KitMaker: 19 posts
Armorama: 0 posts
Posted: Monday, November 11, 2002 - 05:14 PM UTC
I have purchased a heap of German vehicles from someone leaving the country, the paintwork is ok but flat all vehicles are grey or desert yellow. I have looked at some articles on this site and have decided to try my hand at repainting and weathering the lot, this will give me good practice for when I paint my own models. I have made a BMW R750 and sidecar - I was too scared to weather it in case I messed it up - so I chose the Brummer to practice on, The base color is not right, I reckon it looks almost russian in appearance - oh yes I also forgot to remove/mask the decals, so it's a neutral vehicle at this stage.

I also have to repaint the 3 figures I have chosen for this model. I am also toying with trying to make a diorama - I just cant seem to find any pictures of scenes or battles or occupied France. If you have any Ideas please let me know - I have around 90 German vehicles to use.

I have been bitten by the Scale bug!

SS-74
Visit this Community
Vatican City
Joined: May 13, 2002
KitMaker: 3,271 posts
Armorama: 2,388 posts
Posted: Monday, November 11, 2002 - 06:07 PM UTC
Spider,

From what I see, I like it, the little rust on the fenders are nice, if there are some more pictures will be even better to tell.

One thing, I apply weathering after I got all the decals on, no masking. I think the decals should get the same degree of weathering....

Nice.
Spider
Visit this Community
South Africa
Joined: November 11, 2002
KitMaker: 19 posts
Armorama: 0 posts
Posted: Monday, November 11, 2002 - 07:45 PM UTC
Thanks for your suggestion SS - I have added 2 more pictures of the Brummer - I was trying to get a really weathered metal look. See what I mean about painting over the decals? I will not make that mistake again.


Here is the complete photo from the top - Unfortunately I took all therr photos in different lighting - The first pic on the lawn (not to scale) The next on my desk with flourescent and natural light and the third with all of the above and the flash on.


All comments will be gladly accepted, this is my first model so I am not afraid of criticism - I want honesty as it is the only way to improve. If anyone would like to know how I did certain effects - feel free to ask.
Plasticbattle
#003
Visit this Community
Donegal, Ireland
Joined: May 14, 2002
KitMaker: 9,763 posts
Armorama: 7,444 posts
Posted: Monday, November 11, 2002 - 09:25 PM UTC
Hi Spider. These are some of my points of view.
The Brummer is excellent. With the edges drybrushed slightly with a gunmetal typr colour and the slight rusting, it really does look like a metal machine, not just some plastic. I would be quite happy with that.
The camo on the guy that is sitting on the gun barrel looks better than the other two because there is more of it. The spots on, especially, the commander are too few. Some shading on the barrell mans trousers would help as well. Great figure though. Lovely poses. Do you know what they are?
You must be one lucky son of a b@t$h recieving 90 kits from somebody leaving. How come I never get finds like this.
These are only my points of view. As long as you are happy.... thats what is important!
Spider
Visit this Community
South Africa
Joined: November 11, 2002
KitMaker: 19 posts
Armorama: 0 posts
Posted: Monday, November 11, 2002 - 09:48 PM UTC
Dear PlasticBattle

Thanks for your comments, I think the figures are Italeri - I will confirm this. I thank you for your comment on the figures, but I am still going to repaint them all, this is how I received them. Like I said the painting is good, but I wanted to try and do it better by adding more detail - I will let you know as soon as they are finished, possibly in the next few days.

Thanks again for your comments
Spider
Visit this Community
South Africa
Joined: November 11, 2002
KitMaker: 19 posts
Armorama: 0 posts
Posted: Monday, November 11, 2002 - 11:29 PM UTC
Hi All

I am amazed that each photo looks different colors, like it could be a different vehicle - do you think it's due to my antique digital camera - or the lighting?
FAUST
#130
Visit this Community
Noord-Holland, Netherlands
Joined: June 07, 2002
KitMaker: 8,797 posts
Armorama: 4,190 posts
Posted: Monday, November 11, 2002 - 11:51 PM UTC
I think it`s the lighting
lighting is always an important thing when you`re going to take photo`s. When you have a good lighting this will mostly give more life in your model (like natural shading)
making pictures outside early in the morning and late in the afternoon are the best times to photograph at noon the light is often too intens.

this for example is a picture I found on the internet

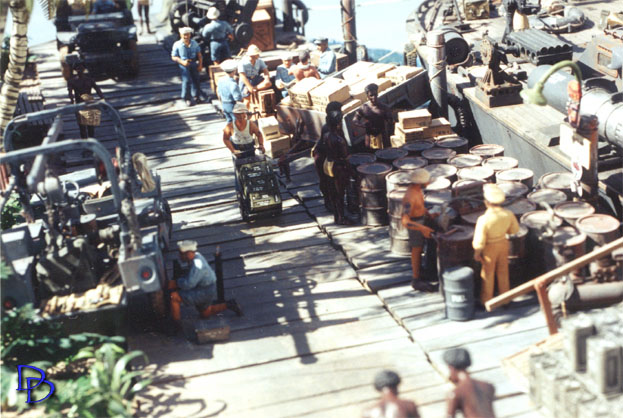
This is a picture of a dio that is taken outside with quite good weather the profit you have with that is that you get real shadowing in the pictures

I take my pictures always in our kitchen at home. above it hangs a Neontube that gives a bright enough light to take good pictures and I don`t have a great camera too
here is an example from what I shot earlier

here you can see the effect of the neontube, a clear not to bright lighting where everything is clearly visible

here is the complete link from where I got the first picture in this post from
surf a bit around and look for the lighting in the dio`s and look for the dio`s too because they are amazing
DYNAMIC DIORAMAS

Spider
Visit this Community
South Africa
Joined: November 11, 2002
KitMaker: 19 posts
Armorama: 0 posts
Posted: Tuesday, November 12, 2002 - 02:06 AM UTC
Thanks for the lighting tips, I will attempt to retake the photos tomorrow in the afternoon as you suggest.

Thanks for the great link to the Dioramas site - they are inspiring to say the least, very effective use of shadows - Thanks for taking the time to include the pictures to help me, by the way the diorama project you showed with the blue styrene, is it finished yet, it looks great and has given me some good ideas, as I have never built a diorama before, thanks again.
SS-74
Visit this Community
Vatican City
Joined: May 13, 2002
KitMaker: 3,271 posts
Armorama: 2,388 posts
Posted: Tuesday, November 12, 2002 - 02:13 AM UTC
Spider, Good good weathering for first trial, You definitely have it in you... I for one don't have it, takes me millions of trial and still not quite there yet....

The metal touch you did is very nice, graphite? And the rust/mud on the fender, How did you do it? Mixing pastel with thinner? Let us know.

As you said, the original paint didn't do the vehicle justice, it's like wearing a KV or T34 paint job.... #:-) Is this the DML Brummbar?
FAUST
#130
Visit this Community
Noord-Holland, Netherlands
Joined: June 07, 2002
KitMaker: 8,797 posts
Armorama: 4,190 posts
Posted: Tuesday, November 12, 2002 - 02:14 AM UTC
Spider

No the dio with the blue styrene is not finished yet still have a lot to do on it
but this is the result of only four hours work
I let you all know when it`s finished and the progress (if possible daily updated) can be viewed in my MSN album link included

http://groups.msn.com/armorama/distractionprogresspictures.msnw?albumlist=2

any questions about it just ask me

Plasticbattle
#003
Visit this Community
Donegal, Ireland
Joined: May 14, 2002
KitMaker: 9,763 posts
Armorama: 7,444 posts
Posted: Tuesday, November 12, 2002 - 03:44 AM UTC

Quoted Text

any questions about it just ask me


What is the blue medium you are using? Is it a commercial product or packaging from some household item?
FAUST
#130
Visit this Community
Noord-Holland, Netherlands
Joined: June 07, 2002
KitMaker: 8,797 posts
Armorama: 4,190 posts
Posted: Tuesday, November 12, 2002 - 03:53 AM UTC
Plasticbattle

the blue stuff I`m using is called Styrofoam
It`s a type of foam that has a great density, when you look at it you see one surface with less iregularities in it. It`s easy to cut and you can carf the stones just in it.
you can see it on my sidewalk. I just draw the lines in my sidewalk and pushed a little harder not too hard. the result is when you paint it all the depts creases cracks are in it just as in a plaster model.

an variant of this stuff can be found at buildingsites, there it`s used for the isolation of the roofs of new buildings I think you can get it in the hardwarestores.
Mine styrofoam comes from the hospital where they use it for making artificial knees and it has even a greater density than the normal stuff.

If you can get it I certainly wouldn`t mind and buy it because you can use it for very many things like dio bases, houses, sidewalks and go on

bison44
Visit this Community
Manitoba, Canada
Joined: August 27, 2002
KitMaker: 471 posts
Armorama: 275 posts
Posted: Tuesday, November 12, 2002 - 11:16 AM UTC
Hi Faust
Your walls in the diorama look to be some sort of foam. Is the sidewalk the same material?? How did u make the cracks and joints in the sidewalk? It looks very good, and i still can't believe u built your own sniper!! Good show!!
FAUST
#130
Visit this Community
Noord-Holland, Netherlands
Joined: June 07, 2002
KitMaker: 8,797 posts
Armorama: 4,190 posts
Posted: Tuesday, November 12, 2002 - 12:52 PM UTC
joh Bison

the stuff I use is a sort of foam
the cracks and joints are just carved in with an ordinairy pen
and the sidewalk is indeed made out of the same stuff.

It`s quite easy to cut it and as you see the carving works out very nice.
Thanks for your comments on my sniper it was the first time I did that too
never made my own figures but I can asure you that it`s pretty funny to do
the same with the building never did that before

Spider
Visit this Community
South Africa
Joined: November 11, 2002
KitMaker: 19 posts
Armorama: 0 posts
Posted: Tuesday, November 12, 2002 - 06:28 PM UTC
SS-74 - Thanks for your comments once again - for the metal look, I started by painting the base color, then I added a black acrylic wash, I airbrushed some dust onto all flat horizontal surfaces. I then took a graphite pencil and made it very sharp. I carefully ran it along all the edges of things like the turrett and the air holes as well as the corners where the metal was joined. I thought I overdid it a bit so I tried to rub some of it off with my finger, wow It started to look like worn metal - I was so excited about this but it only looked good in excellent light. So I went to the art shop and purchased several silver pencils. These worked great I only touched the edges that I needed highlights on, It was great. I also addes some pastels for extra dust and grime, I mixed the shavings of 3 colors of pastelsand brushed and dabbed them on.

The rusty dirt - I scraped some rust off my 4X4s exhaust, added tamiya's flat base and some brown color, then I took some fine green cover material - like you would use for grass and mixed it in, I also put some pastel scrapings in then I dabbed it on with a brush.

The vehicle is my appologies - a Sturmpanzer IV Brumbar Sd Kfz 166

Tamiya product : TAM35077
Jeepney
Visit this Community
Philippines
Joined: July 22, 2002
KitMaker: 1,538 posts
Armorama: 0 posts
Posted: Tuesday, November 12, 2002 - 07:34 PM UTC
I think it's DML Spider. I have the Tamiya Brummbar and it's an earlier version without the machine gun on the hull. I got this pic from the HLJ website:


My Brummbar has been on the shelf for a long time now. It's still in its Dunkelgelb base color. Seeing your work has encouraged me to finally finish it. I'll try doing the worn metal technique that you graciously shared.
Spider
Visit this Community
South Africa
Joined: November 11, 2002
KitMaker: 19 posts
Armorama: 0 posts
Posted: Tuesday, November 12, 2002 - 09:33 PM UTC
Thanks for the correction John - I see exactly what you mean - thanks for pointing it out - I would love to see what your Brummbar looks like before and after.

Please remember to take a before picture, I wish I had.
Jeepney
Visit this Community
Philippines
Joined: July 22, 2002
KitMaker: 1,538 posts
Armorama: 0 posts
Posted: Tuesday, November 12, 2002 - 09:37 PM UTC
I would if I could get hold of a camera . My Brummbar looks like the pic above without the camo, figure, decals and weathering

Dave (SS-74) sent me a nice pile of Brummbar references, both early and late. They should encourage me enough to continue
Spider
Visit this Community
South Africa
Joined: November 11, 2002
KitMaker: 19 posts
Armorama: 0 posts
Posted: Tuesday, November 12, 2002 - 09:46 PM UTC
Wow thats exactly what mine looked like - I had better send you a digital camera :-)

How are we ever gonna see your work?
Jeepney
Visit this Community
Philippines
Joined: July 22, 2002
KitMaker: 1,538 posts
Armorama: 0 posts
Posted: Tuesday, November 12, 2002 - 09:50 PM UTC
If you're not kidding I'll swamp you with pictures (:-) #:-)
 _GOTOTOP