


Campaigns
Where Armorama group builds can be discussed, organized, and updates posted.
Where Armorama group builds can be discussed, organized, and updates posted.
Hosted by Darren Baker, Richard S.
Big and Beefy Entry - KV1 Simplified turret

mikado

Joined: July 10, 2005
KitMaker: 329 posts
Armorama: 254 posts
Posted: Friday, March 10, 2006 - 08:35 PM UTC
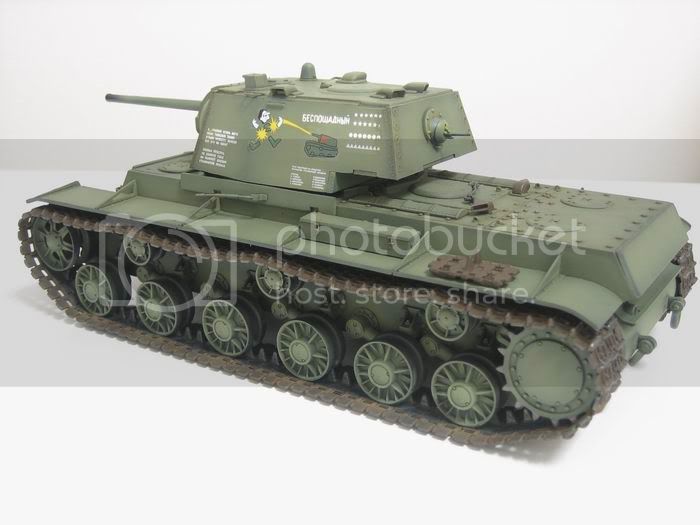
This is my big and beefy entry ....It's the KV1-simplified turret OOB...done with the major assembly....will texture the turret next....

TankCarl

Joined: May 10, 2002
KitMaker: 3,581 posts
Armorama: 2,782 posts
Posted: Friday, March 10, 2006 - 09:21 PM UTC
Mike,that is an interesting way to assemble the track.Are the rollers and roadwheels glued on,or do you have them temporarily tacked? I have just painted my track for my entry,and have the inner roadwheel halves glued to my hull.But the track is a continuous loop as you have done.

mikado
Joined: July 10, 2005
KitMaker: 329 posts
Armorama: 254 posts
Posted: Saturday, March 11, 2006 - 08:55 AM UTC
Quoted Text
Are the rollers and roadwheels glued on,or do you have them temporarily tacked? I have just painted my track for my entry,and have the inner roadwheel halves glued to my hull.But the track is a continuous loop as you have done.
Hi Carl,
I just read your posting for the B&B...Man....you are fast....
For the roller and roadwheel....I have glue them on to the track permenantly...I saw some modeller do it this way, the explanation was it is easier to paint/weather the track this way....so I thought I try it out.....
have not started to paint it yet....so I cannot say if it is easier to paint the track and but harder to assemble them later to the hull.....I guess there must be a balance some where...some sort of "ying and yang" in modelling....

blackeast19
Joined: February 22, 2005
KitMaker: 394 posts
Armorama: 217 posts

Posted: Saturday, March 11, 2006 - 10:55 AM UTC
Hi Mike,
nice looknig build there, would be looking forward to see your completed kit. Can you explain how u intend to texture the turret? Do you mean rough surface?
PS: did u manage to get the KV-1(E)?
Cheers!

nice looknig build there, would be looking forward to see your completed kit. Can you explain how u intend to texture the turret? Do you mean rough surface?
PS: did u manage to get the KV-1(E)?
Cheers!
mikado
Joined: July 10, 2005
KitMaker: 329 posts
Armorama: 254 posts
Posted: Saturday, March 11, 2006 - 05:21 PM UTC
Quoted Text
Hi Mike,
Can you explain how u intend to texture the turret? Do you mean rough surface?
PS: did u manage to get the KV-1(E)?
Cheers!
Hi Dan,
Check out this link in armorama.....lots of useful info here....
https://armorama.kitmaker.net//features/80
Most likely will do the same as describe in the link...
Mike

newnikonian

Joined: July 28, 2005
KitMaker: 279 posts
Armorama: 233 posts

Posted: Saturday, March 11, 2006 - 09:03 PM UTC
Hi Mike
The build looks good and Clean. I tried this method but while fixing the tracks back, I had a tough time. Happened after the oil paint washes. Make sure the amount of wash near the wheel ans axile area is not excesive.
Another point, Beter remove the tow cables from the "Turn Buckle". You can fix them back after painting and weathering is completed. Else you may end up breaking the buckle atleast 5 times. Happened for me
Looking forward to your finished model. Keep us updated. Saw an interesting looking KV1 at ML. The color and weathering looks cool. Check it out.
http://www.network54.com/Forum/110741/message/1141983097/KV1E++weathering+update+%28large+pics%29
Tempting me to do another KV1
Have a Great Day
blackeast19
Joined: February 22, 2005
KitMaker: 394 posts
Armorama: 217 posts
Posted: Tuesday, March 14, 2006 - 04:15 AM UTC
Hi Mike,
Thanks for the tips! See u at the finish line!
Cheers!
:-)
Thanks for the tips! See u at the finish line!
Cheers!
:-)
mikado
Joined: July 10, 2005
KitMaker: 329 posts
Armorama: 254 posts
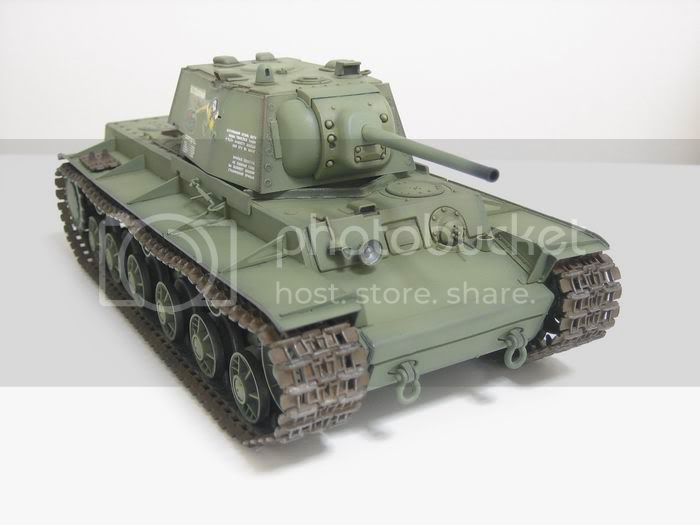
Posted: Saturday, March 18, 2006 - 09:33 PM UTC
Hi all,
Been quite busy lately...
My progress for the B&B has been rather slow...Good thing that I have another 2 month before this campaign ends.....
Only managed to pre-shade this KV1 this weekend....

Been quite busy lately...
My progress for the B&B has been rather slow...Good thing that I have another 2 month before this campaign ends.....
Only managed to pre-shade this KV1 this weekend....

umustb
Joined: April 27, 2005
KitMaker: 1,396 posts
Armorama: 0 posts

Posted: Sunday, March 19, 2006 - 10:21 AM UTC
Hi mike.. I got a question.. How did you make the tracks sag? Or are they link tracks?
mikado
Joined: July 10, 2005
KitMaker: 329 posts
Armorama: 254 posts
Posted: Sunday, March 19, 2006 - 08:36 PM UTC
Quoted Text
Hi mike.. I got a question.. How did you make the tracks sag? Or are they link tracks?
Hi JM,
There are link and lenght track. The sag comes with kit itself so I did not do anything special.... :-)

Sabot
Joined: December 18, 2001
KitMaker: 12,596 posts
Armorama: 9,071 posts
KitMaker: 12,596 posts
Armorama: 9,071 posts
Posted: Sunday, March 19, 2006 - 08:43 PM UTC
How did you like the kit to build overall? I just won one on eBay and am anxious to see it in person.

BattleBuddy
Joined: March 02, 2004
KitMaker: 35 posts
Armorama: 0 posts
Posted: Monday, March 20, 2006 - 12:20 AM UTC
Looking good Mike! Keep us posted, I am especially interested on how you are going to finish the tracks and roadwheels.
Ray Manneck
Ray Manneck
mikado
Joined: July 10, 2005
KitMaker: 329 posts
Armorama: 254 posts
Posted: Monday, March 20, 2006 - 06:00 AM UTC
Quoted Text
How did you like the kit to build overall? I just won one on eBay and am anxious to see it in person.
It's a good and easy built... fitting is fantastic for this trumpeter kit.....except only for the pin mark in L&L track had to spend some time sanding off the pin mark and there are lots of them...though some are not visible after assembling
One point to note...I cannot remember if it is the left or right side of the track....but you need to use one less track than what is specify in the instruction sheet...I believe it is the side where the last road wheel is closer to the drive wheel....
Quoted Text
Looking good Mike! Keep us posted, I am especially interested on how you are going to finish the tracks and roadwheels.
To be honest...I am still scratching my head as to how to finish the track and road wheel....but I did try to dry fit it back to the hull after the pre-shade last weekend and it still work...phew.......

ShermiesRule
Joined: December 11, 2003
KitMaker: 5,409 posts
Armorama: 3,777 posts
Posted: Monday, March 20, 2006 - 06:27 AM UTC
Quoted Text
How did you like the kit to build overall? I just won one on eBay and am anxious to see it in person.
The Trumpeter kits are great. I built 3 myself with a 4th ready to go!

mikado
Joined: July 10, 2005
KitMaker: 329 posts
Armorama: 254 posts
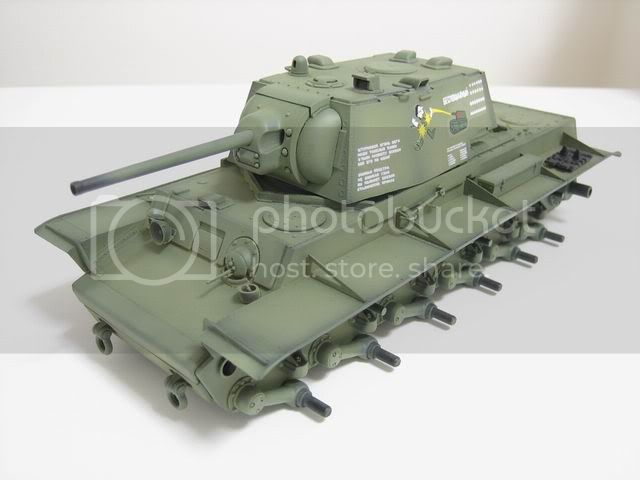
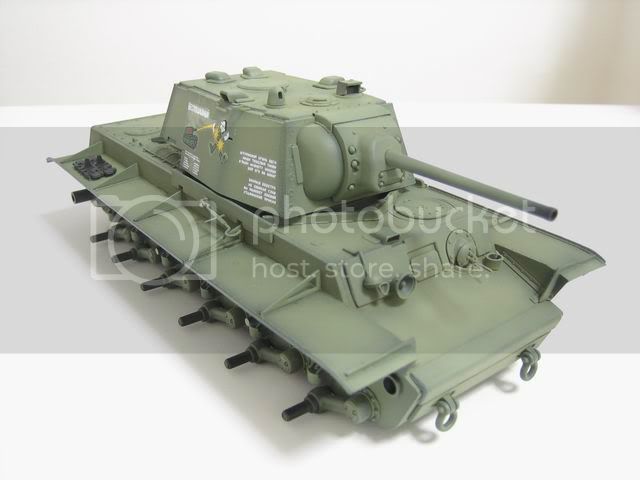
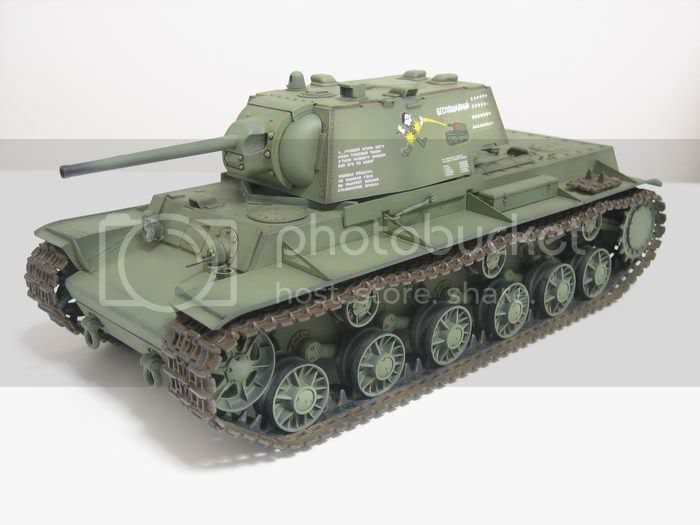
Posted: Friday, March 24, 2006 - 07:08 PM UTC
Hi all,
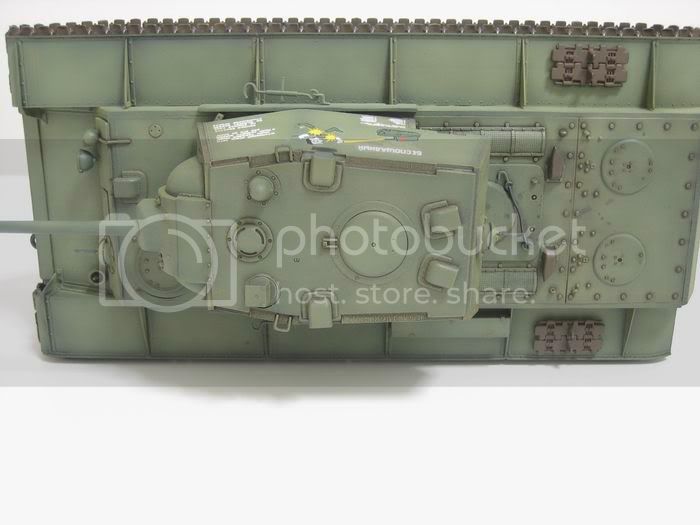
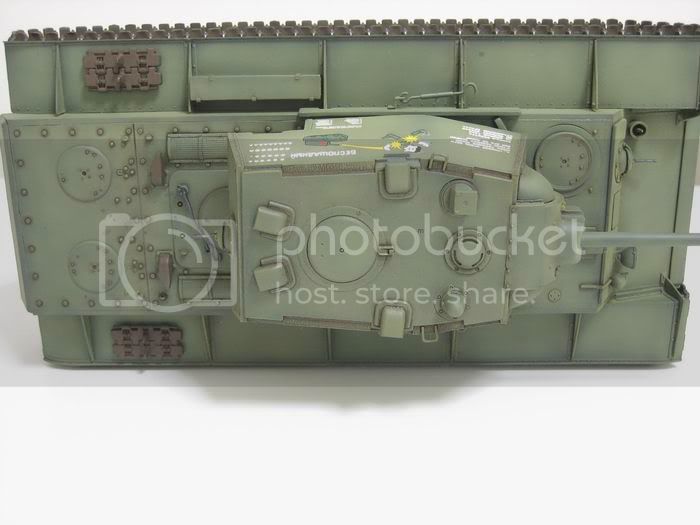
Got the base-coat and the post shade done for the my KV1 entry into the B&B Campaign....
Add in the decal too....hopefully next week I can work on the track .....

Got the base-coat and the post shade done for the my KV1 entry into the B&B Campaign....
Add in the decal too....hopefully next week I can work on the track .....
ShermiesRule
Joined: December 11, 2003
KitMaker: 5,409 posts
Armorama: 3,777 posts
Posted: Friday, March 24, 2006 - 11:03 PM UTC
That KV1 looks excellent. Can't wait to see the tracks
mikado
Joined: July 10, 2005
KitMaker: 329 posts
Armorama: 254 posts
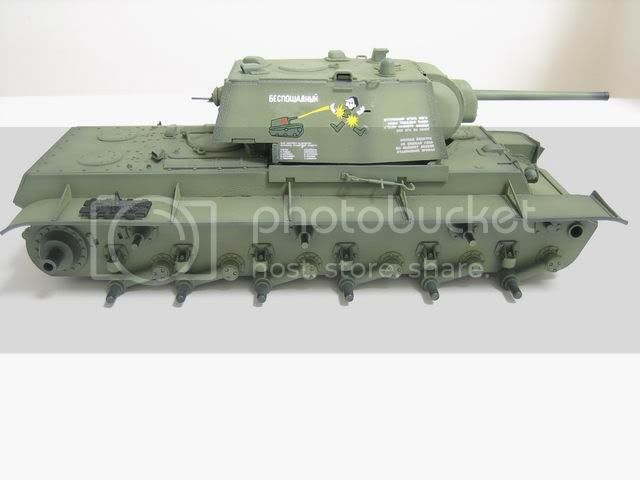
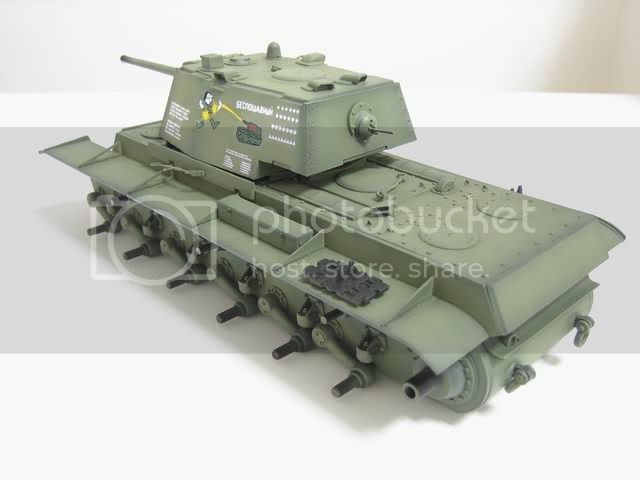
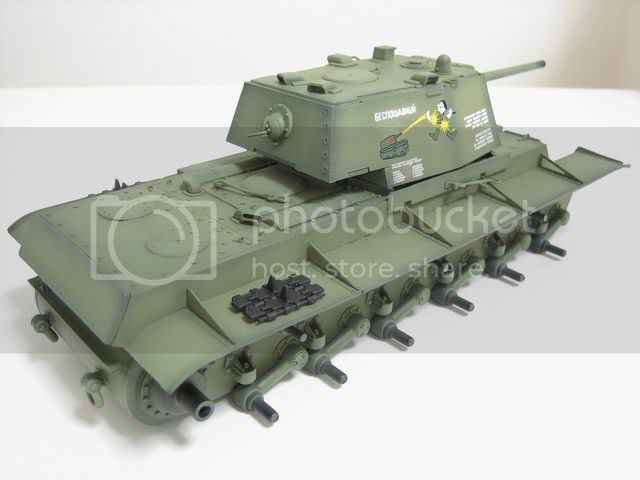
Posted: Saturday, April 01, 2006 - 08:41 PM UTC
Hi all,
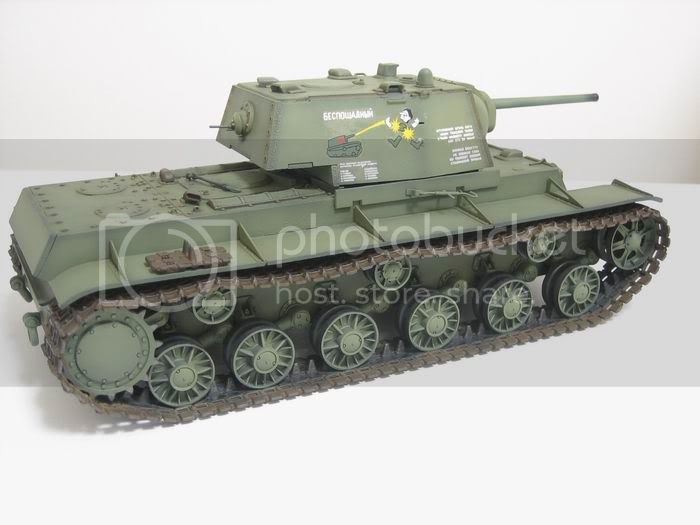
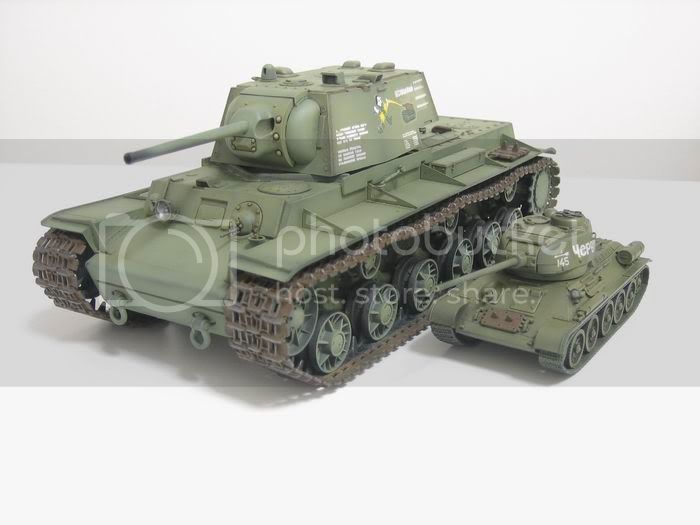
Managed to airbrush multiple layer of thin coating of dark brown + light earth on to the track to simulate rust and mud...then added the bare metal look using a pencil on the outer part of the track and also at the part of the track where the road wheel comes into contact.....and finally, attached the tracks back to the hull.....
using the same brown color, paint brush into the spare track link and the exhaust.......
Not sure what to do next...still thinking if I should add rain mark onto the turret, as this will cover the decal...also not sure if I want to spary buff to have the dust effect...because I have been doing that for the last 3 models....
anyway....will see....must get some idea first before I proceed to weather damage this model....
Any suggestion is most welcome :-)
 |

WEB HOSTING BY


Copyright ©2021 Armorama and Kitmaker Network, a subsidiary of Silver Star Enterprises
All Rights Reserved. Please read our Conditions of Use and Privacy Policy.
All Rights Reserved. Please read our Conditions of Use and Privacy Policy.