

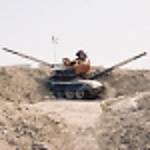
One thing I noticed about the track. You have weathered it as if the tank has been sitting in a motor pool after some type of training environment. The actual picture of the tank is during OIF, there was not alot of sitting around for the end connectors and center guides to get rusty. So they actually should be a silver color to represent all the grinding with the sprocket and the roadwheels.
Ric
Hosted by Darren Baker
M1A1 HC
Ric_Cody

Joined: May 22, 2005
KitMaker: 299 posts
Armorama: 294 posts

Posted: Wednesday, September 13, 2006 - 02:31 PM UTC

HazZaRd

Joined: May 25, 2006
KitMaker: 291 posts
Armorama: 288 posts
Posted: Wednesday, September 13, 2006 - 10:57 PM UTC
thankx for comments
i already changed the color of the headlights but youre talking about a engine fire T handle where is it on the tank?
i already thinked of it too and i'm trying to change it
and for the proces on the tank i started with doing a wash after that i did a pinwash i also aded the MILES tape
pics:


some one got more tips on weathering ?
,Gijs
Quoted Text
Looks Great!!
A couple of things. Black headlights are also acceptable(IR Lensed installed) and the Engine fire T handle should be red.
.
I picked up mine today and couldn't believe someone funally got it right.
i already changed the color of the headlights but youre talking about a engine fire T handle where is it on the tank?
Quoted Text
One thing I noticed about the track. You have weathered it as if the tank has been sitting in a motor pool after some type of training environment. The actual picture of the tank is during OIF, there was not alot of sitting around for the end connectors and center guides to get rusty. So they actually should be a silver color to represent all the grinding with the sprocket and the roadwheels.
Ric
i already thinked of it too and i'm trying to change it
and for the proces on the tank i started with doing a wash after that i did a pinwash i also aded the MILES tape
pics:
some one got more tips on weathering ?
,Gijs


HeavyArty

Joined: May 16, 2002
KitMaker: 17,694 posts
Armorama: 13,742 posts
Posted: Wednesday, September 13, 2006 - 11:08 PM UTC
Quoted Text
engine fire T handle where is it on the tank?
On the left side toward the rear, just behind the NBC filter, centered below teh air filter screen. The handle there should be red.

2CAVTrooper
Joined: October 21, 2005
KitMaker: 310 posts
Armorama: 302 posts
Posted: Wednesday, September 13, 2006 - 11:10 PM UTC
Quoted Text
i already changed the color of the headlights but youre talking about a engine fire T handle where is it on the tank?
The "T" handle is on the loader's (left) side of the hull just above where roadwheel #5 is

FatMike
Joined: September 11, 2006
KitMaker: 106 posts
Armorama: 107 posts

Posted: Thursday, September 14, 2006 - 03:54 AM UTC
You can't tell on the pic, but if youre doing the Diorama as if the tank is moving down the road on its way to take Baghdad, the "Dog House" (GPS) Doors would have been open. That way the gunner could engage targets if he needed to. There is one dark (black tinted) window (right side) and one clear window. Then just some small things, I know if you did this then you couldn't see the .50 cal ammo, but if the .50 cal box is not closed and the TC tried to fire it, the box would go flying off the mount, the ammo box lid is what locks it down to the mount, and the rounds are feed under a metal plate there on the mount. The lid would have been taken off the M240C completely because it would only vibrate off when the M240C was being fired.
Again, sorry man, not trying to dis your model, it looks great, I'm just trying to help you be as actuate as possible.
Mike
PS: Soon enough Ill have one of mine posted and you can flame it all you want
Again, sorry man, not trying to dis your model, it looks great, I'm just trying to help you be as actuate as possible.
Mike
PS: Soon enough Ill have one of mine posted and you can flame it all you want

Razor635
Joined: September 11, 2006
KitMaker: 45 posts
Armorama: 46 posts

Posted: Thursday, September 14, 2006 - 09:27 AM UTC
A big oops. Your sponson box lids are on the wrong side. The hinge lines should be along the outside of the turret. Also mix a little steel along the loaders skate ring. Its unpainted metal even though it looks dark in alot of pictures.
Still looks great.
Still looks great.
HazZaRd
Joined: May 25, 2006
KitMaker: 291 posts
Armorama: 288 posts
Posted: Thursday, September 14, 2006 - 03:31 PM UTC
Quoted Text
You can't tell on the pic, but if youre doing the Diorama as if the tank is moving down the road on its way to take Baghdad, the "Dog House" (GPS) Doors would have been open. That way the gunner could engage targets if he needed to. There is one dark (black tinted) window (right side) and one clear window. Then just some small things, I know if you did this then you couldn't see the .50 cal ammo, but if the .50 cal box is not closed and the TC tried to fire it, the box would go flying off the mount, the ammo box lid is what locks it down to the mount, and the rounds are feed under a metal plate there on the mount. The lid would have been taken off the M240C completely because it would only vibrate off when the M240C was being fired.
Again, sorry man, not trying to dis your model, it looks great, I'm just trying to help you be as actuate as possible.
Mike
PS: Soon enough Ill have one of mine posted and you can flame it all you want
these GPS doors can be opened and closed on the model i have them closed because there is no window in yet
and for the .50cal i'm gooing to change it
Quoted Text
A big oops. Your sponson box lids are on the wrong side. The hinge lines should be along the outside of the turret. Also mix a little steel along the loaders skate ring. Its unpainted metal even though it looks dark in alot of pictures.
Still looks great.
i dont really know what you mean with the sponson box lids
,Gijs
HeavyArty
Joined: May 16, 2002
KitMaker: 17,694 posts
Armorama: 13,742 posts
Posted: Thursday, September 14, 2006 - 05:15 PM UTC
Quoted Text
i dont really know what you mean with the sponson box lids
The tool/storage boxes on either side of the turret. The hinges should be on the oposite side from where you have them, so that they open out, not in. I missed that too.
HazZaRd
Joined: May 25, 2006
KitMaker: 291 posts
Armorama: 288 posts
Posted: Thursday, September 14, 2006 - 05:48 PM UTC
Quoted Text
Quoted Texti dont really know what you mean with the sponson box lids
The tool/storage boxes on either side of the turret. The hinges should be on the oposite side from where you have them, so that they open out, not in. I missed that too.
ok thanks Gino i wil change that as soon as posible
i did not even noticed that they where wrong
,Gijs
Razor635
Joined: September 11, 2006
KitMaker: 45 posts
Armorama: 46 posts
Posted: Thursday, September 14, 2006 - 05:48 PM UTC
If there is incoming artilliary or breeching a minfield, it is SOP to close the doghouse to protect the primary sight from damage. The auxilliary sight is used during these times.
Also the TC and loaders hatch handles should be black. they are rubberized. The loaders periscope(the rectangle part) should be black or white with steel mounting brackets. They are always removed when a vehicle is painted and never change from the factory color. White designates a laser safe periscope.
Also the TC and loaders hatch handles should be black. they are rubberized. The loaders periscope(the rectangle part) should be black or white with steel mounting brackets. They are always removed when a vehicle is painted and never change from the factory color. White designates a laser safe periscope.
FatMike
Joined: September 11, 2006
KitMaker: 106 posts
Armorama: 107 posts
Posted: Thursday, September 14, 2006 - 07:27 PM UTC
Quoted Text
If there is incoming artilliary or breeching a minfield, it is SOP to close the doghouse to protect the primary sight from damage. The auxilliary sight is used during these times.
Some more small fixes, the TC's hatch only opens to 90 degrees. You have your further back, and the cross-wind sensor would be in to up position

Yes, thats true, but seeing as there was only one mine clearing op on the road to Baghdad, and that was done by the Marine Combat Engineers just south of the Diyala River, I didn't think it would be relevant to mention it as this 3ID tank would not have been doing it. This tank is also not a mine clearing tank, so it would not be required to close its dog house doors... Someone has to keep over-watch... Furthermore, if you would like to get into SOP's the gun tube would be 90 degrees over the left side of the tank, with the .50 cal facing the front of the tank and all hatches buttoned up, so that the Combat Engineers could fire the MICLIC over the tank before you plow / roll through the mine field. I was on a plow tank and a roller tank...
Removed by original poster on 09/16/06 - 01:58:11 (GMT).
HazZaRd
Joined: May 25, 2006
KitMaker: 291 posts
Armorama: 288 posts
Posted: Friday, September 15, 2006 - 04:12 PM UTC
hey
i'm almost done with the weathering only need to spray some dust on it and a flatt layer
i made a picture of it

i'm almost done with the weathering only need to spray some dust on it and a flatt layer
i made a picture of it
FatMike
Joined: September 11, 2006
KitMaker: 106 posts
Armorama: 107 posts
Posted: Saturday, September 16, 2006 - 12:12 AM UTC
That looks great man, I would live to see more pics of it.
Razor635
Joined: September 11, 2006
KitMaker: 45 posts
Armorama: 46 posts
Posted: Saturday, September 16, 2006 - 12:18 AM UTC
WOW the fixes look great.
On the but side. If I had that much of a rust trail dripping from my NBC panels i would be freaqing out. It is a cool effect though.
On the but side. If I had that much of a rust trail dripping from my NBC panels i would be freaqing out. It is a cool effect though.
HazZaRd
Joined: May 25, 2006
KitMaker: 291 posts
Armorama: 288 posts
Posted: Sunday, September 17, 2006 - 10:33 PM UTC
hey
almost finished only the otherside of the tracks and maby a little bit of dust on the side
pics:


almost finished only the otherside of the tracks and maby a little bit of dust on the side
pics:
FatMike
Joined: September 11, 2006
KitMaker: 106 posts
Armorama: 107 posts
Posted: Monday, September 18, 2006 - 12:52 AM UTC
I think it looks great, the one last thing I could tell you, and I'm sure that you already know this, but you must weather the bags. They would have gotten really dusty one the road march to Baghdad. It really looks great though man.
Ric_Cody
Joined: May 22, 2005
KitMaker: 299 posts
Armorama: 294 posts
Posted: Tuesday, September 19, 2006 - 02:36 PM UTC
one thing I've noticed, not sure if its been brought up yet or not, but your CIP's on the sides of the turret. They say this side off, however the way the panels are on the turret, are actually on. If they were flipped 180 degrees then they would be off. So you could go through the pain of flipping them and putting on a new decal, or paint over the part that says this side off and it would be fine.
Ric
Ric

troubble27
Joined: October 10, 2003
KitMaker: 783 posts
Armorama: 637 posts

Posted: Wednesday, September 20, 2006 - 05:34 AM UTC
Hey, nice job on the Abrams! Looking at yours, I can hardly wait to build mine! The dio base is also very well done. I would only add one thing to the base..........lots of trash in the street. I hope I dont offend anyone here, but from the pictures I have seen of Iraq cities and around them, there is always trash blowing around the street. 
DeskJockey
Joined: July 17, 2006
KitMaker: 1,558 posts
Armorama: 1,159 posts
Posted: Wednesday, September 20, 2006 - 06:40 AM UTC
Very nice build--with all the helpful tips you've gotten it's looking extremely good. What did you use for the diorama base?
HazZaRd
Joined: May 25, 2006
KitMaker: 291 posts
Armorama: 288 posts
Posted: Wednesday, September 20, 2006 - 04:41 PM UTC
Quoted Text
Hey, nice job on the Abrams! Looking at yours, I can hardly wait to build mine! The dio base is also very well done. I would only add one thing to the base..........lots of trash in the street. I hope I dont offend anyone here, but from the pictures I have seen of Iraq cities and around them, there is always trash blowing around the street.
thanks for the stowage i will try to make it dusty
but this isn't the base where he comes on i'm planning a street in a city with a hmmwv and the m1a1
Quoted Text
Very nice build--with all the helpful tips you've gotten it's looking extremely good. What did you use for the diorama base?
for the diorama base i used a wooden base sand and the underside of a model/kit box for the road
,Gijs
troubble27
Joined: October 10, 2003
KitMaker: 783 posts
Armorama: 637 posts
Posted: Wednesday, September 20, 2006 - 06:13 PM UTC
That street looks really good for a piece of cardboard. Good idea. A lot of us use fine sandpaper and then paint it accordingly for street sections. Again, nice job. Cant wait to seeit finished!

Citizinsane
Joined: July 27, 2006
KitMaker: 463 posts
Armorama: 450 posts
KitMaker: 463 posts
Armorama: 450 posts
Posted: Saturday, September 23, 2006 - 04:51 AM UTC
Hi,
maybe a lil´ tip... I always give my models (even the sand colored) some light sand colored overall washings... something like a mix of tamiya buff(70%)+deck tan(30%), to simulate the fine dust on all the tank´s surfaces and the stowage... finally, to finish off, some pigments, a cote of heavily thinned matt base... Aaaand it´s finished
 Max
Max
maybe a lil´ tip... I always give my models (even the sand colored) some light sand colored overall washings... something like a mix of tamiya buff(70%)+deck tan(30%), to simulate the fine dust on all the tank´s surfaces and the stowage... finally, to finish off, some pigments, a cote of heavily thinned matt base... Aaaand it´s finished
Max |

WEB HOSTING BY


Copyright ©2021 Armorama and Kitmaker Network, a subsidiary of Silver Star Enterprises
All Rights Reserved. Please read our Conditions of Use and Privacy Policy.
All Rights Reserved. Please read our Conditions of Use and Privacy Policy.