Joe,
Two words: out standing!
Hosted by Darren Baker
AAVP7A1 with interior build
trahe

Joined: April 03, 2006
KitMaker: 1,158 posts
Armorama: 950 posts

Posted: Sunday, February 25, 2007 - 10:04 PM UTC
Posted: Sunday, February 25, 2007 - 10:33 PM UTC
ref cutting circles i have a compass with a scapel handle secured to it, also depending on what size circles you make the most of buy a larger compass and drill 2 holes through the scalpel handle and place a slot in the compass so the blade is at the correct height to use. the restriction on this last method is it cant be used to make small circles.

junglejim

Joined: February 18, 2003
KitMaker: 1,728 posts
Armorama: 1,629 posts

Posted: Sunday, February 25, 2007 - 10:41 PM UTC
Awesome work Joe. Having done this before (my article was in Oct 2006 issue of Model Military International), it's neat to follow your build and note how the construction took a similar path (yours is much neater than mine, however!) Here's a few pics of how mine turned out, hope you don't mind the 'hijack', but if others are contemplating this, it's not really that hard, just have to break it down into smaller parts, eg, start with the floor, then engine compartment, etc, and it won't seem as such a big task.


Cheers,
Jim


Cheers,
Jim

mother

Joined: January 29, 2004
KitMaker: 3,836 posts
Armorama: 1,370 posts

Posted: Monday, February 26, 2007 - 01:11 AM UTC
Well for cutting ovals, itís like this. First draw the lines of how wide itís going (blue) to be then the lines how wide(red). Using my circle template draw the size circles needed at both ends(green). Using a sharp knife cut lightly at first and deeper as you go.
Now to get itís shape and smooth, I used a wide handled paint brush and wrapped sanding paper around it and sanded till it looked right.

Ti, doing the nuts were easy as well. I just sliced many, many and many. I sliced them as close of the thickness of the hole, just barley going over the top. Glued them in place and using a sanding stick lightly sand them flat.
Hey Jim, yes I did happen to run across yours during my on-line search for interior shots along with some others great references, by the way yours looks great. Would you happen to have any shots of the gunners station, I was able to get these from a few members.


Now to get itís shape and smooth, I used a wide handled paint brush and wrapped sanding paper around it and sanded till it looked right.

Ti, doing the nuts were easy as well. I just sliced many, many and many. I sliced them as close of the thickness of the hole, just barley going over the top. Glued them in place and using a sanding stick lightly sand them flat.
Hey Jim, yes I did happen to run across yours during my on-line search for interior shots along with some others great references, by the way yours looks great. Would you happen to have any shots of the gunners station, I was able to get these from a few members.


Erik67

Joined: July 31, 2005
KitMaker: 1,871 posts
Armorama: 1,423 posts

Posted: Monday, February 26, 2007 - 01:36 AM UTC
Thanks Joe, that was a really usefull tip. Never thought of using a brush handle for sanding.
Erik
Erik


mother

Joined: January 29, 2004
KitMaker: 3,836 posts
Armorama: 1,370 posts

Posted: Wednesday, March 07, 2007 - 09:03 AM UTC
Hey all itís been sometime since my last update, my new medication has me less motivated. Anyhow I was able to do some touch up painting today. I still have a few things to add along the sides and add in the center benches. Iíd like to thank the following for their help and many reference photos that aided in the buildÖptruhe, bison126, jungleJim and HeavyArty...thanks guys. 


Iím hoping to have the interior done and buttoned up this weekend, and to start on the exterior work. More to comeÖ
Joe


Iím hoping to have the interior done and buttoned up this weekend, and to start on the exterior work. More to comeÖ
Joe

ti

Joined: May 08, 2002
KitMaker: 2,264 posts
Armorama: 1,763 posts

Posted: Wednesday, March 07, 2007 - 09:06 AM UTC
Hey Joe. You've done it again. You are simply a master at what you do. Everything is dso darn neat. Do you use a precision cutter or what?? BTW, what did you use for the seat cushions? I'm interested in doing something like that. I'm really envy at your way of getting everything so perfect. Great job.

mother

Joined: January 29, 2004
KitMaker: 3,836 posts
Armorama: 1,370 posts

Posted: Wednesday, March 07, 2007 - 09:47 AM UTC
Thanks Charles, as for a precision cutterÖno just my trusty hobby knife, 6inch metal ruler and cutting matt. As for the seat cushions ,which I was a bit sloppy in doing are made by using baking modeling clay. Thereís no end to using this stuff, just make what ever you need and bake at 250 degrees for 10-15mins.
CharlesÖ follow this LINK here, it'll give you more information.
Joe
CharlesÖ follow this LINK here, it'll give you more information.
Joe

HeavyArty


Joined: May 16, 2002
KitMaker: 17,694 posts
Armorama: 13,742 posts

Posted: Wednesday, March 07, 2007 - 11:27 AM UTC
It's looking great Joe. Good job so far. Can't wait to see it done. Are you going to do it with the RAMS/RS upgrade to the tracks and new exhaust?
james84

Joined: January 28, 2006
KitMaker: 1,368 posts
Armorama: 950 posts

Posted: Wednesday, March 07, 2007 - 01:21 PM UTC
What an ambitious project!
But it's coming out fairly nice!
Great work!
But it's coming out fairly nice!
Great work!

afv_rob

Joined: October 09, 2005
KitMaker: 2,556 posts
Armorama: 2,199 posts

Posted: Wednesday, March 07, 2007 - 04:13 PM UTC
Joe thats amazing!! Everything looks just so neat and perfect, you have done a masterful job with the plasti card there and all the little components look spot on. You'll be laughing at anyone whos spent a fortune on the Hobby fan kit.
Will you be building this as a RAM/RS version with EAAK?? Ive just picked up an EAAK kit and Tamiya base model, I dont think after the Bradley though that I can be bothered to scratch another interior for a while. I will be watching this build with great interest.
Will you be building this as a RAM/RS version with EAAK?? Ive just picked up an EAAK kit and Tamiya base model, I dont think after the Bradley though that I can be bothered to scratch another interior for a while. I will be watching this build with great interest.
trahe

Joined: April 03, 2006
KitMaker: 1,158 posts
Armorama: 950 posts

Posted: Wednesday, March 07, 2007 - 04:54 PM UTC
Joe,
Absolutely fantastic. You got skills! Can't wait for further progress shots.
Absolutely fantastic. You got skills! Can't wait for further progress shots.
drumthumper

Joined: December 22, 2004
KitMaker: 392 posts
Armorama: 227 posts

Posted: Wednesday, March 07, 2007 - 05:53 PM UTC
Joe,
I don't often use the superlative - stunning. But in this case what else can I say! Tremendous job!
Mike
I don't often use the superlative - stunning. But in this case what else can I say! Tremendous job!
Mike

troubble27

Joined: October 10, 2003
KitMaker: 783 posts
Armorama: 637 posts

Posted: Wednesday, March 07, 2007 - 08:54 PM UTC
Wow, Joe, that looks incredible. Ive been watching this thread with silent enthusiasm, and I gotta finally speak up and say this thing looks amazing. Man, you really have some serious scratch building skills. I wouldnt have the patience to do all that. Keep us posted, cant wait to see the rest of it!
Gary
Gary


ti

Joined: May 08, 2002
KitMaker: 2,264 posts
Armorama: 1,763 posts

Posted: Wednesday, March 07, 2007 - 09:26 PM UTC
Thanks Joe. I figured you used something like that.  I saw this clay in a hobby store, so now I have an excuse to buy it.
  Thanks for the link. I appreciate it. Again Joe. This model is going to be your masterpiece. Thanks for inspiring me.
 I saw this clay in a hobby store, so now I have an excuse to buy it.
  Thanks for the link. I appreciate it. Again Joe. This model is going to be your masterpiece. Thanks for inspiring me.
bison126

Joined: June 10, 2004
KitMaker: 5,329 posts
Armorama: 5,204 posts

Posted: Thursday, March 08, 2007 - 12:08 AM UTC
Pleased to help. And when I see what you can do, it's a real pleasure to be of some use.
I love the details you add like the heater conduct, the radio set, the instrument panel and so on.
Why bothering paying so much for a Hobby Fan interior set ? Just do it yourself
Olivier
I love the details you add like the heater conduct, the radio set, the instrument panel and so on.
Why bothering paying so much for a Hobby Fan interior set ? Just do it yourself

Olivier
Hawkeye

Joined: March 29, 2002
KitMaker: 701 posts
Armorama: 640 posts

Posted: Thursday, March 08, 2007 - 12:37 AM UTC
Excellent work Joe,Joe, with the paint on there you would not know that was not an AM interior, very impressive.
Regards from the Swamp
Eth
Regards from the Swamp
Eth
jvazquez

Joined: September 26, 2006
KitMaker: 857 posts
Armorama: 811 posts

Posted: Thursday, March 08, 2007 - 01:09 AM UTC
Amazing with what someone can do with plastic card!
Terrific work!!

Terrific work!!


mother

Joined: January 29, 2004
KitMaker: 3,836 posts
Armorama: 1,370 posts

Posted: Friday, March 16, 2007 - 09:55 AM UTC
Well I finally got it buttoned up, and did the welding in the seams. The welds were done by gluing on 0.4mm rod with Ten-X, and then using the Ten-X to soften the plastic I took a number 11 blade and broke the tip of and closely pressed into the rod to simulate the weld bead.
The EAAK blocks are Evergreens 1x2mm strips. If my calculations are close then that makes them 1.5 inch by 3 inches in 1/35th. They took two days of laying and gluing them on, I used Hobby Fans instruction sheet as a guide.
Iím now off to paint, and for the first time Iíll be painting in the whole camouflage scheme using the airbrush. In the past Iíd just airbrush in the green then using Q-tips filling in the last two colors by rolling the paint on with the Q-tip. It does work out pretty good, but there are to many lumps and bumps on this build. Iíll post more tomorrow with itís cammo on.
Joe


Cuhail

Joined: February 10, 2004
KitMaker: 2,058 posts
Armorama: 791 posts

Posted: Friday, March 16, 2007 - 10:21 AM UTC
Quoted Text
You posted that pic for me didn't ya? Just so I'd know exactly what I did wrong on my scratchbuilt one? Yeah? Well It worked. :-) I can see exactly what I did wrong AND what I did right. :-)
Looks freaking awesome, Joe! I wanna know how we're gonna see the rest of the finished interior now that the cap is on? I mean, good job on the blocks and everything, but, I wasn't done marveling at the amazing interior ya did! You did snap a few more piccies, didn't ya?
Erin Go Bragh!
Cuhail


afv_rob

Joined: October 09, 2005
KitMaker: 2,556 posts
Armorama: 2,199 posts

Posted: Friday, March 16, 2007 - 02:54 PM UTC
Joe this is simply amazing!!!!!! It looks absolutley fantastic, and soo well deatiled. Have you got any shots of the interior of the turret you have done? I feel i may be getting bitten by the AAV7 bug....hmm now wheres my Tamiya kit!? Those weld beads looks stunning.

ti

Joined: May 08, 2002
KitMaker: 2,264 posts
Armorama: 1,763 posts

Posted: Friday, March 16, 2007 - 03:42 PM UTC
Looking fantastic Joe. May I ask how you did the welds?

mother

Joined: January 29, 2004
KitMaker: 3,836 posts
Armorama: 1,370 posts

Posted: Saturday, March 17, 2007 - 12:34 AM UTC
Charles,
What Iíve done was use a 0.4mm round rod, then glue it in place with Ten-X or any liquid cement. Donít use superglue to glue in place, the liquid cement wonít penetrate through the superglue and soften the plastic rod.
In fig.1 and fig.2 shows a no.#11 blade, in fig.2 the tip is broken of just at the tip.
Now your ready to weld, first run a couple of passes of cement over the rod, about an inch or two at a time. Then take the blade and press into the soften rod. Small soft jabs is all needed. Itís almost like welding for real. There are other ways in doing weld beads, but I found this way to be easier and realistic. Oh yeahÖif you mess up some just let it harden and go over it again. Also you donít want to really get the rod soaked with the cement or itíll just turn to blob.

Joe
What Iíve done was use a 0.4mm round rod, then glue it in place with Ten-X or any liquid cement. Donít use superglue to glue in place, the liquid cement wonít penetrate through the superglue and soften the plastic rod.
In fig.1 and fig.2 shows a no.#11 blade, in fig.2 the tip is broken of just at the tip.
Now your ready to weld, first run a couple of passes of cement over the rod, about an inch or two at a time. Then take the blade and press into the soften rod. Small soft jabs is all needed. Itís almost like welding for real. There are other ways in doing weld beads, but I found this way to be easier and realistic. Oh yeahÖif you mess up some just let it harden and go over it again. Also you donít want to really get the rod soaked with the cement or itíll just turn to blob.

Joe

mother

Joined: January 29, 2004
KitMaker: 3,836 posts
Armorama: 1,370 posts

Posted: Saturday, March 17, 2007 - 12:58 AM UTC
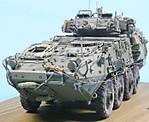
Well here she is with some paint. The green is Model Masters while the other two are from Tamiya. This is the first time I used my airbrush to do a three color cammo paint job, it was so easy enough to do that I will continue to do so from now on. Next step is to lighten the three colors some to highlight certain areas. The hardest part doing armor (for me) are the tracks, I did a search here and found some great suggestions.
Joe


Joe


ti

Joined: May 08, 2002
KitMaker: 2,264 posts
Armorama: 1,763 posts

Posted: Saturday, March 17, 2007 - 01:43 AM UTC
Wow Joe thanks for the tip and boy does it look fantastic after painting it. You are a fantastic modeller Joe. Thanks for sharing.  BTW, is it a must I use this particular type of glue or does any modeller glue work?
 BTW, is it a must I use this particular type of glue or does any modeller glue work?
 |


