Just FYI, it seems that one of my posts is also AWOL.
Nothing major but kind of odd.
Campaigns
Where Armorama group builds can be discussed, organized, and updates posted.
Hosted by Darren Baker, Richard S.
Sherman Campaign
Posted: Wednesday, July 21, 2010 - 09:52 PM UTC
ppawlak1
Victoria, Australia
Joined: March 14, 2006
KitMaker: 1,973 posts
Armorama: 1,843 posts
Joined: March 14, 2006
KitMaker: 1,973 posts
Armorama: 1,843 posts
Posted: Wednesday, July 21, 2010 - 09:55 PM UTC
The Tasca Firefly sounds great Jeremy
Mmmm it's a shame about the missing posts - I wonder how many we've lost ....
20 hours worth ??
Mmmm it's a shame about the missing posts - I wonder how many we've lost ....
20 hours worth ??
thebear
Quebec, Canada
Joined: November 15, 2002
KitMaker: 3,960 posts
Armorama: 3,579 posts
Joined: November 15, 2002
KitMaker: 3,960 posts
Armorama: 3,579 posts
Posted: Wednesday, July 21, 2010 - 10:40 PM UTC
Hi Chris ...The square shaped pieces on the corners of the engine hatches was part of a refit done to M4A3s (after the war) which made opening the doors easier...
Rick
Rick
Abn-modeller
Stockholm, Sweden
Joined: July 05, 2009
KitMaker: 76 posts
Armorama: 75 posts
Joined: July 05, 2009
KitMaker: 76 posts
Armorama: 75 posts
Posted: Thursday, July 22, 2010 - 02:43 AM UTC
Well, here's what I'm working on- an M4 DV during the Normandy campaign...
I have one question here, the turret interior pictured here is it the "wet stowage" interior? And would it have been found in an M4 during this time and place?
Posted: Thursday, July 22, 2010 - 05:58 AM UTC
First of all, amazing to see the quality of work in this thread - and how quick you guys build!
Second of all, here is my entry, the DML 1/35 M4A1 76(W)
Obligatory box-top photo. I will be building my entry as a Sherman of the 1st Polish Armoured Division in an urban combat diorama.
Some of the "extras" that will be used on this
And the work so far. I could've sworn I've done more link&length tracks than that!
Now as you can see, this is a pretty big project, especially as I still haven't finished a model this year! Thankfully we've got a full year for this baby (even more so since I'm concentrating on a Pz.IV for the Workhorse campaign first....)
War_Machine
Washington, United States
Joined: February 11, 2003
KitMaker: 702 posts
Armorama: 385 posts
Joined: February 11, 2003
KitMaker: 702 posts
Armorama: 385 posts
Posted: Thursday, July 22, 2010 - 10:19 AM UTC
Well, I guess the site's recent crash wiped out my last post as well as the pics I uploaded for it, so here goes again. M7 build update two, take two.
First of all I made the necessary fixes to the suspension as pointed out to me by Richard (thanks again).
Then I fixed up the kit's rear hull plate. I sanded off the molded on guides for attaching the tools, drilled out the hole for the starter crank, and cut and filed the notch present on real vehicles but missing in the kit. I added the curved plate between the air filters and exhausts with a piece of lead foil. Lastly I added exhausts from a Tamiya M4, as the kit was missing these as well. I carved the exhausts up a little to try to replicate the earlier fishtail exhausts. Not perfect, but it works in a pinch.
I added the handle to the rear hull door and filled the sinkhole in the idler mount after taking the pic.
Next I added a few missing boxes and mounts for storing the driver's clear windshield inside the hull front plate out of modified kit parts, plastic strip, and spare bolts. I also added the flanges on either side of the opening for the howitzer with sheet plastic.
After that was done I had to make a new instrument panel. The kit comes with the later taller and slightly rounded panel, while the version I'm building had a rectangular panel. I made mine by laminating three sections of plastic sheet, then applied instrument faces using decals scrounged from my spares. When dried, the decals were sealed under a thin sheet of clear plastic. A couple of rivets and knobs later and construction was done.
Next I carefully painted the panel leaving only the faces of the dials visible.
Next up I had to modify the kit's ammunition storage box. The kit comes with a later 200 round storage box, but earlier Priests had 100 round boxes, so I cut down and modified the kit's part and added sheet styrene and angle stock as necessary.
I knew from the start that I was going to redo the driver's compartment, as the detail is a bit sparse and the box on the right is for later versions of the Priest.
I cut off the molded on transmission, filled the resulting hole with sheet styrene, and added the transmission from an Academy M36 kit. I also added the driver's controls, foot pedals, seat and seat mount, and attachments for the piece of white styrene tube, which I believe is part of the braking system, from the Academy kit as well. I didn't install the seat yet for ease of painting. The engine wiring is copper wire. I also added the internal bolt strips from laminated plastic sheet and spare bolts, and the cover plates for the brakes are sheet plastic with Archer surface detail rivets and more spare bolts. Finally, the new floor on the right was cobbled together from an AFV Club M10.
I fleshed out the rest of the driver's compartment by gluing the ammunition storage box in place, adding a wire along the left side of the hull interior, and a small storage compartment for maps or whatever else is necessary. I've seen vehicles with storage compartments on the side or on the overhang above the driver, but I wanted to dress up the area next to the driver, so it got the box.
I also added a storage box on the left hull side next to the driver. I believe this is for some sort of optical device, but I'm not an expert on the vehicle, so I'm not entirely certain. I just know that it's usually there.
Lastly, I came up with a driver figure, since I plan on displaying my Priest rolling down a Sicilian road. He's a significantly modified driver figure from the Tamiya Opel Blitz kit. I realize that his right arm is bigger than his left, but that was the best one I could find in my spares.
Next up I'll paint the driver and start putting together the 105 before breaking out the airbrush and getting some painting done on the subassemblies. I'll post some more pics when I get some more done.
thebear
Quebec, Canada
Joined: November 15, 2002
KitMaker: 3,960 posts
Armorama: 3,579 posts
Joined: November 15, 2002
KitMaker: 3,960 posts
Armorama: 3,579 posts
Posted: Thursday, July 22, 2010 - 10:21 AM UTC
Hi Cal...No the M4 never got the wet stowage system ..sorry
Posted: Thursday, July 22, 2010 - 11:02 AM UTC
Greetings Everyone!
@ Ed; Man that M7 is so cool it makes me want to go to church! Awesome Work!!
@ Neil; Great start on your A1, I’m likening the plan you have set for it.
@ Stefan; Also Great work on your M36B1, Hope you post a few more pix of that beauty and your A1-DV rocks!
@ Andrew; Really nice Firefly “Carole”, maybe you give everyone a run down on how you did canvas mantlet cover since it looks outstanding.
@ Justin; Your M3 is progressing nicely, good work on the Sponsor Fillers. I could never understand why Tamiya left them open.
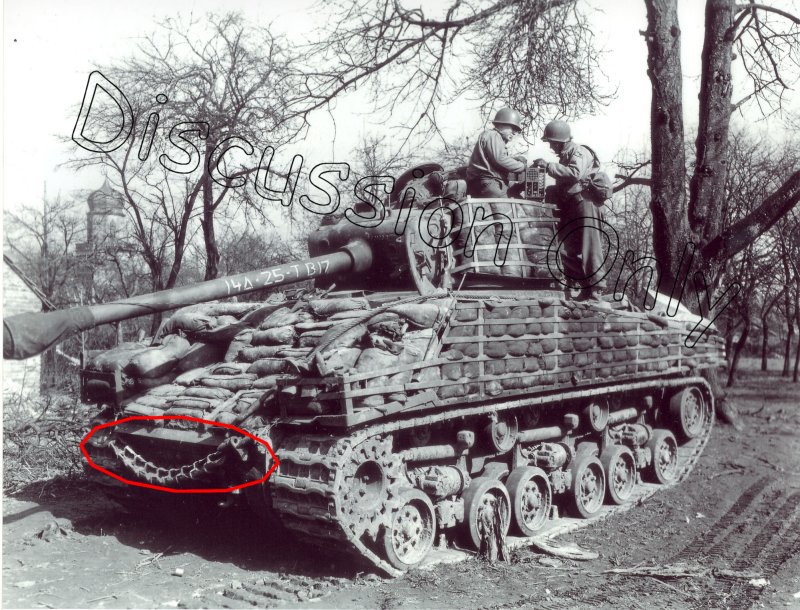
@ Chris; The below pictures show the set for the engine door hinges. Now if I understand correctly from my reading these where post WWII modifications and possibly even post Korean War. Due to the armored air ducting attached to the inside of these they where quit heavy. Hope that helps out.
Armored Air Ducting
Heavy Duity Hinges
If I got this wrong please let us know!
Great work by everyone!!
MrDrummy
Texas, United States
Joined: October 17, 2009
KitMaker: 86 posts
Armorama: 82 posts
Joined: October 17, 2009
KitMaker: 86 posts
Armorama: 82 posts
Posted: Thursday, July 22, 2010 - 11:40 AM UTC
@ Ed- I saw your post before it got nuked yesterday, and I'm just as impressed as I was then! Your instrument panel looks great. Nice Scratch-building!
@ Stefan- Thanks for that post! That's a nice lookin' build. What exactly did the sand skirt do, anyway?
I've got an Aber PE set on the way! Should be here early next week, though I will, once again, be on the road.
Here's where I am at the moment:
I added some styrene strip to the weld lines as per Eric, and have started the first little "chop" session. If I get time while I'm home this evening, I'll get to work a little on the final weld look.
I also cut off the grab handles on the rear hull, and will be attaching wire soon. Hatches next!
Thanks again to everyone for encouragement and tips! Can't wait to see some more progress from everyone!
thebear
Quebec, Canada
Joined: November 15, 2002
KitMaker: 3,960 posts
Armorama: 3,579 posts
Joined: November 15, 2002
KitMaker: 3,960 posts
Armorama: 3,579 posts
Posted: Thursday, July 22, 2010 - 12:12 PM UTC
Hi Ed ..if you missed my answer last time.....
Awesome job sir!
Justin ...hehehe we'll make a real shermaholic out of you by the time this group build is over Good stuff !
Awesome job sir!
Justin ...hehehe we'll make a real shermaholic out of you by the time this group build is over Good stuff !
Grindcore
New York, United States
Joined: September 23, 2006
KitMaker: 389 posts
Armorama: 358 posts
Joined: September 23, 2006
KitMaker: 389 posts
Armorama: 358 posts
Posted: Thursday, July 22, 2010 - 04:28 PM UTC
Ok, Lucky Model says the 1/48 Firefly and RB barrel are on the way and Adalbertus says the decals are inbound as well. Hopefully by the end of the month they should all be here.
cdharwins
New Jersey, United States
Joined: October 28, 2006
KitMaker: 491 posts
Armorama: 462 posts
Joined: October 28, 2006
KitMaker: 491 posts
Armorama: 462 posts
Posted: Thursday, July 22, 2010 - 04:38 PM UTC
@ Eric and Rick, Thanks for the info about the engine deck. I'm still not sure what those other four posts are along the back, so I think I'll just cover that area with stowage.
Chris
Chris
mopnglo
United States
Joined: January 07, 2006
KitMaker: 452 posts
Armorama: 271 posts
Joined: January 07, 2006
KitMaker: 452 posts
Armorama: 271 posts
Posted: Thursday, July 22, 2010 - 05:37 PM UTC
Wow, it's going to be really hard to keep up with this campaign! So many great starts far - I don 't even know where to begin. There is so much going on already and the campaign just started! I definitely need to thank Eric for the great SBS on adding welds.
@Neil - who makes that base? Is it Great North Roads?
@Cal - Great work on the M4! I also really like the three you posted in a separate thread. Wonderfully done!
@Ed - Definitely a "well done" so far on the M7!!! I'm looking forward to your next post!
Now a question for you guys. I've used DOA, Lifecolor, and Vallejo as a base coat on my last few builds. I'm thinking about going back to Tamiya for my 1/72 M4. I'm debating whether I need to spray a primer coat first, though, with the PE wading trunks. Will Tamiya stick to that much PE without primer? This is my first 1/72 model and I'm a little worried that a primer coat might thicken some detail. Any suggestions?
Thanks!
Michael
Posted: Thursday, July 22, 2010 - 06:35 PM UTC
Quoted Text
@Neil - who makes that base? Is it Great North Roads?
No, its SB Scotia, SB Models own line of accesories.
http://sbmodels.uk.net/index.php?option=com_virtuemart&page=shop.browse&category_id=6&Itemid=1&vmcchk=1&Itemid=1
BTW, I would always recomend the use of a primer coat, and especially for Tamiya paints which I find adhere poorly to bare plastic, let alone metal. What are you using for primer? Some are thicker than others.
mopnglo
United States
Joined: January 07, 2006
KitMaker: 452 posts
Armorama: 271 posts
Joined: January 07, 2006
KitMaker: 452 posts
Armorama: 271 posts
Posted: Thursday, July 22, 2010 - 06:50 PM UTC
Neil, thanks for the reply! I'll definitely check out SB Scotia!
I've been using Rustoleum Automotive Primer for 1/35 models. It works well. I've tried Krylon for Plastic, but didn't have a good experience with it. Do you have a primer that you recommend?
Thanks again!
Michael
I've been using Rustoleum Automotive Primer for 1/35 models. It works well. I've tried Krylon for Plastic, but didn't have a good experience with it. Do you have a primer that you recommend?
Thanks again!
Michael
Posted: Thursday, July 22, 2010 - 07:48 PM UTC
Gentlemen, this is a great Campaign, it's a pleasure to be part of it! Lots to learn and lots going on here!
Cal: I'm afraid the DV tanks were never fitted with wet stowage. As far as I know only the 47° hull Shermans had wet stowage.
Neil: Good choice on that M4A1 and certainly a different marking option. Looking forward to the progress. I have that one in the stash as well.
Ed: Great work on the M7!
Eric: I'm afraid the M36B1 is not part of this campaign, I built it for the tank killers campaign. You can see the whole build in my build log.
Justin: Nice work on the detailing. The weld seam on the sides should be a bit more smooth and wider, it was a different seam than the others. At least that was my impression of the pictures.
Michael: I use Tamiya colors right on plastic and PE all the time and it sticks fine. I acutally prime/preshade (in one step) my models with Tamiya XF-1 black.
Cheers everyone!
Stefan
ppawlak1
Victoria, Australia
Joined: March 14, 2006
KitMaker: 1,973 posts
Armorama: 1,843 posts
Joined: March 14, 2006
KitMaker: 1,973 posts
Armorama: 1,843 posts
Posted: Thursday, July 22, 2010 - 08:18 PM UTC
A great contributions by everyone - great work Guys !
@ Cal - nice progress ! As mentioned, that machine is not a Wet Storage Shermie.
@ Neil - a nice plan there mate. The figs will be interesting to do. There are no stand alone Polish shoulder patches for your figs from what I an gather. They would be a great addition !!
@ Ed - thanks for reposting, once again VERY good work. The instrument panel is first class !!
@ Justin - great work on those welds, you and Eric have set a precedent !!
@ Jimmy - hope you get those goodies soon..
@ Everyone - great work keep it up.
Cheers
Paul
DAR
United Kingdom
Joined: April 27, 2002
KitMaker: 250 posts
Armorama: 188 posts
Joined: April 27, 2002
KitMaker: 250 posts
Armorama: 188 posts
Posted: Thursday, July 22, 2010 - 10:06 PM UTC
Fantastic level of work being produced so far! Well done guys.
I'll post an update soon (I'm going to have to pull my socks up )
Posted: Friday, July 23, 2010 - 12:28 AM UTC
Good Morning Everyone…at least for me anyways!
I would like to thank everyone for your nice comments about the post I made relating to the welds. As I see it the main reason for these campaigns is to pass alone all the different techniques that are used. I understand some people will think that the welds are over sized or don’t prefer that method, and that Kool. It’s just how I do it.
@ Chirs; I’m not sure what the four post are either. But if I was to guess its also a post WWII/Korea(?) mod as well. So if your doing a WWII version I think you would be ok to leave them off. But like you said, stowage works too.
@ Justin; Them welds are looking great. Let us know what your thoughts are about that method and any suggestions/improvement that you think would work better.
@ Michael; I agree, keeping up with this campaign is sometimes difficult as I don’t want to miss anything. As for priming I would suggest that you do. Like Stefan I also prime in a dark color but not black, unless I’m laying down some panzer gray. I use a vary, vary dark color similar to the main coat color. Usually I start with model master enamel white primer, SKU#52719. Let that dry for minimum of 24-48 hours. After that I apply Tamiya XF27 Black Green Acrylic for pre-shading. Both are sprayed on via the airbrush. I think you could do it the same way as Stefan suggest, in fact I may try that this time around, priming and pre-shading in one step. Last thingy, I never have used “Restoleum/Krylon” as a primer and would stay way from them since they are not intended for our finely build masterpieces.
@ Stefan; thanks for the link to your M36B1 build. Awesome looking project you got there!
@ Neil; thanks for the SB models web site looks like they might have some interesting items.
I need to stop posting and get to building!!
Posted: Friday, July 23, 2010 - 06:43 AM UTC
Quoted Text
Neil, thanks for the reply! I'll definitely check out SB Scotia!
I've been using Rustoleum Automotive Primer for 1/35 models. It works well. I've tried Krylon for Plastic, but didn't have a good experience with it. Do you have a primer that you recommend?
Thanks again!
Michael
I use Halfords Grey Primer - its an automotive primer that modellers over here swear by. Its a bit heavier than say Mr. Surfacer, but I don't have an old airbrush that I'm willing to put that stuff through I have seen Vellejo have brought out a pre-mixed water soluble primer in the magazines, but I've yet to see it on sale at shows over here.
Quoted Text
Neil - a nice plan there mate. The figs will be interesting to do. There are no stand alone Polish shoulder patches for your figs from what I an gather. They would be a great addition !!
Yeah, it appears Archer don't do the Polish 1st AD I guess my guys will just have to do without the flashes as my painting skills aren't quite up to that.
Quoted Text
@ Neil; thanks for the SB models web site looks like they might have some interesting items
Yeah, they're a regular on the UK show circuit, always lots of interesting stuff on their stall!
ppawlak1
Victoria, Australia
Joined: March 14, 2006
KitMaker: 1,973 posts
Armorama: 1,843 posts
Joined: March 14, 2006
KitMaker: 1,973 posts
Armorama: 1,843 posts
Posted: Friday, July 23, 2010 - 10:35 AM UTC
Quoted Text
Yeah, it appears Archer don't do the Polish 1st AD I guess my guys will just have to do without the flashes as my painting skills aren't quite up to that.
Adalbertus have a couple of figs with decals, however they are for 2nd Corps.
The Shoulder patched and eagles would be appropriatr, but the collar flashes would be the wrong color.
Ortona 1943
Staghound Armoured Car Crew 1944-45
If you're in the market for either, there would be left over decals for your figs - depending on how many you need of course !!
Cheers
Paul
thebear
Quebec, Canada
Joined: November 15, 2002
KitMaker: 3,960 posts
Armorama: 3,579 posts
Joined: November 15, 2002
KitMaker: 3,960 posts
Armorama: 3,579 posts
Posted: Friday, July 23, 2010 - 12:12 PM UTC
I usually don't use a real primer but I use Nato Black from Tamiya as a base coat ...It also means my wheels are already painted if I'm careful..
Great work everybody!! Keep it up
MrDrummy
Texas, United States
Joined: October 17, 2009
KitMaker: 86 posts
Armorama: 82 posts
Joined: October 17, 2009
KitMaker: 86 posts
Armorama: 82 posts
Posted: Friday, July 23, 2010 - 05:15 PM UTC
As far as primer goes, on the one piece of armor I've done, I've used Mr. Surfacer 1000. When I build aircraft I rarely prime, though it does seem certain colors of Tamiya acrylic tend to scratch off pretty easily. Richard, NATO Black seems to be one of the easiest to scratch. Might just be my bottle... Anyway, the Mr. Surfacer really helped add some "tooth" to the model, and I had not problems with paint scuffing or coming off.
A little update:
I took a break from the welds, and I finished all the grab handles. They look OK, I think, and so I'm moving on. I swear this picture makes them look terrible-- like a second grader did them. Must just be a bad angle!
I used some fine stainless wire that I had laying around from some old drum brushes that fell apart mid-gig. I'm not sure what gauge it is, but I had to drill a #82 hole to get it to fit.
Also-- my attempt at 'chains.' Twisted and flattened copper wire. What do you think? Take them or leave them?
@ Eric- I've found that the "weld seam" technique you use is pretty easy. I thought that the .020 styrene would be too much, so I used .015, as you had suspected it would be more true to scale. However, in some places the .015 melted completely into the ravines that are the Tamiya welds. I should have used .020, in retrospect. I think that .010 would work best to beef up some of the other upper hull welds. It's a learning experience anyway. I'm glad to have some of you much more experienced guys around!
I have a LOT of clean-up to do around all the weld-seam areas, but it won't be too hard, and with a coat of Mr. Surfacer, no one will ever know that it looked this bad!
ppawlak1
Victoria, Australia
Joined: March 14, 2006
KitMaker: 1,973 posts
Armorama: 1,843 posts
Joined: March 14, 2006
KitMaker: 1,973 posts
Armorama: 1,843 posts
Posted: Friday, July 23, 2010 - 09:21 PM UTC
Good work all around Justin...
Weld seams, handles, chains...
I really like what you're doing
I've tried different types of 'primer' in the past ...
As far as Nato Black goes, it is ok, and good for preshading - although I fiind X18 Semi Gloss Black is better for preshading..
Tamiya primer out of the Can, this stuff is brilliant !! This is the best I've used and I highly recommend it !!!
Cheers
Paul
AgentG
Nevada, United States
Joined: December 21, 2008
KitMaker: 1,109 posts
Armorama: 1,095 posts
Joined: December 21, 2008
KitMaker: 1,109 posts
Armorama: 1,095 posts
Posted: Saturday, July 24, 2010 - 06:19 AM UTC
Ok you folks are responsible for my recent bout of Shermaholicism.
Work has been a real bear lately, but all the necessary bits are gathered and I'm am getting ready to start this weekend on my M4A2 late, depicting a tank on Pelielu.
On another note, I have two kits ordered to make one correct Marine M4A3 that will depict a 4th Battalion tank on Iwo Jima.
See what you've done to me?
G