Campaigns
Where Armorama group builds can be discussed, organized, and updates posted.
Sherman Campaign
PadrePete
Visit this Community
Ontario, Canada
Joined: May 18, 2010
KitMaker: 219 posts
Armorama: 213 posts
Posted: Thursday, July 01, 2010 - 08:37 AM UTC
Just saw this. Count me in for either a Tasca M4A1, or the Dragon 6313 Mk III. Don't know theatres yet. I also have a Ic Firefly I want to do in Canadian markings.

thebear
Visit this Community
Quebec, Canada
Joined: November 15, 2002
KitMaker: 3,960 posts
Armorama: 3,579 posts
Posted: Thursday, July 01, 2010 - 08:41 AM UTC
I just had to try them ...Wow Archer casting marks are awesome ...It's a long process of cutting out and adding each number one by one but these decals look perfect... The numbers I added are actual numbers seen on a turret and on the front housing ...


The transmission covers were glued together 'decals added and then a coat of Mr Surfacer to blend everything and give that cast effect ..


That's it for now!!

Rick
p.s don't worry I left a small line between the transmission cover pieces ..it was just a bit too wide for my liking so I added a bit of Mr Surfacer and rescribed the line but it doesn't show in the pictures..
madmax5510
Visit this Community
Hunedoara, Romania
Joined: May 06, 2008
KitMaker: 354 posts
Armorama: 343 posts
Posted: Thursday, July 01, 2010 - 09:25 AM UTC
Hi Thebear,and sorry for my late reply.I have only one picture with Battling B...If you have another pictures,or some advices, please...
cdharwins
Visit this Community
New Jersey, United States
Joined: October 28, 2006
KitMaker: 491 posts
Armorama: 462 posts
Posted: Thursday, July 01, 2010 - 09:52 AM UTC
Rick, I am definately going to get those dry transfers, man. They look great.

Chris
thebear
Visit this Community
Quebec, Canada
Joined: November 15, 2002
KitMaker: 3,960 posts
Armorama: 3,579 posts
Posted: Thursday, July 01, 2010 - 10:16 AM UTC
Hi Madmax..There is a larger picture (same one as in the In Action)in the Concord M4 Sherman at War book number 7001 .(page 23 ) A friend was planning on building this tank but looking at that picture it looks like it has the later turret with the built up cheek armor and no pistol port ...There doesn't seem to be a gun crutch between the hatches ..
So if you plan on using the Tasca Late kit you will need a new turret and the Tasca kit doesn't give you the late sharp nose transmission cover.

Rick
thebear
Visit this Community
Quebec, Canada
Joined: November 15, 2002
KitMaker: 3,960 posts
Armorama: 3,579 posts
Posted: Thursday, July 01, 2010 - 10:19 AM UTC
Hi Chris ...Those are decals and not dry transfers ..I just added a drop of future to where I was going to add the number and everything melted together with no unsightly edges ..
errains
#045
Visit this Community
South Carolina, United States
Joined: September 23, 2005
KitMaker: 362 posts
Armorama: 350 posts
Posted: Thursday, July 01, 2010 - 01:55 PM UTC
Battlewagon M4A3E8 ETO: Part 1-Concept

Greetings to all the participants of the Sherman Campaign…let the FUN begin!!!

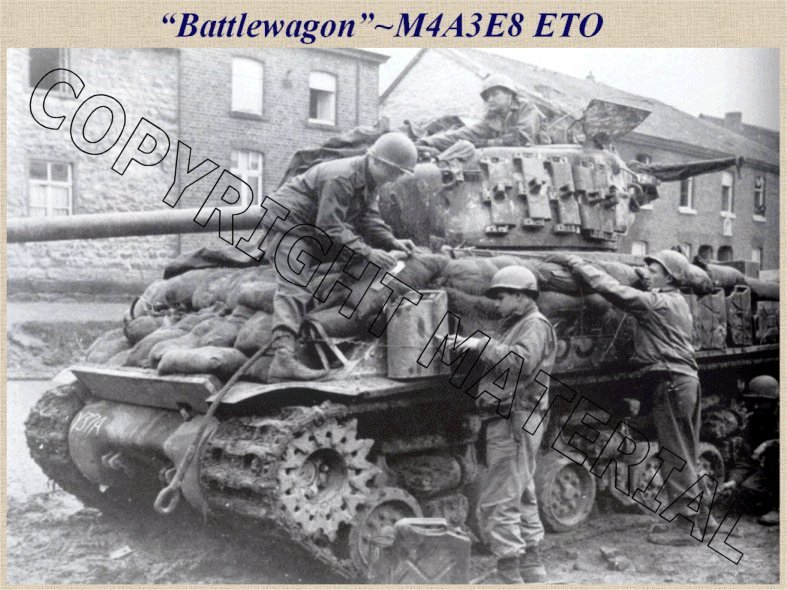
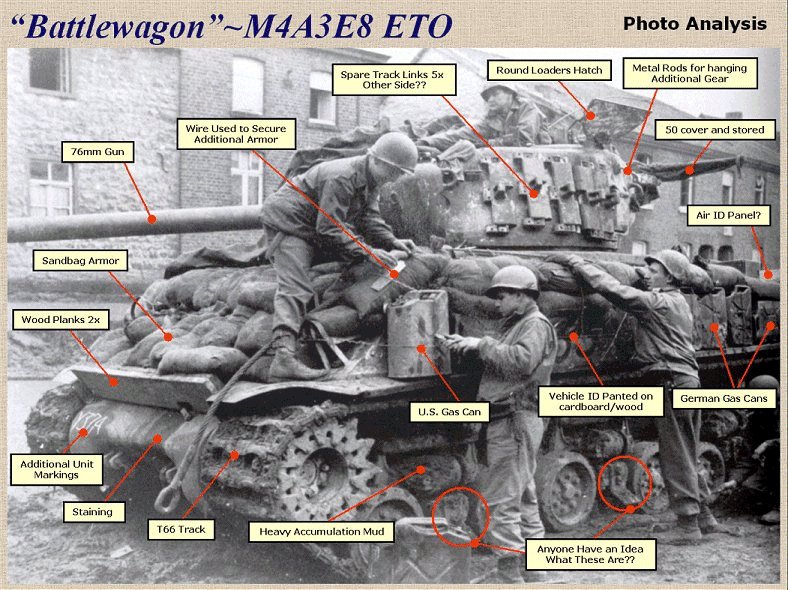
For this campaign I plan to complete two, possibly three Shermans based vehicles. The first will be inspired from the photo below that I call,


This Photo has always been one of my favorites of a Sherman in wartime action. The wear of combat shown both by the vehicle and crew epitomizes the harsh conditions endured by man and material. Additionally the configuration of the supplemental armor utilizing the combination of both sandbags and gas cans make this somewhat unique from other Shermans using field added armor.

Prior to starting the build I spent several hours analyzing the photo and deciding which features I wanted to include. The idea is to not build an exact replica but serve more as an inspiration, with some artistic license.


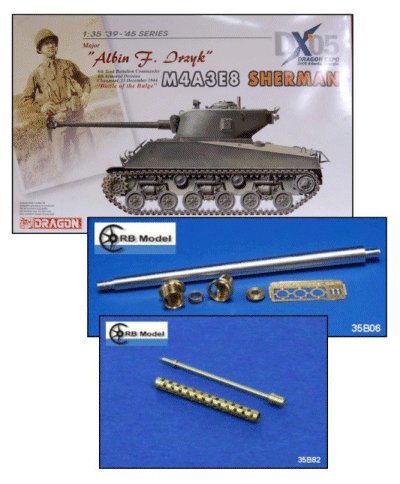
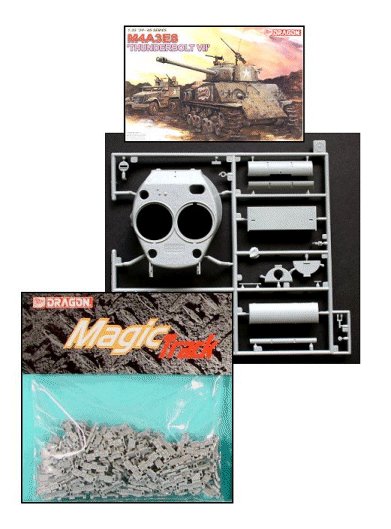
The base kit will be the older Dragon M4A3E8 “Aibin F Irzyk” kit 6283. However for this build a turret with the larger round loaders hatch was needed. Recently I picked up Dragons new E8 “Thunderbolt VII” kit which comes with a spare turret which fits the bill. As a bonus the “Thunderbolt VII” kit also comes with the T66 magic tracks, which are needed as well. I decided early on to keep the use of aftermarket items to a minimum. I was able to locate, fairly cheaply, RB Models from Poland, the 76mm main gun barrel and 30cal bow machine gun barrel. All additional details will be made from scratch, savaged from the spare parts bin or previously owned aftermarket items, mostly storage…maybe.


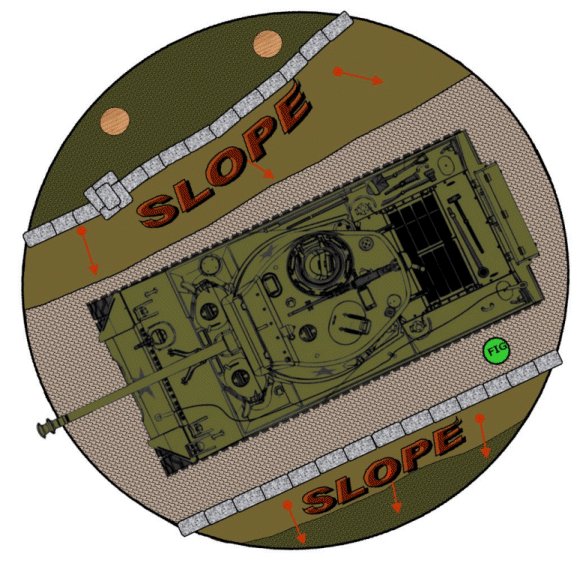
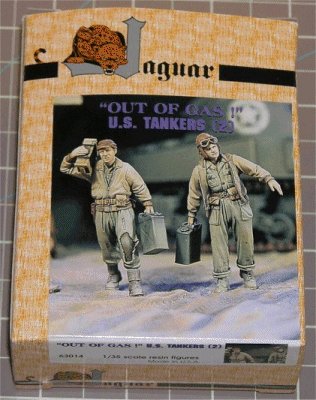
For the finial display I’ll stick to a somewhat simple layout as shown below with one figure, on the left, from an old Jaguar set


I would like to conclude by wishing everyone the best of luck and I’m looking to all the awesome builds presented within the SHERMAN CAMPAIGN!!

ltb073
Visit this Community
New York, United States
Joined: March 08, 2010
KitMaker: 3,662 posts
Armorama: 3,078 posts
Posted: Thursday, July 01, 2010 - 01:56 PM UTC
Hi Guys,
Here is todays progress.
Photobucket
Photobucket
I'll will have to brake out the putty tomorrow and clean up some of the seams.
cdharwins
Visit this Community
New Jersey, United States
Joined: October 28, 2006
KitMaker: 491 posts
Armorama: 462 posts
Posted: Thursday, July 01, 2010 - 02:19 PM UTC

Quoted Text

Hi Chris ...Those are decals and not dry transfers ..I just added a drop of future to where I was going to add the number and everything melted together with no unsightly edges ..


Decals? Even better!
ppawlak1
Visit this Community
Victoria, Australia
Joined: March 14, 2006
KitMaker: 1,973 posts
Armorama: 1,843 posts
Posted: Thursday, July 01, 2010 - 06:52 PM UTC

Quoted Text

As it is in the Sherman lineage...are we including the Ram?


It fits the 'bill' John !
ppawlak1
Visit this Community
Victoria, Australia
Joined: March 14, 2006
KitMaker: 1,973 posts
Armorama: 1,843 posts
Posted: Thursday, July 01, 2010 - 07:57 PM UTC
@ David W - that really is different David ... the 'Bolster' is something I havn't seen yet. The beauty of this Campaign is that 'funnies' are able to be entered as builds. What a great idea - love it. Keep posting pics !!

@ Tom - another funny, yet a little more modern Nice !! Two shermies for you, I hope to get a few done too The international date line is pretty good on occasions, on others it is a pain

@ Richard - thanks, cool I hope to get A IIDV done too but with different division. I love the casting markings, great work with the texturing also. I must try those markings during one of my builds here. Great pics too, thanks for posting so soon !

@ Sal - You're off to a fast start. Thanks for the update pics.

@ Peter - Welcome ! make sure you post progress pics / updates.

@ Eric - Brilliant planning ! Awesome start to this Campaign, great planning normally results in a great finished project. I love the detail you've highlighted in the pics, and your progress towards your start. Hope to see some build pics soon.... I have kit 6283 also... my biggest problem may be starting multiple builds. I MUST stay focussed !!

Lots of updates and posts guys, thanks for keeping us all posted. Some fast starts here !!

I've started on the IC Hybrid wheels, I've cleaned them up and will put them together tonight. I'll paint them before assembling the boggies and prepainting the assemblies prior to attaching them to the hull.

It may be a week or so before I really do a lot on this project, as I need to finish off the Canuk C2 Mexas I'm building ATM

Cheers

Paul
discordian
Visit this Community
New Jersey, United States
Joined: May 28, 2009
KitMaker: 239 posts
Armorama: 94 posts
Posted: Friday, July 02, 2010 - 10:01 AM UTC


I'm really really hoping to bust into this tonight after my kids are in bed and get a little time over the holiday weekend to get rolling.

Strictly out of the box. I've gone nuts on a few builds with extras and I'm hoping the fun factor will return with this guy.(I didn't add a lot of extras, but the extras I chose drove me nuts)
Removed by original poster on 07/03/10 - 00:16:38 (GMT).
sgtreef
Visit this Community
Oklahoma, United States
Joined: March 01, 2002
KitMaker: 6,043 posts
Armorama: 4,347 posts
Posted: Friday, July 02, 2010 - 01:35 PM UTC
Here we go but first must finish the Jeep.


thebear
Visit this Community
Quebec, Canada
Joined: November 15, 2002
KitMaker: 3,960 posts
Armorama: 3,579 posts
Posted: Friday, July 02, 2010 - 02:34 PM UTC
I got a question....Does everyone want to know if something needs to be corrected or do I just shut up ?...Or do I mention it and then you guys just tell me it's okay that way for you ...
Of course I only want to help and in no way would it be to put anyone down or to be thought of as cocky . Then I'm sure someone will correct me as well and I'm fine with that..

Let's all have fun!!
ppawlak1
Visit this Community
Victoria, Australia
Joined: March 14, 2006
KitMaker: 1,973 posts
Armorama: 1,843 posts
Posted: Friday, July 02, 2010 - 02:40 PM UTC

Quoted Text

I got a question....Does everyone want to know if something needs to be corrected or do I just shut up ?...Or do I mention it and then you guys just tell me it's okay that way for you ...


If you see something that is in need of correcting, mention it politely with a comment about whether they believe it is an issue or not.

That would be the poitically correct way to bring something up.

Some won't be phased and will be happy the way a project is, others will be thankful that it has been brought to their attention.
discordian
Visit this Community
New Jersey, United States
Joined: May 28, 2009
KitMaker: 239 posts
Armorama: 94 posts
Posted: Friday, July 02, 2010 - 03:04 PM UTC

Quoted Text

I got a question....Does everyone want to know if something needs to be corrected or do I just shut up ?...Or do I mention it and then you guys just tell me it's okay that way for you ...
Of course I only want to help and in no way would it be to put anyone down or to be thought of as cocky . Then I'm sure someone will correct me as well and I'm fine with that..

Let's all have fun!!


As long as you're not a ass about it I'll take whatever criticism will help my next build be better.
But I'm more interested in technique than historical accuracy in my builds at this point in my "career".

However - since you appear to be offering bolt counting services ( ) I have a question... my kit is above - the Soviet M4A2 (76) Red Army. It comes with both straight return and raised return roller arms. For the tank in the photo which is correct?
HONEYCUT
Visit this Community
Victoria, Australia
Joined: May 07, 2003
KitMaker: 4,002 posts
Armorama: 2,947 posts
Posted: Friday, July 02, 2010 - 03:22 PM UTC

Quoted Text

I got a question....Does everyone want to know if something needs to be corrected or do I just shut up ?...Or do I mention it and then you guys just tell me it's okay that way for you ...


I say let us know Rick! For others unknowing, Rick is a super resource of M4 knowledge and a great bloke to top it off. Any advice from him will be all constructive for sure...


Quoted Text

I have a question... my kit is above - the Soviet M4A2 (76) Red Army. It comes with both straight return and raised return roller arms. For the tank in the photo which is correct?


Hey Scott
From any photos I've seen I'd run with the upswept arms regardless of what is seen on the boxart.

Brad


HONEYCUT
Visit this Community
Victoria, Australia
Joined: May 07, 2003
KitMaker: 4,002 posts
Armorama: 2,947 posts
Posted: Friday, July 02, 2010 - 03:26 PM UTC
Hey Eric
Some great thought has gone into your entry mate. I love the details you have picked out of that first photo. I know not what those angled steel 'brackets' are on the running gear? Nice pick on the stencilled tank number
The diorama plan looks the part...
Brad
thebear
Visit this Community
Quebec, Canada
Joined: November 15, 2002
KitMaker: 3,960 posts
Armorama: 3,579 posts
Posted: Friday, July 02, 2010 - 04:46 PM UTC
I did find a picture of that tank in the book Armor Photo Gallery 16 Sherman M4A2 part 2 on page 68 .. It's hard to tell but I'm pretty sure it has the upswept bogies ..it does have the early wheels with the 5 holes but the sprocket is the solid one and not the fancy one seen in the box art ...The tracks are the T54E1 type as per the box art but not the type in the kit (go figure!) Can't tell too much more from the picture..it does have a plank (which is crooked)between the fenders but no stowage whatsoever on the front hull..

hth
Rick
thebear
Visit this Community
Quebec, Canada
Joined: November 15, 2002
KitMaker: 3,960 posts
Armorama: 3,579 posts
Posted: Friday, July 02, 2010 - 05:42 PM UTC
Me again...don't worry I'm about to slow down for a while...I've got 8000 bails of hay to bring in in the next few weeks so modelling time will be kinda cut short..
Here what I got done today ...
First of all Tasca did not do its homework too well on the bogies.. Jim Wechsler over on Track links built this kit and noticed a little mistake ..The bogies come looking like this...

but should look like this..

It's a simple fix of just cutting off the top sticking out of the bolt and drilling a small hole instead ..
I built up the bogies but instead of adding the foam pieces that Tasca provides, I used .40 evergreen styrene cut to fit ..

I sanded the wheels and then took a rough file and banged up the rubber on the wheels to represent the ware and tear of the dessert on the wheels ..

Tasca doesn't furnish the very early covers for the gouser boxes but I noticed that Dragon had left them on the sprues of their M4 Normandy kit which won't be used . So with a bit of sanding and patience I got them to fit ..It wasn't a perfect fit but if you look at pictures you can see that they can be a loose fit ..

I also fixed the rear lights that were sitting on a big blob of plastic...I filled in the hole and glued the light in a more realistic way .. I also added the lifting rings ..


I used the PE from the Tasca kit but had to cut it to size to fit the new gouser covers and then painted the inside of the gouser covers with some black paint to make sure not to see unpainted plastic on the finished model ..

To the front of the hull I added the DV ports and added a bit of Mr Surfacer to the corners just to smooth out the fit but after sanding there is no putty to be seen ..great engineering on the part of Tasca ! I added the fron lifting hooks and the MG ..I also sanded down a line that was too pronounced for me on the sides of the hatches ..this was discussed on ML about a month ago and his pictures were quite convincing ..Not hard to do,it just took a few swipes with some sand paper and all is well..

I forgot to take a before picture but you can see the line on their mid M4A1 kit ,just to show the difference..

And last but not least I made handles for the front hatches and filled and sanded the holes for the springs that were not used on these early shermies...


Well thats it for me today !
Rick
all comments good or bad are welcome
ppawlak1
Visit this Community
Victoria, Australia
Joined: March 14, 2006
KitMaker: 1,973 posts
Armorama: 1,843 posts
Posted: Friday, July 02, 2010 - 09:12 PM UTC
Hey Rick !

nice work on the bogies - I was unaware of the issue with the nuts / bolts.

The DV Blocks look great, yes the 'putty' work is very nicely done, it'll look awesome when painted.

Good luck with those Bails !!

I painted the wheels on my Shermie, and I'll assemble the bogies tomorrow.

Cheers

Paul
ppawlak1
Visit this Community
Victoria, Australia
Joined: March 14, 2006
KitMaker: 1,973 posts
Armorama: 1,843 posts
Posted: Friday, July 02, 2010 - 10:29 PM UTC
@ Jeff - that resin Roller set will be really interesting to see on that M4 ....

Whicn resin kit is it ?
MichaelSatin
Staff MemberCampaigns Administrator
AEROSCALE
Visit this Community
Colorado, United States
Joined: January 19, 2008
KitMaker: 3,909 posts
Armorama: 510 posts
Posted: Saturday, July 03, 2010 - 05:04 AM UTC
OK, I THINK I've made a decision. This is going to take a minute:

M1 Super Sherman (M4A1E8), IDF, Jerusalem 1967

When I originally planned this project many years ago, I got a Dragon M4A1(76W) and AFV Club HVSS suspension. The more I dug into it, the more I needed. I got some Dragon tracks, swiped a different turret shell (with the correct loader's hatch) from another kit (I think the M4A3E8(105)) and bits from here and there. Looking at it recently I realized I would need even more.

Then, the light dawned ! I have the Premium Edition M51! Thus, my original M51 kit is surplus!! Now I think, bashing it all together, I have everything I need.

On with the show!

Michael