Campaigns
Where Armorama group builds can be discussed, organized, and updates posted.
Sherman Campaign
canuck100a
Visit this Community
Nova Scotia, Canada
Joined: September 13, 2005
KitMaker: 96 posts
Armorama: 96 posts
Posted: Sunday, August 15, 2010 - 11:30 AM UTC
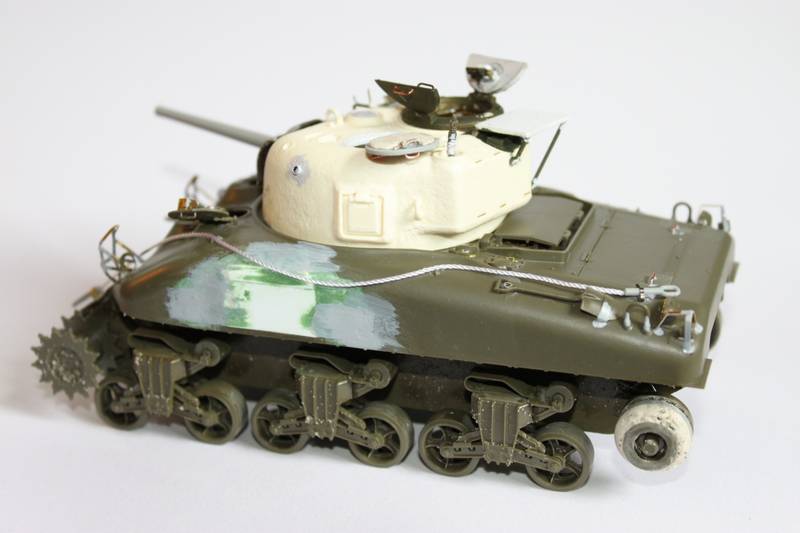
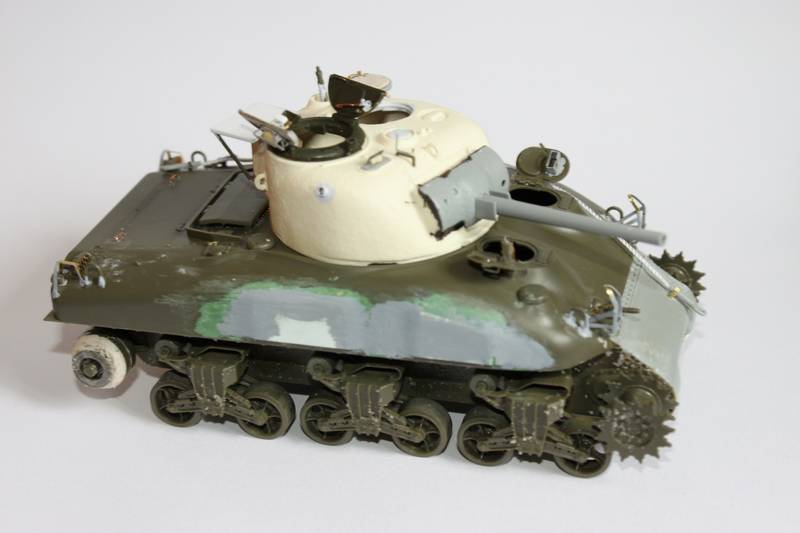
Started putting together my Firefly VC. Sticking pretty close to the instructions so far, just a few a scatch built items such as the periscope guards and hatch springs. Picked up a Ultrcast crew commander for the turret and several sets of Ultracast decals. I will have to decide which to decide on based on photos and other details I have to look into.
This is may first exposure to these type of track links..... mind numbing has a new meaning for me.

I am seeing some pretty impressive shermans here. Nice work guys.

Eric


HONEYCUT
Visit this Community
Victoria, Australia
Joined: May 07, 2003
KitMaker: 4,002 posts
Armorama: 2,947 posts
Posted: Sunday, August 15, 2010 - 05:23 PM UTC
Hey Eric some nice work on those guards and springs mate. Look forward to seeing this one completed. I reckon the next set of hatch springs you should use a smaller gauge wire? Your technique is spot-on but I reckon you need to get about 10 spirals grouped together. Just nit-picking, that's all

Well some proof that I'm still working on something...

The DML M4A1 DV kit. I have added Archer casting numbers and some other bits of PE including Aber and the kit stuff...


The General Steel symbol on the rear bustle from Archer was not accurate enough in shape for my liking, so I resorted to a spares box DML fret that had a better shaped one. I added some casting scars for this and other foundry numbers/symbols from putty, using photo reference from surviving tanks (eg. tank monuments throughout France)
The casting scar around the bustle lower edge is different to the join of top and bottom turret halves, so this join line was puttied over and a new putty 'casting ' line was added.


Using a pen I marked where the casting scars would be as per reference photos, and secured the decals in place. Take note that the numbers should read 50808 not 50308 as this is an error. It could be fixed using individual alphanumerics provided, but as this decal was one piece I thought it easier alter the 3 to an 8 later, whilst in position...


I used a combination of the kit and Formations tools and added tie downs from a Voyager fret I had lying around.


More to come, and from different Shermans
Brad
canuck100a
Visit this Community
Nova Scotia, Canada
Joined: September 13, 2005
KitMaker: 96 posts
Armorama: 96 posts
Posted: Monday, August 16, 2010 - 05:35 AM UTC
Hi Brad,

Sigh.....

I know what you are saying. After they were done and installed, I looked at them and thought "They are way out of scale". So I left them for awhile and moved on to other items. I will bite the bullet and redo them more to scale later this week. If I don't they will taunt me forever.


BTW you are doing a great job on your sherman build. Look forward to seeing more.

Regards,
Eric
AlanL
Visit this Community
England - East Anglia, United Kingdom
Joined: August 12, 2005
KitMaker: 14,499 posts
Armorama: 11,675 posts
Posted: Monday, August 16, 2010 - 08:09 AM UTC
Hi Guys,

Lots of great work going on here, looking great folks.

Al
MVisser
Visit this Community
Utrecht, Netherlands
Joined: December 14, 2006
KitMaker: 2,679 posts
Armorama: 313 posts
Posted: Monday, August 16, 2010 - 09:01 AM UTC
... sorry you guys, An other Sherman (my 3th Sherman WIP)

The Dragon M4


and another WIP
Marder III M (dutch forum)

I just can't sit still, but the Jumbo is almost ready for primer
War_Machine
Visit this Community
Washington, United States
Joined: February 11, 2003
KitMaker: 702 posts
Armorama: 385 posts
Posted: Monday, August 16, 2010 - 10:13 AM UTC
Finally back with another update on the M7. Most of the work has been on dealing with small details for the interior.

I redid the crew seats because they were either molded with ring-shaped cushions or had gigantic sink marks in them. Either way I filled and sanded them. The seats also had to be repositioned because they interfered with the fit of the side plates to the hull when lowered. I shaved off the molded on mounts and made new ones out of sheet plastic. I also added a small storage box and canvas bucket.
As can be seen, I also installed the modified pulpit.

It took a bit of tweaking to get the fit right and plenty of sanding, filling, priming, and repeating to get things to where I was happy with it. I finished things off for now by adding weld marks with putty.
Next up I assembled the 105, which was pretty straight forward.

All I added was a few missing bolts and rivets. It was pretty nice to not have to put in too much extra time with the parts for once.
After that I modified the engine deck.

I added the screened vents with parts from the kit's unrealistic wire storage cases, which don't look too good for their intended role but work pretty well here. I also added two missing fuel filler caps, the recessed bolts for securing the main engine deck screen, and two fuel shut off points (at least that's what I've seen them called). I finshed up my sanding off all the raised marks for tool placement and the tie downs, which weren't present on earlier production models of the M7.
I probably would have been able to get more done with the M7 if I hadn't decided that I wanted an M8 ammo trailer to go with it. Since the Tiger Models kit is somewhat pricey, and I happened to have an old issue of Finescale Modeller, I decided to scratchbuild one.

The subassemblies were made out of sheet plastic, channel stock, and a few parts from my supply of spares. Some copper wire and fishing line for the brake lines, fotoetched tie downs from AFV Club's M5A1, wing nuts from an Academy M36, and more Archer surface detail rivets finished off the build.


I know there are a couple of areas that could have turned out better, but not bad overall for my first crack at scratchbuilding a vehicle, if I do say so myself.
Next up is priming and any necessary fixes for the trailer and then breaking out the airbrush to paint the subassemblies before beginning the final push to finish things off. Lots of great work going on for this campaign so far and I hope I can add a little something to it with this and my future updates.
cdharwins
Visit this Community
New Jersey, United States
Joined: October 28, 2006
KitMaker: 491 posts
Armorama: 462 posts
Posted: Monday, August 16, 2010 - 10:41 AM UTC
There certainly are some fine looking Shermans here!! Great work guys! I've learned a couple of cool techniques here, as I'm sure alot of others have as well.

Speaking of learning new techniques...


Quoted Text

Started putting together my Firefly VC. Sticking pretty close to the instructions so far, just a few a scatch built items such as the periscope guards and hatch springs.


Eric, what did you use to make the periscope guards?

Chris
thebear
Visit this Community
Quebec, Canada
Joined: November 15, 2002
KitMaker: 3,960 posts
Armorama: 3,579 posts
Posted: Monday, August 16, 2010 - 11:17 AM UTC
Great work all around guys ...I do have a couple of pictures of cannonball if you're interested ..
Ed ..your priest looks great (got the new Dragon kit but I won't say it looks really nice ) keep up the good work...
I got a bit done on my kit but nothing worth pictures yet ..I'll post soon..

Rick
canuck100a
Visit this Community
Nova Scotia, Canada
Joined: September 13, 2005
KitMaker: 96 posts
Armorama: 96 posts
Posted: Monday, August 16, 2010 - 02:22 PM UTC
Hey Chris,

Well I would like to tell you that it was some exotic wire that I sourced after many weeks of searching.........

But the truth is I was trying to form the guards a couple of nights ago with brass wire that was not really working out. When my wife who is cleaning out the storage room asked me if I wanted the florist wire that she bought at the dollar store years ago and was going to toss out.

Well that is what I made the guards with. And since then the springs on the hatches.

Sometimes good things happen.

Eric
War_Machine
Visit this Community
Washington, United States
Joined: February 11, 2003
KitMaker: 702 posts
Armorama: 385 posts
Posted: Monday, August 16, 2010 - 04:46 PM UTC
Hey Richard, thanks for the kind words, and feel free to make any deserved positive comments about the new Dragon kit. I've been so set in my determination to do this conversion that new kits being released of the same subject really doesn't bother me.
ppawlak1
Visit this Community
Victoria, Australia
Joined: March 14, 2006
KitMaker: 1,973 posts
Armorama: 1,843 posts
Posted: Monday, August 16, 2010 - 09:38 PM UTC
Well a lot of great progress, keep up the excellent posts and pics team

@ Dani - nice !! Very nice, I relly like the white wash result you've achieved. Super progress !!

@ Michael - super work on those wading stacks !

@ Wayne - demagog is a beauty, love the stacks etc...

@ Eric - the decals, and figure look top notch, looking forward to seeing them on the Firefly !

@ Brad - I must try casting numbers some time. They really add a lot to the finished project !!

@ Martin - that M4 looks first class, what markings will you be using.

@ Ed - great to see the M7 coming along, the ammo trailer will be a super addition !

Keep those posts and pics coming !!

Cheers

Paul
MrDrummy
Visit this Community
Texas, United States
Joined: October 17, 2009
KitMaker: 86 posts
Armorama: 82 posts
Posted: Monday, August 16, 2010 - 10:14 PM UTC
I'm about to start with a few bits of PE from the Aber set for my Tamiya M4A3, and I have a Sherman question for the Shermaholics among us:

Which side of the sand guard attachment do I use? The one with two rows of holes, or one row? Is this a case by case basis, or are all versions of the Sherman the same?

Also- is there a website that shows certain differences between the types? I'm having a hard time sorting out what I'm supposed to use, and what I'm not!

Thanks guys. Awesome work!
HONEYCUT
Visit this Community
Victoria, Australia
Joined: May 07, 2003
KitMaker: 4,002 posts
Armorama: 2,947 posts
Posted: Tuesday, August 17, 2010 - 12:49 AM UTC

Quoted Text


Also- is there a website that shows certain differences between the types? I'm having a hard time sorting out what I'm supposed to use, and what I'm not!


Hey Justin
Try this website for some great info regarding the US forces during WWII.

http://www.usarmymodels.com/

You will find a fair bit left over from the Aber sets.
The most useful stuff I have found on these frets are the periscope assemblies, the sandshield attachment strips, gunner's sights, tail-light details, the spare track holders and .50cal barrel clamps etc. AND the M4A3 rear stowage rack if you dare!!
The sand shield strips should show the single row (as viewed from the detail side of the fret)

Brad
cdharwins
Visit this Community
New Jersey, United States
Joined: October 28, 2006
KitMaker: 491 posts
Armorama: 462 posts
Posted: Tuesday, August 17, 2010 - 07:44 AM UTC

Quoted Text


But the truth is I was trying to form the guards a couple of nights ago with brass wire that was not really working out. When my wife who is cleaning out the storage room asked me if I wanted the florist wire that she bought at the dollar store years ago and was going to toss out.


Cool, thanks Eric. I'll try it. It sounds like the price is going to be right, too
mopnglo
Visit this Community
United States
Joined: January 07, 2006
KitMaker: 452 posts
Armorama: 271 posts
Posted: Tuesday, August 17, 2010 - 08:27 AM UTC
Chris, I use florist wire a lot too. I picked up a few different sizes from the floral department at Walmart for a couple of bucks each. I doubt I'll ever run out!
cdharwins
Visit this Community
New Jersey, United States
Joined: October 28, 2006
KitMaker: 491 posts
Armorama: 462 posts
Posted: Tuesday, August 17, 2010 - 01:57 PM UTC

Quoted Text

Chris, I use florist wire a lot too. I picked up a few different sizes from the floral department at Walmart for a couple of bucks each. I doubt I'll ever run out!


Thanks, Michael. I'm assuming you guys use superglue to put it together?

mopnglo
Visit this Community
United States
Joined: January 07, 2006
KitMaker: 452 posts
Armorama: 271 posts
Posted: Tuesday, August 17, 2010 - 02:06 PM UTC
Yes, I use super glue. I also use the florist wire to add support when building resin figures. You can leave a long piece of wire to help hold the figure while painting then cut it short when you're ready to attach the figure/piece.
ppawlak1
Visit this Community
Victoria, Australia
Joined: March 14, 2006
KitMaker: 1,973 posts
Armorama: 1,843 posts
Posted: Tuesday, August 17, 2010 - 05:13 PM UTC

Quoted Text


Quoted Text


Also- is there a website that shows certain differences between the types? I'm having a hard time sorting out what I'm supposed to use, and what I'm not!


Hey Justin
Try this website for some great info regarding the US forces during WWII.

http://www.usarmymodels.com/

You will find a fair bit left over from the Aber sets.
The most useful stuff I have found on these frets are the periscope assemblies, the sandshield attachment strips, gunner's sights, tail-light details, the spare track holders and .50cal barrel clamps etc. AND the M4A3 rear stowage rack if you dare!!
The sand shield strips should show the single row (as viewed from the detail side of the fret)

Brad


I find that site very useful, thanks for posting Brad.

I have the we;d beads done and brass rod handles finished ont he engine deck.

Hopefully the hull is finished this weekend. I still need to figure out the color of oddballs machine - Russian armor green may be the go I think with lots of light washes

Keep up the great work and posts everyone !!

Paul
Abn-modeller
Visit this Community
Stockholm, Sweden
Joined: July 05, 2009
KitMaker: 76 posts
Armorama: 75 posts
Posted: Tuesday, August 17, 2010 - 10:18 PM UTC
Great builds everyone! Here's an update on my post d-day DD sherman
The turret is Trakz and I scratch built some stuff on it to make it look like it did on the DD's and also added a Tiger Models late split hatch....


You can see the cast armor plates on the sides too, just made out of sheets of plastic and lots of putty! And thin sandpaper


HONEYCUT
Visit this Community
Victoria, Australia
Joined: May 07, 2003
KitMaker: 4,002 posts
Armorama: 2,947 posts
Posted: Wednesday, August 18, 2010 - 12:23 AM UTC
Paul, it is certainly a good site for not only the armour aspects, but also as a one stop read for most all available US figures on the market.

Cal, great work so far mate! The armour looks the part and nice work on the light guards. How did you make the DD idlers?

Brad
Abn-modeller
Visit this Community
Stockholm, Sweden
Joined: July 05, 2009
KitMaker: 76 posts
Armorama: 75 posts
Posted: Wednesday, August 18, 2010 - 01:17 AM UTC
Thanks Brad, the idlers were quite messy to make, had to use parts i had like 4 regular idlers chopped up and some sculpting with putty and some left over parts from other kits (not sure what the parts were supposed to be )
They look pretty good here but are not 100% when you look real close
D_J_W
Visit this Community
Hamilton, New Zealand
Joined: December 30, 2005
KitMaker: 436 posts
Armorama: 367 posts
Posted: Wednesday, August 18, 2010 - 12:53 PM UTC
Hi All,

an update on my Sherman Bolster, just about ready to paint.


Cheers
David
thebear
Visit this Community
Quebec, Canada
Joined: November 15, 2002
KitMaker: 3,960 posts
Armorama: 3,579 posts
Posted: Wednesday, August 18, 2010 - 12:55 PM UTC
very nice David!
thebear
Visit this Community
Quebec, Canada
Joined: November 15, 2002
KitMaker: 3,960 posts
Armorama: 3,579 posts
Posted: Wednesday, August 18, 2010 - 01:16 PM UTC
Found this on Youtube..thought it might interest a few around here ..


http://www.youtube.com/watch?v=V-7JZIHsRN0&feature=fvst

Rick
HONEYCUT
Visit this Community
Victoria, Australia
Joined: May 07, 2003
KitMaker: 4,002 posts
Armorama: 2,947 posts
Posted: Wednesday, August 18, 2010 - 10:02 PM UTC
Love it Rick. Not only for Count Basie