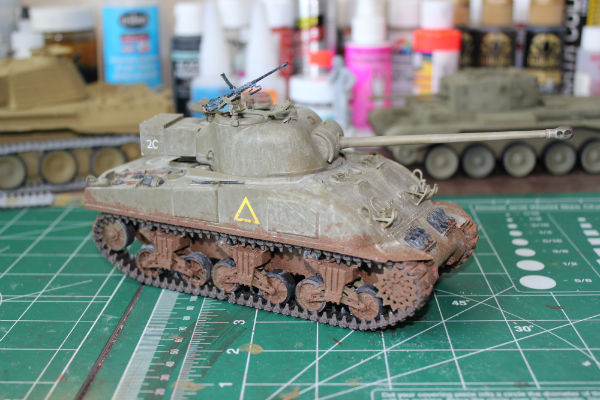
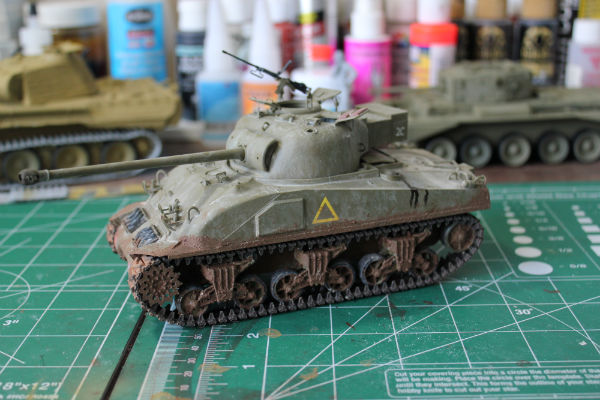
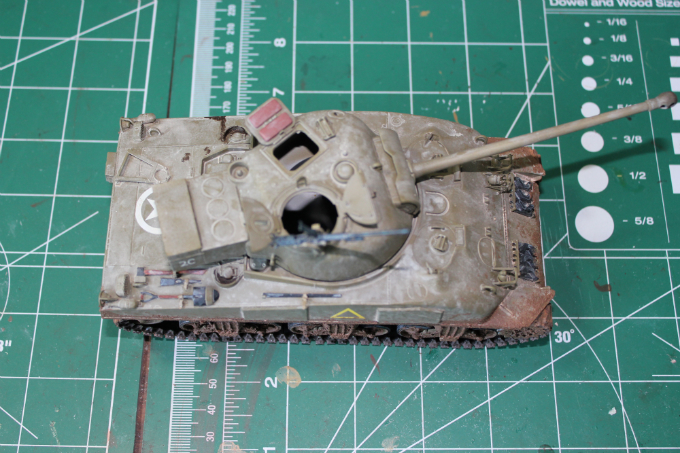
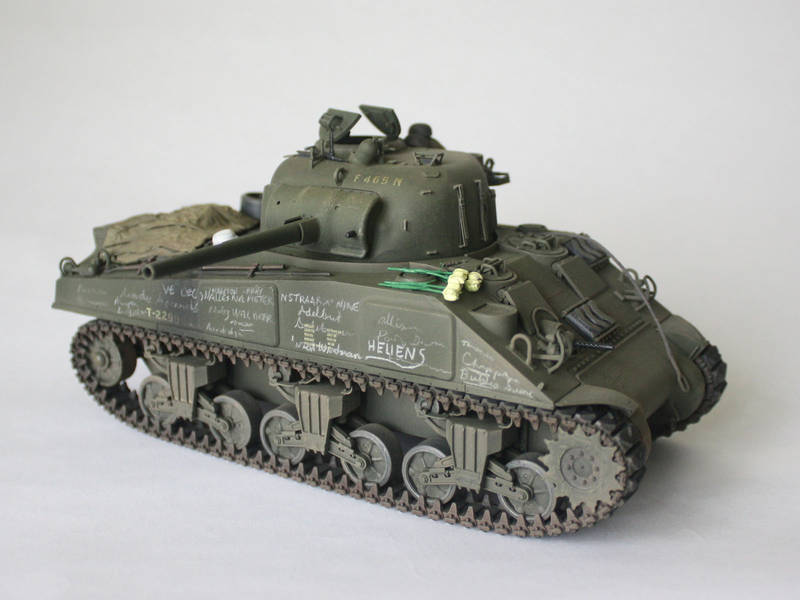
Hello again folks, remember me? My modelling mojo ran away from home last year, however its recently returned, and like the prodigal son its been welcomed with open arms - although instead of slaughtering a fattened calf, I decided to pick up this Sherman again.
Now, main contruction is pretty much complete, tracks have been built in 4 sections so they can be easily painted then re-attatched.
The plan was to build this as part of a diorama, but there's no chance of doing that before the deadline, however I do intend to finish that later
I need to find a British tank commander figure in a suitably "action" pose, interacting with the infantry. Any ideas?
This is what I had in my minds-eye when I imagined this dio. The dead SS trooper in the foreground is going to get a Panzerfaust
How long I got to paint and weather this? A week?
All comments/advice/constructive criticism welcomed
Campaigns
Where Armorama group builds can be discussed, organized, and updates posted.
Hosted by Darren Baker, Richard S.
Sherman Campaign
Posted: Saturday, June 25, 2011 - 06:06 AM UTC
Posted: Saturday, June 25, 2011 - 06:35 AM UTC
Hi Neil,
That's a nice lookin' M4A1 you got there in bare plastic - I hope you can paint like the wind! Assuming we're in 1:35, Miniart released a very nice set of British tankers - I'd suggest one with the steel tanker's helmet given evident danger in your dio. There's one talking into a microphone that'd look good hunkered down in the hatch.
Tom
BillGorm
New Jersey, United States
Joined: November 02, 2009
KitMaker: 609 posts
Armorama: 433 posts
Joined: November 02, 2009
KitMaker: 609 posts
Armorama: 433 posts
Posted: Saturday, June 25, 2011 - 06:49 AM UTC
Hi Neil - What base are you using?
stevieneon
England - West Midlands, United Kingdom
Joined: January 24, 2009
KitMaker: 144 posts
Armorama: 143 posts
Joined: January 24, 2009
KitMaker: 144 posts
Armorama: 143 posts
Posted: Saturday, June 25, 2011 - 07:23 AM UTC
Raul.....I love that colour - what paint and colour did you use. Neil - nice job but your vents are on back to front! Stevie.
tylusfaust
New Jersey, United States
Joined: December 18, 2005
KitMaker: 371 posts
Armorama: 217 posts
Joined: December 18, 2005
KitMaker: 371 posts
Armorama: 217 posts
Posted: Saturday, June 25, 2011 - 12:52 PM UTC
Neil,
That's a really nice diorama you got there. The figure locations and positions look very good and natural. The dead German is a nice use of the wire cutter position, right? As for getting it done? Wow, tall order. Drink lots of coffee and don't sleep, maybe. But I'd suggest relaxing and enjoying it.
Stevie,
Thanks for the compliments. I used Tamiya OD with a little buff to lighten and I pre-shaded just using a brush and black paint. There are some pics of this technique earlier is this forum. Then I just used some oils for filters and even acrylic yellow as a filter to highlight some areas. It's a technique I copied from MIG found on his great forum here.
Next post I'll post some finished pics and I am DONE. WOOHOO!
tylusfaust
New Jersey, United States
Joined: December 18, 2005
KitMaker: 371 posts
Armorama: 217 posts
Joined: December 18, 2005
KitMaker: 371 posts
Armorama: 217 posts
Posted: Saturday, June 25, 2011 - 01:05 PM UTC
And I am finished! I called this one done on June 23, 2011.
Check out the finished pics below
Sideshot
Nice shot of the sandbags and wire holding them up.
Pic of the stowage, clutter, and tarp.
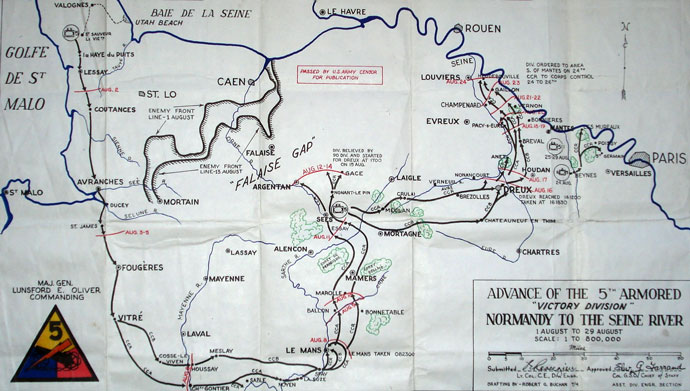
Apparently these guys were keeping track of every city the 5th Armored took.
A footnote map of the 5th Armor's travels through France.
So there it is! This is only the 2nd Sherman I've built and the first campaign I've ever been in. I have to say it's been great and I've learned more than I could have imagined when I started. Everyone's been incredibly encouraging and generous with their advice and expertise. I can't wait to join other campaigns just to be able to learn as much as I did here. I've already joined the Panther campaign and will probably be building a captured Panther.
So thanks to everyone here, good luck with the rest of your builds, and as always any comments or questions are always welcomed.
As for this build, I'm off to put this sucker on Ebay and see if he can get me a few shekels for my next few kits.
Bigrip74
Texas, United States
Joined: February 22, 2008
KitMaker: 5,026 posts
Armorama: 1,604 posts
Joined: February 22, 2008
KitMaker: 5,026 posts
Armorama: 1,604 posts
Posted: Saturday, June 25, 2011 - 01:28 PM UTC
Raul,
Those are the most realistic looking sand bags that I have seen yet.. What is your process in making them?
Bob
Those are the most realistic looking sand bags that I have seen yet.. What is your process in making them?
Bob
Posted: Saturday, June 25, 2011 - 07:54 PM UTC
Quoted Text
Hi Neil - What base are you using?
Its from SB Scotia
http://sbmodels.uk.net/index.php?option=com_virtuemart&page=shop.browse&category_id=6&Itemid=1&vmcchk=1&Itemid=1
Quoted Text
Neil - nice job but your vents are on back to front! Stevie
Which vents Stevie? I'm no Sherman expert!
Quoted Text
Neil,
That's a really nice diorama you got there. The figure locations and positions look very good and natural. The dead German is a nice use of the wire cutter position, right? As for getting it done? Wow, tall order. Drink lots of coffee and don't sleep, maybe. But I'd suggest relaxing and enjoying it.
The figure is actually a dead german figure made by MiG Productions. Just to clarify, I only intend to finish the tank, the dio will follow later. If it turns out half as nice as yours I will be well happy with myself. I particularly like your MG gunner leaning on the barrel, he really catches my eye.
MGunner
Kentucky, United States
Joined: May 27, 2010
KitMaker: 51 posts
Armorama: 48 posts
Joined: May 27, 2010
KitMaker: 51 posts
Armorama: 48 posts
Posted: Sunday, June 26, 2011 - 06:53 AM UTC
here is my firefly its been finished for some time just havent posted the pics the model is complete just need to add the turret plugs and stowage
this is my frist sherman and frist campaign that i completed any suggestions, help, comments would be appreciated. thanks this was a fun build.
now on to that silly VC firefly in my stash
this is my frist sherman and frist campaign that i completed any suggestions, help, comments would be appreciated. thanks this was a fun build.
now on to that silly VC firefly in my stash
MGunner
Kentucky, United States
Joined: May 27, 2010
KitMaker: 51 posts
Armorama: 48 posts
Joined: May 27, 2010
KitMaker: 51 posts
Armorama: 48 posts
Posted: Sunday, June 26, 2011 - 07:05 AM UTC
ok round two with the photos
i guess you got to be smarter than the equipment your operating
ppawlak1
Victoria, Australia
Joined: March 14, 2006
KitMaker: 1,973 posts
Armorama: 1,843 posts
Joined: March 14, 2006
KitMaker: 1,973 posts
Armorama: 1,843 posts
Posted: Sunday, June 26, 2011 - 08:34 AM UTC
Great work everyone !
Make sure you post the completed pics in the Gallery. No pics in Gallery no ribbon.
Cheers
Paul
Make sure you post the completed pics in the Gallery. No pics in Gallery no ribbon.
Cheers
Paul
MGunner
Kentucky, United States
Joined: May 27, 2010
KitMaker: 51 posts
Armorama: 48 posts
Joined: May 27, 2010
KitMaker: 51 posts
Armorama: 48 posts
Posted: Sunday, June 26, 2011 - 08:47 AM UTC
i don't mean to ask a silly question but where is the gallery so i can post the photo's and i assume its the same as with posts
GaryKato
California, United States
Joined: December 06, 2004
KitMaker: 3,694 posts
Armorama: 2,693 posts
Joined: December 06, 2004
KitMaker: 3,694 posts
Armorama: 2,693 posts
Posted: Sunday, June 26, 2011 - 09:05 AM UTC
Quoted Text
i don't mean to ask a silly question but where is the gallery so i can post the photo's and i assume its the same as with posts
Sherman Campaign Gallery
Posted: Sunday, June 26, 2011 - 09:51 AM UTC
Neil, I think Stevie was referring to those scoop-like things on top of the rear corners of the tank. They cover square stowage bins in the hull where "grousers" (special cleats sometimes added to the track for extra grip) were stowed. The good news is the covers were only held on with one bolt in real life, and could be seen installed "backwards" with the opening facing to the rear (as you did) or even with them swapped left-for-right. In fact, they could be lost altogether (leaving just the underlying hole), and on later versions were deleted completely.
As for me, I spent today among the flowers! Well, six 1:35 tulips, to be exact. Once I get them finished and added to my tank I'll post final shots - but that'll be tomorrow now.
Tom
As for me, I spent today among the flowers! Well, six 1:35 tulips, to be exact. Once I get them finished and added to my tank I'll post final shots - but that'll be tomorrow now.
Tom
Anmoga
Spain / España
Joined: November 18, 2004
KitMaker: 456 posts
Armorama: 333 posts
Joined: November 18, 2004
KitMaker: 456 posts
Armorama: 333 posts
Posted: Sunday, June 26, 2011 - 09:54 PM UTC
Hi guys,
I won't be able to make it.
After I enrolled and started my build I accepted a job offer in Qingdao (China).
Lately I've been quite busy getting ready to move to China and I went there the 15th of June.
Over here I still haven't got any time for modelling because of my new responsabilities and because of the search of an apartment for me.
I am still living at the hotel and will move next 1st of July.
After that I will have to wait for my modelling tools to arrive to China but most likely I will buy some new basic tools.
Best of luck to everybody,
Angel
ppawlak1
Victoria, Australia
Joined: March 14, 2006
KitMaker: 1,973 posts
Armorama: 1,843 posts
Joined: March 14, 2006
KitMaker: 1,973 posts
Armorama: 1,843 posts
Posted: Sunday, June 26, 2011 - 11:42 PM UTC
Thanks for the update Angel, good luck in your new Job !
I've finished my 1st Polish Armored Division Sherman V. I didn't add stowage as I've run out of time, so here it is :
Built OOTB with some Ultrcast figures (with Hornet heads).
Keep up the great work guys, this has been an awesome campaign !!
Cheers
Paul
I've finished my 1st Polish Armored Division Sherman V. I didn't add stowage as I've run out of time, so here it is :
Built OOTB with some Ultrcast figures (with Hornet heads).
Keep up the great work guys, this has been an awesome campaign !!
Cheers
Paul
cdharwins
New Jersey, United States
Joined: October 28, 2006
KitMaker: 491 posts
Armorama: 462 posts
Joined: October 28, 2006
KitMaker: 491 posts
Armorama: 462 posts
Posted: Monday, June 27, 2011 - 12:50 AM UTC
Well, I'm not going to be able to finish. It's impractical for my wife to send me my airbrush/propellant/paint/brushes/thinnner etc. out here to Afghanistan. I got the kit built, but I'll have to send it home and paint it after I finish my tour.
This was the first campaign I signed up for, and it was a lot of fun. I think you guys may have infected me with Shermaholism!!!! I'm just bummed I won't be able to finish in time. But...hopefully there will be another Sherman Campaign in the future...(or maybe another "Get 'er Done") Count me in!!
Here she is...
Thanks guys, and keep up the great work.
Chris
This was the first campaign I signed up for, and it was a lot of fun. I think you guys may have infected me with Shermaholism!!!! I'm just bummed I won't be able to finish in time. But...hopefully there will be another Sherman Campaign in the future...(or maybe another "Get 'er Done") Count me in!!
Here she is...
Thanks guys, and keep up the great work.
Chris
AgentG
Nevada, United States
Joined: December 21, 2008
KitMaker: 1,109 posts
Armorama: 1,095 posts
Joined: December 21, 2008
KitMaker: 1,109 posts
Armorama: 1,095 posts
Posted: Monday, June 27, 2011 - 06:50 PM UTC
Chris that is a beautiful clean build.
Keep your head down and thanks for doing what you do. Get home soon bro.
G
Just an old jarhead.
Keep your head down and thanks for doing what you do. Get home soon bro.
G
Just an old jarhead.
Posted: Tuesday, June 28, 2011 - 04:23 AM UTC
Paul,
Just uploaded my "finished" pic! I'll be updating my build log with more pics tonight - feel free to plunder my gallery if you need any for the Feature.
Nice Polish Shermie, by the way!
Chris, sorry you can't get it painted out there - it's a very nice build.
And here's my "money shot":
When does Shermans 2011 start?
Tom
PS: Not sure why (or how) it managed to upload twice! That's technology for ya...
tread_geek
Ontario, Canada
Joined: March 23, 2008
KitMaker: 2,847 posts
Armorama: 2,667 posts
Joined: March 23, 2008
KitMaker: 2,847 posts
Armorama: 2,667 posts
Posted: Tuesday, June 28, 2011 - 05:12 AM UTC
Well, some really super looking Shermans popping up in this thread as time winds down. Every time I thoing that I am making progress something goes wrong. I've been struggling with one the last PE trim part for the front(intake) stack). As of this writing I believe that it's finally done.
As an example of this jinxed built, while trying to get the right track on the idler on that side snapped off. I tried reattaching it two times but even after letting the various glues dry for hours, the darn thing would break again. I drilled a hole in the hull mounting point and then in the idler wheel. Stretched some sprue and created a pin to mate the two.
I used gap filling CA glue with the mounting and let it cure over night. I just applied some more of the same glue mixed with plastic plastic dust and coated the joint one more time. I also tried my hand at stretching the DS tracks on that side and once the glue is fairly dry I'll try putting the track on again. Keeping my fingers crossed that it will hold. Still needs a final coat of base colour and the decals.
Cheers,
Jan
madmax5510
Hunedoara, Romania
Joined: May 06, 2008
KitMaker: 354 posts
Armorama: 343 posts
Joined: May 06, 2008
KitMaker: 354 posts
Armorama: 343 posts
Posted: Tuesday, June 28, 2011 - 05:37 AM UTC
Wonderfull work Sherman's-guys!
I upload 2 pictures with my 4A3 105 mm in campaign galery[to be sure to receive the ribbon ].I hope to finish my 4A1 Battling B. until the finish of this campaign...I built another Shermie[braille ofcourse] for another campaign[BlitzKrieg 3-Italy],an british MKIII[4A2].Few pictures, only for hear some opinion[criticism] specialized:
Cheers!
Dani
Bigrip74
Texas, United States
Joined: February 22, 2008
KitMaker: 5,026 posts
Armorama: 1,604 posts
Joined: February 22, 2008
KitMaker: 5,026 posts
Armorama: 1,604 posts
Posted: Tuesday, June 28, 2011 - 08:50 AM UTC
@ Jan: OUCH!!!!!!!!!!!!!!
@ Dani: I like the camo job.
Bob
@ Dani: I like the camo job.
Bob
ppawlak1
Victoria, Australia
Joined: March 14, 2006
KitMaker: 1,973 posts
Armorama: 1,843 posts
Joined: March 14, 2006
KitMaker: 1,973 posts
Armorama: 1,843 posts
Posted: Tuesday, June 28, 2011 - 09:03 AM UTC
Keep going Jan - good progress ~
@ dani - congrats on finishing, thanks for posting !
Cheers
Paul
@ dani - congrats on finishing, thanks for posting !
Cheers
Paul
Posted: Tuesday, June 28, 2011 - 09:44 PM UTC
Progress pics of my M4 Sherman
HONEYCUT
Victoria, Australia
Joined: May 07, 2003
KitMaker: 4,002 posts
Armorama: 2,947 posts
Joined: May 07, 2003
KitMaker: 4,002 posts
Armorama: 2,947 posts
Posted: Tuesday, June 28, 2011 - 11:45 PM UTC
Quoted Text
And here's my "money shot":
That's a lovely bit of work Tom! You should be pleased as punch with how that turned out.
Disappointingly, I won't get anything completed in time. Hell I'll be lucky to set eyes on the things as they are at my ex partners place...
Oh well all in due course...