Campaigns
Where Armorama group builds can be discussed, organized, and updates posted.
Where Armorama group builds can be discussed, organized, and updates posted.
Hosted by Darren Baker, Richard S.
Korean War Campaign

vonHengest

Joined: June 29, 2010
KitMaker: 5,854 posts
Armorama: 4,817 posts

Posted: Tuesday, January 11, 2011 - 06:19 AM UTC
Sure thing, and good luck on the hunt!

AgentG

Joined: December 21, 2008
KitMaker: 1,109 posts
Armorama: 1,095 posts

Posted: Tuesday, January 11, 2011 - 09:55 AM UTC
Ok a bit more progress. I noticed that the jarhead crews of these monsters left one end of the tow cable mounted to the tow point. I used the kit cable but bent it ever so slightly to connect correctly. I used a scrap of wire to replicate the field phone cord also.

I detailed the .50 mount with some scraps of .020 rod and strip. Tamiya left a horrendous ejector pin mark right smack dab in the middle of where the two tubes cross.

I'm spending time on jerrycans, ammo cans and the stowage rail now. More to come.
G

I detailed the .50 mount with some scraps of .020 rod and strip. Tamiya left a horrendous ejector pin mark right smack dab in the middle of where the two tubes cross.

I'm spending time on jerrycans, ammo cans and the stowage rail now. More to come.
G

vonHengest

Joined: June 29, 2010
KitMaker: 5,854 posts
Armorama: 4,817 posts

Posted: Tuesday, January 11, 2011 - 05:08 PM UTC
Looking great G, your attention to detail and scratchbuilding/modifying continue to be inspirational 


warreni

Joined: August 14, 2007
KitMaker: 5,926 posts
Armorama: 712 posts

Posted: Tuesday, January 11, 2011 - 09:19 PM UTC
Finished!
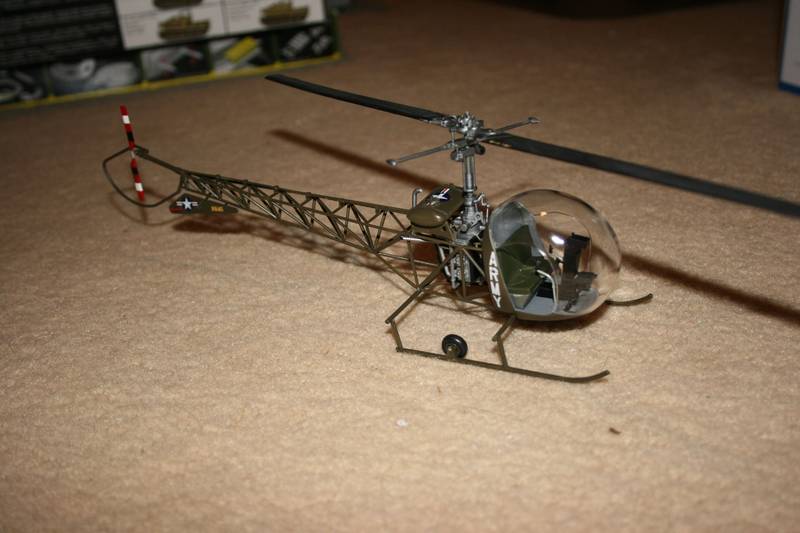
Academy 1/35 Bell OH-13.
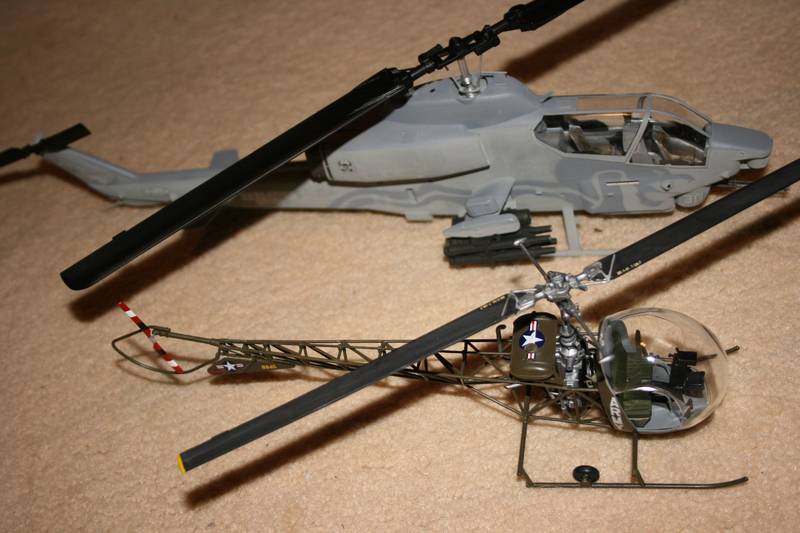
I didn't realise how small the Bell 47 was until I put it next to my AH-1W in the same scale.
Oh no.. It is raining again...

Academy 1/35 Bell OH-13.

I didn't realise how small the Bell 47 was until I put it next to my AH-1W in the same scale.
Oh no.. It is raining again...
Frigate

Joined: April 22, 2006
KitMaker: 500 posts
Armorama: 50 posts

Posted: Wednesday, January 12, 2011 - 03:42 AM UTC
Warren,
Really nice model ! Now you just need a 1/35th "Hot Lips" waving him in !
How did the kit go together ? Any real problem areas ?
Congrats on the first completion ! (If I'm correct ? )
Great build......Bruce......
Really nice model ! Now you just need a 1/35th "Hot Lips" waving him in !
How did the kit go together ? Any real problem areas ?
Congrats on the first completion ! (If I'm correct ? )
Great build......Bruce......


warreni

Joined: August 14, 2007
KitMaker: 5,926 posts
Armorama: 712 posts

Posted: Wednesday, January 12, 2011 - 07:08 AM UTC
Hi Bruce.
Oh no, Hotlips Hoolihan was way too imperious to go and do something as menial as wave in a chopper!
No REAL problems with the kit. There were a few areas that required a bit of modelling skill but nothing more than trial fitting and trimming until it went together. The boom was a little warped but it went together with some persuasion.
The other problem that I did not end up fixing as you could not see it anyway once the model was finished was the back wall of the cockpit not lining up perfectly with the rear of the cockpit shell.. if you know what I mean.. But as I said you would need to be staring at it at a very unusual and uncomfortably cosy angle to even glimpse the problem.
All in all a simple little kit that you could super-detail to death if you really wanted.
Cheers
Warren
Oh no, Hotlips Hoolihan was way too imperious to go and do something as menial as wave in a chopper!

No REAL problems with the kit. There were a few areas that required a bit of modelling skill but nothing more than trial fitting and trimming until it went together. The boom was a little warped but it went together with some persuasion.
The other problem that I did not end up fixing as you could not see it anyway once the model was finished was the back wall of the cockpit not lining up perfectly with the rear of the cockpit shell.. if you know what I mean.. But as I said you would need to be staring at it at a very unusual and uncomfortably cosy angle to even glimpse the problem.
All in all a simple little kit that you could super-detail to death if you really wanted.
Cheers
Warren
Posted: Wednesday, January 12, 2011 - 07:48 AM UTC
Lotsa nice work going on. I'll go ahead and pollute it with some of my aircraft efforts.
Photo nose of F2H-2P being opened up.

Photo nose of F2H-2P being opened up.


AgentG

Joined: December 21, 2008
KitMaker: 1,109 posts
Armorama: 1,095 posts

Posted: Wednesday, January 12, 2011 - 02:28 PM UTC
Missing from the Tamiya kit are the fender braces added shortly after WWII. With that in mind I replicated the rear braces with .020 rod and some scratched mounting lugs and plates. There were no turn buckles on the rear just a small threaded area near the hull which is near invisible in scale.


G


G
Posted: Wednesday, January 12, 2011 - 08:29 PM UTC
Wow, this campaign is off to an auspicious start on we already have the first finisher!
Bob: So it will be more of a what-if? That's okay with me, I'll allow what-ifs with the M41 as it was designed for this war and we have some indication that it actually was there. Hope everyone's okay with that.
Warren: I see your whirly bird has landed in the right forum... Nice job and congrats on being the first finisher!
Wayne: great progress on the M26! I like all the little details you're adding!
Andrew you've built that M24 in no time! Looks like you have some experience?
Mark no pollution at all! It's great to see more flying thingies (whatever the right word for these things is ). What will you use to make the glass?
Cheers everyone and keep the progress going!
Stefan
Bob: So it will be more of a what-if? That's okay with me, I'll allow what-ifs with the M41 as it was designed for this war and we have some indication that it actually was there. Hope everyone's okay with that.
Warren: I see your whirly bird has landed in the right forum...
 Nice job and congrats on being the first finisher!
Wayne: great progress on the M26! I like all the little details you're adding!
Andrew you've built that M24 in no time! Looks like you have some experience?

Mark no pollution at all! It's great to see more flying thingies (whatever the right word for these things is
 ). What will you use to make the glass?
Cheers everyone and keep the progress going!
Stefan

warreni

Joined: August 14, 2007
KitMaker: 5,926 posts
Armorama: 712 posts

Posted: Wednesday, January 12, 2011 - 08:55 PM UTC
Thanks Stefan
Cheers
Warren
Cheers
Warren
Posted: Thursday, January 13, 2011 - 04:16 AM UTC
Quoted Text
What will you use to make the glass?
Stephan, my first guess is to use some clear (acetate?) that came as the collar forms for some dress shirts I bought last year. Second shot is to see if I have any .08-.09" clear sheet left from another project somewhere.
Oh, 'wingy thingy' will work too.


Bigrip74

Joined: February 22, 2008
KitMaker: 5,026 posts
Armorama: 1,604 posts

Posted: Thursday, January 13, 2011 - 06:02 AM UTC
Stefan, I will paint the M41 in OD.
Bob
Bob

AgentG

Joined: December 21, 2008
KitMaker: 1,109 posts
Armorama: 1,095 posts

Posted: Sunday, January 16, 2011 - 12:11 PM UTC
Another long work week has ended so some progress has been made on the Pershing. I scratchbuilt the front fender braces with good old Evergreen styrene. I made the turnbuckles from .020 rod sandwhiched between .040 halfround. Scraps were cut for the mounting brackets.


The side rails are drying and I'll have pics of those up later.
G


The side rails are drying and I'll have pics of those up later.
G

GregCloseCombat

Joined: June 30, 2008
KitMaker: 2,408 posts
Armorama: 2,394 posts

Posted: Sunday, January 16, 2011 - 05:16 PM UTC

Ignore the Tiger from another campaign (a little lazy tonight with the pics).
Here's my start on the E8
Posted: Sunday, January 16, 2011 - 05:56 PM UTC
making a little progress..

Shirt collar plastic seems to be working out


Shirt collar plastic seems to be working out


Bigrip74

Joined: February 22, 2008
KitMaker: 5,026 posts
Armorama: 1,604 posts

Posted: Sunday, January 16, 2011 - 06:16 PM UTC
Wow Mark, that is a great tip. I bet it will work for tank lenses also.
Bob
Bob

vonHengest

Joined: June 29, 2010
KitMaker: 5,854 posts
Armorama: 4,817 posts

Posted: Sunday, January 16, 2011 - 06:38 PM UTC
Excellent Mark. If I may offer up a suggestion, I would cut out the individual lenses to size, and then I would cut a strip that ran across the back of them inside the nose and glue them to that. You may have to cut several pieces for each lense to build them up to the appropriate thickness. Then temporarily attach the whole assembly and sand it to match the contour of the nose. Then coat the darn thing with Future to get rid of the inevitable scratches and haze and give it a rock hard coating. Again, just a thought 
*edit: You may be able to thin the kit plastic from inside the nose to save some time and avoid building up the clear too much.

*edit: You may be able to thin the kit plastic from inside the nose to save some time and avoid building up the clear too much.
Posted: Sunday, January 16, 2011 - 08:36 PM UTC
Wayne, great job on those little details. Have never attempted the fender braces before as I considered them too fiddly...
Now, Greg, you should know that the King Tiger was never in Korea! Shame on you! Definitely an no-go!

 Nice progress on the Easy 8!
Mark, good to see another method or trash recycling. If one keeps his eyes open, there's a lot you can use! If I may put in my own 2 cents on the attachment issue: I would probably try to attach it with Kristal Klear (I think that's the name of it?) Should hold well and keep it clear at the same time.
Cheers!
Stefan
Now, Greg, you should know that the King Tiger was never in Korea! Shame on you! Definitely an no-go!


 Nice progress on the Easy 8!
Mark, good to see another method or trash recycling. If one keeps his eyes open, there's a lot you can use! If I may put in my own 2 cents on the attachment issue: I would probably try to attach it with Kristal Klear (I think that's the name of it?) Should hold well and keep it clear at the same time.
Cheers!
Stefan

warreni

Joined: August 14, 2007
KitMaker: 5,926 posts
Armorama: 712 posts

Posted: Sunday, January 16, 2011 - 08:49 PM UTC
PVA glue makes excellent windows. Just fill the gap and let it dry.. Easy!
Stefan, you can use Krystal Clear to make the windows the same way. I am sure it is basically expensive PVA glue anyway..
Stefan, you can use Krystal Clear to make the windows the same way. I am sure it is basically expensive PVA glue anyway..

Posted: Monday, January 17, 2011 - 03:20 AM UTC
Thanks guys. I thought about using PVA or Testor$ canopy glue and build up the windows. I've even used artist's gel gloss medium for lenses before. I was concerned about the size (3mm x 5mm) being too hard to fill with the glues. It's held in with Tamiya extra thin glue and it didn't cause any crazing.
Hadn't thought about building in up on a clear sheet.. Molded part is .035" thk, plastic is .015", so it could work if the interior curves aren't too sharp. Bottom 3 windows are going to be a challenge anyway,,
Hadn't thought about building in up on a clear sheet.. Molded part is .035" thk, plastic is .015", so it could work if the interior curves aren't too sharp. Bottom 3 windows are going to be a challenge anyway,,


Frigate

Joined: April 22, 2006
KitMaker: 500 posts
Armorama: 50 posts

Posted: Monday, January 17, 2011 - 05:08 AM UTC
Mark,
Your bottom windows might not be too bad. Might I suggest using clear plastic sheet on each side to a straight cut down the center just like the plastic fuselage pieces. Once you actually glue the fuselage together, where the glass pieces meet just fill with gloss gel medium. The back ground is dark, so I really doubt it will show up too much. Good Luck, its looking good.
My F9F is coming along, just getting close to where I have to commit to either a USN Carrier bird, or a USMC "Mud Mover" , so we'll see.
Take it easy...................Bruce


GregCloseCombat

Joined: June 30, 2008
KitMaker: 2,408 posts
Armorama: 2,394 posts

Posted: Saturday, January 22, 2011 - 07:05 PM UTC
OOB except I'm waiting on a barrel to arrive. Too bad there's no Korean tankers with the wool caps to use for a crew.


eoinryan

Joined: April 30, 2010
KitMaker: 232 posts
Armorama: 134 posts

Posted: Sunday, January 23, 2011 - 05:52 AM UTC
Enter the Dragon!
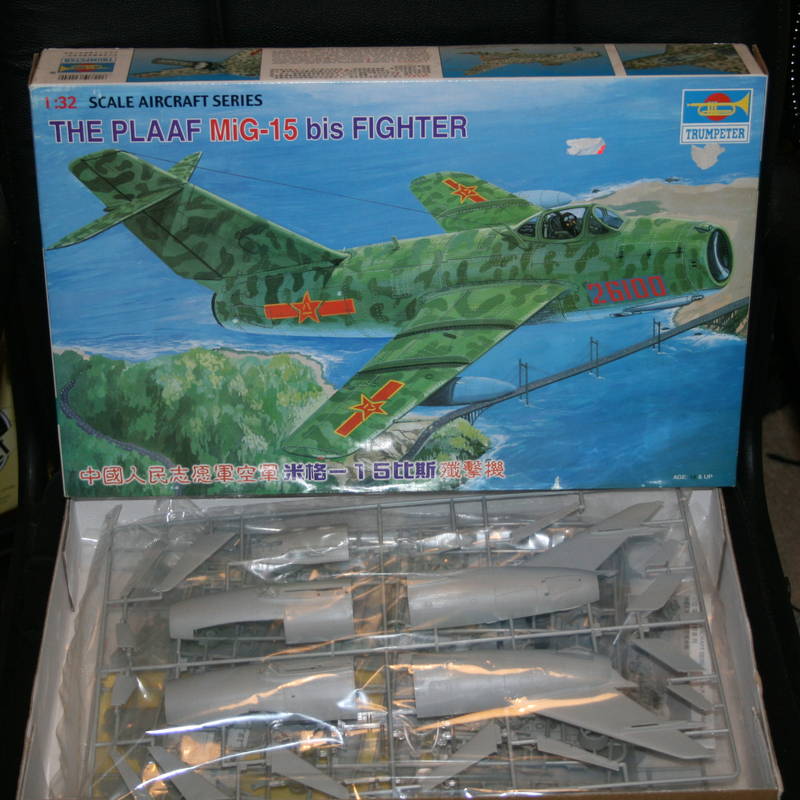
I'm building a Chinese MiG-15 straight out of MiG alley.
It's one of Trumpeter's 1/32 kits from a few years back.
Eoin

vonHengest

Joined: June 29, 2010
KitMaker: 5,854 posts
Armorama: 4,817 posts

Posted: Sunday, January 23, 2011 - 02:05 PM UTC
Mark: Keep us updated 
Greg: Wow, that went together fast! Can't wait to get started on mine
Eoin: I look forward to your build, I was wondering what that kit is like.

Greg: Wow, that went together fast! Can't wait to get started on mine

Eoin: I look forward to your build, I was wondering what that kit is like.
muddyfields

Joined: February 04, 2006
KitMaker: 884 posts
Armorama: 622 posts

Posted: Monday, January 24, 2011 - 09:05 AM UTC
Hi
Nearly made my choice of what to build. I've narrowed it down to 1 of 3.
Alan Su76
Italeri T34/85
AFV Centurian MKIII.
Hopefully make my mind up soon.
Eoin
Funny I've just about finished building that exact kit. Some nice detail in it.
I had problems with the front wheel/landing gear covers alignment.
My was licensed under the Frog label but all the sprues are maked up Trumpeter. Will be interested to see what you make of it.
Shaun

 |


