Campaigns
Where Armorama group builds can be discussed, organized, and updates posted.
Panther Campaign
Hangelafette
Visit this Community
Pennsylvania, United States
Joined: April 22, 2012
KitMaker: 344 posts
Armorama: 315 posts
Posted: Sunday, October 28, 2012 - 01:25 PM UTC
Anders - stunning work on that Panther and the figures!

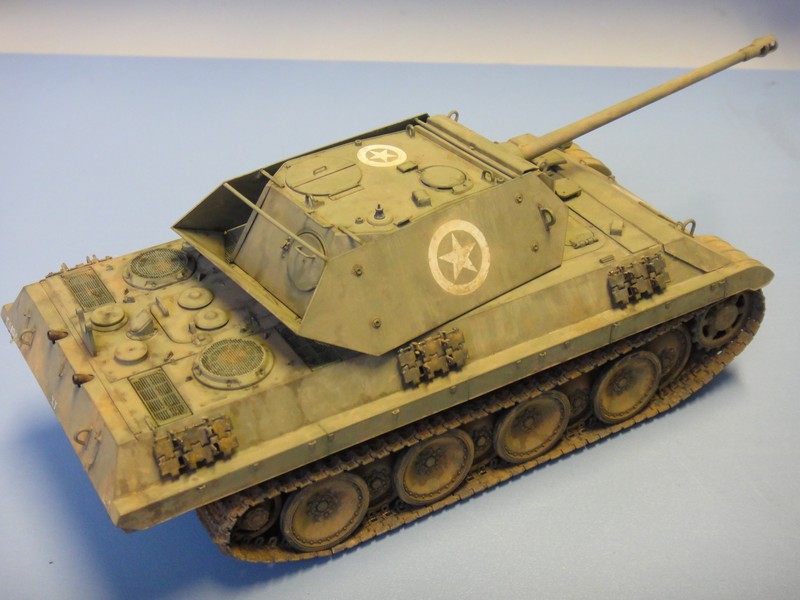
I finally managed to get some paint on my Panther F, going for a what-if green.


Nate
spacewolfdad
Visit this Community
England - West Midlands, United Kingdom
Joined: May 23, 2010
KitMaker: 642 posts
Armorama: 593 posts
Posted: Thursday, November 08, 2012 - 09:59 AM UTC
Hi Everyone,

Wonderful work being displayed in this campaign and up to page 73, how does that compare with other campaigns? I don't think I have been in a campaign with so many pages. I have had a bit of a slow period with my modelling, but I hope to get this build finished in time. I have managed to get the rail for the schurzen fitted to the other side of the tank and have put the running gear in place, the outer wheels are left off to allow the painting of the inner wheels to show the silvering from the guide horns rubbing them. When this is done I will fix the outer wheels in place and attach the schurzen properly. Here are a few photos of the progress so far...


All the best,

Paul
CMOT
Staff MemberEditor-in-Chief
ARMORAMA
Visit this Community
England - South West, United Kingdom
Joined: May 14, 2006
KitMaker: 10,954 posts
Armorama: 8,571 posts
Posted: Thursday, November 08, 2012 - 11:31 AM UTC
It is good to see work still being added here, nice work so far Nathan and Paul.
Nito74
Visit this Community
Lisboa, Portugal
Joined: March 04, 2008
KitMaker: 5,386 posts
Armorama: 4,727 posts
Posted: Thursday, November 08, 2012 - 11:39 AM UTC
Great work Nathan ! I really like the different shades of green you got there.

Dragom's Panther F is a stunning kit !!!
Wulfen
Visit this Community
Oregon, United States
Joined: November 24, 2008
KitMaker: 53 posts
Armorama: 52 posts
Posted: Thursday, November 08, 2012 - 02:14 PM UTC
Hi Guys!

You probably don't remember me from the bottom of page 15, but I am finally able to find some time to work on my Panther, after nearly a year of non-tank modeling projects and other delays keeping me away from the plastic.

Lots of great builds have been shown in this campaign and I have enjoyed reading about all of them and I hope mine will be a worthy addition.

I am building a late Panther G. Not any particular tank, just one that was built in late to mid January at MNH. The time frame for the model is supposed to be about April or May of the same year. I am using the Dragon, Black Knights Panther G. My information pertaining to what parts to use for a late model MNH is from AMPS Central SC Group build 2 build notes No. 1, posts by Herbert Ackermann and a few other people as well as Panther: Tank Quest for Combat Supremecy, Panzer tracts 5-3, Actung Panzer 4 and Panther by Canfora.


So here is step 1. Pretty standard. Although there was a short adventure when one of the part A21's decided to leap from my fingers and hide under my shredder..

Dragon-Panther 1945 MNH -1


Step 2 went pretty well, just took a little time to put things together. I haven't actually added all the parts as I am waiting to see if it will be easier to join the top and bottom then add them (there will be some dry fitting done) , also I haven't glued G7&G6 into place yet.

This step is the first step that has MNH parts, being the final drive G8/9 which goes with skid shoe (G24/26) which will be added in step 3.

Dragon-Panther 1945 MNH - 2


Dragon-Panther 1945 MNH - 3

I'm planning doing the tracks next for a test fit. The kit comes with a single piece track that is nice but I will be using Master Club tracks.

Dragon-Panther 1945 MNH - 4

Dragon-Panther 1945 MNH - 5


Here's a short set I put together rolled around the the drive sproket.

Dragon-Panther 1945 MNH -6
so far they have been easy to put together and look fantastic. But ask me how I feel about them after putting all those tiny pins into place.

So far I'be been pretty happy with how this kit is going together. Though I will say that the AMPs document is helping a lot with keeping my sanity as to which parts of the kit I actually need to use. Would be nice if the instructions actually labeled start dates of parts somwhere when there are mulitple choices, or something like that.


Hopefully I will have more to post soon, as I have less than 2 months to finish this!
Hangelafette
Visit this Community
Pennsylvania, United States
Joined: April 22, 2012
KitMaker: 344 posts
Armorama: 315 posts
Posted: Thursday, November 08, 2012 - 04:45 PM UTC
Paul - Looking good!

Darren - Thanks!

John - It has been a very enjoyable kit... and I have another one

James - I will follow your build with interest as I was bewildered by the instructions for my Panther F and ultimately decided to just slap it together. Those masterclub tracks look very nice, but those pins

best of luck! I recently picked up some SKP model clickable tracks for Panther A - G and they go together great and they are cheap compared to most AM tracks.

Nate
Wulfen
Visit this Community
Oregon, United States
Joined: November 24, 2008
KitMaker: 53 posts
Armorama: 52 posts
Posted: Friday, November 09, 2012 - 05:17 PM UTC
Hi everyone!

Well it took nearly a hour and a half, but the tracks are all clicked together. I still have a bit of work to do with them.. theres a little bit of cleaning up that needs to be done, I plan on running a toothbrush over them to get rid of a little flash. Still have the pins to look forward to.. lol

here's a few pics for a basic test fit and just to see how they look.. not all the roadwheels are on obviously and no clean up has been done to the track.

Dragon-Panther 1945 MNH -7

Dragon-Panther 1945 MNH -8

Dragon-Panther 1945 MNH -9

Next will be the cutting and test fitting of the rest of the parts in step 3, followed by step 4 (suprize!!) the rear of the tank which will include my first attempt at PE... assuming i don't melt it all ..

tylusfaust
Visit this Community
New Jersey, United States
Joined: December 18, 2005
KitMaker: 371 posts
Armorama: 217 posts
Posted: Sunday, November 11, 2012 - 11:19 AM UTC
Hi all,
Where do I post the pics of my finished Panther for the campaign ribbon? Is it in this forum or another?

Thanks in advance
Raul
Dragon164
#226
Visit this Community
British Columbia, Canada
Joined: February 20, 2012
KitMaker: 1,909 posts
Armorama: 1,066 posts
Posted: Sunday, November 11, 2012 - 01:44 PM UTC
Raul,
The pics go here:

http://gallery.kitmaker.net/showgallery.php/cat/27035

Cheers Rob.
Panther64
#261
Visit this Community
North Carolina, United States
Joined: September 12, 2005
KitMaker: 395 posts
Armorama: 365 posts
Posted: Monday, November 12, 2012 - 02:50 PM UTC
Ok finally got my Dragon Ausf F in today. I want to combine it with my Revell Ausf G using the steel wheels and turret fom the Dragon kit. I am going to make it with the FG 1250 IR night fighting gear and an "experimental urban camouflage". With a little trimming, the turret ring fit the Revell upper hull fairly nice. Hope to get this done before deadline.
CMOT
Staff MemberEditor-in-Chief
ARMORAMA
Visit this Community
England - South West, United Kingdom
Joined: May 14, 2006
KitMaker: 10,954 posts
Armorama: 8,571 posts
Posted: Tuesday, November 13, 2012 - 07:11 AM UTC
A little tight on time Kerry but I will watch with interest.

Rob thanks for pointing Raul in the right direction.
HEINE-07
Visit this Community
Ohio, United States
Joined: February 28, 2007
KitMaker: 392 posts
Armorama: 198 posts
Posted: Tuesday, November 13, 2012 - 06:55 PM UTC
The Panther sure makes for a beautiful tank. I am sure yours will be exemplary, Kerry.
Dragon164
#226
Visit this Community
British Columbia, Canada
Joined: February 20, 2012
KitMaker: 1,909 posts
Armorama: 1,066 posts
Posted: Tuesday, November 13, 2012 - 10:07 PM UTC
You are welcome Darren
Maybe you could put a link in the first post so it is easier to find.

Cheers Rob.
CMOT
Staff MemberEditor-in-Chief
ARMORAMA
Visit this Community
England - South West, United Kingdom
Joined: May 14, 2006
KitMaker: 10,954 posts
Armorama: 8,571 posts
Posted: Wednesday, November 14, 2012 - 01:21 AM UTC
There is a link near the start of the thread.
Dragon164
#226
Visit this Community
British Columbia, Canada
Joined: February 20, 2012
KitMaker: 1,909 posts
Armorama: 1,066 posts
Posted: Wednesday, November 14, 2012 - 01:40 AM UTC
It's on the 4th page I think, it would be easier for people to find if it was on the first post, you should still be able to add it. It's just a suggestion.

Cheers Rob.
Panther64
#261
Visit this Community
North Carolina, United States
Joined: September 12, 2005
KitMaker: 395 posts
Armorama: 365 posts
Posted: Wednesday, November 14, 2012 - 03:14 PM UTC
A little more work done tonight. Got the wheels together and noticed the Revell axels on the suspension arms were way too short for the Dragon steel wheels. So I cut them off, added some reinforcing wire and started adding the correct size diameter plastic rod. I need to hit the LHS and get some end biters to trim back the wire as most are too long. I've glued in a few of the rods on shorter wires to see what they will look like, these will be trimmed later to correct length to receive the wheels.
I wanted to add a scratch built interior but that will have to wait until after the campaign as I don't have enough time. I will gently glue down the upper/lower hulls and turret so I can go back at a later date and do that.
eMan
#298
Visit this Community
Hong Kong S.A.R. / 繁體
Joined: August 08, 2002
KitMaker: 1,182 posts
Armorama: 665 posts
Posted: Thursday, November 15, 2012 - 07:37 PM UTC
Ersatz Panther M10 finished.


CMOT
Staff MemberEditor-in-Chief
ARMORAMA
Visit this Community
England - South West, United Kingdom
Joined: May 14, 2006
KitMaker: 10,954 posts
Armorama: 8,571 posts
Posted: Thursday, November 15, 2012 - 10:06 PM UTC
Very nice work with this e man especially getting some life into the single colour paint scheme.
asmodeuss
Visit this Community
Quebec, Canada
Joined: November 19, 2011
KitMaker: 1,389 posts
Armorama: 1,388 posts
Posted: Friday, November 16, 2012 - 01:13 AM UTC
Superb work EMan! I just love the finish.

Phil.
BBD468
Visit this Community
Texas, United States
Joined: March 08, 2010
KitMaker: 2,465 posts
Armorama: 2,383 posts
Posted: Friday, November 16, 2012 - 02:54 AM UTC
WOW eMan!!! Ersatz looks awesome...luv it!!!

Gary
ElCapitan
Visit this Community
Pennsylvania, United States
Joined: May 14, 2007
KitMaker: 219 posts
Armorama: 217 posts
Posted: Friday, November 16, 2012 - 06:43 AM UTC
eMan,

Well done on the paint job. It looks great.

Kevin
Panther64
#261
Visit this Community
North Carolina, United States
Joined: September 12, 2005
KitMaker: 395 posts
Armorama: 365 posts
Posted: Friday, November 16, 2012 - 04:08 PM UTC
Really awesome looking Panther M10 Ersatz there eman! I love the color modulation. I had a chance to go through all the pages here, there are so many great looking Panthers. I really want to get mine done in time. I was able to test fit the steel wheels to their new axels and everything is lining up so paint will be coming soon. I also modified the front/top of the glacis and extended the armor plate past the radioman/drivers hatches and puttied in the G model recessed lines. Finally, I was able to get the turret together, it goes together so well with little to no gaps.
spacewolfdad
Visit this Community
England - West Midlands, United Kingdom
Joined: May 23, 2010
KitMaker: 642 posts
Armorama: 593 posts
Posted: Sunday, November 18, 2012 - 10:52 PM UTC
Hi Everyone,

Excellent work being displayed in this campaign:

@ Wulfen: Nice work with the tracks, they really add realism to the model. A tip with the photo-etch - if you can put a dark coloured cloth on the work surface and if possible have it hang over the edge onto your lap, then if anything 'pings' off into the 'blue yonder' it will be easier to find.

@ Panther64: Well done with the kit-bash, looks really interesting and Braille Scale too. I will be following this with interest.

@ eMan: Superb paint job, wonderful weathering and I love the subtle variations in tone on the vehicle.

I have now finished all the construction on my Panther and am now ready to apply paint, I will undercoat it first with Tamyia Fine Surface Primer and then fire up the airbrush. Here are the pictures of the finished build...


That's it for now, next post will be more colourful hopefully.

All the best,

Paul
CMOT
Staff MemberEditor-in-Chief
ARMORAMA
Visit this Community
England - South West, United Kingdom
Joined: May 14, 2006
KitMaker: 10,954 posts
Armorama: 8,571 posts
Posted: Monday, November 19, 2012 - 03:54 AM UTC
Very clean build Paul I look forward to seeing it painted.
BBD468
Visit this Community
Texas, United States
Joined: March 08, 2010
KitMaker: 2,465 posts
Armorama: 2,383 posts
Posted: Monday, November 19, 2012 - 06:50 AM UTC
Hi Kerry, Its comin'along nice man!

Paul, that is one magnificent wee Panther right there bud!! Looking forard to some color!

Gary