Motorcycle Mayhem Campaign
England - East Anglia, United Kingdom
Joined: August 12, 2005
KitMaker: 14,499 posts
Armorama: 11,675 posts
Posted: Friday, September 28, 2012 - 10:35 PM UTC
Hi Pat,
Good progress, and nice looking figures. Just opening the box on the Tamiya BSA.
Anyone else built these two little gems?

Now these are tiny


Cheers
Al
'Action this Day'
Winston Spencer Churchill
England - East Anglia, United Kingdom
Joined: August 12, 2005
KitMaker: 14,499 posts
Armorama: 11,675 posts
Posted: Saturday, September 29, 2012 - 12:22 AM UTC
Well, arriving late as usual, but opened the box this morning.
http://armorama.kitmaker.net/forums/197945&page=1The BSA M20 with the ITA conversion.
Cheers
Al


'Action this Day'
Winston Spencer Churchill
Dublin, Ireland
Joined: November 27, 2004
KitMaker: 6,048 posts
Armorama: 4,619 posts
Posted: Saturday, September 29, 2012 - 08:00 AM UTC
Sub assemblies primed in Panzer gray and then sprayed Russian green. I managed to lose one of the Side car frame supporting struts so I'll have to McIver something up out of stretched sprue to replace it

Now to see how much Value Gear stowage I can pile on it

Pat
work to become not to acquire

#130
Noord-Holland, Netherlands
Joined: June 07, 2002
KitMaker: 8,797 posts
Armorama: 4,190 posts
Posted: Monday, October 01, 2012 - 04:10 AM UTC
Ola Guys...
Well after ditching my original plan for a junkyard bike I also ditched my other plan to have a motocycle floating in midair by a magnetic field because the sciency bit was too hard for my simple brain and the stuff needed to make it work cost a ton.
So I went back to the drawing board to think up plan C.
And plan C ended up to come from a diorama I started a few months ago. Possibly a bit before the campaign started (I hope I can still get permission to use it since the motorcycle already was a bit underway). It was called "Barbarossa Blitz" and featured a small river with a blown up bridge and a disabled T38 M (the multicolored piece of crap) which was used as a makeshift bridge. Couple of days back I looked at it again and loathed my own creation. Diorama was too big, Composition too stupid and the tank too ugly. Here is a picture from something I was not happy with.

And some pictures of the work on the motorcycle


Motorcycle is Masterbox' BMW R75 without it's sidecar. Spiced up with some parts from the old SHowmodelling update set for BMW and Zundapp. The bars were a leftover from Revells R75 kit as is the figure. Sculpted new arms and gave it a Hornet head. On these pictures only a few of the Update parts from the Showmodelling set were added.
So while looking at it last week suddenly plan C uncovered itsself. So I took out one of my big hobbyknifes and cut out the 10% of the diorama I actually liked. The bit with the Motorcycle dispatcher. I added a lot more details from the Showmodelling set. Did some more work on the figure. Did some mods on the base itself. And to the composition. and shot some primer. This is the result so far.


I hope this can still be entered. Would love to hear about that.
With friendly greetz
Robert Blokker
Greetz Robert "FAUST" Blokker
"Wees niet onverstandig, haastig of voortvarend; alles sal regkom, as ons almal ons plig doen".
FUTBOL KAVGADIR!!!!!!!

#041
Kobenhavn, Denmark
Joined: July 20, 2006
KitMaker: 10,069 posts
Armorama: 4,677 posts
Posted: Tuesday, October 02, 2012 - 05:11 AM UTC
Robert, I am not the campaign administrator, but I think you are good for an entry.
The previous diorama looked good although I agree the tank looked a little 1970'ties

would look nice with another tank in there or maybe crashed nose first into the stream.
The mini diorama looks great now. Looking forward to see more.
Campaign'oholic - 252+ campaigns completed
Alaska, United States
Joined: January 06, 2006
KitMaker: 530 posts
Armorama: 450 posts
Posted: Tuesday, October 02, 2012 - 07:25 AM UTC
Hi Robert,
I think that you are on track with this little dio. Often times, less is more. The smaller dio lets the eye focus on the really interesting aspect which is the motorcycle and rider.
Your choice of a more dynamic, "action" position for the motorcycle is also very inspiring. Any motorcycle in motion is dynamic in itself but you've made this even more interesting by your choice of position. Great work so far. I'm really looking forward to seeing it completed.
Jim
Large Scale Armory
Why is the rum....always gone? --Capt. Jack Sparrow
Alpes-Maritimes, France
Joined: April 18, 2011
KitMaker: 28 posts
Armorama: 23 posts
Posted: Tuesday, October 02, 2012 - 09:33 AM UTC

#130
Noord-Holland, Netherlands
Joined: June 07, 2002
KitMaker: 8,797 posts
Armorama: 4,190 posts
Posted: Tuesday, October 02, 2012 - 09:38 AM UTC
@jesper
Thanks for the kind words. I hope the campaignleader will share your opinion as well. When I started the big dio i thought I started with something cool. Then the ugly resin mongrel came and for a while I still thought that. But after a while the interest was lost.. The dio is cut up now. The only other part of it that might resurface one day in another dio is the other part of the blown up bridge.
@james.
Thanks for the compliments. I like compact diorama's. Most of all they do not occupy much space. And they don't take 130 years to finish. Which I like because I'm very slow builder. But it let's the viewer indeed focus more on what is important. I'm glad you like the dynamic composition. I spend quite a bit of time on that. It is something I often miss in dioramas as it is mostly static displays that we modelers do it often is hard to say if something was meant to have the impresdion of being on the move. With motorcycles even when a drivers figure is sitting on it it is not immediately apparent. Which is a shame because as you can see it only needs some small pose changes to give the idea of speed and motion. Often putting it off balance already gives the idea of movement
More on this soon. Covered the foam with a sort of spackle. And sprayed everything black. Painting of the bike and figure will start soon too.
Greetz Robert "FAUST" Blokker
"Wees niet onverstandig, haastig of voortvarend; alles sal regkom, as ons almal ons plig doen".
FUTBOL KAVGADIR!!!!!!!

#130
Noord-Holland, Netherlands
Joined: June 07, 2002
KitMaker: 8,797 posts
Armorama: 4,190 posts
Posted: Tuesday, October 02, 2012 - 09:45 AM UTC
@Fred
Thanks for the compliments. Really appreciated. That dkw brings back some memories. Simple little kit but you definately got the best out of it. I love that camo job you put on it. Superb. It got me thinking what color I should give my motorcycle. Probably boring grey or sandgelb.
Greetz Robert "FAUST" Blokker
"Wees niet onverstandig, haastig of voortvarend; alles sal regkom, as ons almal ons plig doen".
FUTBOL KAVGADIR!!!!!!!
Ontario, Canada
Joined: May 28, 2006
KitMaker: 172 posts
Armorama: 122 posts
Posted: Wednesday, October 03, 2012 - 03:14 AM UTC
Robert, that scene you propose looks great. Reminds me of that movie Steve McQueen did, The Great Escape.

regards,
Jack

#041
Kobenhavn, Denmark
Joined: July 20, 2006
KitMaker: 10,069 posts
Armorama: 4,677 posts
Posted: Friday, October 05, 2012 - 04:33 AM UTC
Campaign'oholic - 252+ campaigns completed
England - South East, United Kingdom
Joined: February 05, 2008
KitMaker: 1,381 posts
Armorama: 63 posts
Posted: Friday, October 05, 2012 - 06:05 AM UTC
hi FAUST, sorry for the late reply...
i think that will look great, go for it, i'm sure we'll all want to see that finished.
all the best
paul

#130
Noord-Holland, Netherlands
Joined: June 07, 2002
KitMaker: 8,797 posts
Armorama: 4,190 posts
Posted: Friday, October 05, 2012 - 08:15 AM UTC
@ Jack
There are indeed some parrellels between the scenes. Totally unintentional. I didn't even think of that scene untill it was mentioned in this thread.
@ Jesper
Nice work on the R75. Also nice paintwork on the figure. I like that camo cover.
@ Paul
Thanks for accepting my project for this campaign. Really appreciated. Lately I have been on quite a good modeling flow so I'm pretty sure this one will see the end.
Got a little progress as well. Laid down a coat of Plasterboard spackle. Sprinkled birdcage sand over it. Made ruts and tire tracks in it and coated everything in a nice black. I do this actually for the styrene sides of the base because I think it looks nice and it helps pop out the much lighter colored scene on top. But it also works nice as a primer/preshade of the groundworks.
And I got some paint on the motorcyclist. I always start with the flesh tones and they are finished.
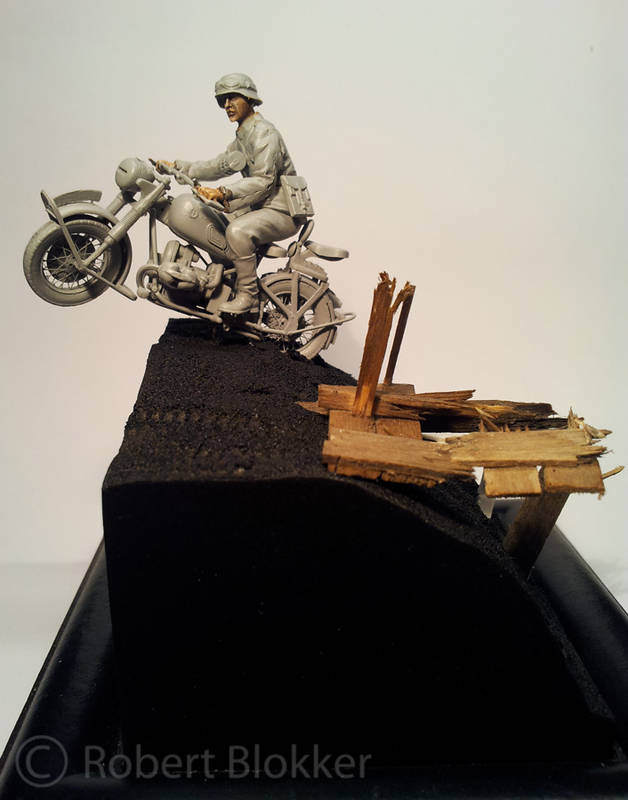
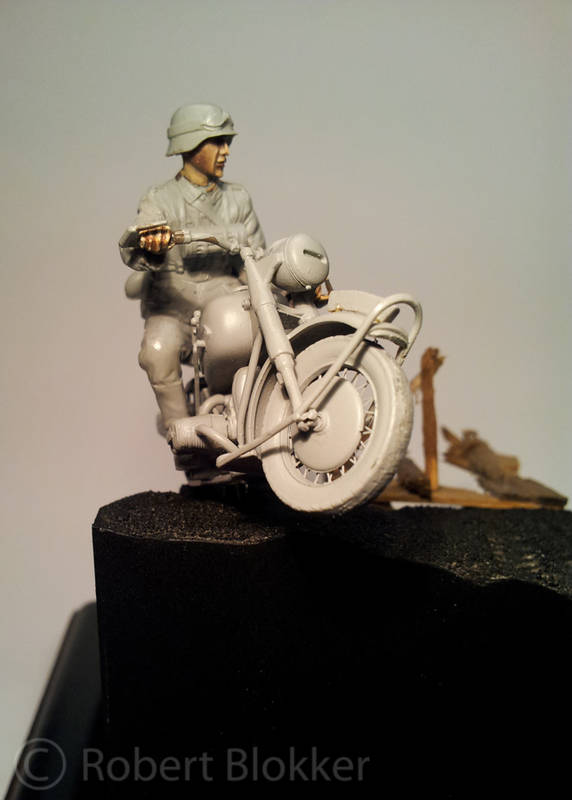
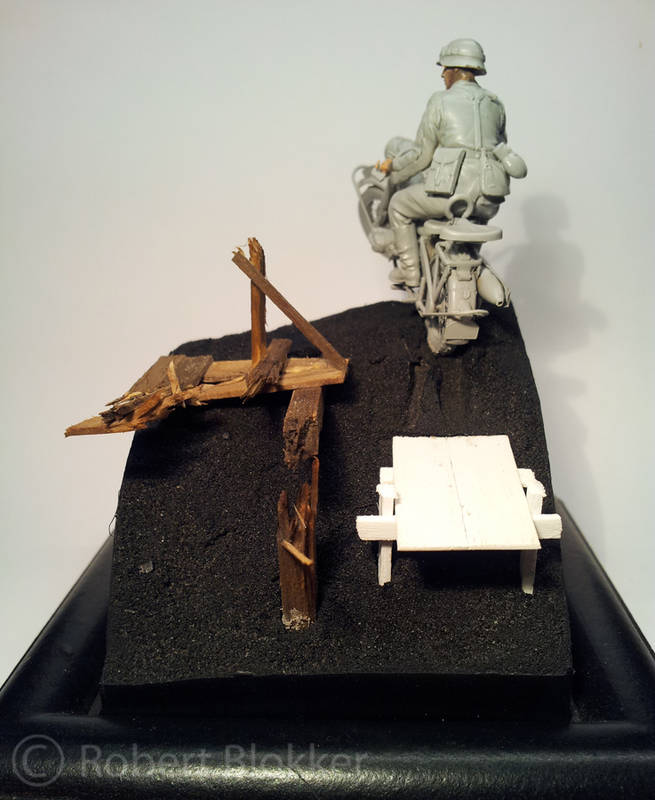
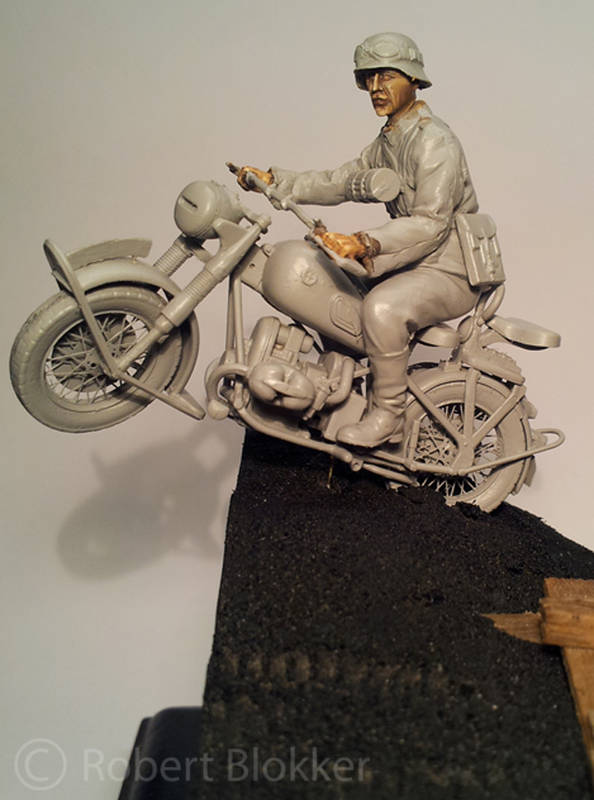
Next up. Painting the uniform. The motorcycle and the groundworks.
As always looking forward to any feedback
Greetz Robert "FAUST" Blokker
"Wees niet onverstandig, haastig of voortvarend; alles sal regkom, as ons almal ons plig doen".
FUTBOL KAVGADIR!!!!!!!
England - East Anglia, United Kingdom
Joined: August 12, 2005
KitMaker: 14,499 posts
Armorama: 11,675 posts
Posted: Friday, October 05, 2012 - 08:39 AM UTC
Hi Robert,
The project is looking excellent.
Al


Fred and Jasper, coming along really well.
Al
'Action this Day'
Winston Spencer Churchill
England - East Anglia, United Kingdom
Joined: August 12, 2005
KitMaker: 14,499 posts
Armorama: 11,675 posts
Posted: Saturday, October 06, 2012 - 08:31 PM UTC
Hi folks,
A bit of progress on the BSA.


Cheers
Al
'Action this Day'
Winston Spencer Churchill

#130
Noord-Holland, Netherlands
Joined: June 07, 2002
KitMaker: 8,797 posts
Armorama: 4,190 posts
Posted: Sunday, October 07, 2012 - 01:40 AM UTC
@ Alan
Thanks for the compliments. Great work on the BSA. Read the struggles with the ITA update set in the other thread. But you got a good result out of it.
I got a 1 pic update. Bike in mid paint. Engine block is finished bar some parts that need to be a different color. Other stuff needs a second coat to alter the color it is painted in. And then it is off to Filters washes and weathering.
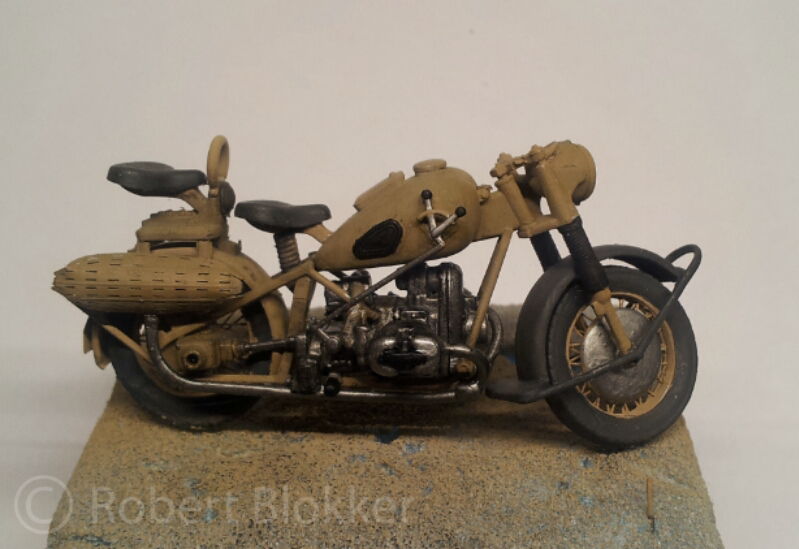
Greetz Robert "FAUST" Blokker
"Wees niet onverstandig, haastig of voortvarend; alles sal regkom, as ons almal ons plig doen".
FUTBOL KAVGADIR!!!!!!!
England - East Anglia, United Kingdom
Joined: August 12, 2005
KitMaker: 14,499 posts
Armorama: 11,675 posts
Posted: Sunday, October 07, 2012 - 07:13 AM UTC
Hi Robert,
Nice work, coming along a treat. The holding ring one the rear seat looks very thick, I don't know if they were that thick in real life but a little thinner might look better.
The BSA was fun, wanted a slightly earlier bike so altered/left off a few parts. Carving out the excess plastic has helped give it a bit more definition. Not 100% sure about the colour, I think duller would have been better. I used NATO Brown but when I did the Tilly I mixed my own and I prefer it, but I can probably dull it down a bit.
Started work on a rider this evening.
If this one turns out OK then I might well start on the Triumph which is in the pending pile.
I've been looking for a picture of a 1940s dispatch rider to see if they wore the britches and long boots at that point, but most seem to be in wet weather clothing.
Cheers
Al

'Action this Day'
Winston Spencer Churchill
England - South East, United Kingdom
Joined: February 05, 2008
KitMaker: 1,381 posts
Armorama: 63 posts
Posted: Tuesday, October 09, 2012 - 04:06 AM UTC
i'm getting there slowly...


paul
Hawaii, United States
Joined: August 27, 2006
KitMaker: 1,646 posts
Armorama: 1,557 posts
Posted: Tuesday, October 09, 2012 - 02:00 PM UTC
A nice collection of motorcycles coming into this campaign!! Good work all.
John C: What kit is that for the quad?? I'd like to pick one of those up.
Happy Modeling, -zon

"Certainty of death.
Small chance of sucess.
What are we waiting for?"
-Gimli, Return of the King.
England - East Anglia, United Kingdom
Joined: August 12, 2005
KitMaker: 14,499 posts
Armorama: 11,675 posts
Posted: Wednesday, October 10, 2012 - 09:35 PM UTC
Hi folks,
A bit more work on the kit and figure.
Added a front number plate, these seem to have been on the earlier bikes but like the rear number plate didn't carry a registration number but a bike number ie 47 or 24 or 550.
A bit of work done on the figure, new head and removed the molded on straps. He's looking a bit shinny, but some dust should tone things down a bit.
I think the figure is sitting a bit too high. There are two small pins linked from the springs into the seat which may need shortened. I can't think of anything else that would cause this but there is no indication of this need in the build stage.


Al
'Action this Day'
Winston Spencer Churchill
South Carolina, United States
Joined: December 03, 2009
KitMaker: 2,160 posts
Armorama: 1,906 posts
Posted: Friday, October 12, 2012 - 06:25 AM UTC
England - East Anglia, United Kingdom
Joined: August 12, 2005
KitMaker: 14,499 posts
Armorama: 11,675 posts
Posted: Friday, October 12, 2012 - 08:55 AM UTC
Managed to remove and lower the seat, figure sits better now.
About done on this one too.


Cheers
Al
'Action this Day'
Winston Spencer Churchill
North Carolina, United States
Joined: December 24, 2007
KitMaker: 462 posts
Armorama: 262 posts
Posted: Saturday, October 13, 2012 - 02:59 AM UTC
Nice work all around.
Zon, sorry can't give your that info don't know step dad does rc swap meets and give it to me about a year ago all I can tell It's a casting of a toy.
John
RANGERS We Lead The Way
on the bench:
swamp phase dio
maldorain protector
Removed by original poster on 10/14/12 - 18:24:28 (GMT).
Removed by original poster on 10/14/12 - 18:37:49 (GMT).


 would look nice with another tank in there or maybe crashed nose first into the stream.

