California, United States
Joined: November 01, 2009
KitMaker: 657 posts
Armorama: 481 posts
Posted: Friday, June 21, 2013 - 04:41 PM UTC
" For those who fought for it Freedom has a flavor the protected will never know"
Italeri T-55, Syrian Army 6 Day War Taken out. 2%
AFV IDF Shot. 6 Day War 0%..
California, United States
Joined: November 01, 2009
KitMaker: 657 posts
Armorama: 481 posts
Posted: Friday, June 21, 2013 - 06:47 PM UTC
" For those who fought for it Freedom has a flavor the protected will never know"
Italeri T-55, Syrian Army 6 Day War Taken out. 2%
AFV IDF Shot. 6 Day War 0%..
Georgia, United States
Joined: January 07, 2013
KitMaker: 572 posts
Armorama: 302 posts
Posted: Sunday, June 23, 2013 - 12:42 AM UTC
Build looks good I'm finishing up on mine Had a fit issue pop up so i'm not painting yet but I should have it done in about two weeks or sooner.
Sascha(IronOwl)


Isere, France
Joined: April 23, 2011
KitMaker: 735 posts
Armorama: 606 posts
Posted: Sunday, June 23, 2013 - 06:49 PM UTC
hello,
Chris, nice work.
here are my progress
steph


California, United States
Joined: November 01, 2009
KitMaker: 657 posts
Armorama: 481 posts
Posted: Sunday, June 23, 2013 - 07:12 PM UTC
Steph,
Great work, is that the Tamiya M4 and marking of 1st Northants Yeomanry?? I cant wait to see whatyou got for the Commonwealth Thunder GB. this build is awsome.
E
" For those who fought for it Freedom has a flavor the protected will never know"
Italeri T-55, Syrian Army 6 Day War Taken out. 2%
AFV IDF Shot. 6 Day War 0%..
Isere, France
Joined: April 23, 2011
KitMaker: 735 posts
Armorama: 606 posts
Posted: Sunday, June 23, 2013 - 09:09 PM UTC
thank you Eugene. yes, 1st Northants Yeomanry.
steph

Warszawa, Poland
Joined: March 12, 2013
KitMaker: 125 posts
Armorama: 36 posts
Posted: Monday, June 24, 2013 - 09:16 AM UTC
Hi,
quick update on what I've done so far.
Tank was primed and painted with Tamiya XF-62. All stowage on top was painted as well. Then I put few thin layers of gloss varnish and put decals.


Regards,
Radek
On the bench: some armour ... and a plane... Oh and you would probably find some unfinished ships somewhere around the mancave ;)
Indiana, United States
Joined: June 10, 2005
KitMaker: 6,188 posts
Armorama: 5,960 posts
Posted: Monday, June 24, 2013 - 09:37 AM UTC
I like it Radek!

I wouldn't block off the rear deck too much... unless it's set in wintertime?
Still, looking good!
~ Jeff
Indiana, United States
Joined: June 10, 2005
KitMaker: 6,188 posts
Armorama: 5,960 posts
Posted: Monday, June 24, 2013 - 09:39 AM UTC
Nice work on yours too Steph!
Man, all you guys have some sweet Shermans... time for me to get to work huh.

~ Jeff
New Jersey, United States
Joined: October 28, 2006
KitMaker: 491 posts
Armorama: 462 posts
Posted: Monday, June 24, 2013 - 12:24 PM UTC
Quoted Text
Well Hello all
I am back from Afghanistan and have started my build, It is the tamiya M4A3 in 1/35 and I will build straight from the box as this is my first Armor kit ever and 1st Sherman it will be a 14th AD sherman in germany. Pics in a few whrn I can find my cord.
Eugene
Welcome home. Nothing like a little post-deployment modeling to ease back into the regular world.
Chris
On the workbench:
Mk II Male, Takom Conversion
Hobby Boss T-18
California, United States
Joined: November 01, 2009
KitMaker: 657 posts
Armorama: 481 posts
Posted: Monday, June 24, 2013 - 08:37 PM UTC
Radek,
your sherman looks good, I am right behind you with my A3. And
chris yes it does little nerve racking after being gone for a bit and then jumping right in to an armor build which I have never done but it is fun so far and I have a ton of Ideas. gonna go back to A/C after this to get the skills going again and then come back to armor for awhile, I am hooked.
Eugene
" For those who fought for it Freedom has a flavor the protected will never know"
Italeri T-55, Syrian Army 6 Day War Taken out. 2%
AFV IDF Shot. 6 Day War 0%..
Warszawa, Poland
Joined: March 12, 2013
KitMaker: 125 posts
Armorama: 36 posts
Posted: Tuesday, June 25, 2013 - 05:07 AM UTC
Quoted Text
I like it Radek! 
I wouldn't block off the rear deck too much... unless it's set in wintertime?
Hi Jeff,
I want to make a Sherman from 6th Armoured Div Jan'45 somewhere in Ardennes (except of the gun - OOB parts & decals only), so stowage on rear deck seems ok (although still I don't know how those food ratios could survive there

).
@Eugene,
Oh no ... the chase on my back... I have to slow down then ... otherwise I'll die tired

But as this is no race, good luck with your A3! Your's is also looking nice. And it's all about fun afterwards, so it's good you have great time builidng your Sherman.
Regards,
Radek
On the bench: some armour ... and a plane... Oh and you would probably find some unfinished ships somewhere around the mancave ;)
California, United States
Joined: November 01, 2009
KitMaker: 657 posts
Armorama: 481 posts
Posted: Wednesday, June 26, 2013 - 06:35 PM UTC
" For those who fought for it Freedom has a flavor the protected will never know"
Italeri T-55, Syrian Army 6 Day War Taken out. 2%
AFV IDF Shot. 6 Day War 0%..

#226
British Columbia, Canada
Joined: February 20, 2012
KitMaker: 1,909 posts
Armorama: 1,066 posts
Posted: Wednesday, June 26, 2013 - 08:40 PM UTC
Eugene,
Yes the tank does have something there Tamiya just did not make that part for their Shermans.

The area above the tracks should be closed.

Cheers Rob.
PS looking good so far!

Anything without guns is a target!
27 completed campaigns and counting :)
California, United States
Joined: November 01, 2009
KitMaker: 657 posts
Armorama: 481 posts
Posted: Thursday, June 27, 2013 - 02:01 PM UTC
" For those who fought for it Freedom has a flavor the protected will never know"
Italeri T-55, Syrian Army 6 Day War Taken out. 2%
AFV IDF Shot. 6 Day War 0%..

#226
British Columbia, Canada
Joined: February 20, 2012
KitMaker: 1,909 posts
Armorama: 1,066 posts
Posted: Thursday, June 27, 2013 - 10:14 PM UTC
Eugene,
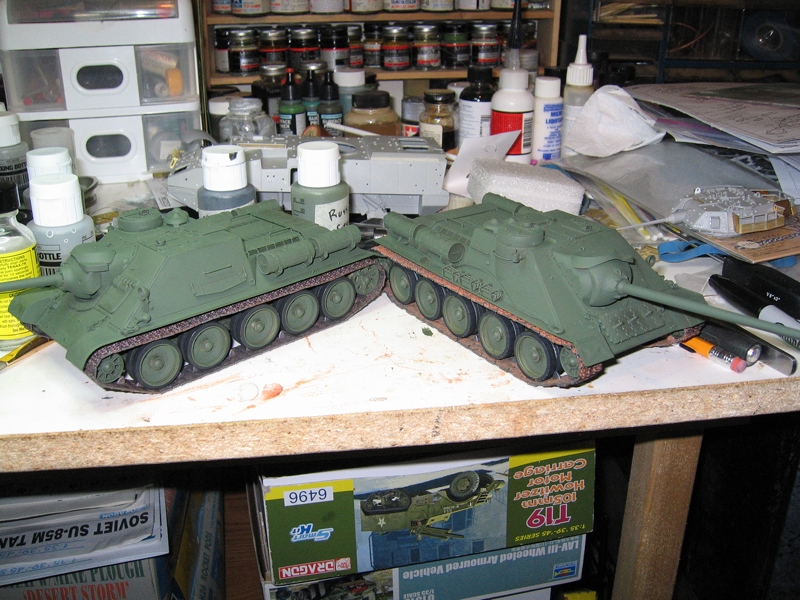
What worked good for me when I wanted to rust tracks was to take an orange,red and yellow pastel and sand them into a powder I then mixed them till I had a color I liked and added some Mona Lisa mineral spirits(a very mild mineral spirit) to make a wash which I put on with a brush.

That's the result on the right.

Cheers Rob.
Anything without guns is a target!
27 completed campaigns and counting :)
Indiana, United States
Joined: June 10, 2005
KitMaker: 6,188 posts
Armorama: 5,960 posts
Posted: Thursday, June 27, 2013 - 10:55 PM UTC
Hey... those are not Shermans!

Just kiddin'!

~ Jeff

#226
British Columbia, Canada
Joined: February 20, 2012
KitMaker: 1,909 posts
Armorama: 1,066 posts
Posted: Friday, June 28, 2013 - 03:27 AM UTC
Anything without guns is a target!
27 completed campaigns and counting :)
California, United States
Joined: November 01, 2009
KitMaker: 657 posts
Armorama: 481 posts
Posted: Friday, June 28, 2013 - 08:52 AM UTC
Rob Thanks for the help, I thought mixing the pigments with the spirts was for washing panel lines and stuff?? Man I have alot to learn. The Tranks on the left is what I was trying to replicate. I will do for next on thanks for the help again.
EUge
" For those who fought for it Freedom has a flavor the protected will never know"
Italeri T-55, Syrian Army 6 Day War Taken out. 2%
AFV IDF Shot. 6 Day War 0%..

#226
British Columbia, Canada
Joined: February 20, 2012
KitMaker: 1,909 posts
Armorama: 1,066 posts
Posted: Friday, June 28, 2013 - 02:17 PM UTC
EUge,

Glad to help, a wash is usually oil paint mixed with spirits and pigments are usually put on last with nothing over them as that changes their effect.
Have a look in this thread:
https://armorama.kitmaker.net/forums/140764&page=1Cheers Rob.
Anything without guns is a target!
27 completed campaigns and counting :)
Isere, France
Joined: April 23, 2011
KitMaker: 735 posts
Armorama: 606 posts
Posted: Sunday, June 30, 2013 - 10:19 AM UTC
Indiana, United States
Joined: June 10, 2005
KitMaker: 6,188 posts
Armorama: 5,960 posts
Posted: Sunday, June 30, 2013 - 10:34 AM UTC
California, United States
Joined: November 01, 2009
KitMaker: 657 posts
Armorama: 481 posts
Posted: Sunday, June 30, 2013 - 12:46 PM UTC
" For those who fought for it Freedom has a flavor the protected will never know"
Italeri T-55, Syrian Army 6 Day War Taken out. 2%
AFV IDF Shot. 6 Day War 0%..
Illinois, United States
Joined: August 18, 2011
KitMaker: 34 posts
Armorama: 25 posts
Posted: Monday, July 01, 2013 - 06:42 AM UTC
I finally got this bad boy on the bench! Work started yesterday. I'm going to push to get this done by the end of the campaign.

Texas, United States
Joined: January 30, 2006
KitMaker: 1,954 posts
Armorama: 629 posts
Posted: Monday, July 01, 2013 - 07:48 AM UTC
here is the basis of my build, the Dragon Sherman Firefly Vc with the 'welded hull':


 ).
).


 The area above the tracks should be closed.


 So here are the progress shots up till now which is future, decals,then I hope to try a was and then call it good for my first ever armor kit.


