Hi Don,
I like to deeply layer my rubber, starting with one of the greys you mentioned as a base and then using a series of washes and dry-brushings of different shades of black and grey to get a better "rubber" look. The base coat is unrealistic, but the cumulative effect of all the different layers makes it come to life. Then after I get good "rubber" I finish off with "dirt", again using washes and dry-brushing with colours to match the rest of the weathering on the vehicle.
Since I brush-paint tyres with acrylics I just keep a small palette (made of half a dozen bottle caps glued to a board) on the table and put different amounts of black and white paint in each. No exact measuring, but one cap always has pure black - the rest are altered drop-by-drop til they look interesting...
Hope this helps!
Campaigns
Where Armorama group builds can be discussed, organized, and updates posted.
Where Armorama group builds can be discussed, organized, and updates posted.
Hosted by Darren Baker, Richard S.
Car Dealership campaign
Posted: Saturday, April 13, 2013 - 07:32 AM UTC
Posted: Saturday, April 13, 2013 - 01:04 PM UTC
Howdy Y'all 
@Tom-thanks for the tip. I think I'll try that. Have you ever tried mixing brown in with the black? I was hoping for an easier solution to painting tires. Gotta remember the old saying, "nothing good comes easy."
Thanks,
Don "Lakota"

@Tom-thanks for the tip. I think I'll try that. Have you ever tried mixing brown in with the black? I was hoping for an easier solution to painting tires. Gotta remember the old saying, "nothing good comes easy."
Thanks,
Don "Lakota"
Posted: Sunday, April 14, 2013 - 07:45 AM UTC
Hmmm. Adding brown? You can't get away with it for weathering - brown plus black = very dark murky brown. I'm afraid you just gotta pay the dues...
JediWookie

Joined: November 26, 2011
KitMaker: 113 posts
Armorama: 79 posts

Posted: Sunday, April 14, 2013 - 05:00 PM UTC
Had a few spare hours over the weekend and got the Citroen 11cv ready for some painting. The Tamiya kit has been a lot of fun, everything fits together very well. Great little kit.


JediWookie

Joined: November 26, 2011
KitMaker: 113 posts
Armorama: 79 posts

Posted: Thursday, April 18, 2013 - 10:44 PM UTC
I finished the Citroen. It was a fun build, I cracked one of the windows and got glue on another so I put a bit of dust on it to try to cover it up. 


Posted: Saturday, April 20, 2013 - 10:32 AM UTC
Howdy Y'all 
I tried painting my tires with layers of paint washes. First I used Vallejo German Black Brown Camouflage.
Then I used Vallefo Panzer Colors Light Rubber. I will finish the tires with "dust" when I weather the entire model.


The camera flash washed out the subtlties of layering the washes.
Take care,
Don "Lakota"

I tried painting my tires with layers of paint washes. First I used Vallejo German Black Brown Camouflage.
Then I used Vallefo Panzer Colors Light Rubber. I will finish the tires with "dust" when I weather the entire model.
The camera flash washed out the subtlties of layering the washes.
Take care,
Don "Lakota"
Posted: Sunday, April 21, 2013 - 08:36 AM UTC
Gary, that was a fast build! Congratulations! (I'm falling behind on my own car...)
Don, it's looking good - can't wait to see the weathering go on!
Don, it's looking good - can't wait to see the weathering go on!
Posted: Monday, April 29, 2013 - 04:13 AM UTC
Here is my first inprocess photo after 1st coat of paint.
This is my first attempt at a gloss finish.

Tom
This is my first attempt at a gloss finish.
Tom
Posted: Monday, April 29, 2013 - 07:28 AM UTC
Ah, the joy of gloss! 

Posted: Monday, April 29, 2013 - 08:27 AM UTC
And how to do chrome!
Tom
Tom
Posted: Monday, April 29, 2013 - 10:10 AM UTC
Quoted Text
And how to do chrome!
Tom
Hmmm - Alclad, or Bare Metal Foil? Choices, choices...
Posted: Monday, May 13, 2013 - 01:48 PM UTC
Here are my finished model photos.
The gloss paint and chrome were a new process for me and I learned a lot.


Tom
The gloss paint and chrome were a new process for me and I learned a lot.
Tom
ltb073

Joined: March 08, 2010
KitMaker: 3,662 posts
Armorama: 3,078 posts

Posted: Monday, May 13, 2013 - 02:28 PM UTC
Outstanding job Tom what did you use for the chrome 

Posted: Tuesday, May 14, 2013 - 02:15 AM UTC
Wow, now that's one extremely nice finish you have there Tom! The chrome is fantastic 


Hmmm, now lemme see, where did I put my Opel campaign entry...
Cheers,
Tat


Hmmm, now lemme see, where did I put my Opel campaign entry...

Cheers,
Tat
Posted: Tuesday, May 14, 2013 - 06:55 AM UTC
Tom, that car is beautiful! Congrats!
Posted: Monday, May 20, 2013 - 04:14 AM UTC
Quoted Text
Outstanding job Tom what did you use for the chrome
I used two types of "chome"
First BareMetal foil. That is what is on the windows and the stripes down the sides.
Second was humbrol stainless steel that can be buffed to a high shine. This was applied to the headlights and the tubular frames.
I am going to experiment on using alclad's chrome paint next.
Has anyone used that? If so, what was your experience?
Thanks,
Tom
Posted: Tuesday, May 21, 2013 - 11:49 AM UTC
goodness Tom... if this was a contest, I'd give up now.. Looking great.
Lots of interesting builds going on here..
done a little work on my 1940 Ford... these 1/32 Lindberg kits leave a lot to be desired. Got the Olive Drab painted. next is to gloss it for the markings.

Just thought I'd post to stay in the hunt.
Delbert
Lots of interesting builds going on here..
done a little work on my 1940 Ford... these 1/32 Lindberg kits leave a lot to be desired. Got the Olive Drab painted. next is to gloss it for the markings.

Just thought I'd post to stay in the hunt.
Delbert
Posted: Thursday, May 23, 2013 - 05:35 AM UTC
Hey Delbert, surely you get combat pay for wrestling with a Lindberg kit! 

Lookin' good nonetheless.
(Got OD and decals on mine, so I guess I need to post some pics? Still need to find time for pin washes before the matte coat and detail painting begins.)


Lookin' good nonetheless.
(Got OD and decals on mine, so I guess I need to post some pics? Still need to find time for pin washes before the matte coat and detail painting begins.)
Posted: Saturday, May 25, 2013 - 09:03 AM UTC
Another Day Another Update. I'm starting to roll with the 3 day weekend that I actually took off from work for.. LOL
Got some more painting done. Gloss coated it added some decals from the Spares box. Used what I had. Not really a specific unit. I'm thinking of leaving this one in a Gloss finish. Something different..

Backstory for this 1940 Ford Convertible Staff Car.
a high ranking officer in a state side posting side steps gas and tire rationing by turning this sporty coupe into his "Staff" car. Therefore he is able to drive upstate every weekend for his golf game with his cronies.
Delbert
Got some more painting done. Gloss coated it added some decals from the Spares box. Used what I had. Not really a specific unit. I'm thinking of leaving this one in a Gloss finish. Something different..

Backstory for this 1940 Ford Convertible Staff Car.
a high ranking officer in a state side posting side steps gas and tire rationing by turning this sporty coupe into his "Staff" car. Therefore he is able to drive upstate every weekend for his golf game with his cronies.
Delbert
Posted: Saturday, May 25, 2013 - 09:26 AM UTC
Nice! I agree with keeping it gloss, but I'd still throw a black pin wash into the front grille to give some depth between the bars.
Posted: Wednesday, May 29, 2013 - 05:25 PM UTC
This is my enter for the campaign, Tamiya 1/35 German Stey TYP 1500A/01. 


Posted: Thursday, May 30, 2013 - 08:00 PM UTC
Some progress update pics. 


Posted: Thursday, May 30, 2013 - 11:58 PM UTC
Hi Everyone.
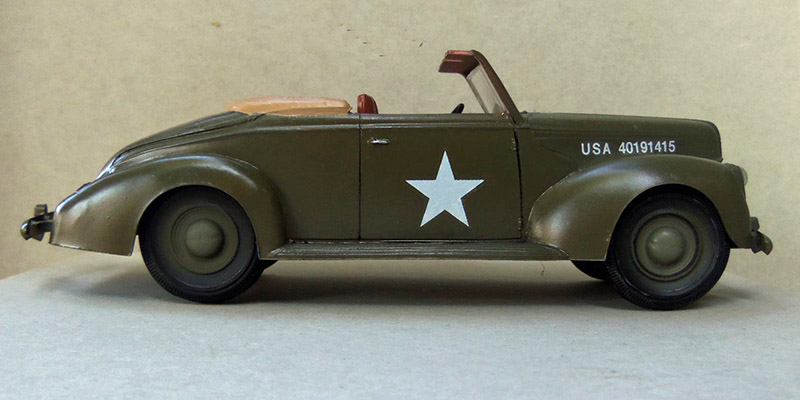
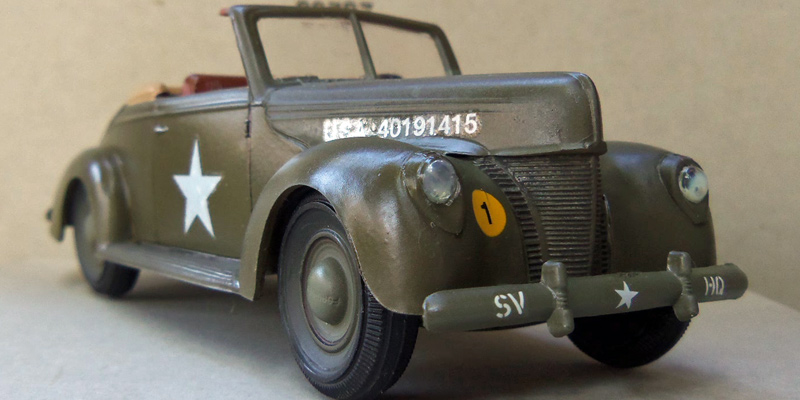
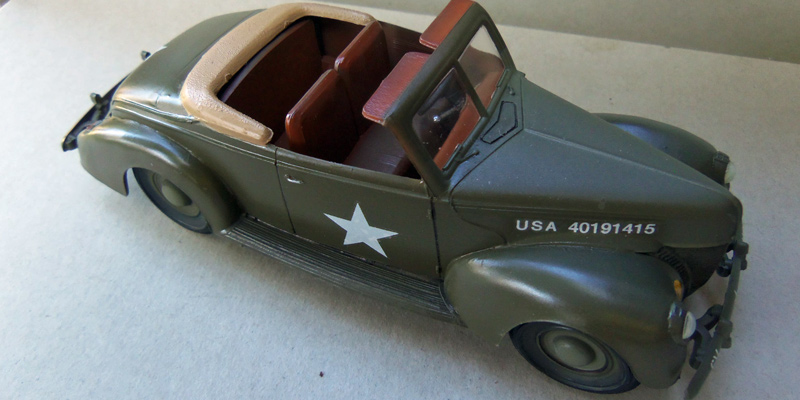
Its been a fun little campaign for me. I managed to build something I wanted to try for a while, namely one of these 1/35th scale Lindberg kits I see in the stores.
This kit cost me $3.99, and if you look at the photos enough you will prob see why it was so cheap. I think the molds for this one was tooled back in the 1950's. I built it out of the box, and although the kit isn't all that much, with some care you can get something decent.
Here are my finished photos, I've also uploaded them to the gallery. Thanks for looking.


Backstory for this 1940 Ford Convertible Staff Car.
a high ranking officer in a state side posting side steps gas and tire rationing by turning this sporty coupe into his "Staff" car. Therefore he is able to drive upstate every weekend for his golf game with his cronies.
Its been a fun little campaign for me. I managed to build something I wanted to try for a while, namely one of these 1/35th scale Lindberg kits I see in the stores.
This kit cost me $3.99, and if you look at the photos enough you will prob see why it was so cheap. I think the molds for this one was tooled back in the 1950's. I built it out of the box, and although the kit isn't all that much, with some care you can get something decent.
Here are my finished photos, I've also uploaded them to the gallery. Thanks for looking.


Backstory for this 1940 Ford Convertible Staff Car.
a high ranking officer in a state side posting side steps gas and tire rationing by turning this sporty coupe into his "Staff" car. Therefore he is able to drive upstate every weekend for his golf game with his cronies.
Posted: Sunday, June 02, 2013 - 10:26 AM UTC
Hi Lap Man,
Good start on that Steyr!
I'd better get my own skates on - the end is coming...
Good start on that Steyr!
I'd better get my own skates on - the end is coming...

iakarch

Joined: May 19, 2007
KitMaker: 459 posts
Armorama: 421 posts

Posted: Friday, June 14, 2013 - 11:22 AM UTC
an update on my Citronen its ready for paint. I'm going to do the crome first.


 |


