Armor/AFV
For discussions on tanks, artillery, jeeps, etc.
Mirror Model's D7 Bulldozer in 1/35th
165thspc
#521
Visit this Community
Kentucky, United States
Joined: April 13, 2011
KitMaker: 9,465 posts
Armorama: 8,695 posts
Posted: Wednesday, August 12, 2015 - 06:15 PM UTC
I know this is a very minor detail but if you have spent much time around old farm machinery you might already know that the small receptacle shown hanging from the upper part of the air cleaner in the photo is actually a clear glass jar. The perforated lid of the jar is permanently attached to the pre-cleaner assembly and the jar itself unscrews from the lid. It is designed to collect any fluid or solid residue picked up by the air cleaner. Because it is clear glass the driver can monitor any build up and occasionally empty the jar when necessary.


I know the jar could easily have gotten sprayed over with O.D. if the vehicle at some point was repainted. However for my purposes I am going to try and replace this small item with a polished piece of clear plastic rod.

NOTE ALSO: The entire upper pre-cleaner assembly is held on with just a metal pinch band and a set screw (like a radiator hose clamp) so it can be rotated to any angle. The first driver above has rotated his pre-cleaner 180 degrees from how it shows on the model to better protect the glass jar from possible breakage. I will also be rotating this entire assembly on my model to some odd angle just to add another smidge of asymmetrical eye appeal. (And to give the hobby competition judges something else to argue about!)
165thspc
#521
Visit this Community
Kentucky, United States
Joined: April 13, 2011
KitMaker: 9,465 posts
Armorama: 8,695 posts
Posted: Wednesday, August 12, 2015 - 07:58 PM UTC
Example of pre-air cleaner assembly found on eBay. This is a slightly smaller unit made for a Farmall Tractor but they come in all sizes:

Please Note: The catch jar is actually a "Ball" canning jar! (everyone of these I have ever seen was a "Ball" jar!)


Photo by tractorcare
165thspc
#521
Visit this Community
Kentucky, United States
Joined: April 13, 2011
KitMaker: 9,465 posts
Armorama: 8,695 posts
Posted: Thursday, August 13, 2015 - 05:38 PM UTC
Still working on getting the hood and front radiator grill seated properly. As you can see the lower corners of the grill are almost but not quite seated into the alignment notches on the front tips of the frame members.


Also something not visible in this photo; the rear of the hood is sitting just a tad high but that should be easily fixed once the grill is properly in place.
165thspc
#521
Visit this Community
Kentucky, United States
Joined: April 13, 2011
KitMaker: 9,465 posts
Armorama: 8,695 posts
Posted: Thursday, August 13, 2015 - 05:42 PM UTC
Also working on some piping and wiring for the engine as well as some extra added detail to the back wall of the radiator:


I extended the circular fan shield a little deeper and added the "V" shaped strengthening ribs to the back surface of the radiator housing. Would also like to add a little bit of a "texture" to the back side of the radiator itself. (More on that later.)
165thspc
#521
Visit this Community
Kentucky, United States
Joined: April 13, 2011
KitMaker: 9,465 posts
Armorama: 8,695 posts
Posted: Thursday, August 13, 2015 - 06:15 PM UTC
A note about the starting crank on the D7:

The crank did not turn over the main engine but rather was used to start a small 2 cylinder gas donkey engine that in turn was then used to start the main engine.

Early Caterpillar engines had the crank going straight forward through the bottom left corner of the radiator and out the front of the vehicle. Easy enough on the tractor but not so convenient on a bulldozer.

__________________________________________________________

Later Cats had a 90 degree gearbox added to the shaft so the crank went upwards vertically to protrude out the top of the hood. The MiniArt dozer represents this type of starting arrangement.
photo by emincihen
___________________________________________________________

In what I think was the final design change, the 90 degree gearbox was turned to face out the side of the vehicle and a hole was drilled in the radiator cowl to accommodate the crank. The Mirror Models offering chooses to model the starting crank in this style.

165thspc
#521
Visit this Community
Kentucky, United States
Joined: April 13, 2011
KitMaker: 9,465 posts
Armorama: 8,695 posts
Posted: Thursday, August 13, 2015 - 07:04 PM UTC

. . . . . . . . . . . . . . . . . . Tonight's double feature . . . . . . . . . . . . . . . . . . .


{ - Starting a WWII D7 Bulldozer" - }

Movie found on YouTube:

https://www.youtube.com/watch?v=SL4PXcSLtT0

____________________________________________________________


{ - Armored dozer in action; April 12, 1945 - }

Also found on YouTube:

https://www.youtube.com/watch?v=6HQ_h1IPPjY

Copyright CriticalPast**

** Not really sure how a film shot during wartime by US Army Combat Photographers who were supported by my Father's defense worker payroll taxes + war bonds and is now in the public domain can be copyrighted by these folks but I'll go along with it just for grins.
M4A1Sherman
Visit this Community
New York, United States
Joined: May 02, 2013
KitMaker: 4,403 posts
Armorama: 4,078 posts
Posted: Thursday, August 13, 2015 - 07:13 PM UTC
[quote]Started my Mirror Model's D7 Bulldozer just a few days ago. Thought this might be a good chance to post some progress build photos and to squash a few negative rumors about the quality of this kit.


CAD image Mirror Models[/quot

Hi, Mike! There's an "Inside Blade" D7 in the future as well, isn't there? I forget who from; MINIART or MIRROR?
M4A1Sherman
Visit this Community
New York, United States
Joined: May 02, 2013
KitMaker: 4,403 posts
Armorama: 4,078 posts
Posted: Thursday, August 13, 2015 - 07:14 PM UTC

Quoted Text

Also working on some piping and wiring for the engine as well as some extra added detail to the back wall of the radiator:


I extended the circular fan shield a little deeper and added the "V" shaped strengthening ribs to the back surface of the radiator housing.

(I am considering ways to put some sort of radiator texture into that big circle.)


You might try some fine PE "radiator mesh"?
165thspc
#521
Visit this Community
Kentucky, United States
Joined: April 13, 2011
KitMaker: 9,465 posts
Armorama: 8,695 posts
Posted: Thursday, August 13, 2015 - 07:26 PM UTC
Dennis, I have some "radiator mesh" in my parts box. Just trying to deside if it can be seen all that much on the model before I cut into what is a rather expensive AM item.

An alternative would be to simply scribe a crosshatch pattern into the plastic.

Thanks
Mike


p.s. Dennis I am not sure what you mean by an "inside blade"??? I thought such equipment did not come out till way after the war.***

Between Mirror and MiniArt we now have a straight blade dozer, an angled blade dozer, a hydralic blade dozer, two different styles of armored dozers, a towing tractor, a recovery tractor and a recovery tractor with optional front mounted winch. About the only thing missing is the pipeline crane
165thspc
#521
Visit this Community
Kentucky, United States
Joined: April 13, 2011
KitMaker: 9,465 posts
Armorama: 8,695 posts
Posted: Friday, August 14, 2015 - 09:20 AM UTC
Working now on the track carriages - 47 parts per side even without the mud shields.

I love the way Mirror uses actual springs in their carriage. You have to grind them slightly with a Dremmel abrasive wheel to get them to the proper length but the final result is excellent!


Not planning on using the mud shields on the track carriages. The shields are marked "optional" on the Mirror instruction sheet. Some dozers did not have them (or lost them over time.) I like seeing all that exposed equipment and it makes the dozer look even older.

p.s. Later models of the D7 had a solid rather than spoked front wheel. You could enclose these front spokes with a disc of plastic sheet for a more modern look if desired.

p.p.s. I might put one or two pieces of the mud shields on just to make for a little bit of visual variation.


Frenchy
Visit this Community
Rhone, France
Joined: December 02, 2002
KitMaker: 12,719 posts
Armorama: 12,507 posts
Posted: Friday, August 14, 2015 - 05:29 PM UTC

Quoted Text

About the only thing missing is the pipeline crane variant.


I guess you don't mean this one ?


What about a Trackson T7 Traxcavator ?


H.P.
165thspc
#521
Visit this Community
Kentucky, United States
Joined: April 13, 2011
KitMaker: 9,465 posts
Armorama: 8,695 posts
Posted: Friday, August 14, 2015 - 06:06 PM UTC
Yes I was thinking of this crane but also the rather odd looking folding 6ton crane on the Caterpillar chassis designed by Roebling. I tried to find a photo but right now the only images I come across are whole pages lifted out of the Ampersand book! (Don't want to violate Pat and David's copyright.)
165thspc
#521
Visit this Community
Kentucky, United States
Joined: April 13, 2011
KitMaker: 9,465 posts
Armorama: 8,695 posts
Posted: Friday, August 14, 2015 - 09:19 PM UTC
Many photos of both crane variants and a lot of other cool Cat stuff can be found on the AMPS site at:

http://www.amps-armor.org/ampssite/reviews/showReview.aspx?ID=3124&Type=BR

It looks like the Ampersand book is going to be an excellent reference for this project!
165thspc
#521
Visit this Community
Kentucky, United States
Joined: April 13, 2011
KitMaker: 9,465 posts
Armorama: 8,695 posts
Posted: Saturday, August 15, 2015 - 03:54 PM UTC
Dennis, it looks like I was mistaken. There was a variant of the Caterpillar called the "beach dozer" that had a very narrow blade hinged from INSIDE the frame just as you indicated!
165thspc
#521
Visit this Community
Kentucky, United States
Joined: April 13, 2011
KitMaker: 9,465 posts
Armorama: 8,695 posts
Posted: Saturday, August 15, 2015 - 08:13 PM UTC
In the instruction sheet there is an oddly worded phrase regarding putting the track legs together.

"Push 87 (94) well into 72 and 74 (73 and 75) . . . . "

These parts form a twin lengthwise box beam with hollow centers that support all the track rollers, the main drive gear and the tensioner pulley between them, Therefore the two outside beams need to be properly seated onto the center beam but the instructions make it sound like you are to smash all these items together. What you need to do instead is thoroughly clean and dress the mating edges of all three pieces and then gently and properly seat all three pieces together as shown below.

First glue one side beam on the center frame then place all five track rollers and then glue the other side beam on to trap the rollers. This process can be made much easier if you glue the five rollers on instead of trying to let them turn free.


Here are the two box beams fully assembled. - - Also one side of the center beam can be easily dressed just by running it over some really fine flat sandpaper in a circular motion.
KoSprueOne
Visit this Community
Myanmar
Joined: March 05, 2004
KitMaker: 4,011 posts
Armorama: 1,498 posts
Posted: Saturday, August 15, 2015 - 08:32 PM UTC
Thanks for including all of the detailed mechanical facts through out your build.


165thspc
#521
Visit this Community
Kentucky, United States
Joined: April 13, 2011
KitMaker: 9,465 posts
Armorama: 8,695 posts
Posted: Saturday, August 15, 2015 - 09:11 PM UTC
Thanks Ko. I try to recount the research as well as the information building process I go through when putting a model together.

I am glad others appreciate this approach as well.
165thspc
#521
Visit this Community
Kentucky, United States
Joined: April 13, 2011
KitMaker: 9,465 posts
Armorama: 8,695 posts
Posted: Saturday, August 15, 2015 - 11:47 PM UTC

4x1 Sheep's foot roller set.

An article on the modular Sheep's foot roller offered by Plus Models appeared in Armorama at:

http://armorama.com/forums/233032&page=1


2x2 Sheep's Foot roller set.
165thspc
#521
Visit this Community
Kentucky, United States
Joined: April 13, 2011
KitMaker: 9,465 posts
Armorama: 8,695 posts
Posted: Sunday, August 16, 2015 - 12:26 AM UTC
Caterpillar tractor in action with LeTourneau scraper.

165thspc
#521
Visit this Community
Kentucky, United States
Joined: April 13, 2011
KitMaker: 9,465 posts
Armorama: 8,695 posts
Posted: Sunday, August 16, 2015 - 03:09 AM UTC
Hint to Mirror and LZ Models:

Some later Cat dozers had solid front wheels, or maybe this is a field mod. This would be an easy resin conversion to offer as an AM part or even include them (2) in the base kit as an option!

165thspc
#521
Visit this Community
Kentucky, United States
Joined: April 13, 2011
KitMaker: 9,465 posts
Armorama: 8,695 posts
Posted: Sunday, August 16, 2015 - 08:39 AM UTC
Well I decided to bite the bullet; expensive AM parts are made to be used so I went for the RB Products "Radiator Mesh" - don't know how much it will show when finished but I did it anyway!


I sure like how that radiator mesh looks!
justsendit
Visit this Community
Colorado, United States
Joined: February 24, 2014
KitMaker: 3,033 posts
Armorama: 2,492 posts
Posted: Sunday, August 16, 2015 - 09:04 AM UTC

Quoted Text

Movie Night


In film No. 2, it looks like the operator went after that Opel Blitz with a real vengeance!
Thanks for sharing the WIP pics, historical pics, and films!

—mike
165thspc
#521
Visit this Community
Kentucky, United States
Joined: April 13, 2011
KitMaker: 9,465 posts
Armorama: 8,695 posts
Posted: Sunday, August 16, 2015 - 08:58 PM UTC
Yes, I was sitting there watching, saying "" OK, perfectly good Opel Blitz truck, let's salvage that and send it back to the States." But no, the dozer driver even ends up flipping it over and burying it in all those tall fir trees!
M4A1Sherman
Visit this Community
New York, United States
Joined: May 02, 2013
KitMaker: 4,403 posts
Armorama: 4,078 posts
Posted: Sunday, August 16, 2015 - 09:47 PM UTC

Quoted Text

Dennis, I have some "radiator mesh" in my parts box. Just trying to deside if it can be seen all that much on the model before I cut into what is a rather expensive AM item.

An alternative would be to simply scribe a crosshatch pattern into the plastic.

Thanks
Mike


p.s. Dennis I am not sure what you mean by an "inside blade"??? I thought such equipment did not come out till way after the war.***

Between Mirror and MiniArt we now have a straight blade dozer, an angled blade dozer, a hydralic blade dozer, two different styles of armored dozers, a towing tractor, a recovery tractor and a recovery tractor with optional front mounted winch. About the only thing missing is the pipeline crane


I use the term "Inside Blade" which refers to the terminology that was used back in my years (1986-1993) spent working as parts manager at a JOHN DEERE dealer who sold and serviced Agricultural Tractors and Farm Machinery (plows, harrows, balers, rotary mowers, harvesters, planters, ag-tractors from 1923 Model Ds, 1930s-vintage styled and un-styled Model As, Bs, GPs, Ms, 40s, 50s, 60s, 70s and on up to the latest 2x and 4x4 Farm Tractors up to 8460s in 1993 when I left),

Industrial Equipment, (crawlers- bulldozers, to the non-John Deere people, which ranged from the 440, up to 550G-series crawlers, tracked front-end loaders, 4x4 front-end loaders, excavators, 4x4 backhoe/loaders, and industrial tractors), and also BOBCAT Skid-steers,

Forestry Equipment (4x4 and tracked log-skidders, and all of the various winches and pedestal claw-grabs associated with the logging industry) and,

Consumer Products (lawn tractors, garden tractors- yes, there IS a difference between the 2 types, tow-behind garden implements and wagons, lawn mowers, chain saws, mostly Stihls and Huskys, with some Johnsereds, and all sorts of other stuff that the week-end gardeners get upset over).

Now, an "outside blade" is the type of dozer blade that is mounted OUTSIDE of the track-frames and tracks, as is the model that you are building; an "inside blade" is mounted to the frame proper, INSIDE the track-frames and tracks, and it is pivoted (angled) and raised hydraulically, as opposed to the earlier "straight" cable-controlled "outside blade" as seen on your model.

I believe that MINIART or MIRROR MODELS will be doing an "inside blade" version of the D-7- I'm pretty sure that it is MINIART that will be doing the inside/angle blade model, BUT- I'm not 100% positive, so that's why I asked...
M4A1Sherman
Visit this Community
New York, United States
Joined: May 02, 2013
KitMaker: 4,403 posts
Armorama: 4,078 posts
Posted: Sunday, August 16, 2015 - 09:55 PM UTC

Quoted Text

Hint to Mirror and LZ Models:

Some later Cat dozers had solid front wheels, or maybe this is a field mod. This would be an easy resin conversion to offer as an AM part or even include them (2) in the base kit as an option!
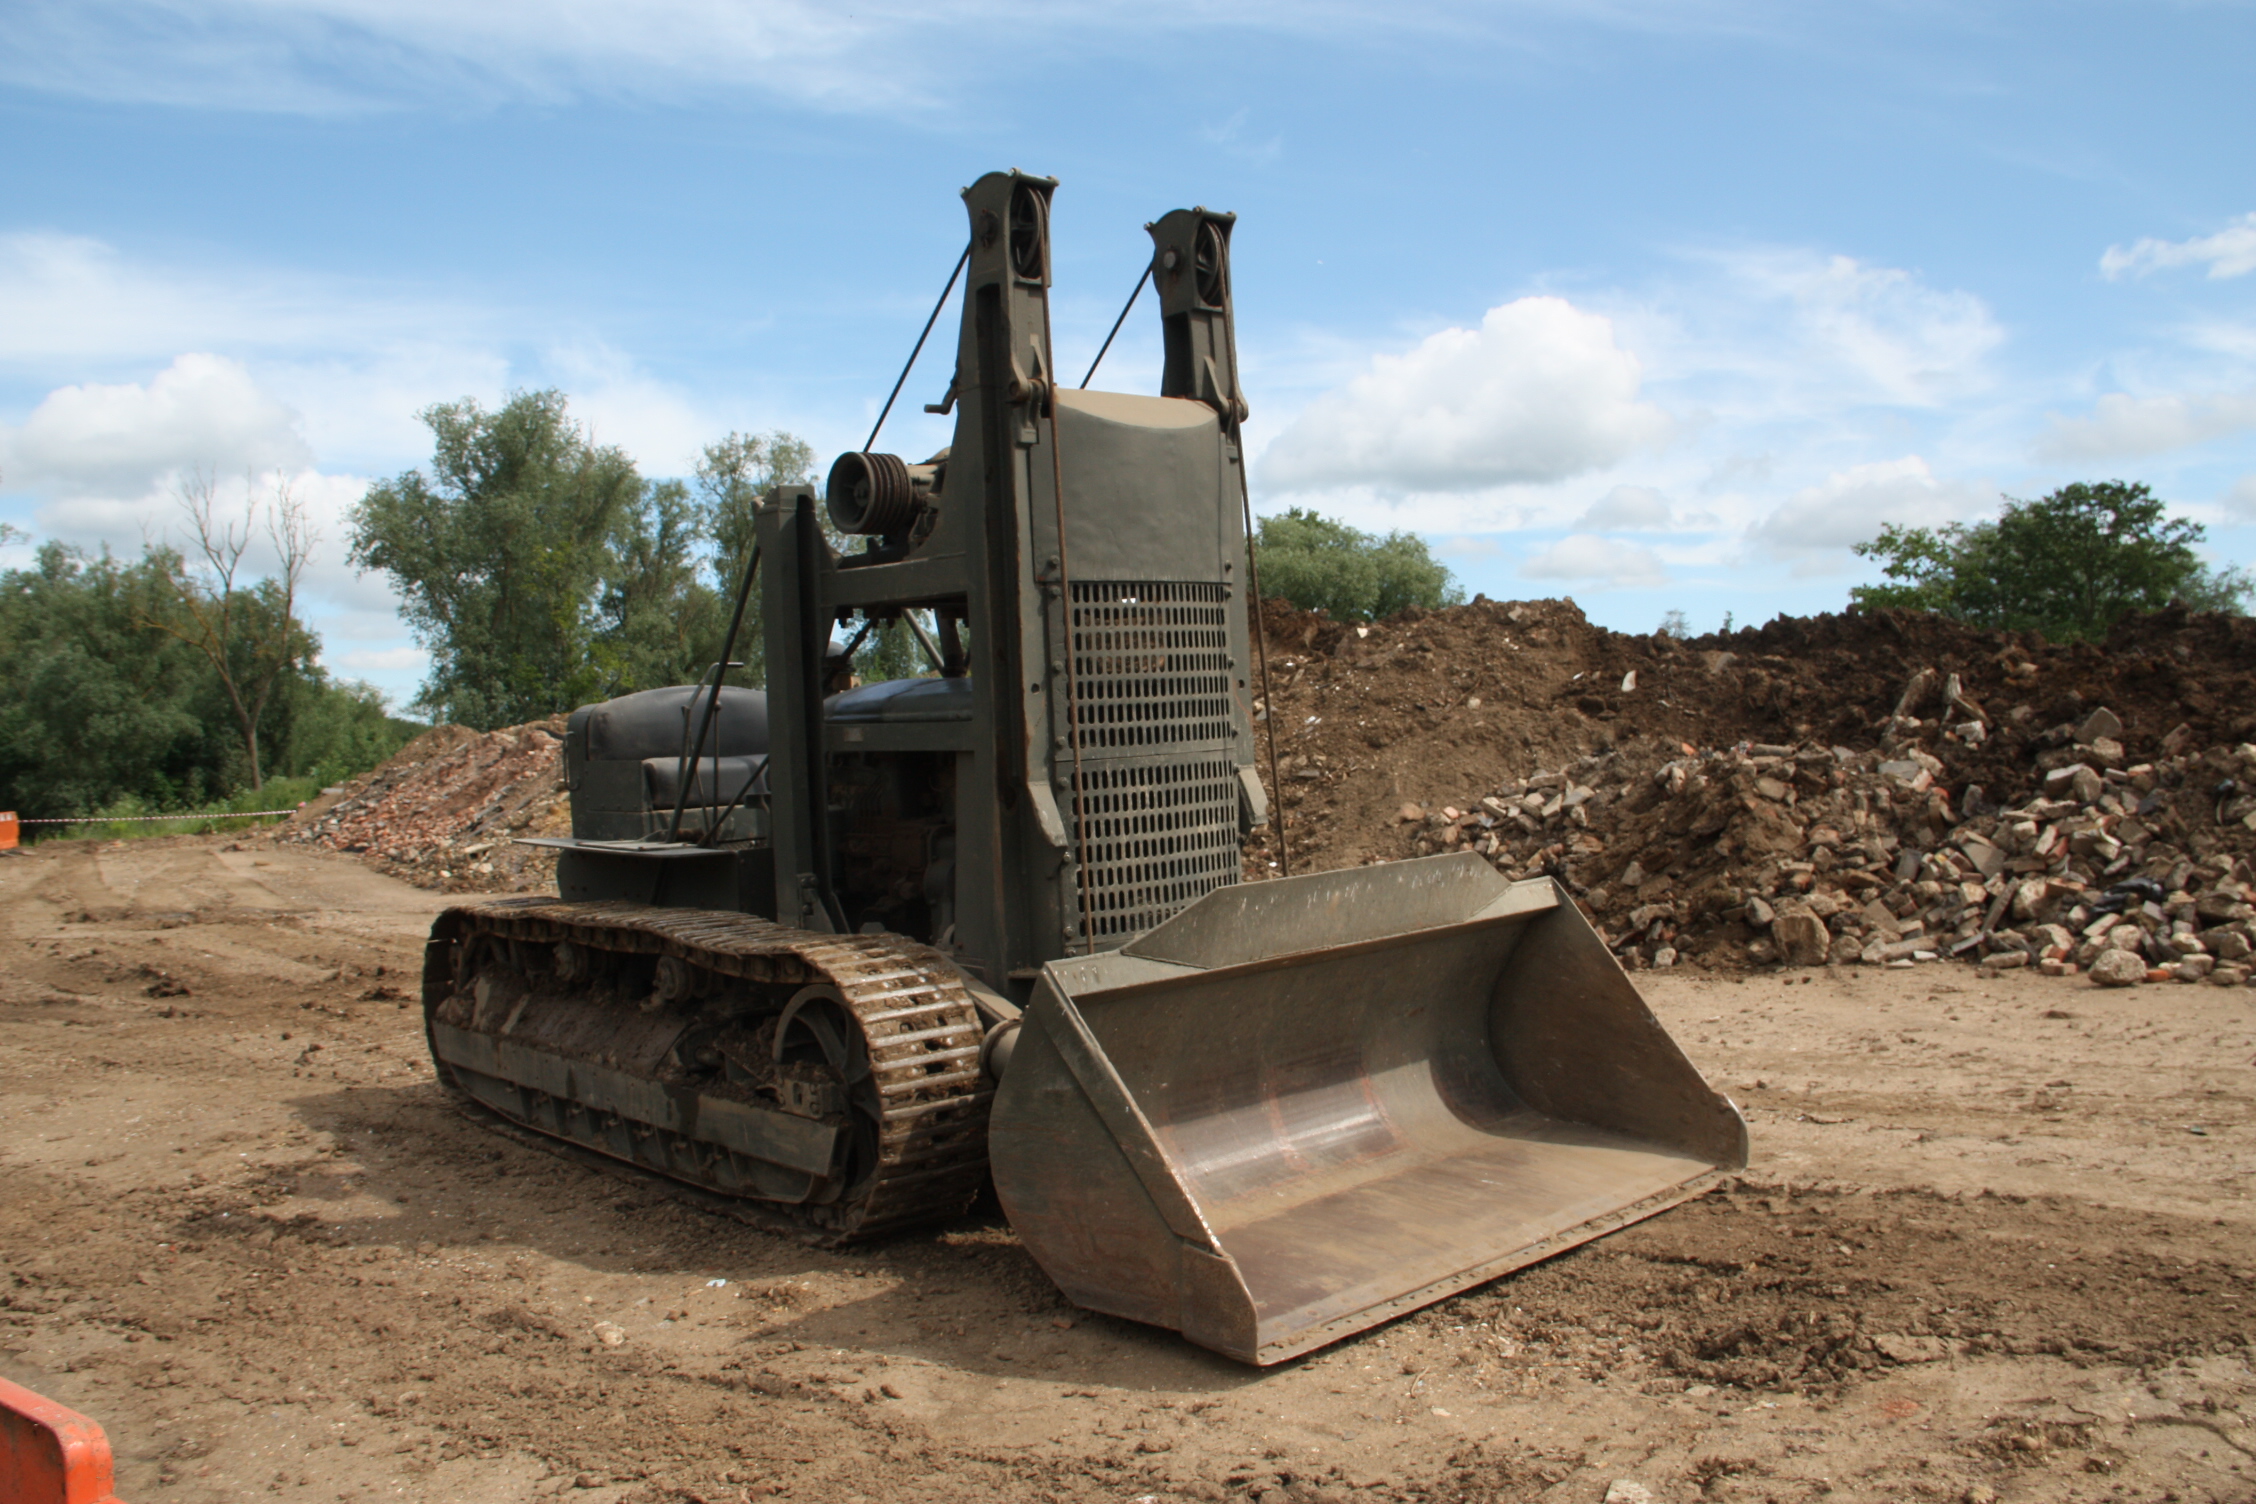


This is an "outside blade" machine...