Queensland, Australia
Joined: August 06, 2005
KitMaker: 3,353 posts
Armorama: 3,121 posts
Posted: Saturday, February 09, 2019 - 11:18 AM UTC
Off to a great start Tat. The connection points on older kits like these are quite large. Sometimes you are better off using a saw to remove them than cutters, to avoid the stress issues. With 8 wheels to fit, I hope you get all level.
Here is some pics of the Citroen with details added - headlight shrouds, pedals, firewall panels, roof liner and seat supports. Had to trim a few millimeters off the bottom of that. Matchbox made it to sit on the floor pan.


On the Bench:
Dust, styrene scraps, paint splotches and tears.
tatbaqui
 News Writer
#040
Metro Manila, Philippines
Joined: May 06, 2007
KitMaker: 2,713 posts
Armorama: 2,451 posts
Posted: Saturday, February 09, 2019 - 11:23 PM UTC
Thanks Peter. In some places there is almost no gap between the part and the sprue connector, that I managed to mangle a foot of one the figures

One good thing though is having the wheels and tires separate, thus easier to paint than having to deal with masks and the like.
Yours is looking good too. I didn't know Matchbox did a Citroen. What I can clearly recall from their Blue Range is that 6-wheel Tyrrell car. Also the Bugatti roadster.

Nordrhein-Westfalen, Germany
Joined: March 22, 2015
KitMaker: 671 posts
Armorama: 45 posts
Posted: Sunday, February 10, 2019 - 08:36 AM UTC
Jacob,
what a great stash. I like the little Dingo from Matchbox. I built it this December. It is a nice little kit.
Peter,
I have never built cars made by Matchbox but this one surely Looks great!
Tat,
nice kick off. I have the Puma in the stash too and will be happy to learn from Your built.
The Humber kit of Matchbox is fantastic. The newer plastic of Revell behaves much more better than the old one from Matchbox. I painted the Humber roughly and will now go for weathering!

Oliver

On the desk: Probably a Panzer III.
tatbaqui
 News Writer
#040
Metro Manila, Philippines
Joined: May 06, 2007
KitMaker: 2,713 posts
Armorama: 2,451 posts
Posted: Wednesday, February 13, 2019 - 01:02 AM UTC
Thanks Oliver -- hope to do good on this one. Wow, you sure work fast, you'll have time to build your Puma!
The axe and bolt cutters were molded onto this side where I've put the pick axe. Details were very faint so I sanded it off. I thought of improving some parts of the kit. For one, the tool handles are quite thick:
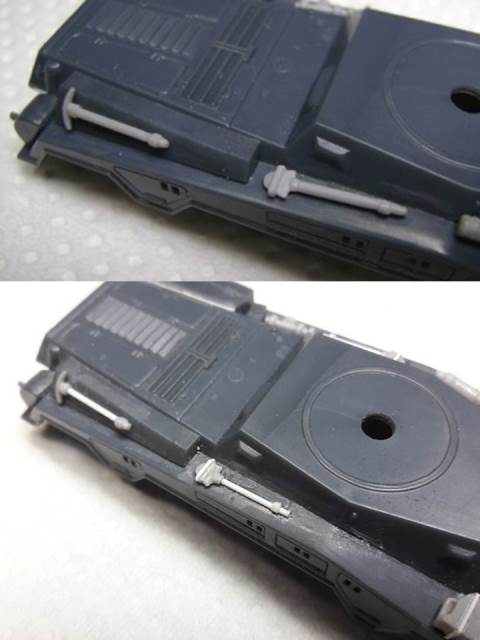
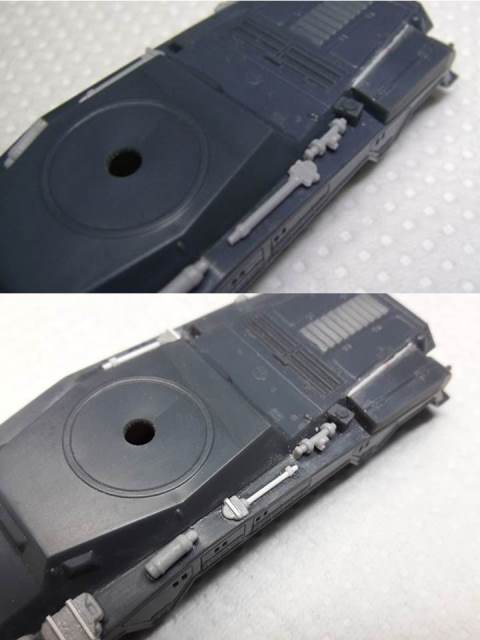
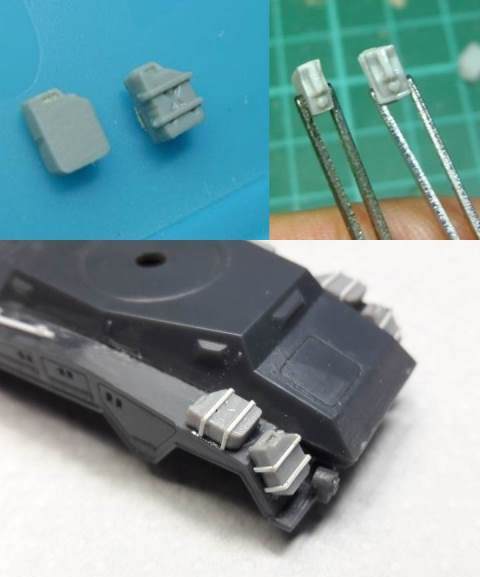
Next the Jerry cans were sanded down. I find them too chubby they looked like suitcases. Hesitant at first as for sure the "X" will go, but I think it looks better overall.
The streetlamp was just a blob of plastic. Looked around for small bits in the spares box to make one. Found some of these angled rods in a 1/144 kit, so that became the frame. The "roof" was from 1/35 Pz IV vision port cover, cut and fitted into place.

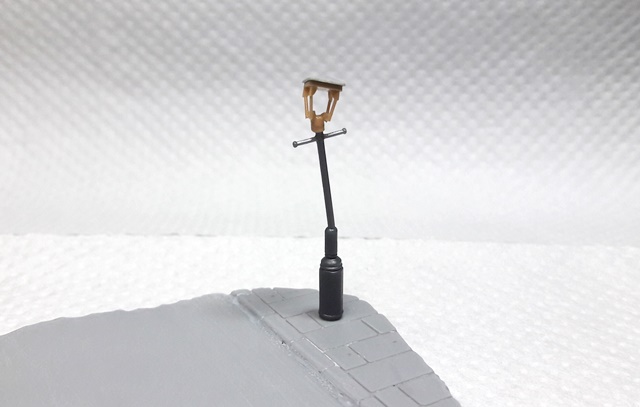
Good thing it's depicted as a damaged lamp post, so no worries on getting it straight, or even the need to put in some clear parts.

Working next to paint the wheels before mounting them onto the tires.
Cheers,
Tat
Queensland, Australia
Joined: August 06, 2005
KitMaker: 3,353 posts
Armorama: 3,121 posts
Posted: Wednesday, February 13, 2019 - 07:21 AM UTC
Quoted Text
I didn't know Matchbox did a Citroen. What I can clearly recall from their Blue Range is that 6-wheel Tyrrell car. Also the Bugatti roadster.

They did quite a few more than those! There is a list with images here:
http://www.matchboxkits.org/index.php?cPath=86&osCsid=jao6kc8cvmoneqple823egted5I had the SS 100 Jaguar and the Aston Martin Ulster - unfortunately both poorly built. "Fun Fact" the SS car company produced its 100 series vehicle and called it Jaguar. After WW2, given the connotations of "SS" at the time, the company decided to change it's company name - to "Jaguar". The rest, as they say, is history.
On the Bench:
Dust, styrene scraps, paint splotches and tears.
Queensland, Australia
Joined: August 06, 2005
KitMaker: 3,353 posts
Armorama: 3,121 posts
Posted: Wednesday, February 13, 2019 - 07:37 AM UTC
Coming along very Nicely Oliver. I love the way the detail is popping out.
Great work with the detailing Tat. It really does improve the look. That Lamp post is an eye catcher.
I wouldn't worry about losing the 'x' as such, as the 'x' type jerry can was actually a very early war one. The design was replaced in 1940/41 by the type with a rectangle in the centre of an 'x' type impression and given its introduction date, the Puma would unlikely ever have had an 'x' type.
This pick shows a mix of the older 'x' type and a 1941 stamped newer type toward the bottom

Probably a bit late for you now, and it may not be the extent of detailing you want to do, but I have replicated this can before. Sanding the jerry can down like you did, adding the bevel to the sides as the face is not flat, then using a very thin piece of rectangular plastic card that I cut to make the centre rectangle and the four outer shapes so there was a channel between the bits. A bit of a sand when set blended in the edges of the outer section and thinned the shim even further. Three lengths of stretched sprue formed the triple handle. The spout on a jerry can is not in the centre, it is offset to the side, so I replaced that too with some sprue and a shim cap. Yes, a lot of work....
On the Bench:
Dust, styrene scraps, paint splotches and tears.
tatbaqui
 News Writer
#040
Metro Manila, Philippines
Joined: May 06, 2007
KitMaker: 2,713 posts
Armorama: 2,451 posts
Posted: Wednesday, February 13, 2019 - 12:03 PM UTC
Quoted Text
Coming along very Nicely Oliver. I love the way the detail is popping out.
Great work with the detailing Tat. It really does improve the look. That Lamp post is an eye catcher.
I wouldn't worry about losing the 'x' as such, as the 'x' type jerry can was actually a very early war one. The design was replaced in 1940/41 by the type with a rectangle in the centre of an 'x' type impression and given its introduction date, the Puma would unlikely ever have had an 'x' type.
This pick shows a mix of the older 'x' type and a 1941 stamped newer type toward the bottom

Probably a bit late for you now, and it may not be the extent of detailing you want to do, but I have replicated this can before. Sanding the jerry can down like you did, adding the bevel to the sides as the face is not flat, then using a very thin piece of rectangular plastic card that I cut to make the centre rectangle and the four outer shapes so there was a channel between the bits. A bit of a sand when set blended in the edges of the outer section and thinned the shim even further. Three lengths of stretched sprue formed the triple handle. The spout on a jerry can is not in the centre, it is offset to the side, so I replaced that too with some sprue and a shim cap. Yes, a lot of work....
Wow that is quite a challenge at that scale, and to me too

Will give it a try

Ontario, Canada
Joined: April 04, 2009
KitMaker: 458 posts
Armorama: 456 posts
Posted: Thursday, February 14, 2019 - 04:48 AM UTC
Great to see that several people are already making some positive progress.

. I almost forgot I had signed up for this adventure. If anyone recalls I had a few choices at the start, The Matchbox labeled T-80 or M1 and/or the Matchbox Challenger I. I've decided to choose the Challenger as it was one of Matchboxes last designed kits and its been gathering dust on a shelf, forlornly fo too long. So her is where it stands after a much needed bath.

And here looking a bit more like a proper tank?


Hope the images above work out as I'm still new using Imgur!
Good luck to all,
A.J.

Queensland, Australia
Joined: August 06, 2005
KitMaker: 3,353 posts
Armorama: 3,121 posts
Posted: Thursday, February 14, 2019 - 07:41 AM UTC
Quoted Text
Wow that is quite a challenge at that scale, and to me too 
Will give it a try 
Tat, you have already made straps and the lamp post so you are up to it. Cut your piece of styrene card to the full outside shape. Pencil in the centre rectangle and the grooves and then cut along the groove line. That will give you your 5 pieces. It sounds harder than it is. Then with a bit of practice you can move onto to more complex scratch builds

My Arriflex 35 camera in 1/35th scale - WIP

On the Bench:
Dust, styrene scraps, paint splotches and tears.
Queensland, Australia
Joined: August 06, 2005
KitMaker: 3,353 posts
Armorama: 3,121 posts
Posted: Thursday, February 14, 2019 - 07:45 AM UTC
Great to see you remembered us AJ!
Looking forward to seeing the Chally finished. I bought that kit at a swap meet. So excited I forgot to check inside the box until much later... no tracks...

On the Bench:
Dust, styrene scraps, paint splotches and tears.
Queensland, Australia
Joined: August 06, 2005
KitMaker: 3,353 posts
Armorama: 3,121 posts
Posted: Friday, February 15, 2019 - 06:14 PM UTC
Okay, life got in the way this week, but I have managed to get the interior assembly finished. Had to re-work the storage compartment as Matchbox designed the lid to be movable with a central pivot, which is wrong. These had an option of a 'Rumble Seat' but you could never fit in the way Matchbox would have it represented. They give you no back rest, but do give you a seat, which if used would have you sitting with the rear window passing through your head!
A bit of research and I was able to find some pics on various sites of different vehicles to show what needed to be done. I also shaved off the moulded on door handles and window winders and replaced them with wire and styrene ones. Matchbox had the door handle pointing so low you would need to reach down to your ankle to open the door.
I also a strip of styrene under the window opening for the wooden door top that is missing on the kit and made a licence plate bracket from scrap etch fret - it is a square frame, not a L shaped bracket as per the kit item. The plate was thinned to be more to scale too.
Dry fit components in pic. Now off for a bath and when dry, a primer coat inside for painting.

On the Bench:
Dust, styrene scraps, paint splotches and tears.
Nordrhein-Westfalen, Germany
Joined: March 22, 2015
KitMaker: 671 posts
Armorama: 45 posts
Posted: Sunday, February 17, 2019 - 01:34 AM UTC
Tat:
Outstanding detail work on the lamp! The enhanced tools of the Puma look good, as well. Maybe I will find some time to start my kit, too. But, there is an old Fujimi F-86 that demands lots of putty and sanding.
AJ:
The Challenger seems to be a nice little kit. I think Revell got it still in the program.
Peter:
Your Citroen comes along very nice. I really like those tiny improved handles.
I managed to finish my Humber using the diorama plate provided by Matchbox. I guess, the crew-member is far too big for 1/76 scale but I like it!


Oliver

On the desk: Probably a Panzer III.
Queensland, Australia
Joined: August 06, 2005
KitMaker: 3,353 posts
Armorama: 3,121 posts
Posted: Sunday, February 17, 2019 - 10:08 PM UTC
Looks great Oliver. Love the little extras on the base. As to the figure, well the Humber was not that big and I think its okay.


Thanks for joining in. Don't forget to post pics in the Gallery so you get your ribbon!!!
https://gallery.kitmaker.net/showgallery.php/cat/31567On the Bench:
Dust, styrene scraps, paint splotches and tears.
Queensland, Australia
Joined: May 16, 2010
KitMaker: 232 posts
Armorama: 218 posts
Posted: Sunday, February 17, 2019 - 11:45 PM UTC
i'm not in this campaign but enjoying the great nostalgic builds going on


Ashore, it's wine, women and song, aboard it's rum, bum and baccy

#323
Arizona, United States
Joined: February 13, 2013
KitMaker: 791 posts
Armorama: 344 posts
Posted: Monday, February 18, 2019 - 07:53 AM UTC
Robbie: "Would 60 Gallons be sufficient ?"
Forbidden Planet - 1956
Queensland, Australia
Joined: August 06, 2005
KitMaker: 3,353 posts
Armorama: 3,121 posts
Posted: Monday, February 18, 2019 - 08:02 PM UTC
Quoted Text
i'm not in this campaign but enjoying the great nostalgic builds going on 

Still time to find a kit an join!

On the Bench:
Dust, styrene scraps, paint splotches and tears.
Queensland, Australia
Joined: August 06, 2005
KitMaker: 3,353 posts
Armorama: 3,121 posts
Posted: Monday, February 18, 2019 - 08:03 PM UTC
Nice to see the twins Robbie.
On the Bench:
Dust, styrene scraps, paint splotches and tears.

#110
Florida, United States
Joined: September 20, 2005
KitMaker: 248 posts
Armorama: 224 posts
Posted: Tuesday, February 19, 2019 - 01:30 AM UTC
To One and All,
Getting started a little late. Still thinking which one to go with. These are my choices right now.
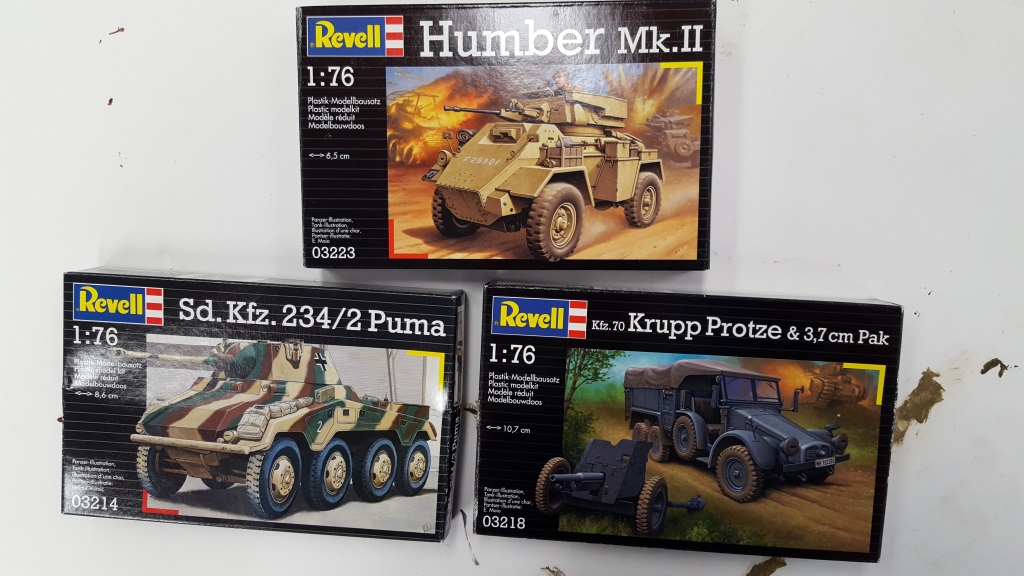
Leaning towards the Puma. I will post a start photo soon.
Thanks,
Minas-Ithil
Stephen
tatbaqui
 News Writer
#040
Metro Manila, Philippines
Joined: May 06, 2007
KitMaker: 2,713 posts
Armorama: 2,451 posts
Posted: Tuesday, February 19, 2019 - 10:37 AM UTC
Nice work Oliver -- congrats on your finish! How did you do the puddle, was it white glue?

Queensland, Australia
Joined: August 06, 2005
KitMaker: 3,353 posts
Armorama: 3,121 posts
Posted: Tuesday, February 19, 2019 - 06:44 PM UTC
Stephen, toss all three in the air and build whichever one/s come down

Yes a tough decision... (mind control waves)...do the Protze...Do the Protze (mind control waves loop)... do the Protze...
Whatever you choose, welcome aboard.
On the Bench:
Dust, styrene scraps, paint splotches and tears.

#110
Florida, United States
Joined: September 20, 2005
KitMaker: 248 posts
Armorama: 224 posts
Posted: Wednesday, February 20, 2019 - 06:03 AM UTC
Petbat,
While I am leaning towards the Puma, I seem to constantly hear this whisper - "Build the Protze, build the Protze" Very unnerving....
Stephen
Minas-Ithil
Nordrhein-Westfalen, Germany
Joined: March 22, 2015
KitMaker: 671 posts
Armorama: 45 posts
Posted: Wednesday, February 20, 2019 - 07:59 AM UTC
Peter: Thank´s a lot. Glad You like it. I realize, I have the wrong tires for the desert from Your picture. This is really a nicely packed Humber and a great scene for modeling, too!
Tat: I used Revell´s contacta clear, but I think, White Glue will do the Job, as well!
Stephen; Yes, the Protze will be great! My favourite, too!
Oliver

On the desk: Probably a Panzer III.

#323
Arizona, United States
Joined: February 13, 2013
KitMaker: 791 posts
Armorama: 344 posts
Posted: Saturday, February 23, 2019 - 09:39 AM UTC
Robbie: "Would 60 Gallons be sufficient ?"
Forbidden Planet - 1956
Queensland, Australia
Joined: August 06, 2005
KitMaker: 3,353 posts
Armorama: 3,121 posts
Posted: Saturday, February 23, 2019 - 06:18 PM UTC
Looking better every time Robbie.
Yes, but that is what the build is all about - remembering the good and the bad, and seeing how our skills have matured to overcome the little challenges.
On the Bench:
Dust, styrene scraps, paint splotches and tears.
Warszawa, Poland
Joined: October 26, 2012
KitMaker: 65 posts
Armorama: 62 posts
Posted: Sunday, February 24, 2019 - 03:58 AM UTC
The very first vehicles I've made as a child were the Matchbox ones. I still possess some of them. Here is my favorite one - open top, the whole gun is visible. Made in 1984 or 1985. For some unknown reason it is unfinished. I still have somewhere decals for it, so maybe I will add them. The model is covered with more than 30 years old dust layer. Those brown spots are pretending to be mud splashes.


So, here is my entry photo.

I will do my best to reproduce another Priest a bit better than this upper one. As I'm going to do a very early M7, I will use tracks and suspension from Mirage's Grant and some leftovers (e.g. Browning M2) from Dragon's M4.

If there will be enough time to do another model (I'm also involved in Italian campaign) I will start something from this pile.


 . I almost forgot I had signed up for this adventure. If anyone recalls I had a few choices at the start, The Matchbox labeled T-80 or M1 and/or the Matchbox Challenger I. I've decided to choose the Challenger as it was one of Matchboxes last designed kits and its been gathering dust on a shelf, forlornly fo too long. So her is where it stands after a much needed bath.


