

1⁄35Making Trees with Wire
Next step, you need to cover the metal frame. Try to cover ALL metal parts, to avoid your tree oxidizing later. Before you do this, make sure your tree skeleton looks right. Bend and shape the branches and roots till they "feel right".
 |
Several materials can be used to cover the tree. Several brands of plaster can
do the trick. I would not use expensive high quality products like "magic
sculpt" or milliput. PU resin is not the best choice either, since it is too
runny (and too expensive).
After trying several options, my choice goes to a product that is made to glue
bathroom tiles. It is a powdery cement-like substance that is mixed with water,
so you can make it as thin as you want and apply it with a paintbrush. I prefer
it to plaster for two reasons : it contains a sticky substance that is meant to
literally "glue" the tiles to the wall, so it sticks well to the tree frame and
does not run off. This gluey aspect makes it a bit more flexible than plaster
too (which may crack if you're not careful). Furthermore, it has a slightly
sandy aspect, that gives your tree a natural look.
Making trees like this takes some experience. Even if your first tree does not
look perfect, it will have taught you all you need to know to make a splendid
second tree.
Step Four : Adding Twigs
Too add finer branches, you can also call in the help of Mother Nature. Several
"brands" of shrubs and trees - or their roots - offer a nice selection of fine
twig-like extensions that do just the trick. You can add these individually to
the tree structure by using a drop of CA glue, or tie them to the branch with a
stand of sewing thread. Twist the thread around the "branch" and the small
twig(s) you want to add, then add a drop of glue. Finally, remove the surplus
thread.
 |
Instead of one piece of twig, you can tie a few of them together first. To do
this, you place a few twigs next to each other, as if you would arrange a bouquet
of flowers. When you like the result, add a drop of CA glue at the basis where
they must be kept together, and wind a string of sewing-thread around that
place. The drop of CA glue will make sure the thread stays fixed for the coming
348 years. Next, you cut away everything below the thread with a sharp hobby
knife.
The resulting "bouquet" of twigs can now be added to the tree, at the place
where you think this will look right. Keep repeating this process till the whole
tree is done. This is a painstaking job that can take an hour - or more - but
the end result is worth it !
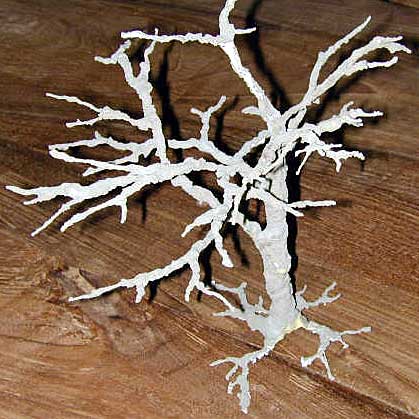
Here's a few pictures of the same tree. I entered it in the dio contest.
Regretfully, I did not take any pictures before the snow was added, but I think
the pictures give a good idea of the final structure. Since this is a winter
tree, no leaves were added : only branches and twigs.
You could also use the commercially marketed "moss" to replace these twigs, but
I think they don't look convincing.
About the Author


FROM: EUROPEAN UNION
I live in Belgium, Europe. Though modeling was big on my list of hobbies, I spent all my time refurbishing the home we bought a few years ago. I promised I'd be back some day. That day can't be far off, now.
Comments


All Rights Reserved. Please read our Conditions of Use and Privacy Policy.