135
Making Trees with Wire


Step Five : Adding Leaves

Ah ! A lot has been said and written on this subject. Many products can help you here, and I'm far from the expert.
To make a naked tree (dead trees or trees in winter, autumn), you can leave the tree as it is and just spray paint it. You can make it even nicer by adding extra branches from nature. Several bushy plants have roots that look fabulous as model tree branches. you can glue these into your tree, and cover with some plaster/tile glue where needed.


When the whole tree is finished, you can add extra drama by spray painting it. This too is a time-consuming process, but it works wonders. Start by painting the whole tree dark grey (almost black) or very dark brown, depending on the result you want. Then start adding more spray paint colour as you go along. Look at trees in your garden or in nature to see how nature "paints" its trees in summer, winter, fall,... Not just the leaves, but also the stem and branches. A coating with dark green (the one-celled moss that covers most tree stems) looks convincing, too. Make sure you mix your colours right before you add them to the tree.

Leaves are not my specialty, but I discovered a superb product that makes the most wonderful leaves : birch tree seeds. When you roll a seed cone in your hands, it breaks down into individual 1/35 or 1/15 (120mm series) scale leaves. All you need to do is spray paint them.

There are several diorama wizards on Armorama who can advise on leaves. There's plenty of specialized products on the market, not to mention what mother nature and your wives spices and herbs cupboard can offer you !
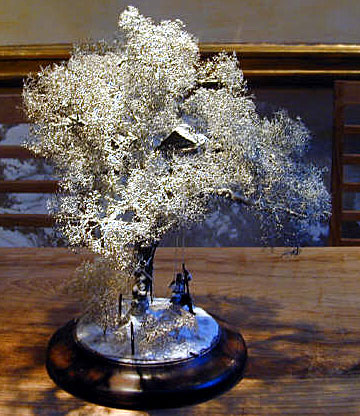
Options : Snow

There are several ways to add snow, and several threads in the diorama forum deal with these. To add snow on a tree, you need to make sure it looks 'real". That means adding snow to the big branches and the stem, as well as to the small twigs.

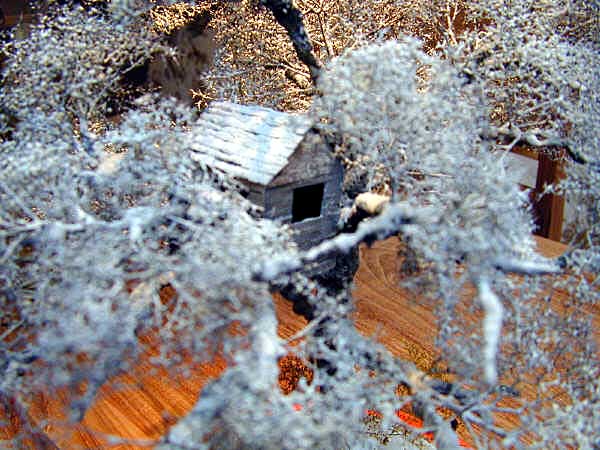
In the example tree, I sprayed a mixture of white glue with water on the tree, and "snowed" microballoons over that. It looked splendid. But for two reasons I'll never do this again : the microballoons are a very unhealthy product that irritated my eyes and throat for several days. Enough reason to ban this from my household forever ! Since they are very light, they spread all over the place. You could achieve the same result with other products like talcum powder or dry shampoo powder. Avoid all edible products like flower or starch : they attract unwanted visitors (bugs !) and colour yellow/brown after a while.

The same thing happened to me with the glue. Don't just use any white glue to add your snow. I'd suggest you add white paint to the glue, to avoid discolouring.

Good luck, and have fun with this!

About the Author

About Jan (GeneralFailure)
FROM: EUROPEAN UNION

I live in Belgium, Europe. Though modeling was big on my list of hobbies, I spent all my time refurbishing the home we bought a few years ago. I promised I'd be back some day. That day can't be far off, now.


Comments

Is Jan still a member here? I can't access his profile to see an email or send him a private message. Thanks Pat
MAR 19, 2009 - 09:46 AM
Belg1960 Short answer (from memory) is that Jan left a few years ago and used to drop in occasionally. I have used his technique and I think it makes fantastic trees - I used magic sculpt instead of grout - which made the tree more expensive but then my excuse is that I was getting a feel for the putty. I think there is a photo somewhere in my gallery. From memory I used copper telephone wire and the height of the tree is effected by how many twists and how "tight" they are, as well as the size of the initial loops. What you may be able to do with the one that you have started is to twist in some additional strands of wire - just overlap and twist for a couple of inches so it has some strength when covered with the trunk material. I did something similar to that when I came up short on a couple of branches. Brian
MAR 20, 2009 - 02:32 AM
Yep, the pics are gone, but step by step is very useful, I'll have to try this method. Thanks for sharing it. milvehfan
MAR 20, 2009 - 02:53 AM
There is a link at the top of the page to the whole how to with pictures of this thread. Pat
MAR 20, 2009 - 06:37 AM
Hi Jan, I must be the only unlucky person on this site, all I see are 2 boxes (1 inside the the other) with a red cross inside, no pix whatsoever, could you please, or someone help as this this tree making seems so good, but I'd like to view it. Thank you.
MAR 20, 2009 - 11:32 AM
Alec and anyone else here is the link to the article with pictures, LINK Pat
MAR 20, 2009 - 11:18 PM
On YouTube there's this kind of spacey guy who makes absolutely great diorama objects and has very good videos showing how he does it. He has a 7 or more part tree making video and he goes through several types of scratch builds based on dowels and twisted wire as well as from other materials. He shows how to build evergreens, palm trees, bushes, shrubs and more. He has dozens of videos on every conceivable thing you could ever want in a diorama or vignette. I believe he may be more into sword and sorcery fantasy type stuff, but everything he does is capable of military diorama use. I think he's really worth checking out. He goes by the name of the Kamloopian and I posted about him in another thread. I really think he's worth mentioning again. Here's a link to one of his tree making videos: http://www.youtube.com/watch?v=V8U177-hOrM&feature=channel
MAR 21, 2009 - 06:16 AM
Belg 1960 thank you for that.
MAR 21, 2009 - 07:07 PM
Oh yes, I'm still very much alive and kicking. 4 years ago I shelved my modeling gear to thoroughly renovate the large house we hought, an old nunnery. Only two more rooms to go and all is done. I already refurbished a large attic room into a modelers's paradise / computer game room. More details to make you all drool about that later I hope to finish all work by x-mas and start modeling again about that time. The good news: you can all perfectly master without me. I see great things on this website. Look forward to joining again Uncle Jan
JUN 09, 2009 - 09:33 AM
Welcome back, Jan!
JUN 09, 2009 - 11:00 AM