

1⁄35Return of the Tiger
18
Comments
Painting and Finishing
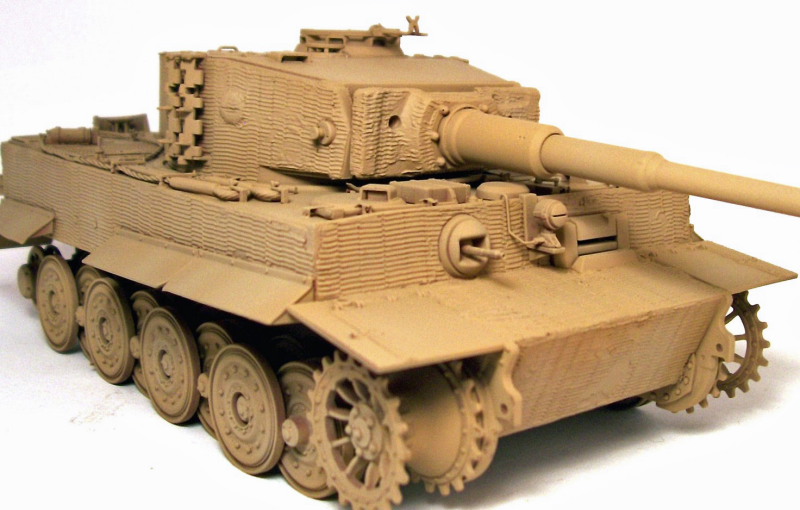
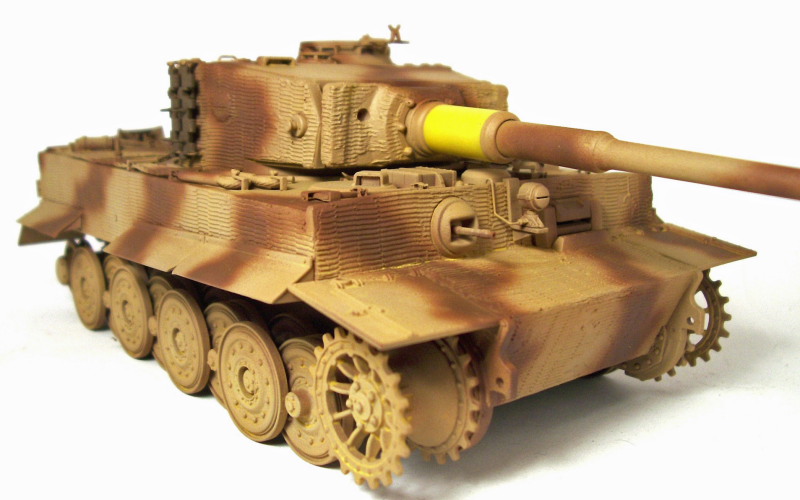
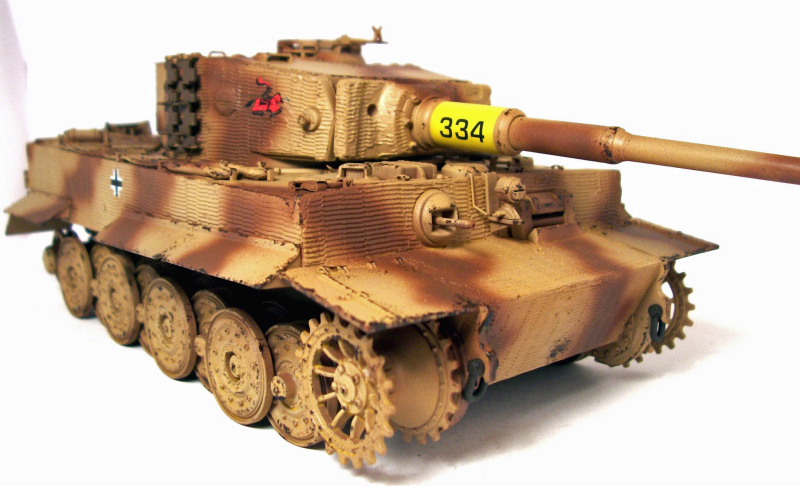
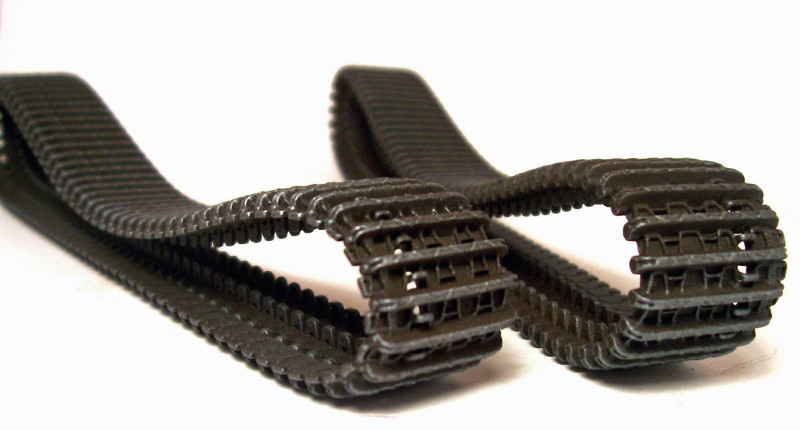
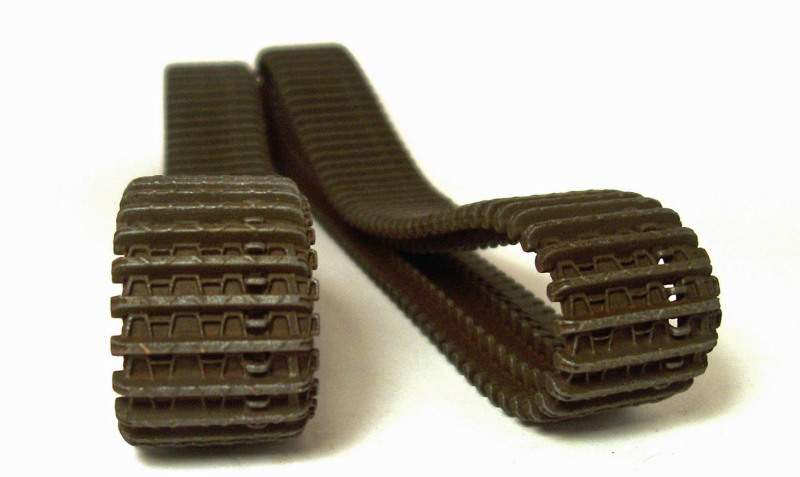
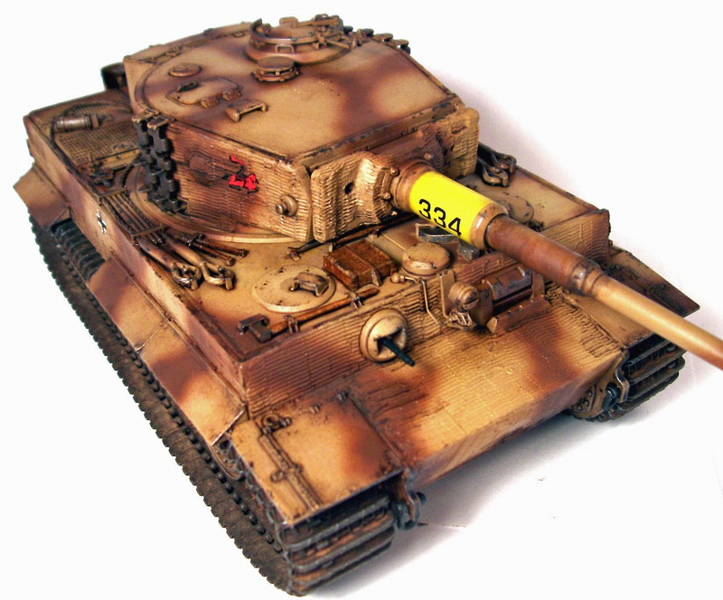
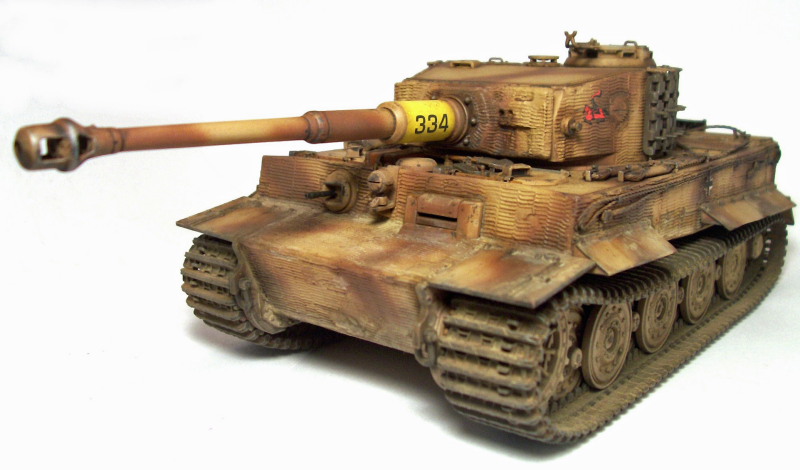
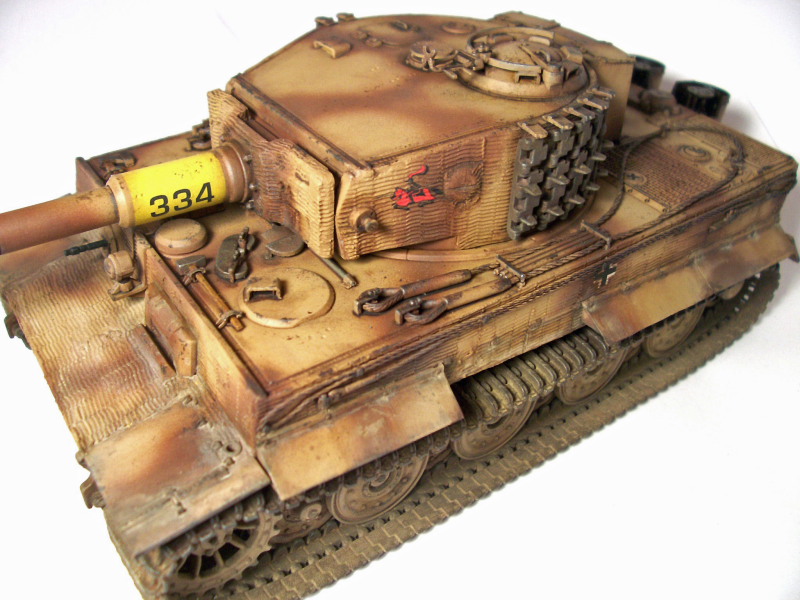
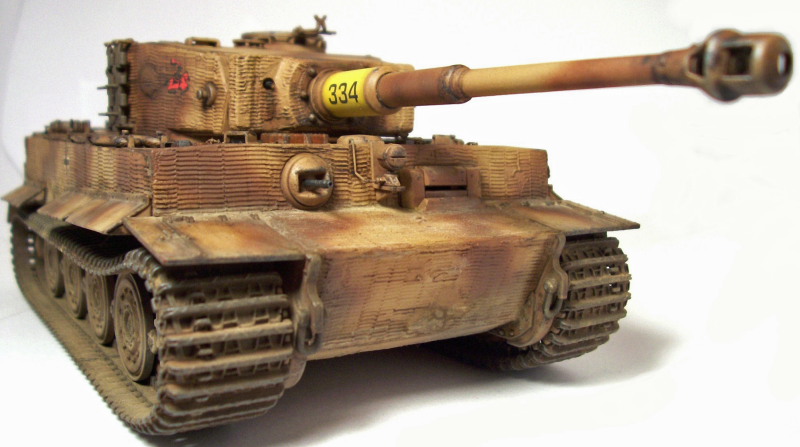
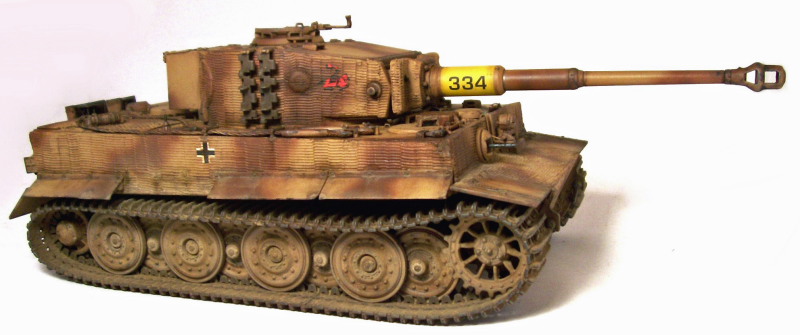
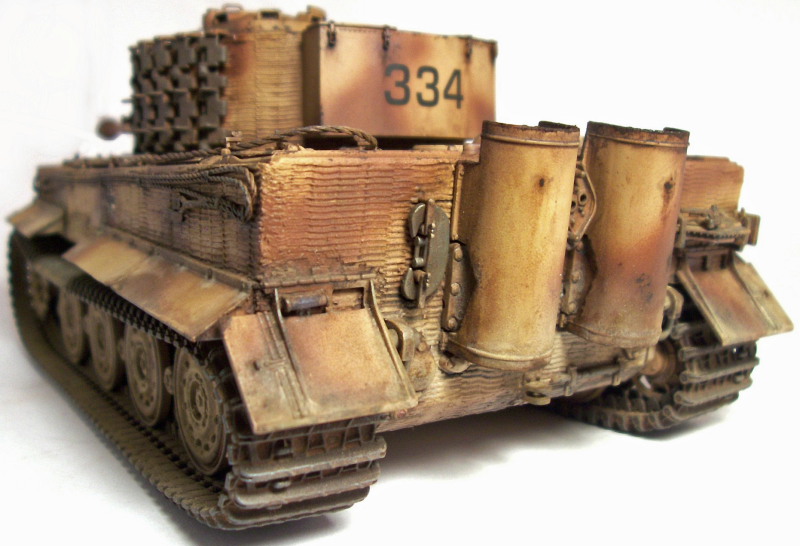
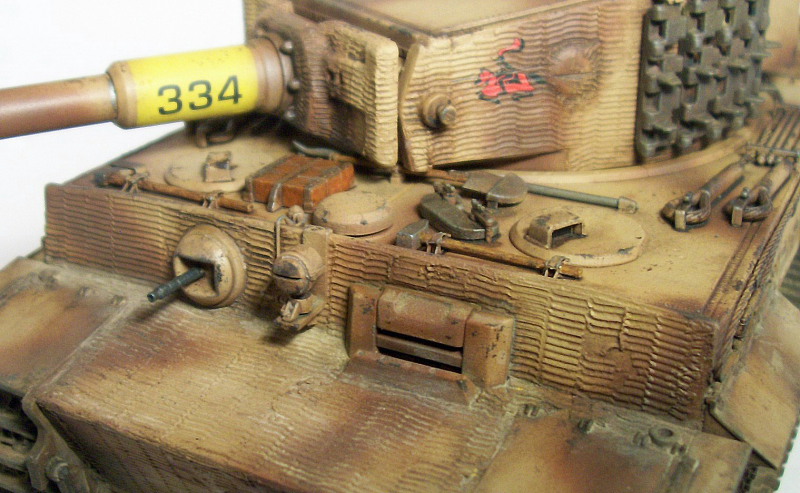
I started by painting the vehicle with rattle-can "Red oxide" auto primer. This helps show any places that may need a little filler or extra sanding and also gives the model a good solid base for the paint coats to following. For the painting on this model i decided to use Tamiya acrylic paints instead of my usual Model Master ones. For the base coat I used "Desert Yellow" with some slight fading here and there with "Buff and then the camouflage was added with Red-brown. All of which was done free hand with the airbrush. I next added the yellow band around the base of the barrell by masking it off and airbrushing it with MM "amber". Work began on the tracks with a base coat of Krylon rattle-can Camouflage Brown followed with a dry-brushing of "Shadowed Steel". I then gave them several washes using "Van Dyke Brown" and "Burnt Sienna" oil paints. After this, I used some brown dry tempura powder which is similar to pigments, scrubbing it into the tracks heavily and followed again with a heavy dark brown wash. After adding the tracks at this point, the next step was completing the final weathering on the vehicle.Weathering
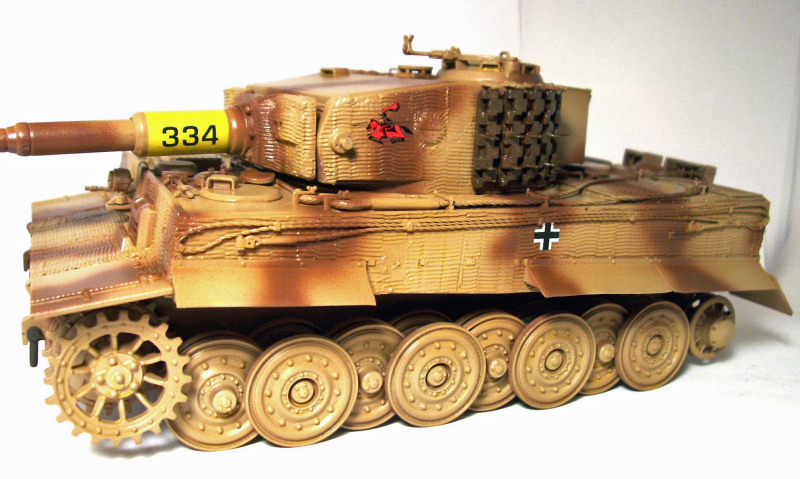
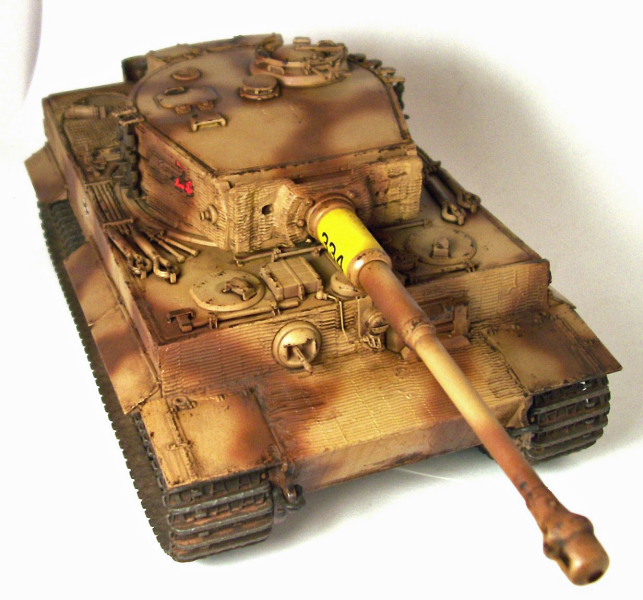
The first stage of weathering was a filter/wash over the entire model using "Yellow Ochre" oil paint to help warm up the colors and blend things together. After this was dry, the model received a gloss coat of Future in preparation for the decals. These went on very nicely and didn't give me any problems and, once on, I gave it another coat of Future to seal everything in and protect the decals from the upcoming weathering stages. Before the weathering began, I gave the model a coat of Testors Dullcote to knock the shine off it. I prefer to weather on dull surfaces as a matter of choice and started out by adding some wear and tear to the edges using straight up "Van Dyke Brown" oil paint. This was applied using the sponge method and left to sit overnight to dry. I then went over the entire model with a heavy wash using the same color. After which I used Master series' "Shadowed Steel" to dry brush the wheels and drive gears in preparation for the tracks which were then added. Moving onto the details, I again used the "Shadowed Steel" and did a little dry-brushing on the rest of the vehicles before i began working on the tools. For the wood handles I base coated them with craft acrylic "Stone" then used a combination of "Van Dyke Brown" and "Burnt Sienna" oils to get the wood grain effect. I used the "Shadowed Steel" once again for the metal parts. Finally, the spare track links and exhaust were first painted and weathered in the same way as the tracks were. With the details complete, I got out the airbrush again and using Tamiya "Buff" did some dusting around the lower hull and fenders and a very light once-over all over the model. More washes followed, with a lighter mud color this time. I added streaks using oil paints applied with a toothpick and cleaned off with down strokes of a brush. Finally, some light colored pigments were dry-brushed on to the tracks and wheels and select spots around the lower hull. With the end in sight, all that remained were a couple of select washes of "Ivory Black" here and there to pick out some details and some different shades of brown washes to add a little variety to the dust and dirt. Another round of light dry-brushing was applied to the tracks and a few other spots here and there with the "Shadowed Steel" , wrapping this one up nicely.Conclusion
What we have here is a beauty of a kit that can be built straight out of the box as demonstrated with very pleasing results. There are a couple of issues I encountered that will need to be addressed, the first being the well known warped hull problem that has carried over from the first Tiger 1 late release and fairly simple to overcome. The second being the tracks are too long when the correct idler wheel is used and the solution of needing to remove two links removed which again can be overcome without too much fuss. There is an excellent site by David Byrden Tiger1 Info dedicated to the Tiger1 which covers this and other tweaks and fixes. I would also like to thank him for his input and advice on several points during this build.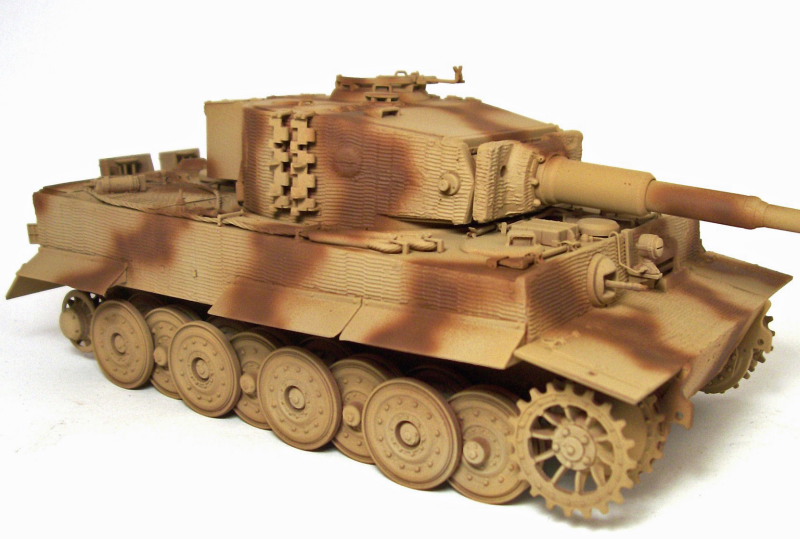


About the Author


FROM: TENNESSEE, UNITED STATES
My name is Ron and i began modeling in january of 2005 while off work with knee surgery i have always been interested in the military and 1/35 scale vehicles and armour are my main subjects, i will build just about any brand of kit there is as long as it interests me and i build for my own collectio...
Comments

Thanks guys i appreciate the comments Dave i agree the metal covers are nicer but like Rick as shown the plastic ones can be damaged too and normally im all about beating things up a bit but i was happy doing minimal damage on this one sorry for the late reply i have been at the beach for the past week heh.
Ron.
JUL 26, 2007 - 08:27 AM

Great Job on the Tiger. Ron.
Nice finish and all.
Have to look into this Shadowed Steel.
Now you say Model Master Amber for barrel is this correct?
Thanks
AUG 05, 2007 - 10:55 PM

I'm so excited reading about your build. I just got my cavalier zim from the mail and I'm about to start my Tiger kit very soon and the timing of your article could not have been more perfect. My kit though is one of the first that came out so I have the separate track version.
good luck to both of us!
AUG 06, 2007 - 11:57 PM
Thanks Jeff, and to answer your question no "amber" is wrong it is supposed to be "insigia yellow" by modelmaster i do not know why i got those two mixed up like that thanks for pointing that out,. i wonder how much trouble it would be for Bill to change that
Thanks Noli, you will love the original release, right after this one i built another for a friend using the original release and it is awesome, there is lots of extra's, have fun and share with us if you can.
Ron.
AUG 07, 2007 - 11:14 AM

Thanks for the reply.
I need to redo mine that is why I asked.
Killer looking Tiger you have their.
AUG 13, 2007 - 10:22 PM
This has been very helpful to me as I build my Tiger I 3-in-1. Many thanks!
AUG 01, 2008 - 04:07 AM
You do us proud! The article, photos and your skills created a superb model. Well done!
AUG 01, 2008 - 04:35 AM

I am glad to see this thread got pulled back to the front. I looked at it again, and immediately went to my stash. I think I need to do one of these, sometime soon.
AUG 01, 2008 - 01:38 PM
Thanks guys for the nice comments im glad this article is still of use it was a wonderful kit to build and still one of my favourites
Ron.
AUG 08, 2008 - 09:19 AM
Copyright ©2021 by Ron Goins. Images and/or videos also by copyright holder unless otherwise noted. The views and opinions expressed herein are solely the views and opinions of the authors and/or contributors to this Web site and do not necessarily represent the views and/or opinions of Armorama, KitMaker Network, or Silver Star Enterrpises. All rights reserved. Originally published on: 2007-07-17 00:00:00. Unique Reads: 47259

WEB HOSTING BY


Copyright ©2021 Armorama and Kitmaker Network, a subsidiary of Silver Star Enterprises
All Rights Reserved. Please read our Conditions of Use and Privacy Policy.
All Rights Reserved. Please read our Conditions of Use and Privacy Policy.