1⁄35Post-War Finnish T-34/85
8
Comments
Introduction
Looking at the competition classes for armored vehicle in domestic model shows, it’s evident that Finnish T-34’s are a very popular subject. But I don’t recall ever seeing much in the way of T-34’s in post-war configuration. If I recall correctly, it was the annual Model Expo of 2003 where I bought Dragon’s (then) new T-34/85 with the intention of building it into a tank operated by the Finnish army. At first I was planning to build the usual WW2 tank in tri-color camo pattern. While looking for references, I didn’t find many photos of wartime tanks (at least in true-to-original paint schemes). Instead, I found a good walk-around of a T-34/85 in post-war configuration in overall green. Somehow the amount of scratch-building that was looming ahead didn’t intimidate me and I knew I wanted to build a model of Ps.245-3 as she appeared in the 1950’s.The parts used
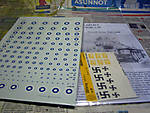
The starting point of my model was Dragon’s T-34/85 UTZ mod.1944. To make my life easier (and my wallet lighter), I purchased some aftermarket accessories mainly to address the major drawbacks in the kit. First, the plastic gun barrel (in two halves!) had to go and in came an aluminum barrel from Eduard. Secondly, the solid engine cover screens weren’t state of the art so PE replacements came from an Aber engine screen set. This particular vehicle sported a mixed selection of wheels, meaning some more shopping. Maquette’s affordable yet good set of earlier type solid wheels was added to the pile. Markings were fortunately an easily dealt with issue. The roundels are the same as used in aircraft so a universal roundel sheet covered the national markings. For the registry numbers, I bought a Wiking-decal T-34 sheet. While it didn’t have the exact the codes I needed, making them would be as simple as cutting up and re-arranging the ones provided. With the basics covered, the only additional parts I could buy were the headlights which were available in cast resin from JS-models. The rest was to be scratch-built using styrene sheet, copper wire, left-overs from numerous PE sets, milliput, and creativity.Construction, pt.1
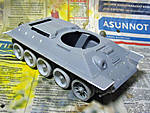
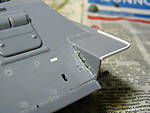
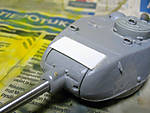
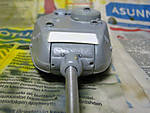
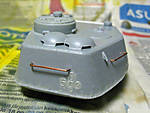
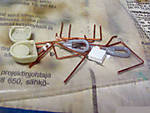
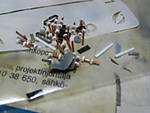
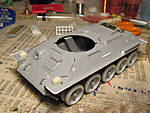
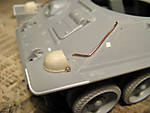
The project started by following the instructions with the hull. Nothing special to write home about just the usual modern Dragon kit in terms of sharp moldings, no flash, great fit. The hull came together quickly, the only deviations from the norm were filling & removing unneeded part locators with the holes for mounting the external fuel tanks the first to get filled with styrene sheet. Then came the time for the first modifications. The fenders were the first target and they were cut down, had their edges rounded, and a strip of styrene glued on the edge. Moving on from the front fenders, the glacis plate received some detailing in the form of squash-molded rivets and two weld beads made from greenstuff putty. As usual, the grab-handles on the hull were replaced with copper wire as I’m not fond of de-sprueing and cleaning up these parts that are so easily made from wire. With the basics on the hull finished, I turned my attention to the next chore-to-be, the wheels. This vehicle I chose to build had an almost full set of solid dish wheels with only one “half-spider” pattern wheel which the kit supplied. I was prepared with a Maquette wheel set which turned out to be quite a struggle since the dimensions of the wheels were almost identical, except for one crucial detail, the axle holes. The Maquette holes were larger than Dragon's, meaning I had to first fill the holes and then drill in larger ones. Thinking about it now, the method I used wasn’t ideal. The most trouble-free solution would have been to buy another Dragon kit to donate the necessary early type wheels. Well, I didn’t and drilling the new holes was tricky. First to get the holes centered and then at right angle was too much for me, several years ago. My fist attempts were less than centered and less than straight. The solution was simple. Carve the holes larger. The wheels now fitted correctly but quite loosely. Actually “loosely” is a gross understatement since they fit so loosely I was forced to glue the wheels to the suspension arms with 2-part epoxy. The wheels were on, but being fixed, would surely prove troublesome while painting. The tracks were also assembled at this point and to ensure proper fit, I glued the idler and drive wheels to the track lengths. When putting the tracks together, I discovered a thing I could have done better with the suspension. I had glued the idler mounts in place and I was forced to make the tracks a little more saggy than I’d preferred to make the ends meet. This is the bad thing with tracks having two kinds of links. If they’re a tiny bit too short add you add two links and they’re too long! With the wheels and tracks taken care of, I started working on the rest of the hull details and the stowage gear that would be piled on the vehicle. With the walk-around as my main reference, I began measuring, calculating and eyeballing dimensions for the gear that would clutter the right hull side and fender. The dozen-or-so bolt-and-nut assemblies were made from copper wire and hexagonal styrene rod. Making the nuts was a test of patience. First, I had to cut thin, even slices from the rod, then mark and drill a hole in the center for the bolt. Quite a lot had to be discarded in both stages, resulting in many more slices cut than used. When done, they were attached with super-glue to holes drilled in the hull side. The stowage boxes were next and were built from styrene sheet with details made using metal wire and scrap PE. While these required some time and care, it was a cakewalk when compared to the rearmost stowage box. It looked quite daunting, being originally made from thin metal and resembling a really sloppily made fruit crate. Making one from styrene meant small contact areas for gluing and careful measuring would be a must in order to get it straight and even. Normal strip styrene and L-shaped rod was used in construction. Surprisingly, it wasn’t really that hard as I imagined. Tedious and fiddly, yes, but far from impossible. Contrary to normal Murphy’s laws concerning modeling, I managed to figure it out that drilling the numerous holes to the components was best done before assembly. When it was done, I set the finished item aside, took a deep breath and congratulated myself for prevailing with such an endeavor. The similar but smaller and much simpler tool box mounts for the left fender was also built at the same time. After the fruit crate was finished, I added some details to the rear hull before proceeding to the turret. The turret required some modifications, but less so than the hull. Before gluing the upper and lower halves together, I removed the original rain-cover plate over the mantlet and made a new larger one from sheet styrene. It was glued on and weld beads were added around it with stretched sprue which was brushed with liquid cement to soften it and then textured with a modeling knife and sand paper when dried. As with the hull, all grab handles were replaced with copper wire and, as on the hull, the number and location of the handles was different than on the kit instructions, so I consulted my references. The new aluminum gun barrel was a drop-fit replacement for the two-part plastic item and it was mounted at this point with super glue The prominent serial numbers on the back of the turret shell were made from part numbers cut from sprue and a missing bolt was added to the gun mantlet. With the turret almost done, I noticed something that made me put the model aside for a couple of years. That gun mantlet… I had completely missed the fact that the kit-supplied mantlet was of the wrong type for the vehicle I was building. The kit-supplied mantlet had the ZiS-S-53 gun collar while I needed an S-53 type. If I had noticed that before assembling the turret, fixing the issue would have been as simple as buying a drop-fit resin replacement part. But with the turret already assembled, I had to resort to modifying it in place. But that was after a few years, literally, of sitting in the box.Comments
Extremely nice and clean detail work! Also the painting and finishing is really nice (good tips for me, as I'm a "green armor builder" as well Thank you for this feature!
PS: I should have known all these details when it came to vote in the DMOM! Congratulations to that very nice piece of work again!
NOV 15, 2007 - 09:40 PM
I like the weathering it is very subtil!!!!!!!!!!!!!!1 Nice one!
I like also you scratch skill!
NOV 16, 2007 - 02:02 AM
Well done Eetu, great to see the article up after following this build closely.
Makes me ashamed to say I still havn't got my captured flak universal carrier article done!
Youv'e done a great job mate, well done!
James
NOV 16, 2007 - 02:10 AM
Eetu,
The model looks great! I have a love for the obscure and a soft spot for small armies. If you had done a little searching on this site, you may have saved yourself some time and work. My company, Decalcomaniacs! makes a decal sheet of everything you need to mark postwar Finnish AFV's. We also do a T-72 sheet with markings for T-72's. If you are still interested, stop by the website. Also, here's a link to Frank DeSisto's review: Time on Target. Hope that helps!
Regards,
Georg Eyerman
Decalcomaniacs!
NOV 16, 2007 - 03:20 AM
Thanks for the compliments.
^^ I've been aware of Decalcomaniacs making several sheets of Finnish armor decals, the problem has just been availability, and me being unable to make purchases from ebay, which seems to be the only place to buy them. Now when I got a visa electron from another bank where it actually works properly in online stores, I'll sure consider getting a sheet or two.
NOV 16, 2007 - 05:01 AM
Eetu, fantastic job on the T-34/85. I have been following your projectin the campagn tread. interesting the read the whole build in an article. Great project and fantastic details.
Thanks for sharing
NOV 16, 2007 - 10:45 PM
Eetu proves he's the man, especially when it comes to scratching the beast. You have my compliments under the campaign thread, yet again I congratulate you on a job very well done!
NOV 17, 2007 - 09:08 PM
Copyright ©2021 by Eetu Tahvonen. Images and/or videos also by copyright holder unless otherwise noted. The views and opinions expressed herein are solely the views and opinions of the authors and/or contributors to this Web site and do not necessarily represent the views and/or opinions of Armorama, KitMaker Network, or Silver Star Enterrpises. All rights reserved. Originally published on: 2007-11-16 00:00:00. Unique Reads: 22149


