

1⁄35Scratchbuilt M1134 Stryker ATGM Variant
25
Comments
The Construction
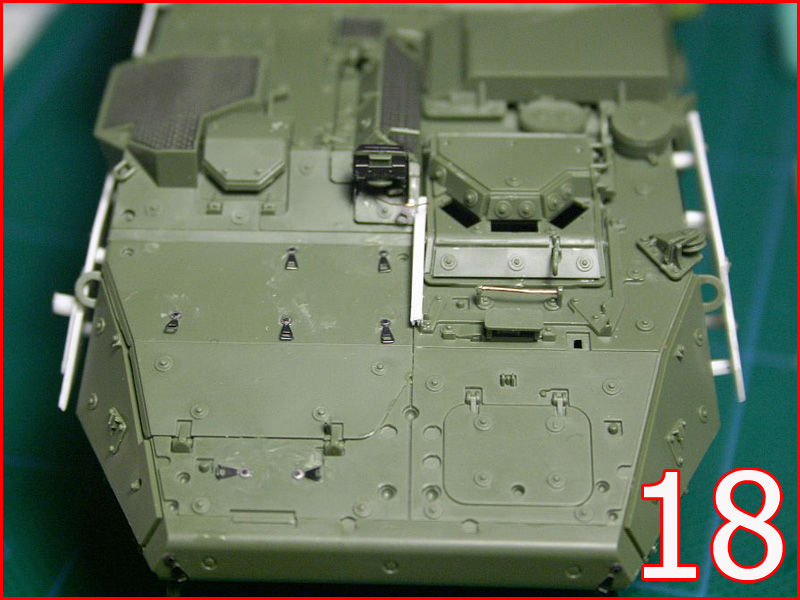
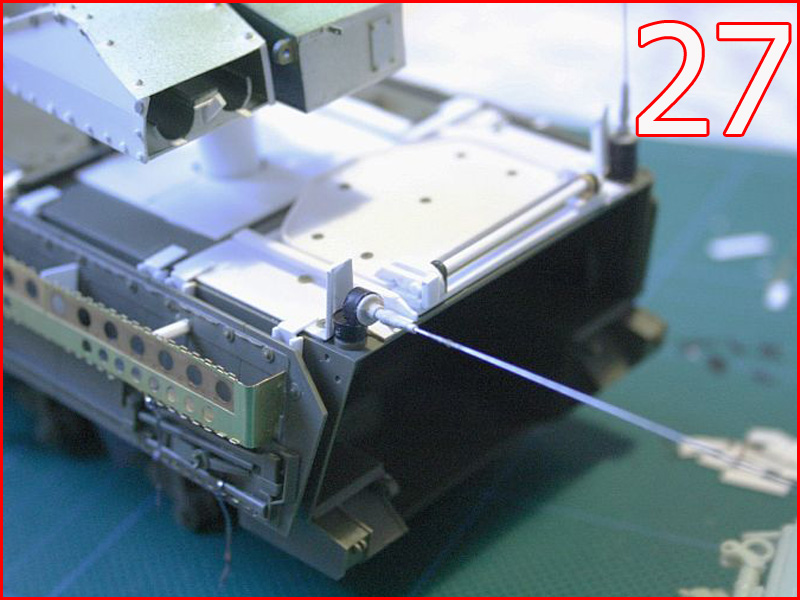
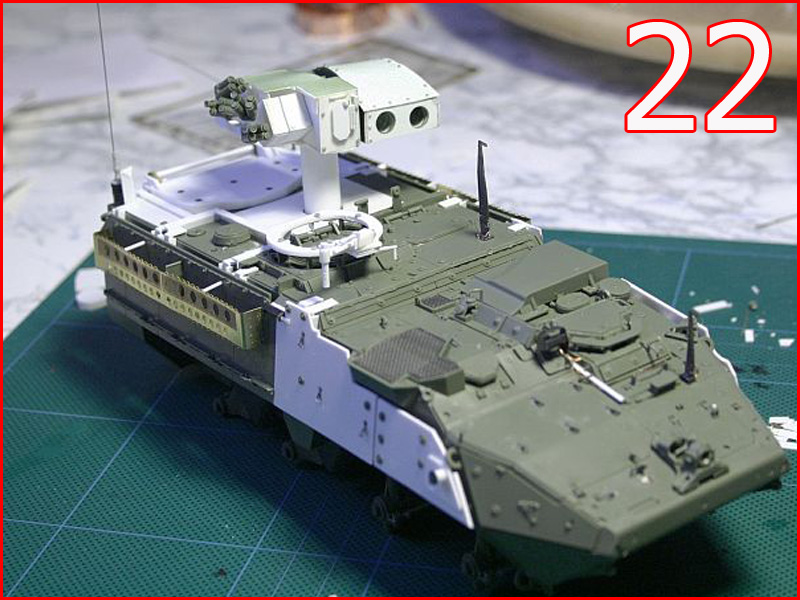
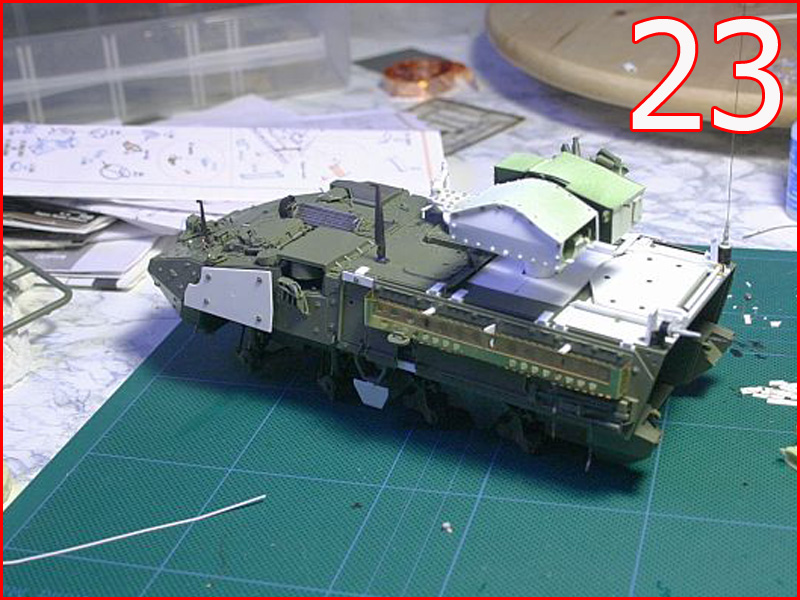
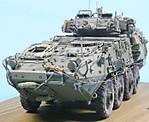
The building procedure did not follow an orthodox method, I did not follow any ABC strict method of any kind. I build according to how I feel. There are many articles that seem to follow some sort of code on how to proceed in an ABC fashion. These do not pertain to me as I do what I feel is right. So my procedure is in no way part of the numerous imposed methods of build that are out there today. My standard is built in the way that I see fit. I would like to point out that some pictures of the beginning stage of this build are not shown. This is simply because I did not take any at the time and/or they got deleted by accident. I had not planned on doing an article on this build. So, pictures of the very beginning stage of the TOW mount & Hatch from scratch, is not included in this article, unfortunately. Stage 1 The first thing I did was assemble all the parts and make adjustments to the lower hull itself. Nothing complicated here. Just following the instructions that came along with the kit made it less difficult. All parts for the hull went together nicely with little effort. Only minor cleaning was needed to remove the flash from the pieces after being removed from their sprues. When it came to attaching the wheel axels I decided that the two front pairs of wheels were set at an angle. Stage 2 The next step was to locate and attach the mounting hatch to hull on the top rear. It was a little tricky without the exact measurements of the top hatch door. So using my method of Deductive Measuring I came to a figure that would seem to fit the area required for the hatch door to be placed without looking awkward to the eye and give some sence of believability. I did not need to make a hole in the hull for the hatch since I had decided to model the door closed. I could have left it open but that would have meant I would need to do an interior and that would not have done justice to the model as a whole. I had to scratch build the door hatch using styrene which was a little tricky. One problem with pictures is there are always parts or angles that you cannot see well and sure enough it is always the part you need the most. So, I examine as many pictures of the same part from different angles. Sometimes you just have to figure out the rest, if youre unsure of the actual design of a part or how it looks. With the hatch door placed I added PE bolts from Edwards deflector kit. Stage 3 After I was satisfied with the hatch door, I measured the area to make and place the hole for the elevated TOW support. I decided to make the TOW mount movable in its vertical range to be able to pose it in any direction. Measuring the hole was tricky. I looked at all angles from pictures and found a location that would be as close to the real thing as possible. I used a table drill to make the hole. It had to be just right in order for the styrene tube to glide up and down easily but still have enough resistance to keep it level when left alone. After that I used 2mm thick styrene to cover the area under the TOW on the hull. Then proceeded to add other little details according to the real thing. I scratch built the three antenna deflector shields to protect the antennas when they were lowered in firing mode. See Pic 21, 26 Stage 4 This stage was the trickiest of all. The TOW missile launcher had a good many arcs, angles, uneven and perpendicular structural designs that I had to come up with without the end results looking like a half baked cookie cutter experiment. A great many detailed pictures helped in getting the TOW missile launcher to come out as accurately as possible. Without having the proper measurements of the actual TOW, I had to use my trusty Deductive Measuring technique. This was merely a trial & error procedure that thankfully only took three tries before I got it to look close to what the actual design structure looked liked. Again, using paper templates to get a rough idea of scale is usually what I do first before cutting out any styrene. This saves me from wasting any unnecessary styrene before the right measurements are found. I used 2mm styrene sheet for the frame of the TOW. The bolts you see around the edges were made by slicing off small pieces from styrene rods. If money is an object, which in most cases it is, this route is usually the best way to go. There are several sizes and structural styrene rod designs to choose from. I used this method for some of my other builds as well. Another alternative is using pre manufactured type bolts. My all time favorite is Caliber 35 brand. Now this company makes the best scale bolts to date. The detail is awesome. I do recommend them for scratch builders. They are a little expensive but are worth it just for the details. Making the internal launch chutes were pretty straight forward. I used 5mm styrene tubes which I cut down in the middle dividing them in two halves. The internal rings at the opening of the TOW were made using sliced tubes. For the smoke dischargers braces & support were all done using square styrene rods. I think I managed to duplicate this area pretty well, even though the angles in some pictures made it difficult to see well. I used the smoke dischargers that came with the AFV Club kit, placing them at the required angles according to the pictures I had in my possession. I also used pop nits from Grant line for some of the smaller representations of bolts.These are basically model railroad sizes which I thought would work well for the areas I needed. On the whole the TOW came out exceptionally well without any scale drawings to work from. See pic 19, 22,23 After the construction of the TOW & the loader hatch I turned my attention to the other small details around the hull. Other modifications, additions and scratch built parts that were done are: Left hull side bin PE part from Trumpeters upgrade kit Plastic sheet styrene for the extra armor Raised light support for the front light cluster Antennas flame deflector shields Edwards PE Grill Deflector A complete gun ring & gun mount Using Light gel plastic for the periscopes Strips of paper for the straps


About the Author


FROM: DALARNAS, SWEDEN
Charles King hails from Sweden. He has been interested in modeling since he was 12; though there was other interest that took priority at the time, he would eventually fall into the modeling soon enough. Not until recent,in 2002 that his interest was rekindled. While browsing the Internet, he ca...
Comments

thanks charles. will be looking forward to see the update. Thanks.
MAR 19, 2008 - 12:25 PM
Jason, here are two pics after I made the changes...I added the tarp and weathered it some more:


MAR 21, 2008 - 04:51 AM
sorry to answer so late. Was outta town. Ti, the updates looks awesome. I particularly like the tarp. How did you achieve the look? looks real to me. Care to share your method...than you. Again, this styker beast looks fantastic.
I hope one of the manufacturers come out with it soon. Or maybe Miloslav can put one together for us.
APR 22, 2008 - 08:12 AM
[quote]sorry to answer so late. Was outta town. Ti, the updates looks awesome. I particularly like the tarp. How did you achieve the look? looks real to me. Care to share your method...quote]
Thanks Jason. Method was simple. 1. Wet tissue papper rolled up 2. Then painted with wate based paint while still wet. 3. weathered with pigments when it was completely dried. That's it.
Nice to see you're coming out with this variant...as always, I'm always the last to know So all my work was for nothing..
APR 22, 2008 - 08:34 PM
Such a simple method for a great looking item. Thanks Ti. Miloslav, I did not doubt you would be doing this variant.
APR 23, 2008 - 10:14 AM

Thanks for a great article.
If I may ask, how far away did you hold the rattle can when spraying on the "dirt"?
APR 24, 2008 - 01:09 AM
You're welcome John. Glad you enjoyed it. I held the can about 20cm from the model. I also used a piece of cardboard as a reflector to reduce the over spray these cans cause as you spray. I also used a kitchen strainer or fryer strainer to reduce the amount of spray particles.
My picture taking abilities is left to be disired. The model looks much better in person than in the pictures...so I would like to think..
APR 24, 2008 - 04:43 AM

Ti, In your last paragh you said you used Spray paint for the dirt. What make was it? btw, Trumpeter has come out with a M1134 now. Have you seen it?
SEP 28, 2008 - 11:19 PM
Copyright ©2021 by Charles King. Images and/or videos also by copyright holder unless otherwise noted. The views and opinions expressed herein are solely the views and opinions of the authors and/or contributors to this Web site and do not necessarily represent the views and/or opinions of Armorama, KitMaker Network, or Silver Star Enterrpises. All rights reserved. Originally published on: 2008-02-11 00:00:00. Unique Reads: 30177

WEB HOSTING BY


Copyright ©2021 Armorama and Kitmaker Network, a subsidiary of Silver Star Enterprises
All Rights Reserved. Please read our Conditions of Use and Privacy Policy.
All Rights Reserved. Please read our Conditions of Use and Privacy Policy.