

1⁄72SAS Jeep
6
Comments
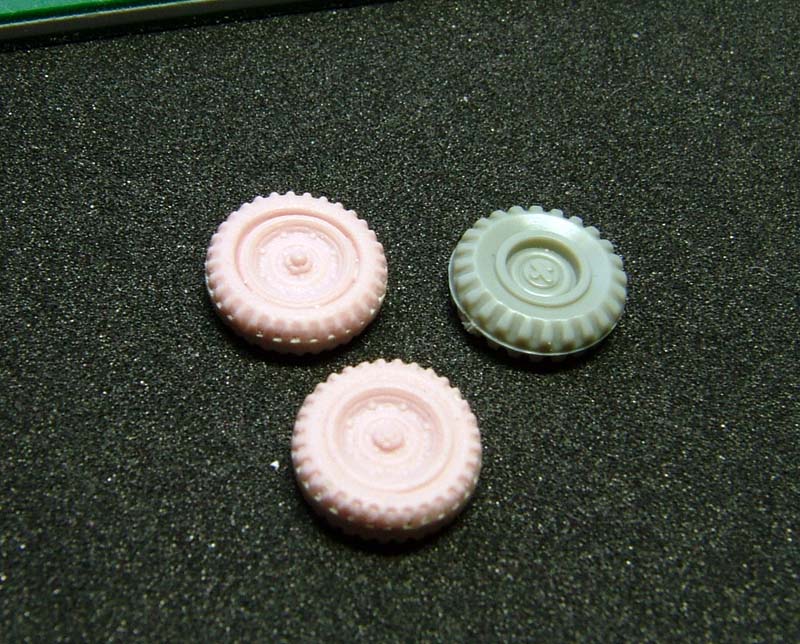
Casting Process
Scratch building almost always eventually lead to casting. Depending on the master, I will make the decision to do a one piece or 2 piece mould. For 2 piece moulds, the next step is to determine where the parting line will be, usually locating it somewhere that is easy to clean up.Procedure for 2 piece moulds
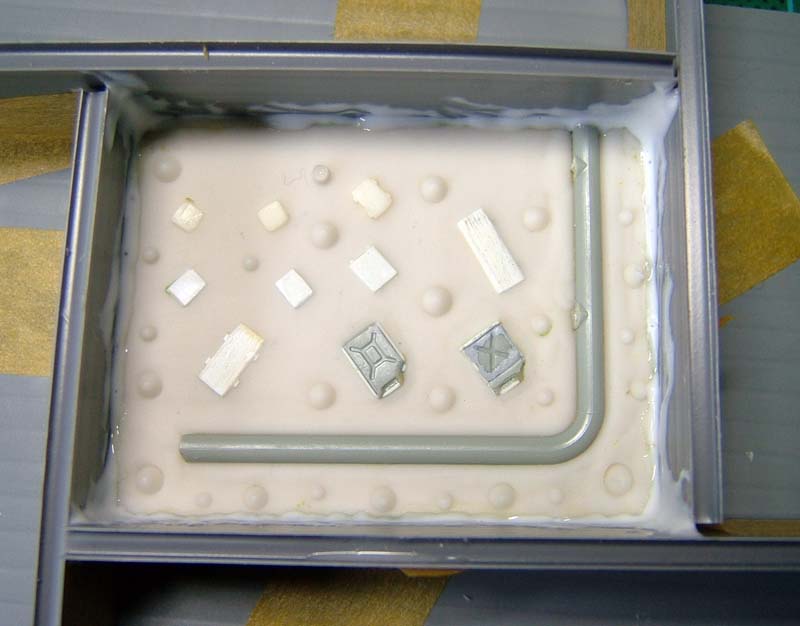
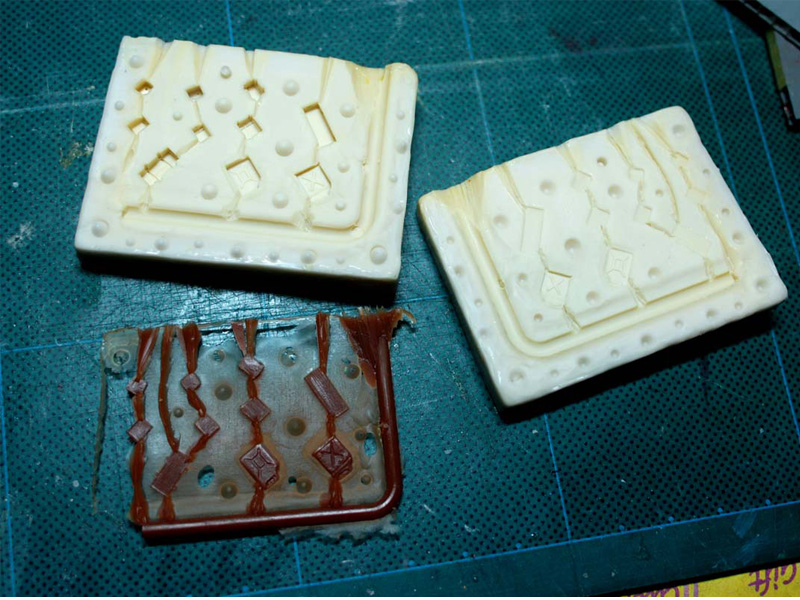
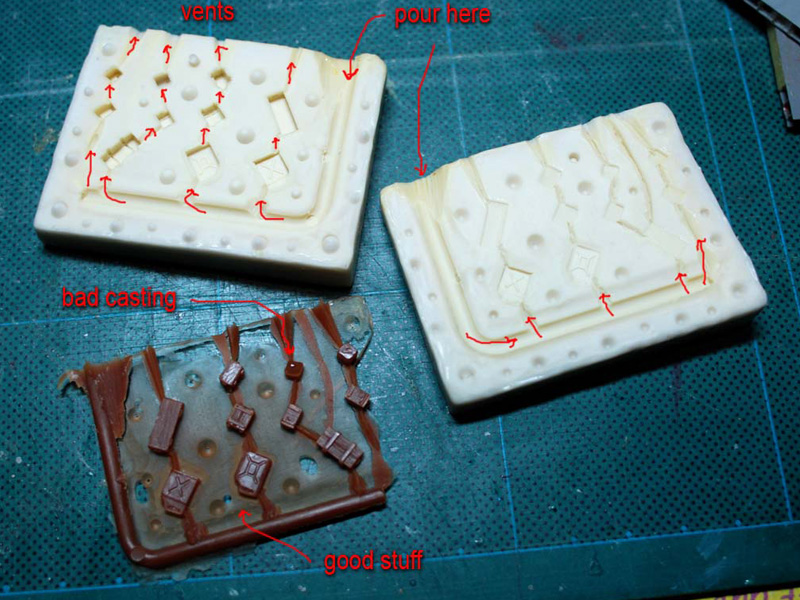
First I lay a slab of modeling clay on top of a piece of corrugated plastic board. I use the non-sulphuric, non-drying, non-hardening oil based clay or plasticine. The non-toxic version for kids should be suitable. I would then arrange the parts I want to cast on the clay; then press them in leaving half of the part exposed. For big pieces, Id dig up a small depression before I press the master into the clay. I will then add small bits of clay to the side, building it up to the exact shape I want the parting line to be. I use the blunt end of a paintbrush and sometimes the tip of a needle to get a clean sharp edge. I also need to ensure that there is a suitable distance between masters and the edge of the mould. Nothing less than ¼ inch is ideal. I also leave some room for the pouring channel. I use a section of plastic sprue for my main pouring channel. I will then use short lengths of wire or cut the smaller pouring channels between parts after the mould has set. When Im happy with the setting of half the master into the clay Ill add the sides of my mould box using strips of corrugated plastic sheet. Then Ill apply white glue to the corners to seal it. These days I use Lego bricks for the sides and seal the corners with plasticine to speed up the process. The last thing to do before pouring rubber is to make the registration keys. I make this by pressing the blunt tip of a paintbrush into the clay around the parts. I press it slightly more than 1/8 of an inch deep. Also dont forget to apply a layer of mould release. I found that silicon rubber doesnt stick to styrene but does stick stubbornly to cured magic sculpt! Silicon rubber will also stick to silicon rubber. For mould release, I use Vaseline applied with a brush. I would first apply a generous amount to make sure I cover all the surfaces. After this, Id go over the parts with a clean brush to remove most of the Vaseline, leaving a fairly thin layer. I let this settle a bit before pouring rubber so that the brush marks disappear. A word about laying out the parts; I dont use a vacuum chamber for casting though I wish I had one. So in order to get relatively bubble free casts, I place my main pouring channel so that it goes under the parts. This allows the resin to slowly come up from below thus reducing the chance to trap air bubbles. This technique works well for the slower setting resins. Of course the necessary vents still need to be made to ensure the air is allowed to escape from the nooks and crannies. Now to pour the rubber, again, since I dont have a vacuum chamber, I have to develop a pouring technique that avoids air bubbles. I first mix up a small amount of RTV silicon rubber, just enough to for a thin layer over the parts, not more than 1 mm thick. I pour this on slowly and evenly over the entire mould box. Sometimes, I would take a metal paint stirrer and poke around the edges and crevices of parts to ensure there are no air bubbles trapped. Once I am satisfied that there are no more trapped air bubbles, I would then let this thin layer settle for a few minutes. In the meantime I will mix up more silicon rubber, this time enough to cover the entire mould for about half an inch from the highest tip of the parts. I would then slowly pour this onto one corner of the mould box, letting it push itself over the parts. As the mould sets, the air bubbles will rise to the surface, while the first thin layer ensures that air bubbles that dont make it to the surface does not stick on the surface of the parts. Its a very slow process but is pretty fool proof. Once the first half of the mold has set (usually 24 hours), I take the whole mould off the plastic base and turn it over. I take off the plastics walls so that I can remove the plasticine layer. I do this carefully so that I dont accidentally remove the parts from the first half of the silicon mould. Then I place the mould, rubber side down, back onto the corrugated plastic base. I rebuild the plastic walls around the rubber and again seal it with white glue. Then I brush on a thin coat of Vaseline over everything, same process as above. Then I repeat the rubber pouring process as previously mentioned. When its set, youve got youre 2 piece mould all set to go.Casting
To make castings, I put the 2 rubber mould halves together. Sometimes I would use a spray on mould release which I found useless for rubber to rubber surfaces, but might actually help protect the rubber from the resin. I would then sandwich the mould between 2 pieces of corrugated plastic and use masking tape to tie the whole thing together. For the jeep parts, I used a fast setting low viscosity 2 part polyurethane resin. I have problems with PU shelf life here in high humidity Singapore. After first opening the PU resin, the humidity in the air slowly degrades the resin causing it to produce air bubbles as it sets, very annoying. This happens even if you seal the container. The solution is to use up the opened PU within 1 or 2 months, or the whole lot becomes unusable after a while. For PU, I pour straight away after mixing the 2 parts together. So I make sure I avoid introducing air bubbles when mixing. These days Ive found a substitute for PU resin. Its a product called Gedeo crystal resin. I believe its an epoxy based resin. As the name suggests, it dry perfectly clear. Its similar to Envirotex but a little bit less odour. Mixing ratio is 2 part resin to 1 part hardener. Pot life is almost an hour and sets around after 15 hours. Slow, but gives you a lot of time to eliminate air bubbles; perfect for home use. When mixed properly it will set to a hard finish that can be drilled and sanded. There is a bit of shrinkage but not too bad. I was also able to color it by adding small amounts of Tamiya acrylic paint after I mixed the resin and hardener together. Because of the long pot life, you can let it sit a bit after mixing before pouring. This allows the air bubbles to dissipate. To cast, I just slowly pour the resin into the main mould channel. When the resin reaches the top of the vents I stop pouring. You can tap the sides of the mould to release air bubbles. In the future Im thinking of using some sort vibrating device to help get rid of trapped air bubbles. When the resin sets, take it out, trim the excess resin and youre good to go. Use super glue to stick it to other surfaces. Prime and paint with normal hobby paints.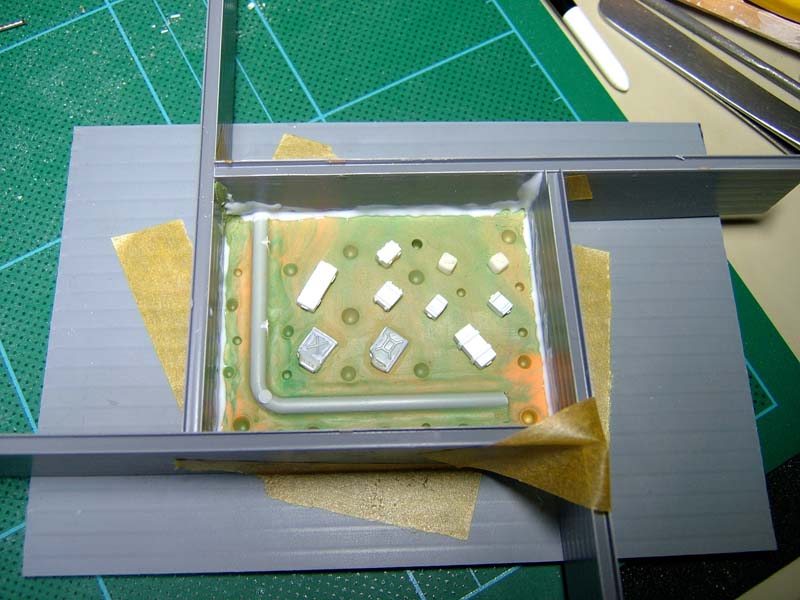
About the Author


Comments


YEEEE HA Great action that jeep is really moving. The driver looks like he is holding on, waiting for the crash, bang wollap! Great sense of speed. love it!
NOV 27, 2008 - 02:47 PM

Sonny, holy cow!!!! The patience that you have in building something in 1/72 is incredible. How do you do that!? That is a great build, make some black and white photos and it would fool everyone!!
DEC 01, 2008 - 07:39 AM
Thanks guys, the reception to the model has been very encouraging. I hope the build feature is informative for you guys.
Also comments and crits are welcome.
Cheers,
Sonny
DEC 09, 2008 - 03:26 AM
Looks great, Sonny. A very action packed little scene.
Thanks for sharing
DEC 10, 2008 - 03:57 AM

Looks real cool, hope mine turns out as good, I am working on 1 now. jeepkid019
MAR 01, 2009 - 03:43 PM
Copyright ©2021 by Sonny Sy. Images and/or videos also by copyright holder unless otherwise noted. The views and opinions expressed herein are solely the views and opinions of the authors and/or contributors to this Web site and do not necessarily represent the views and/or opinions of Armorama, KitMaker Network, or Silver Star Enterrpises. All rights reserved. Originally published on: 2008-11-27 00:00:00. Unique Reads: 40461

WEB HOSTING BY


Copyright ©2021 Armorama and Kitmaker Network, a subsidiary of Silver Star Enterprises
All Rights Reserved. Please read our Conditions of Use and Privacy Policy.
All Rights Reserved. Please read our Conditions of Use and Privacy Policy.