

1⁄35Tasca Sherman Firefly VC
8
Comments
Building the Sherman VC
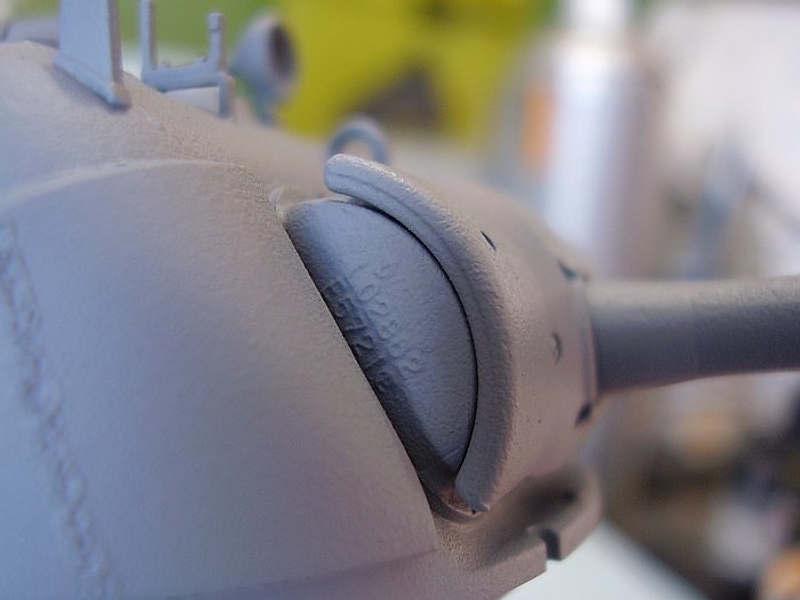
As quite some time has now passed since the initial release of this kit, and many very good build articles have appeared in print and on the net, I wont take you through another step-by-step build up of the kit. Ill focus on how I painted, and what I added to, the model. It was clear from building the lower hull that Tasca had thought of the modeller wanting to add an interior and had included the internal fire wall between the engine bay and the fighting compartment. I decided not to fit an interior this time, as it was the exterior I really wanted to play with on this model.As mentioned in the introduction, detail on the kit is very nice and subtle. In some areas I felt, although probably very much to scale, the surface was a little too subtle and could be slightly obscured by painting and weathering. So with Mr Surfacer 500 and a sponge in hand I dabbed away at the transmission casing, being careful to avoid covering the lovely little foundry numbers included by Tasca. The cast areas of the Turret received the same treatment. On the upper hull weld seams were exaggerated with a Pyrograv and then softened with a layer of Mr Surfacer.
Next the two parts of the hull were glued together and smaller detail parts attached. At this stage I also fitted the body of a driver figure, minus head, firmly into position. The whole hull and turret assemblies were then primed with Mr Surfacer 1000, thinned with cellulose thinner, and sprayed on with an old airbrush. This added a further fine texture to model, which would hopefully look good under layers of paint and weathering. Everything then got a coat of Tamiya Olive Drab.
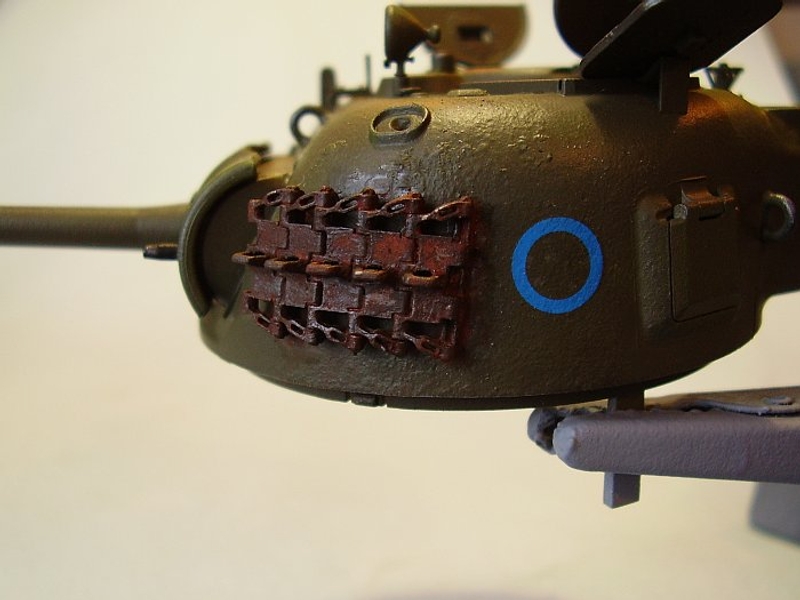
The suspension assemblies were built up and painted then given a wash of black oil paint before attaching them to the hull. On the left hand turret cheek I decided to add some track as appliqué armour. I had several links of Fruils metal track for the Panzer IV left over from a previous build and liked the idea of a workshop crew making use of parts of an enemy Tank to protect the Sherman crew. A rough, heavy rust layer was created on the tracks by mixing a dark orange/red colour from oil paints, whilst this was still wet Mig Pigment powder, Rust, was dabbed onto it to give a very flaky appearance.
At this point the kits decals were applied, the large Blue numbers on the hull sides and blue circles on the turret providing a welcome splash of colour to an, otherwise plain, OD scheme. Decals were sealed with a good coat of flat acrylic varnish in preparation for oil washes.


About the Author

FROM: ENGLAND - SOUTH WEST, UNITED KINGDOM
Born in the Happy, Hippy days of 1967. Now living in South Devon, England. Likes : Allied AFVs, Fast Motorcycles, Real Ale. Dislikes : Breaking Bones, rivet counters.
Comments

Hmmmm...Why does it say I'm not authorized to see that article?
Rick
DEC 08, 2008 - 03:53 PM

sorry, a problem has arisen with the banner for the home page ( it went for a walk... o.k., I forgot... ) As soon as I get it sorted out, the feature will be back up.
Henk
DEC 08, 2008 - 04:03 PM


Hi Paul,
Thanks for the article, interesting insight into the water. Grand looking Firefly and a nice scene.
Overall a very neat build. I'm not sure about the water spilling off the front of the tracks, depending on which angle you view it from it lools a little thick, ie too much as that part of the tank is well out of the water if you know what I mean?
Still a very cleaver use of the clingfilm, and lots off food for thought.
Figures and general setting are great and I'd be happy if my 1st/2nd or 3rd lol, lol efforts with water turn out half as good.
Did you consider any submerged rocks, mud, wood etc under the water or paint any alternative shades below? Water certainly poses a big challenge, very useful read indeed and always great to see a Commonwealth kit.
Cheers
Al
DEC 12, 2008 - 08:45 PM

Sorry for taking so long to answer, I'm new to getting articles posted here and didn't realise anyone had commented on it
Anyway in answer, Alan, i agree the water on the front of the tracks looks a bit thick, it comes from making several attempts to get it to look right. Too much fiddling and too many layers make it a little bulky, i'll know better next time. I had planned on some rocks iand details in the bottom of the river, and there are actually weeds and things there but once the rippled layer went on they became almost invisible.
Thanks for the positive feed back.
Paul
JAN 07, 2009 - 09:10 AM
Copyright ©2021 by Paul Chatfield. Images and/or videos also by copyright holder unless otherwise noted. The views and opinions expressed herein are solely the views and opinions of the authors and/or contributors to this Web site and do not necessarily represent the views and/or opinions of Armorama, KitMaker Network, or Silver Star Enterrpises. All rights reserved. Originally published on: 2008-12-08 00:00:00. Unique Reads: 26082

WEB HOSTING BY


Copyright ©2021 Armorama and Kitmaker Network, a subsidiary of Silver Star Enterprises
All Rights Reserved. Please read our Conditions of Use and Privacy Policy.
All Rights Reserved. Please read our Conditions of Use and Privacy Policy.