

1⁄35Tasca Sherman Firefly VC
8
Comments
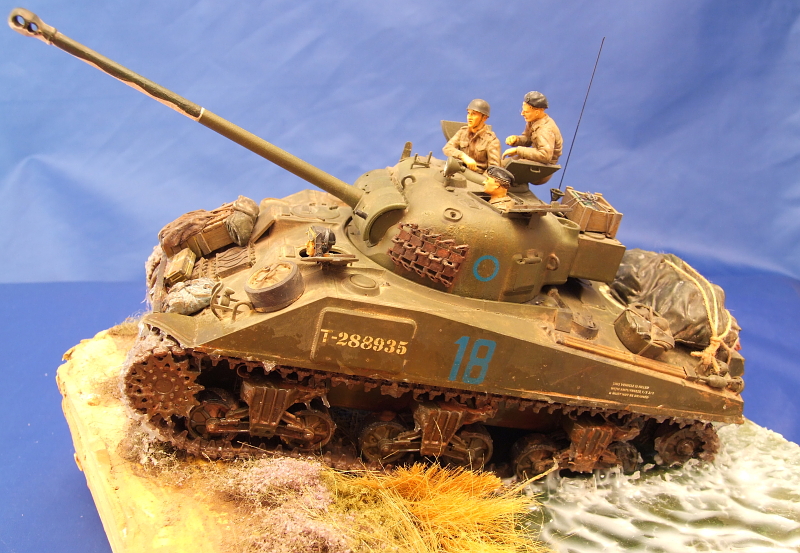
The Wetter, The Better.
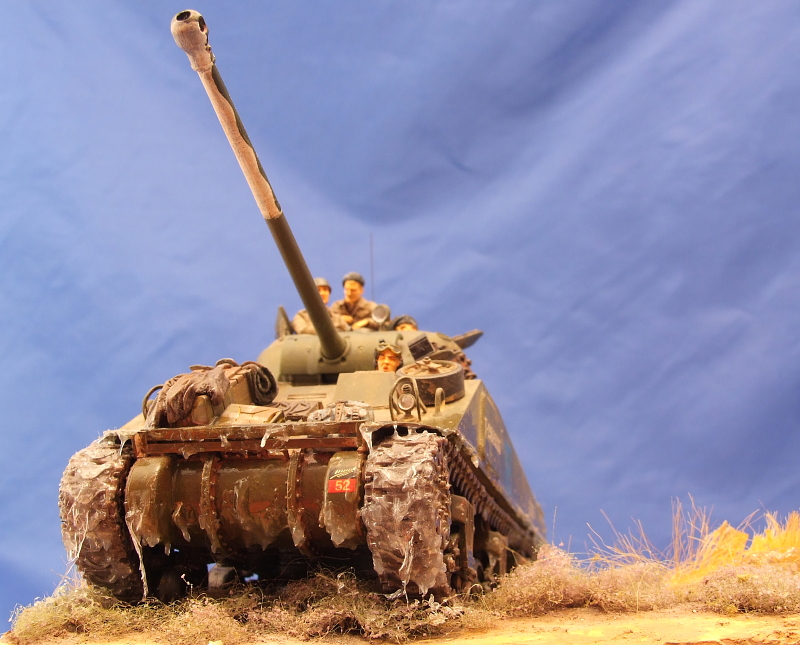
Right, with the model done, there was no putting it off any longer, I had to do the water. I didnt want a calm still stream, I wanted it all churned up full of waves and splashes. I also wanted water dripping and running off of the Tank and tracks as it climbed out of the stream and up a shallow bank.First for the easy bit, I made a small square scene with a flat bed leading to a small slope with reeds and some foliage. The Base was made from a block of polystyrene coved in plaster and the foliage came from Woodland Scenics.
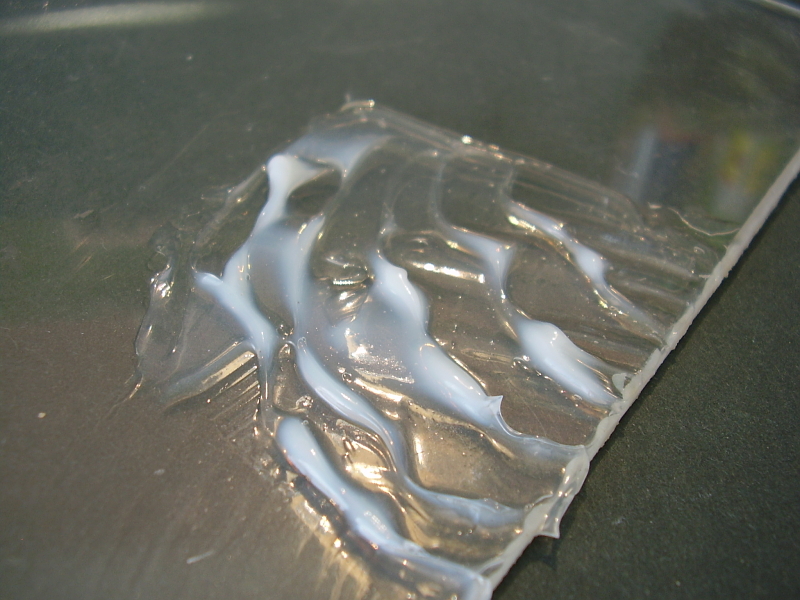
I had never used Vallejos water effect products before so I decided to experiment with them before committing myself to sealing the tank in with them. I used two different Vallejo products for the water. For the solid lower part of the stream I used Still Water which is a clear pourable liquid. Although I believed this would be fairly straight forward to use I still tried it out before using it on the scene. I poured a small amount into a coffee jar lid, about 5mm deep, and left it to see how well it would set. Although the instructions said setting times would be around 24 hours I found at this depth it took several days to set. Trying a shallower depth I found 1mm-2mm would set in around 24-48 hours.
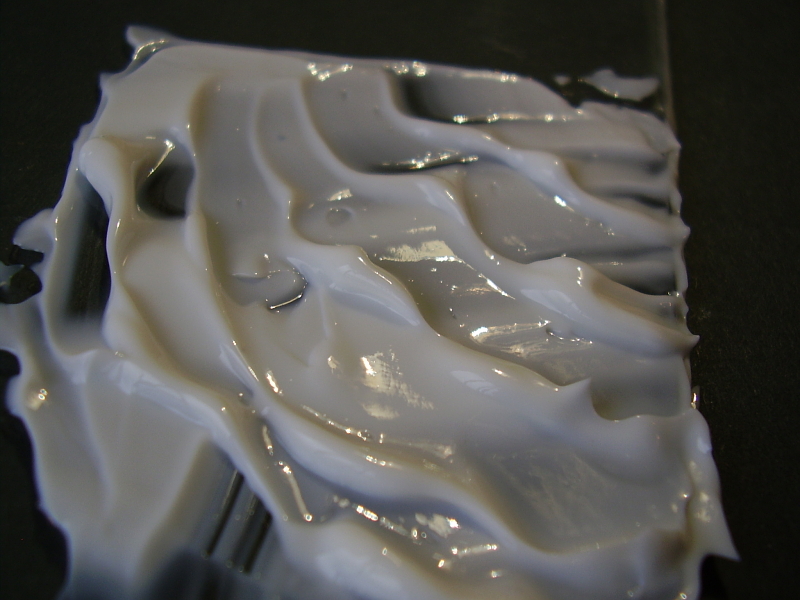
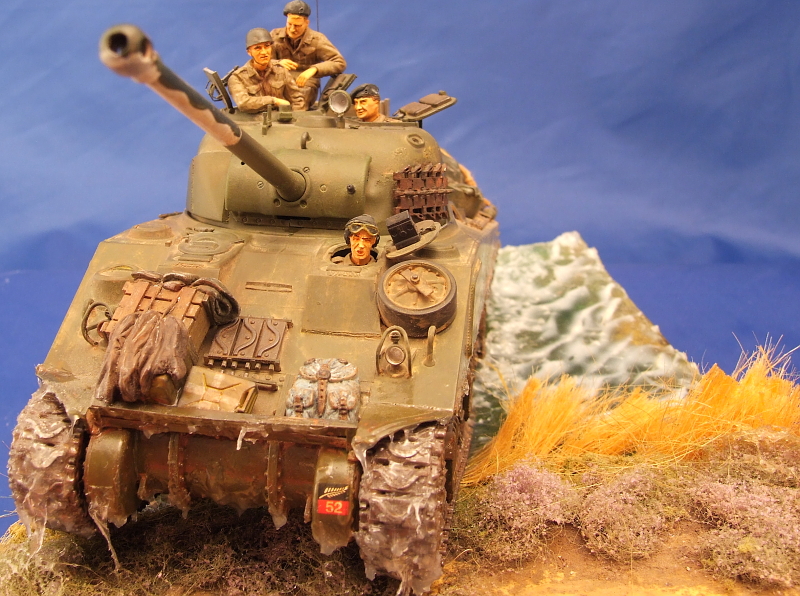
At the same time I was experimenting with Water Effects which would be used to make the moving parts of the water on the surface and around the tracks of the tank. This product has the appearance of a white creamy substance in the jar. I wanted to see how this handled and dried so I spread some waves onto a piece of clear Perspex with a palette knife and left it. After 24 hours it was dry to the touch but still quite opaque in thicker parts. After a couple of days it was mostly transparent, with just the tops of the waves still opaque and white in appearance. This was OK as I now knew smaller ripples and splashes could be put around the tank and the would eventually dry clear, whilst larger waves and slashes would a have the realistic look of foaming, churned up white water where appropriate.
The model was placed in position on the river bank and, with the turret removed, a heavy book was gently rested on the model to depress the suspension in to the contours of the base. To prevent any spring back thick CA was flowed between the suspension arms and the body of the units. The whole thing was then left for 24 hours to set solid. The blobs of clear glue would not be visible once the water was around them.
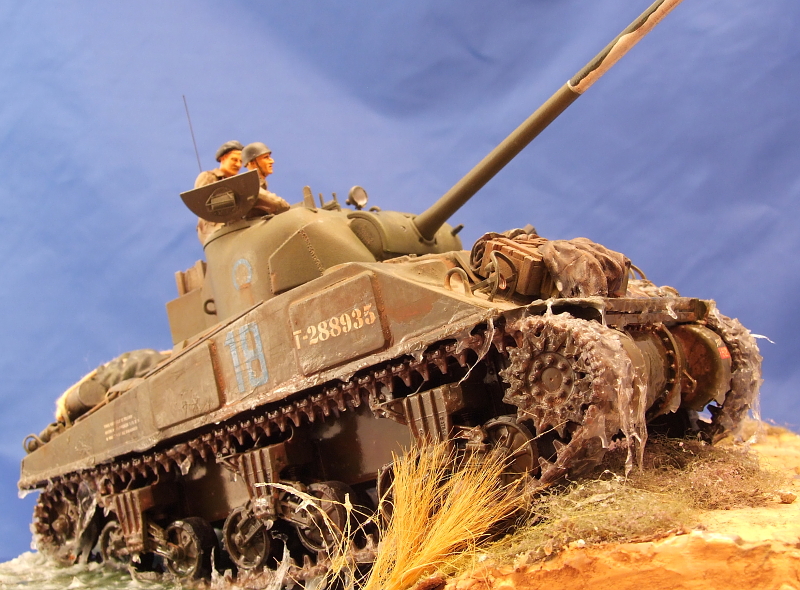
With the model in place thin Perspex sheet was fixed to three sides of the base to help hold the Still Water while it set. Layers of Still were gradually built up about 1-1.5mm at a time and left until fully set before adding the next layer. This process took about 4 or 5 evenings until I was happy with the depth I had. Everything was now put aside for a week to set completely.
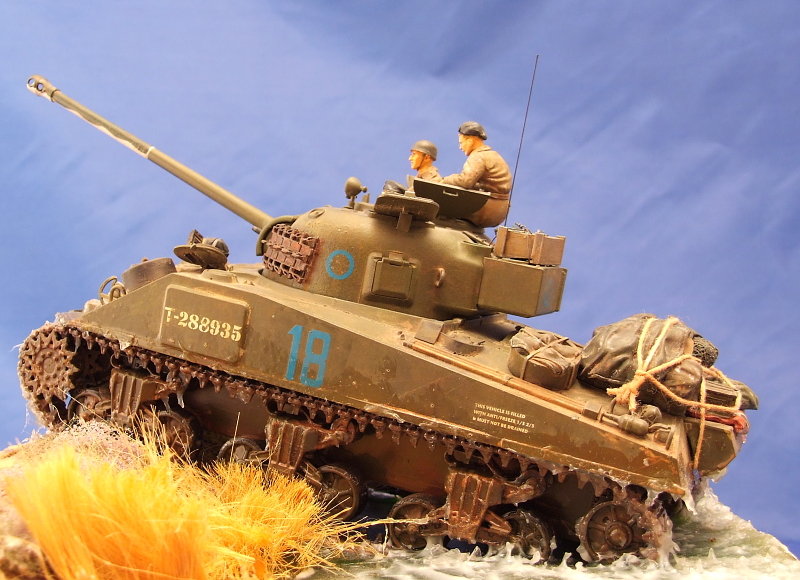
Vallejos Still Water, once set, is never fully hard, but is more like a clear rubber type compound. This allows it to be cut fairly easily. With the water completely set it was separated from the sheets that had held it in place by a large, sharp kitchen knife. (Yes Dear, thats where it disappeared to!)
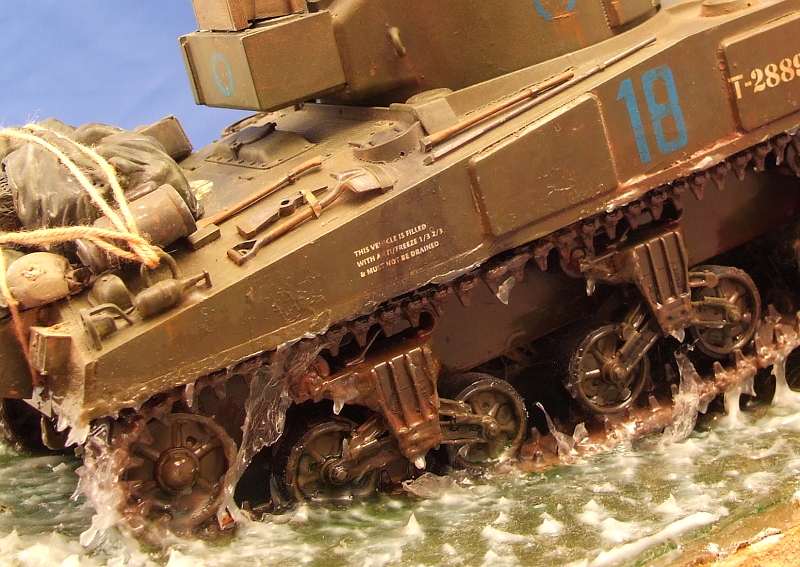
With the solid part done I set about attempting to recreate moving, splashing water, with Vallejos Water Effects. Small waves and ripples were spread across the surface of the still water and drips and splashes put around the Shermans tracks and running gear. The following day when it had dried to a almost completely clear film I was fairly happy with how it was going but felt it was a little too clear. I put thicker deeper waves and splashes across the previous days work and tried making splashes and drip by teasing the white gel into shapes with the tip of a Swann Morton blade.
Up the front and sides of the hull a wet look was made by brushing on a thick layer of Gloss varnish. I didnt use normal modelling varnish but a thicker DIY, water based, clear wood varnish as this has more body than thinner modelling varnishes. This varnish was generously brushed over all of the track and suspension parts and any part of the lower hull that hadnt been made to look wet by the Vallejo products.
When all was set and done I felt the scene looked OK, but wanted a more fluid look to the water running off of the tracks. I tried making thinner drips of the Water Effects gel, but they always broke off when they got really thin. I set the model aside for a good few months and worked on other things, while I tried to come up with a solution I was happy with.
Eureka! Running Water!
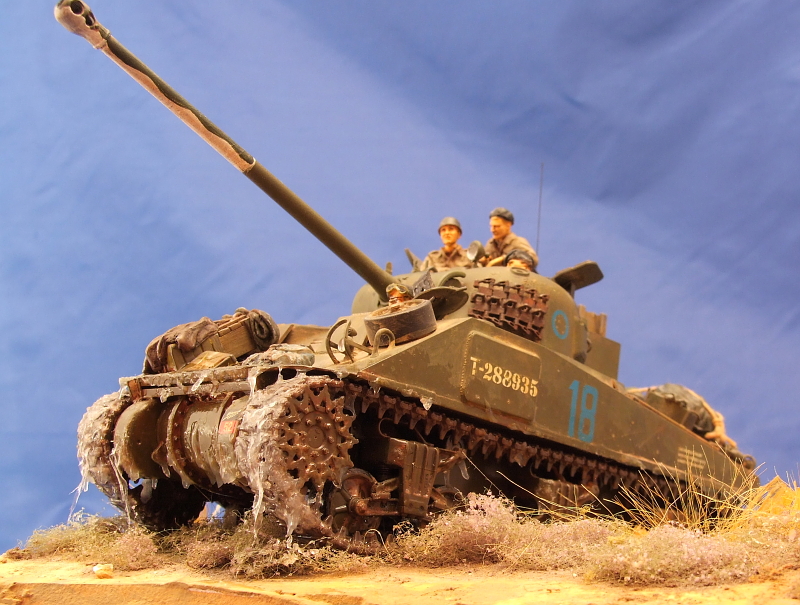
Finally, whilst making a display base for a shop that sold Fairy Figurines, I found the answer to my problem. On one base that I was making for the shop was a little scene with a stream running through it. Again I used Vallejo to make the water to good effect. In one part of the scene the Shop owner wanted a small waterfall. Between us we pondered how to get the look of running water as we tried different ideas. The Eureka! moment came when I was uncovering a palette with oil paints on it. I had sealed the paints the day before with cling film to stop them setting to quickly. Cling film! That was it! I finished the little waterfall with cling film held in place with a coat of clear varnish.Back to the Firefly scene and a few small pieces of cling film were attached to the tracks and front of the transmission cover with Varnish. A few extra splashes in the stream and that was it, I was finally happy with the water and 17 months after opening the box I could happily say The Tasca Firefly was done.

About the Author


FROM: ENGLAND - SOUTH WEST, UNITED KINGDOM
Born in the Happy, Hippy days of 1967. Now living in South Devon, England. Likes : Allied AFVs, Fast Motorcycles, Real Ale. Dislikes : Breaking Bones, rivet counters.
Comments

Hmmmm...Why does it say I'm not authorized to see that article?
Rick
DEC 08, 2008 - 03:53 PM

sorry, a problem has arisen with the banner for the home page ( it went for a walk... o.k., I forgot... ) As soon as I get it sorted out, the feature will be back up.
Henk
DEC 08, 2008 - 04:03 PM


Hi Paul,
Thanks for the article, interesting insight into the water. Grand looking Firefly and a nice scene.
Overall a very neat build. I'm not sure about the water spilling off the front of the tracks, depending on which angle you view it from it lools a little thick, ie too much as that part of the tank is well out of the water if you know what I mean?
Still a very cleaver use of the clingfilm, and lots off food for thought.
Figures and general setting are great and I'd be happy if my 1st/2nd or 3rd lol, lol efforts with water turn out half as good.
Did you consider any submerged rocks, mud, wood etc under the water or paint any alternative shades below? Water certainly poses a big challenge, very useful read indeed and always great to see a Commonwealth kit.
Cheers
Al
DEC 12, 2008 - 08:45 PM

Sorry for taking so long to answer, I'm new to getting articles posted here and didn't realise anyone had commented on it
Anyway in answer, Alan, i agree the water on the front of the tracks looks a bit thick, it comes from making several attempts to get it to look right. Too much fiddling and too many layers make it a little bulky, i'll know better next time. I had planned on some rocks iand details in the bottom of the river, and there are actually weeds and things there but once the rippled layer went on they became almost invisible.
Thanks for the positive feed back.
Paul
JAN 07, 2009 - 09:10 AM
Copyright ©2021 by Paul Chatfield. Images and/or videos also by copyright holder unless otherwise noted. The views and opinions expressed herein are solely the views and opinions of the authors and/or contributors to this Web site and do not necessarily represent the views and/or opinions of Armorama, KitMaker Network, or Silver Star Enterrpises. All rights reserved. Originally published on: 2008-12-08 00:00:00. Unique Reads: 26082

WEB HOSTING BY


Copyright ©2021 Armorama and Kitmaker Network, a subsidiary of Silver Star Enterprises
All Rights Reserved. Please read our Conditions of Use and Privacy Policy.
All Rights Reserved. Please read our Conditions of Use and Privacy Policy.