1⁄35
In-Box Preview: New Paint
The Kit : The Resin Base |
|
|
The first thing I unwrapped, was the resin
base.
The square base depicts a small street scene with a small
piece of the road and a normal sized sidewalk. The solid resin base measures
7,7 x 7,7 centimeters (3" x 3") and is casted in a mint green
colored resin.
|
The base is absolutely free of air bubbles and has nice sharp edges. Very,
very little flash can be detected and a quick sanding of the sides is
really all that it needs.
Both the sidewalk and the street have an excellent structure. The "stones"
that are used, are excellent to represent the WWII streets, but also any
other era during the last hundred years or so.
|
The Kit : The Resin Wall |
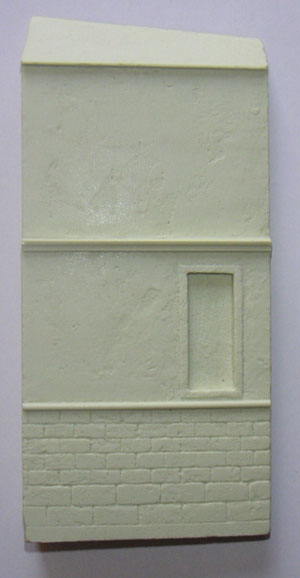
The second part that came out of the box,
was the resin wall.
The wall is also casted in a mint green color and is,
since it's a solid resin piece, quite heavy. It offers almost the same
quality as the base does, in other words, it's almost free of air bubbles.
Am I trying to say that this piece does have air bubbles then...Yes,
I do, but the two or three bubbles I noticed where so tiny that I had
to use a magnifying glass to find them. Regarding the two or three tiny
bubbles, I still consider this part as "Very High Quality".
The wall measures 7,7 x 17 centimeters ( 3" x 6.7")
and at the thickest point it is 2 centimeters (0.8") thick.
The front side of the wall is, as you can see on the
picture on the right, "divided" into three parts, a bottom-,
middle, and top part.
The bottom part depicts the stones where the building
is built on, while the middle and top parts show the worn off plastered
walls that are so common in some parts of the world.
|
|
The stones, in the bottom part, are carved very well. They have a real
natural look and the plaster on the upper parts of the building really
looks to be wearing off. This is beautifully casted in our model. I really
love this part of our kit and I must admit that, when I examined the piece,
I wanted to start building and painting it right away
|
When you assemble the wall to the
base, you'll find that they fit very well and that there are no
gaps between them. The only thing you need is a bit of super-, or
epoxy glue to make this work. For some extra strength you can drill
some holes in both parts and insert some metal rod, but since the
bonding surface is large enough, I really don't think that's necessary.
My conclusion about the resin pieces can only be
that they are beautifully detailed items. They are the main ingredients
to make an excellent vignette, even without the use of the other
goodies that are reviewed next. |
|
About the Author
About Danny Wennekes (Eagle)
I started modeling at the age of 10. When I was 22 my work forced me to quit the hobby until I returned to the modeling frontline at the age of 36.
Nowadays I model dioramas, but in the land of modeling I admire the figure painters.... so skilled and most of them are great guys too....
My favo...
Copyright ©2021 by Danny Wennekes. Images and/or videos also by copyright holder unless otherwise noted. The views and opinions expressed herein are solely the views and opinions of the authors and/or contributors to this Web site and do not necessarily represent the views and/or opinions of Armorama, KitMaker Network, or Silver Star Enterrpises. All rights reserved. Originally published on: 2004-03-30 00:00:00. Unique Reads: 12462


