

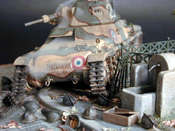
1⁄35Defeat of France, 1940
5
Comments
The Base
The base for the vignette is MPD-011 Cobblestone Corner. It measures approximately 8 x 8 and it allows for a comfortable fit of the French tank. It was primed with VHT Aerosol grey primer and various colors of ceramic paints were applied to get the weathered cobblestone look to the street sections. Some finely ground foam was applied in the grass areas with a wash of thinned white glue to act as the adhesive. The tree surround was painted a dark rust color and highlighted with graphite.The well is MPD-010 and it was painted in the same manner as the base. Just mix a warm grey color that looks right and weather the surfaces with some darker washes and some green algae stain.
The fence railing is lasercut card with small metal balls added on top. The fence is an experiment and not commercially available. It was painted a dark green and then washed with a little lighter shade to make it look a little more substantial. (pic5)
The Tree
The tree is a piece of Manzanita with bark added from putty. The foliage is made from the small dried flowers form the craft store. There are about six areas where I added even finer looking branches from another variety of dried flower to fill in some spots and make the tree more interesting. The whole assembled tree was airbrushed with a brown/grey color and then the leaves were airbrushed with a medium green. The branches that were inevitably coated in some green, were then washed with the cel paint by hand to get the color back to the brown/grey. This takes a little time but the thinned paint will cover fairly easily any place you can reach. The leaves were then highlighted with a few shades of green and orange spotted around to keep your eye moving. The process took some time but it wasnt overwhelming.Assembly of the Components
A hole was drilled in the middle of the tree surround and another up into the base of the tree. A small eyehook was then screwed into the tree through the hole in the base. This allows the tree to actually rotate and be pinched tight to the base without the need for glue. The fence was placed by drilling small holes and gluing the posts in the holes. The well was glued directly to the base.The tank was positioned by drilling holes in two places of the hull and the base and bolting it to the base. The opening for the smoke was drilled out of the hull and the base and a piece of plastic tube was inserted to create a smokestack of sorts. (pic6)
The Smoke
The smoke effect was accomplished by using a smoke unit for model railroads. The unit I purchased is made by SEUTHE-SCHLEY GMBH. I dont know anything about these units but this one seemed to be very compact and very adaptable.This is the area I alluded to that I have no experience in and the task of getting the smoke to work was intimidating. In order to make use of this unit, you need to be able to solder a little and know/learn a little something about electricity and making a circuit. In my case, I had help from a friend to get me set up to create the electrical circuit. I think someone being helpful at the electronics store will also work and after the cost of the smoke unit, the rest of the components are very inexpensive.
I constructed a base from poplar scraps that would conform to my cobblestone perimeter and also be deep enough to enclose the smoke unit and batteries.
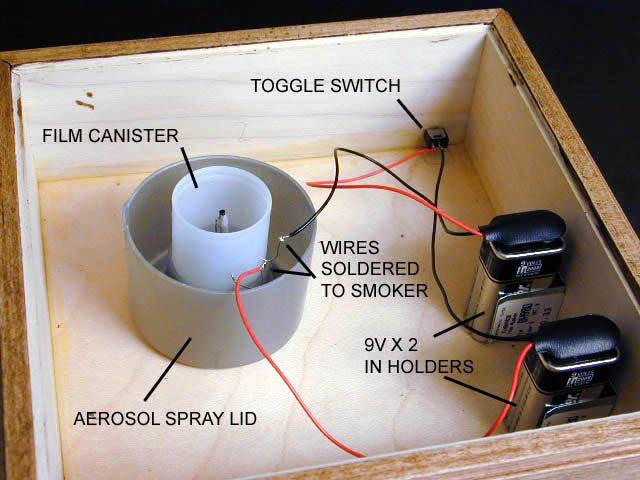
I purchased two battery holders for 9-volt batteries, two battery cap terminals and a toggle switch. The smoke unit is captured in a plastic film canister by drilling a couple of small holes in the side and passing the wires through, letting the device hang in the middle of the canister. The film canister was set in the middle of an upturned aerosol paint can lid. This was bolted to the bottom of the base box. This worked out well because it gave a solid base to keep the smoke fluid and another reservoir in case of spilling when being moved. This setup of the film canister and aerosol can lid is also god for holding custom mixed of paints if the lid is screwed to a board on your tabletop. Its very hard to spill the paint and you can use the reservoir for water or thinner if you are doing washes as an example. The circuit was created as shown in the photo and the wires just needed to be twisted together and soldered to make sure. The toggle was mounted in the side of the base after drilling a hole and pressing it tightly in. (pic7)
The smoke unit instructions show how the circuit is connected in order for the smoke to happen. The best effect is obtained using a power source of 16 volts but I was able to get some smoke with one 9-volt battery. It was simple (for me) to add another battery and 18 volts is close enough to get a good plume of smoke. Trying to reproduce this, larger or smaller batteries could be used through some experimenting.
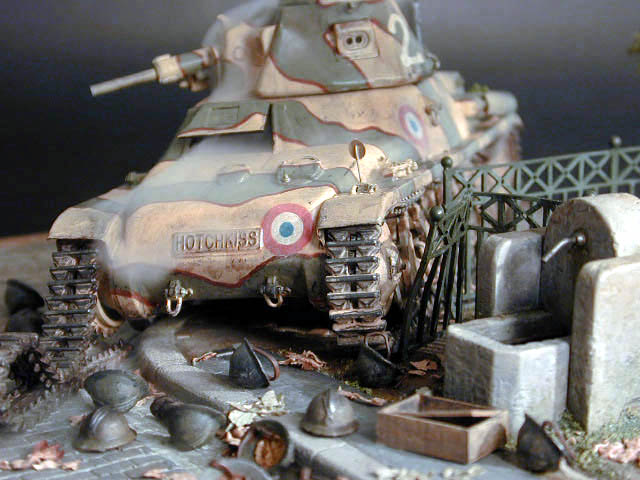
The smoke unit works by heating the special oil and creating steam. Everyone I asked told me I couldnt color it to make it darker but I did find out you can buy it with different scents if that helps anybody. The steam rises and actually gives the surfaces of the tank a slight sheen as it settles. This makes it look light a light rain has fallen, so its not terrible. I did notice that the sheen seems to evaporate eventually so it really is not a problem.
 Pic 5
Pic 5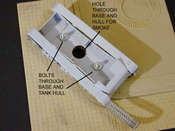 Pic 6
Pic 6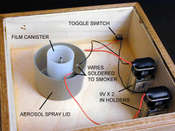 Pic 7
Pic 7

About the Author


FROM: CALIFORNIA, UNITED STATES
I work as a full time model maker and painter while trying to develop my own business providing diorama products to other modelers. I am happily married and live in Ventura County, California.
Comments

Great article Mike. The layout looks terrific with or without the smoke. I like the "drop everything and run" look of the scene. Well done.
I must say you don't often see a tank with a semi-gloss finish, but here, on the Hotchkiss, it looks very realistic as opposed to being dead flat. It captures the steel of the tank.
Thanks for sharing that with us.
MAY 16, 2004 - 01:31 PM

It was indeed an interesting article. It was a good idea to use the smoke generator and LED's to simulate fire and smoke.
MAY 16, 2004 - 06:26 PM

Great article indeed!
The effects are something to cheer up the scene!
Congratulations!
MAY 17, 2004 - 02:36 AM

Mike,
thanks for this excellent article. I think you did another great job. I'm very much impressed with the tree, it looks so darn real.
again, great article ! Thanks.
MAY 20, 2004 - 04:48 AM

A terrific job on both the diorama and the article. The smoke generator was a great effect and very creative.
MAY 20, 2004 - 06:50 AM
Copyright ©2021 by Mike Bishop. Images and/or videos also by copyright holder unless otherwise noted. The views and opinions expressed herein are solely the views and opinions of the authors and/or contributors to this Web site and do not necessarily represent the views and/or opinions of Armorama, KitMaker Network, or Silver Star Enterrpises. All rights reserved. Originally published on: 2004-05-16 00:00:00. Unique Reads: 14342

WEB HOSTING BY


Copyright ©2021 Armorama and Kitmaker Network, a subsidiary of Silver Star Enterprises
All Rights Reserved. Please read our Conditions of Use and Privacy Policy.
All Rights Reserved. Please read our Conditions of Use and Privacy Policy.