

1⁄35Brave Souls - Poland Fall 1944
13
Comments
Groundwork
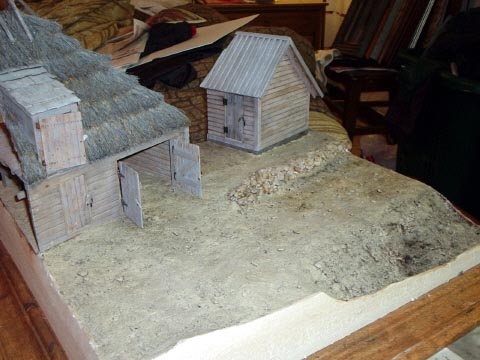
I wanted various heights for this diorama base. The base was built up using insulation foam then covered with celluclay. Over this I sprinkled cat litter and sand and pressed this into the clay. Then I painted the groundwork with brown oxide craft acrylic paint. Over this I painted floquil earth paint then gave it a wash of burnt sienna mixed with raw umber. Then dry brushed again with the floquil earth paint. I then picked out the cat litter rocks and painted it with a medium gray. Then dry brushed them with lighter shades of gray.So I planned the barn being at the highest point and a road going in front of the barn sloping downwards across the scene and a ravine at the front. Along the road I had originally planned a stone wall (which can be seen in some of the early photos). But after much debate, I came up with a better solution. I decided on a different style wall or fence as it were and a granary behind it. Again I used straight forward construction and finished the granary in the same manner I did the barn. I also decided to keep a stone retaining wall between the farmyard and the road.
The images down the right side of the screen are the groundwork related images.
Composition Details - Wattled Fences/Trees
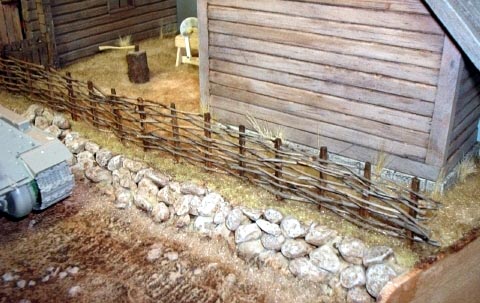
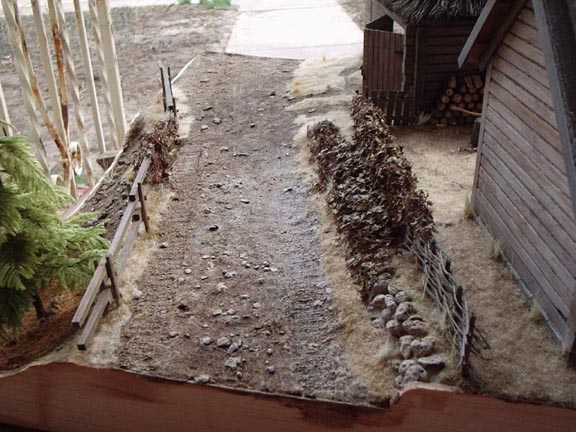
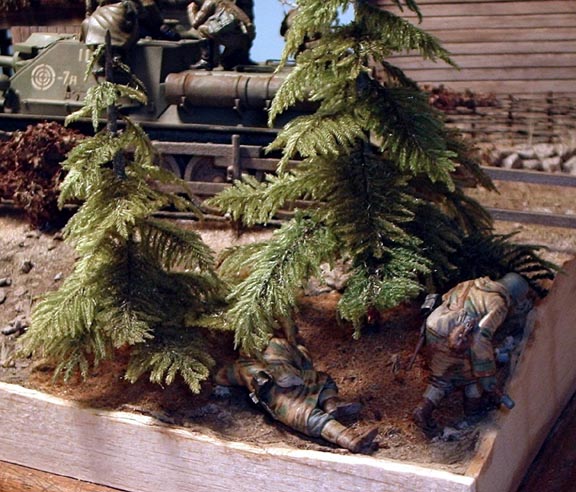
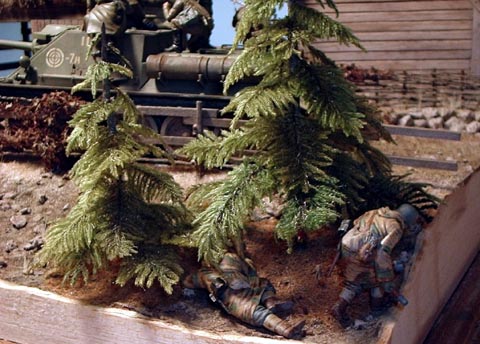
I decided on a wattled fence to further separate the road from the yard. This was made by drilling holes in the base and using square toothpicks for the posts and tumble weed branches for the weave. I also wanted a front fence to separate the road from the ravine, and this was accomplished using the same toothpicks for posts and square basswood stock for the beams. I then put down woodland scenics static grass. I used wild honey and burnt grass. The tall grasses are also woodland scenics. The ivy is made with a scrub pad that was painted brown. I took the idea for a Hudson and Allen ivy pack I picked up awhile backAt this time I decided on a couple of conifer trees for the front of the diorama. I used Bragdon Enterprises conifer branches which are small ferns. These are really cool even including little seeds underneath the branches that look like pine cones. Then I shaped two dowels to make the trunks. I then took a pin drill and drilled holes into the trunk and then glued the branches into the holes. Then, I took the long woodland scenics grass and clipped it with the scissors to the appropriate length to cover under the trees with fallen needles. Then I did a wash of burnt sienna to the needles and removed a few of the pine cones from some of the extra branches to place on under the branches as fallen pine cones.


About the Author


FROM: NEBRASKA, UNITED STATES
When I was a kid I built my first tank at around 10 years old it was a 1/48 scale tamiya m60 motorized. I did a few 1/48 bandai kits as well. then I jumped to model cars for the next few years, around the age of 15 I started back into armor and mostly did the 1/32 monogram stuff. I quit modeling whe...
Comments

This is truly an outstanding project. Attention to details is just incredible. Story line and execution are first class. Bravo!
JUN 05, 2004 - 05:51 AM

From the very first posts regarding this diorama, we have all been drawn to it, wanting more and more. Ever anxious for the next picture, the next post, the next surprise that Kevin had to offer us. And now its finished. And can i just say WOW!! This is truely an amazing work of art. The detail and vision of this piece is one that is rarely seen. I believe that it is truely a prize winning diorama.
I myself had the great pleasure of seeing the diorama in person a few weekends ago. And i would like to let all of you know, as great as the pictures are, they do not do the piece justice. The camera definately does not capture the full effect of the diorama. I was in awe. Excellent work Kevin. I love ya and am very proud of you.
JUN 05, 2004 - 06:08 AM

awesome diorama Kevin. congrats and thanks a lot for sharing all steps with us and for the final article.
best regards
JUN 05, 2004 - 10:12 AM

I really would like to thank everyone that helped out with this dio, also everyone for just having a look, I appreciated all comments and criticisms. I would like to offer a special thanks to Scott for putting it all together so brilliantly and to Mary for putting up with me thru it all. Now its off to the next one. I'll keep you posted. Cheers Kevin
JUN 05, 2004 - 08:51 PM

An excellent feature ! Wonderful modeling in combination with good photography and great writing capabilities !
Thanks for sharing this with us !
JUN 05, 2004 - 09:02 PM

Kevin... thanks for sharing your great diorama with us. You did a great job on it... and you should be proud of the work you have created.
I have followed your posts on this dio... and it has been a pleasure for me to watch your progress.
Once again... my hat is off to you.
Jim
JUN 06, 2004 - 02:18 AM

Bravo! Excellent! Thank you for sharing it with us...I really like the detail on how the buildings were constructed...
JUN 06, 2004 - 12:39 PM

A truly outstanding and inspiring work, one I followed with tremendous interest throughout the building process. I look forward to seeing your next piece.
Keith
JUN 07, 2004 - 02:28 AM
Kevin,
What can I say but wow! I continue to be awe struck by the work on the barn and out buildings. The thatch work is incredible. I'm inspired ! I've read your article over at least three times and continue to be amazed.
Best wishes
Steve
JUN 13, 2004 - 01:43 PM
Again thanks guys for the comments and kind words. Rereading the article I realized I was sorta vague with some of the steps during the building of this. If any one has any questions please feel free to ask, and I will be happy to explain in greater detail. Cheers and thanks again Kevin
JUN 13, 2004 - 02:02 PM
Copyright ©2021 by Kevin Gardner. Images and/or videos also by copyright holder unless otherwise noted. The views and opinions expressed herein are solely the views and opinions of the authors and/or contributors to this Web site and do not necessarily represent the views and/or opinions of Armorama, KitMaker Network, or Silver Star Enterrpises. All rights reserved. Originally published on: 2004-06-05 00:00:00. Unique Reads: 22312

WEB HOSTING BY


Copyright ©2021 Armorama and Kitmaker Network, a subsidiary of Silver Star Enterprises
All Rights Reserved. Please read our Conditions of Use and Privacy Policy.
All Rights Reserved. Please read our Conditions of Use and Privacy Policy.