

1⁄35Tasca M4A3E8
13
Comments
stowage and details
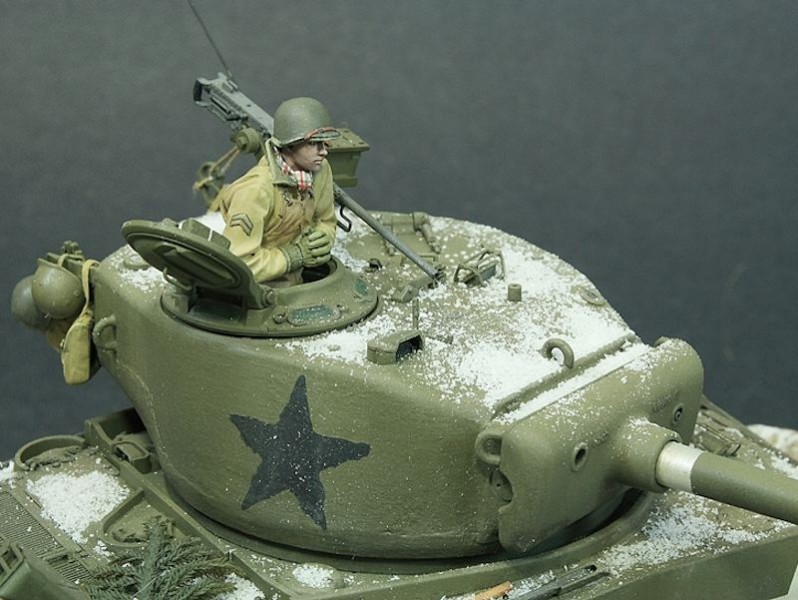
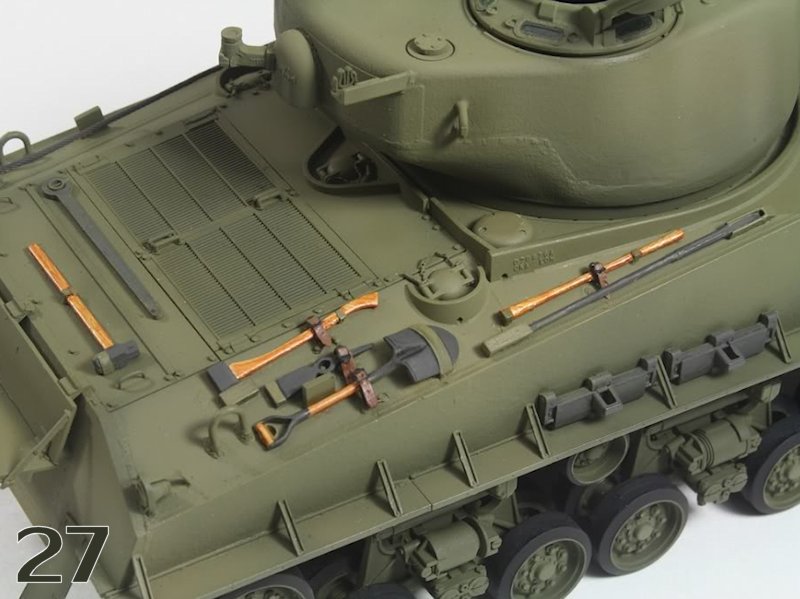
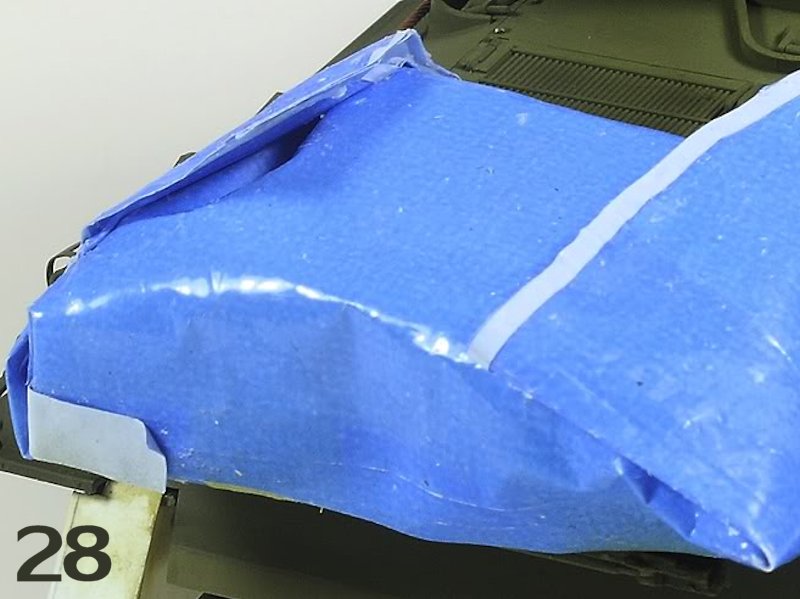
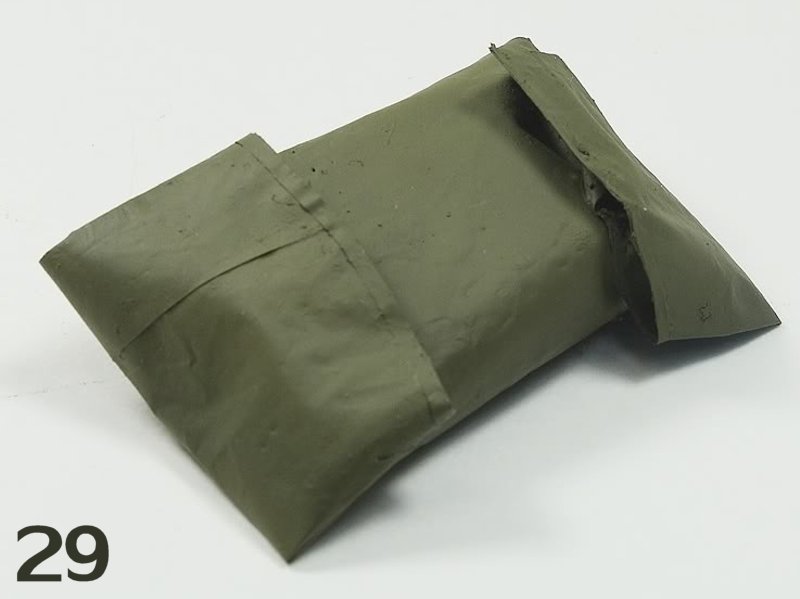
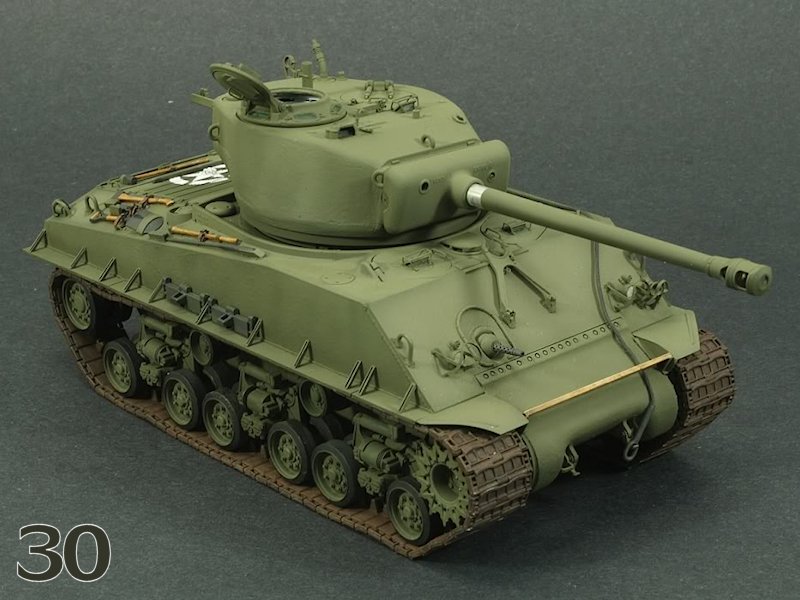
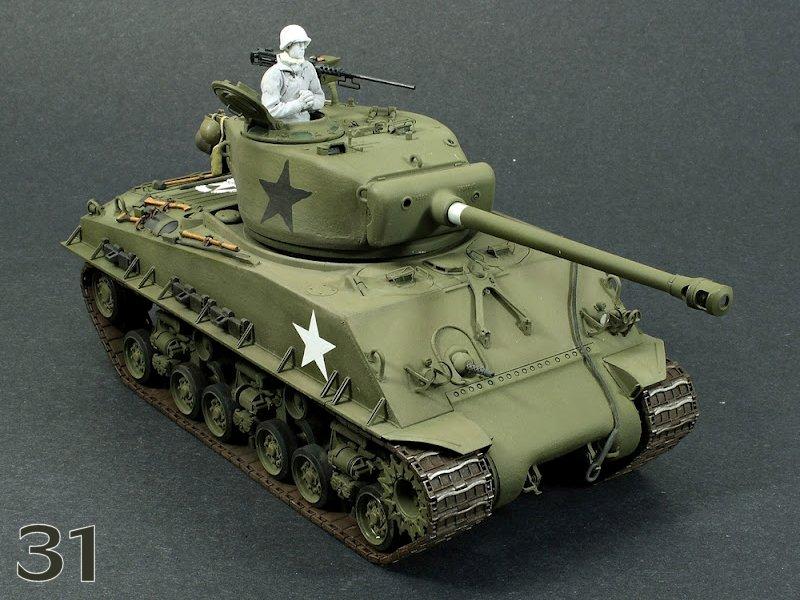
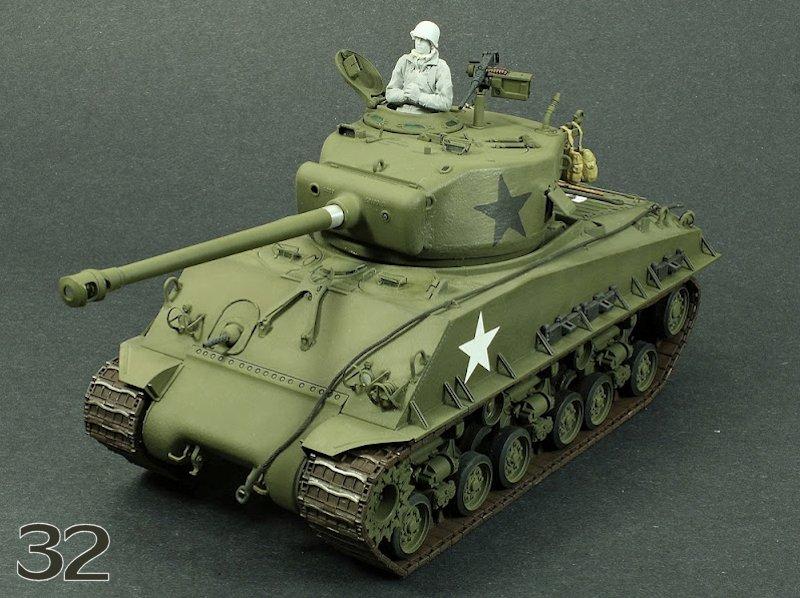
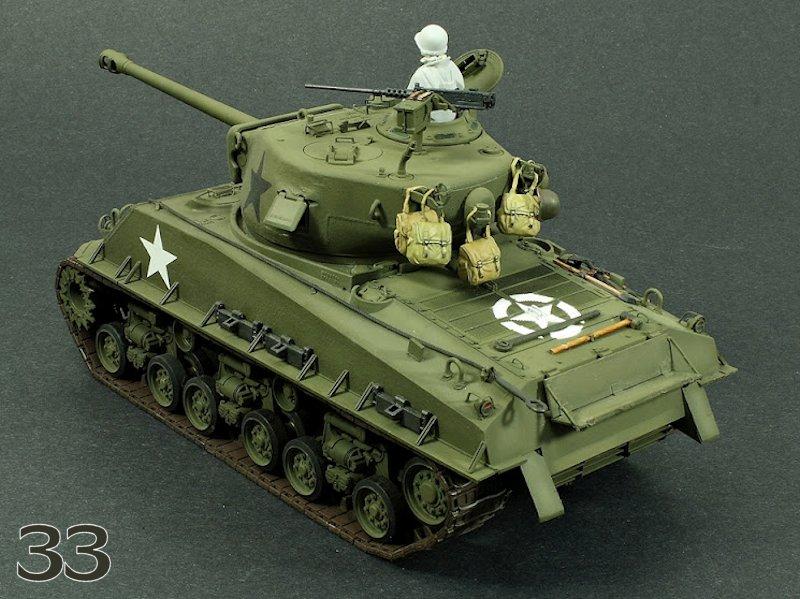
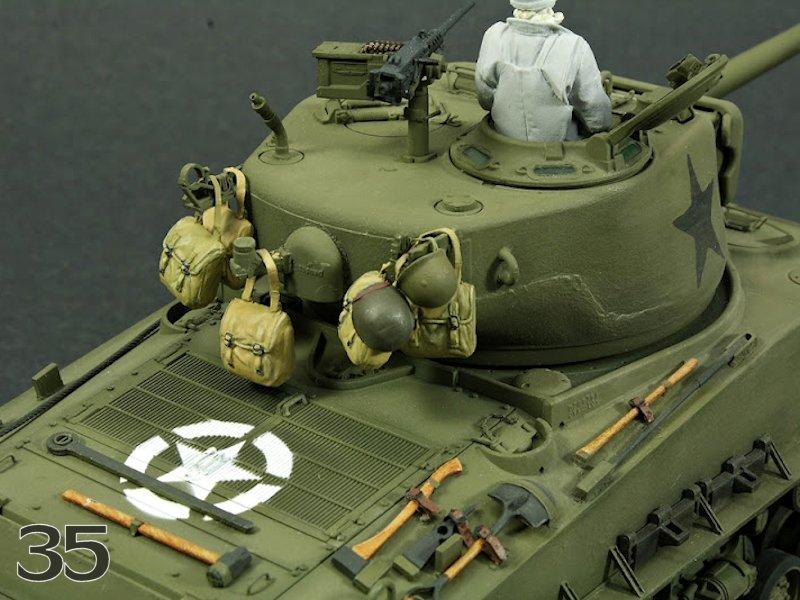
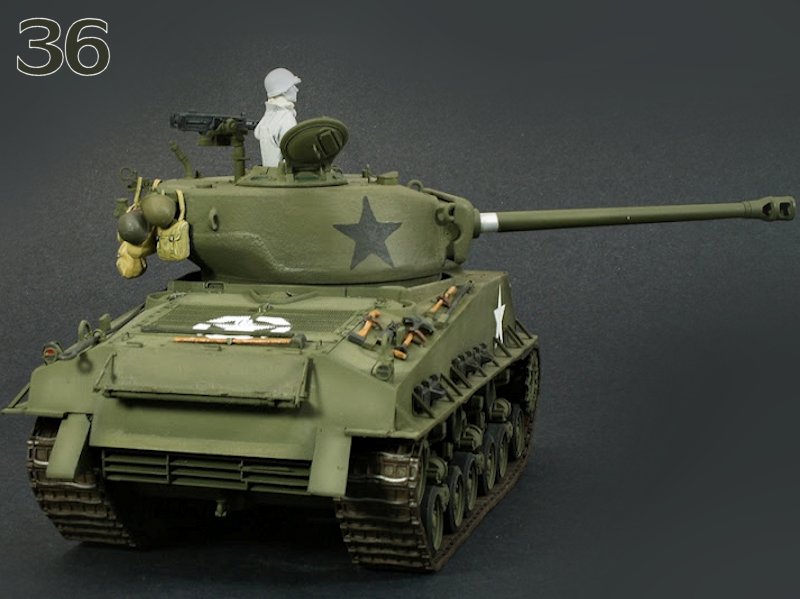
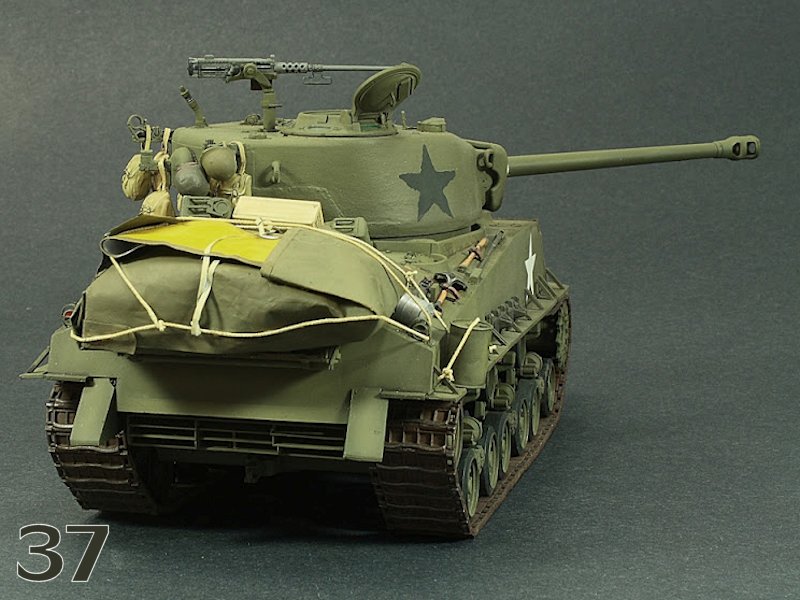
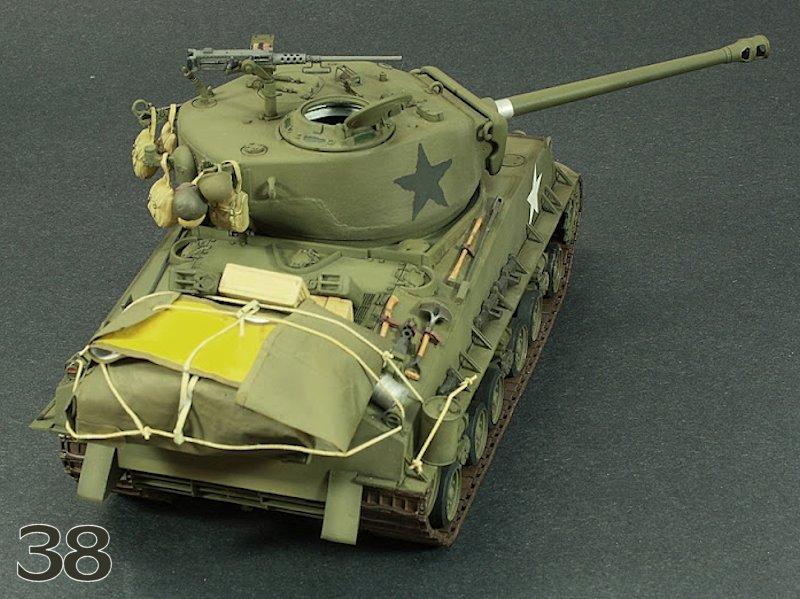
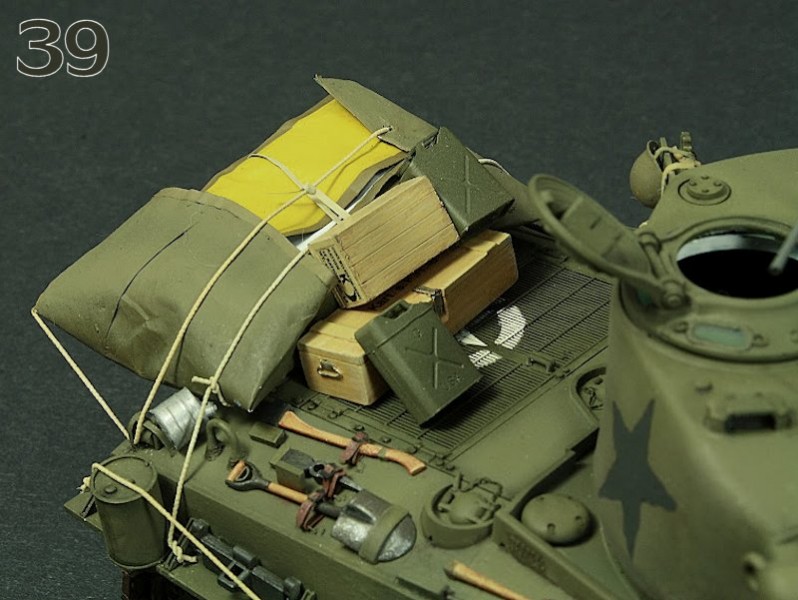
26 27. My reference for the tools and their leather tie down straps was Steve Zaloga's Modelling the M4 Sherman book. I used lead foil and Aber buckles to make the straps which I think look much better than the Formations ones, and this is the reason I didn't use the other Formations tools on the kit. The sledge hammer is supposed to have a leather strap tie down as well, but I didn't add it as would be covered up by the tarpaulin that will go on later. Yes, call me lazy. 28 29. Here we see work on the tarp for the rear stowage of the tank. The tarp looks like a very large one that was laid out flat on the rear deck of the tank, the stowed items would be placed on top, then the tarp would be folded around the stowage and tied down. I had attempted to use Apoxie Sculpt to do this, but couldnt get it to look like the one in my reference photo. Perhaps its just me, but trying to create multiple folds resulted in the Apoxie Sculpt splitting at the edges. I decided instead to use a thick plastic bag to replicate what appears to be a canvas tarp. The kind I used was fairly thick and similar to the bags one gets when buying a pair of shoes or clothes from a store. A zip lock bag would probably do just as well. At any rate, I built it up by laying out some saran wrap (cling film) on the rear deck, adding the stowage and gluing it together with Elmer's white PVA glue. Once dry I removed it and cut my tarp to shape accordingly from the plastic bag. I then laid it out on the rear deck, added the stowage again and proceeded to make my folds. Once it was done and glued together with the white PVA I cut thin strips off some of the bag material and added these to some of the edges of the tarp in order give the look you see in the picture. I then sprayed it with a 60/40 mixture of XF-62/XF-60, again without using primer. I think the thick plastic bag gives a good scale representation of a canvas tarp in terms of the look and shape of the folds in the fabric material. 30. Here the tracks are on, as well as the star on the rear deck. I also added a wooden plank over the final drive for holding stowage, but wasnt too sure if I would keep it there. For the tracks I used a mixture of Vallejo black, silver, gun metal, flat earth as well as the Mig pigments, standard rust, European dust, dry mud, dark mud and Gulf War sand. For the star I used the Eduard stencil set and sprayed it with Tamiya white XF-2. More weathering would be done on the tracks later but I think this was a good start. Something to note is that on this kit the track tension is weak. At this stage I still had to adjust them but it can be done quite easily with the rear idler and drive sprocket; Tasca really thought this through as the tracks and wheels can actually be rotated. Nice. 30 36. I managed to complete the stowage to my satisfaction, having tried to replicate as closely as I could that in my reference picture; I think it turned out OK. For the remainder of the markings, I used the Tasca decals instead of the stencils, as I have had pretty good luck with decals and I assumed the Tasca decals would be as good as their kit. Tasca provide a decal for the painted out National Star which looks just like the one in my reference photo, so in the end it was an easy choice for me. The quality of the decals is excellent and they went on with no problems. I sprayed some Future on the area where I was going to lay them down, then coated them with more Future afterwards, then a matte varnish to finish off. 37 39. The ID panel is made from the same bag material as the canvas tarp. I painted the yellow ID side by first painting it with Vallejo fluorescent yellow, then spraying it a mixture of Tamiya XF-3 Yellow and XF-4 Yellow Green, a colour often used by modellers to do to the yellow/green chromate for aircraft cockpits, wheel wells, etc. The reverse white side was sprayed with Tamiya white whilst the OD border was hand painted in Vallejo Panzer Aces Russian Uniform Green. I painted the K-ration and German artillery shell boxes in the same way that Id paint a figure, by layering on highly diluted acrylic paints. In this case I used various flesh and brown colours from Vallejo, highly diluted in order to give them a bit of grain. Then a wash with Raw Umber oil paint as well as a Vallejo Sepia acrylic wash. Finally, I roughed up the blacked out star on the turret.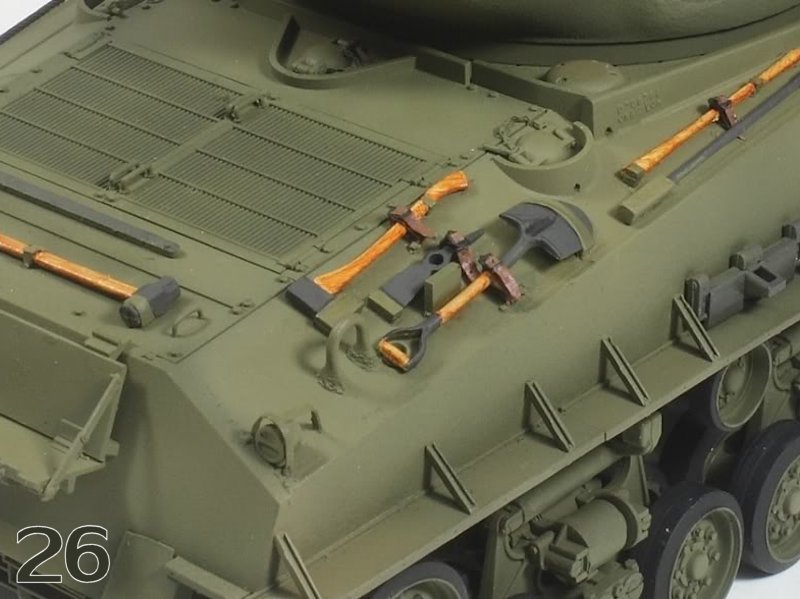

About the Author

Comments
Outstanding job on these vignette David!
What did you used for the grass? It looks very realistic.
JUN 21, 2012 - 09:30 PM

An outstanding piece of work all round, not least in the finished effect. This diorama isn't overcrowded with extraneous stuff, as so many are. You've clearly taken the lesson that "less is more" to heart, with a very salutary effect on the finished result.
Along with Jeremy Hengest above, I'd like to thank you for the exceptionally well-written and -illustrated build log. Also, I second Hengest's suggestion that, if you find this task to your liking, you consider authoring a tutorial on painting 1/35th scale figures. Your Sherman's chilly commander with his colorful scarf and his freezing fingers was all too believable, and almost too realistic!
JUN 22, 2012 - 06:14 AM

Roman:
Thanks very much for having a look at my Sherman project. I am pleased you found it interesting and worthy of your comments.
All the best.
Dave.
Gary:
Thanks so much for commenting on my project. After seeing your excellent work and following your recent build of the Greif I am indeed very grateful for your comments.
Thanks Buddy.
Dave.
Jeremy:
Wow a very big thanks to you for your comments on the build. They are very much appreciated.
With regards to the build I wanted to be as descriptive as I could in order to share what little I know. I want to share my works with others as other do here so that we can all learn from each other and improve our skill set. In that vein if you believe it would be helpful to our community to do a tutorial on figures I shall do it.
Cheers,
David.
Istvan:
Thank you for viewing the build and taking the time to post your comments.
The material I used is called Wildgras from Heki. Heki is a well known suppiier of model railroad material. The SKU number for this product is 1574.
Cheers,
David.
Fred,
Thank you so much for the very kind comments about my build. I wanted to do a simple vignette that was representative of the photo yet not have the natural environment around it overwhelm the model. I am very pleased you like it and I will keep endeavoring to improve my skills and share my efforts with those that might have an interest.
Best regards,
David.
JUN 22, 2012 - 09:28 AM
Very nice work .
Well done David, the Sherman has captured the scene just right.
Michael
JUN 22, 2012 - 11:28 AM
I second the opinion about figures. The tutorial would be of great help!
JUN 22, 2012 - 11:35 AM

My pleasure, it really is an excellent piece of work. Truthfully I think that there is a lot that many of us here could learn from any tutorial that you made, or even an active build log. I am very serious about a figure painting tutorial. It is the Achilles heal to a lot of us regardless of our skill level, especially when it comes to painting convincing faces. Fred, Roman and myself are merely the ones who have openly expressed interest in learning from you.
Whatever you choose to do, please don't stop sharing your work here
Jeremy
JUN 22, 2012 - 01:00 PM

Hey Dave!
Congrats on the excellent execution of this E8 Sherman. You definitely captured the feel of the photograph. Your skills of building and finishing are most evident!
Outstanding work!
Best Regards
Eric

JUN 22, 2012 - 10:47 PM
Roman and Jeremy,
I will definitely look into doing a tutorial on figures.
Thanks again for your support.
Dave.
JUN 24, 2012 - 04:26 AM
Hey Eric,
thanks for having a look and for all your support through out the build log for this project. It is very much appreciated.
Dave.
JUN 24, 2012 - 04:31 AM
Copyright ©2021 by Dave DaSilva. Images and/or videos also by copyright holder unless otherwise noted. The views and opinions expressed herein are solely the views and opinions of the authors and/or contributors to this Web site and do not necessarily represent the views and/or opinions of Armorama, KitMaker Network, or Silver Star Enterrpises. All rights reserved. Originally published on: 2012-06-21 00:00:00. Unique Reads: 21400

WEB HOSTING BY


Copyright ©2021 Armorama and Kitmaker Network, a subsidiary of Silver Star Enterprises
All Rights Reserved. Please read our Conditions of Use and Privacy Policy.
All Rights Reserved. Please read our Conditions of Use and Privacy Policy.